Menu Maintenance: Difference between revisions
m (Added - v1.00.01.31778 - buttons) |
(v1.00.03 - Screenshots) |
||
| (3 intermediate revisions by the same user not shown) | |||
| Line 1: | Line 1: | ||
This screen allows you to maintain the | This screen allows you to maintain the screens (programs) on each of the sub-menus displayed on the main menu. You can then assign them to roles, which will control the menus displayed to the users with that role selected. | ||
You can maintain Roles in the [[Roles]] screen. | You can maintain Roles in the [[Roles]] screen. | ||
See also: | |||
* [[Program Maintenance]] | |||
* [[Menu Options]] | |||
{{Warning}} This is a system administrator function - if you change the settings here, this will affect all users of the system. | {{Warning}} This is a system administrator function - if you change the settings here, this will affect all users of the system. | ||
<gallery widths=600px heights=340px perrow=1> | |||
Image:CTLTMS_Menus.png|''Menu maintenance'' | |||
</gallery> | |||
| Line 21: | Line 31: | ||
The following actions are available on the Details panel: | The following actions are available on the Details panel: | ||
* {{Button| | * {{Button|New}} - create a new record. | ||
* {{Button| | * {{Button|Save}} - save a new record or changes to an existing record. | ||
* {{Button|Delete}} - delete an existing record. | |||
* {{Button| | * {{Button|Help}} - help on this screen. | ||
* {{Button| | * {{Button|Undo}} - undo change made since last save. | ||
* {{Button| | * {{Button|Clear}} - clear all fields. | ||
* {{Button| | * {{Button|Toggle}} - toggle display of all accordion headers. | ||
* {{Button| | |||
| Line 41: | Line 50: | ||
[[Category:Administration]] | [[Category:Administration]] | ||
[[Category:UG 331692 CTL-TMS Reference Guide|100-{{PAGENAME}}]] | |||
Latest revision as of 11:42, 17 January 2020
This screen allows you to maintain the screens (programs) on each of the sub-menus displayed on the main menu. You can then assign them to roles, which will control the menus displayed to the users with that role selected.
You can maintain Roles in the Roles screen.
See also:
![]() Warning: This is a system administrator function - if you change the settings here, this will affect all users of the system.
Warning: This is a system administrator function - if you change the settings here, this will affect all users of the system.
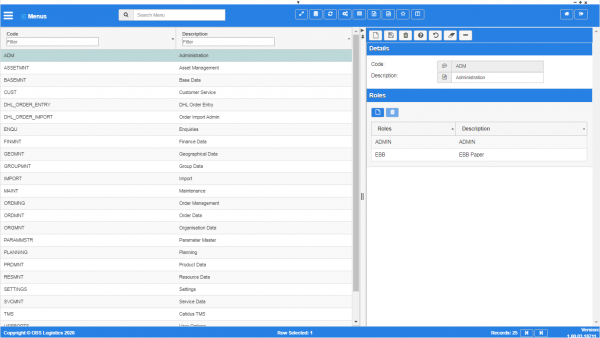
Menu maintenance

You can query data by and/or choose to display data as follows:
- Code.
- Description.
- Active.
- Created By.
- Created Date.
- Last Updated By.
- Last Updated Date.
- Last Active Change By.
- Last Active Change Date.
- Last Process Id.
- Update Counter.
The following actions are available on the Details panel:
 New - create a new record.
 Save - save a new record or changes to an existing record.
 Delete - delete an existing record.
 Help - help on this screen.
 Undo - undo change made since last save.
 Clear - clear all fields.
 Toggle - toggle display of all accordion headers.
You can change or add the following:
- Code - the menu category ID.
- Name - The displayed name.
You can assign the menu items to user roles by clicking the ![]() New button in the Roles section of the Detail panel. The screen will display a pop-up window for you to select the Role from a drop-down list. You can then use the Save button to add the role or just close the window to cancel the addition.
New button in the Roles section of the Detail panel. The screen will display a pop-up window for you to select the Role from a drop-down list. You can then use the Save button to add the role or just close the window to cancel the addition.
You can delete an assigned role by clicking on the row and then clicking the ![]() Delete button.
Delete button.