Customer Vehicle Maintenance: Difference between revisions
m (Minor correction) |
(Initial Creation) |
||
| Line 1: | Line 1: | ||
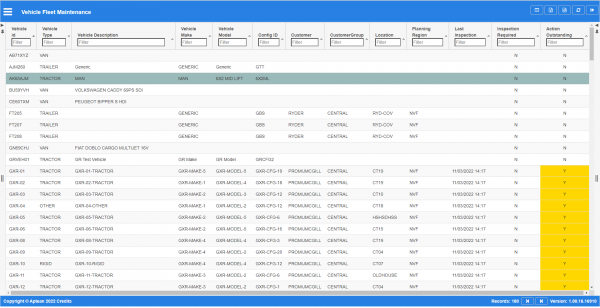
This is the customer vehicles maintenance screen. | This is the customer vehicles maintenance screen. | ||
This screen allows you to maintain the customer vehicles in the system. You can create vehicles and assign to customers and customer locations. | |||
Further, this screen allows you to maintain the fleet, searching for vehicles by customer and location, within or outside your planning group, with actions or inspections outstanding. | |||
<gallery widths=600px heights=340px perrow=1> | |||
Image:CTLTMS_Vehicle_Fleet_Maintenance.png|''Configurations'' | |||
</gallery> | |||
You can choose to find or display data as follows: | |||
* ''Vehicle ID''. | |||
* ''Vehicle Type''. | |||
* ''Vehicle Description''. | |||
* ''Vehicle Make''. | |||
* ''Vehicle Model''. | |||
* ''Config ID''. | |||
* ''Customer''. | |||
* ''Customer Group''. | |||
* ''Location''. | |||
* ''Planning Region''. | |||
* ''Last Inspection''. | |||
* ''Inspection Required''. | |||
* ''Action Outstanding''. | |||
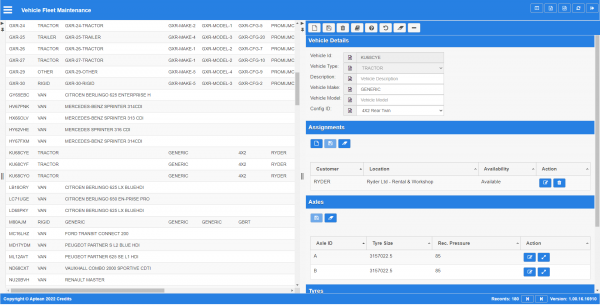
The following actions are available on the Details panel: | |||
* {{Button|New}} - create a new record. | |||
* {{Button|Save}} - save a new record or changes to an existing record. | |||
* {{Button|Delete}} - delete an existing record. | |||
* {{Button|Help}} - help on this screen. | |||
* {{Button|Undo}} - Undo any changes since last save. | |||
* {{Button|Clear}} - clear all fields. | |||
* {{Button|Toggle}} - toggle display of all accordion headers. | |||
You can change or add the following information: | |||
== Details section == | |||
<gallery widths=600px heights=340px perrow=1> | |||
Image:CTLTMS_Vehicle_Fleet_Details1.png|''Details panel'' | |||
</gallery> | |||
* ''Vehicle ID'' - the vehicle ID. | |||
* ''Vehicle Type'' - the type, from a drop-down list. | |||
* ''Vehicle Description'' - the description. | |||
* ''Vehicle Make'' - the make. | |||
* ''Vehicle Model'' - the model. | |||
* ''Config ID'' - the vehicle axle configuration from a drop-down list. | |||
Once created, you can change or assign the vehicle to customer locations using the Assignments section {{Button|New}} button. | |||
A panel will be displayed to enter details. | |||
* ''Customer'' - the customer, through a lookup. | |||
* ''Location'' - the customer location, through a lookup. | |||
* ''Availability'' - a drop-down list of whether the vehicle is available for that customer location. {{Note}} The vehicle can be available at only one location. | |||
When changes have been made, you can use the following buttons on the section header: | |||
* {{Button|Save}} - save a new record or changes to an existing record. | |||
* {{Button|Clear}} - clear all fields. | |||
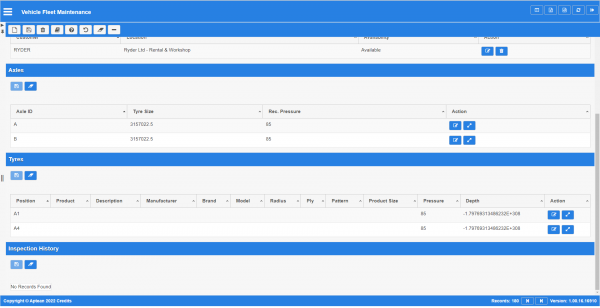
The vehicle axles and tyres are generated automatically from the axle configuration selected. | |||
<gallery widths=600px heights=340px perrow=1> | |||
Image:CTLTMS_Vehicle_Fleet_Details2.png|''Axles and Tyres panels'' | |||
</gallery> | |||
Axles are shown in the Axle section. You can see the tyres on the axle by clicking the {{Button|Detail}} button - the tyres will be shown in the Tyres section below. | |||
You can edit the recommended tyre size and pressure using the {{Button|Edit}} button. | |||
The Tyres section shows the following information: | |||
* ''Position''. | |||
* ''Product''. | |||
* ''Description''. | |||
* ''Manufacturer''. | |||
* ''Brand''. | |||
* ''Model''. | |||
* ''Radius''. | |||
* ''Ply''. | |||
* ''Pattern''. | |||
* ''Product Size''. | |||
* ''Pressure'' - last recorded pressure. | |||
* ''Depth'' - last recorded tread depth. | |||
You can see a history of all inspections on the tyre by clicking the {{Button|Detail}} button against the tyre. You can edit the pressure and tread depth using the {{Button|Edit}} button. | |||
[[Category:UG 440451 CTL-TMS Vehicle Fleet Reference Guide|221-{{PAGENAME}}]] | |||
Revision as of 10:32, 25 April 2022
This is the customer vehicles maintenance screen.
This screen allows you to maintain the customer vehicles in the system. You can create vehicles and assign to customers and customer locations.
Further, this screen allows you to maintain the fleet, searching for vehicles by customer and location, within or outside your planning group, with actions or inspections outstanding.
You can choose to find or display data as follows:
- Vehicle ID.
- Vehicle Type.
- Vehicle Description.
- Vehicle Make.
- Vehicle Model.
- Config ID.
- Customer.
- Customer Group.
- Location.
- Planning Region.
- Last Inspection.
- Inspection Required.
- Action Outstanding.
The following actions are available on the Details panel:
 New - create a new record.
 Save - save a new record or changes to an existing record.
 Delete - delete an existing record.
 Help - help on this screen.
 Undo - Undo any changes since last save.
 Clear - clear all fields.
 Toggle - toggle display of all accordion headers.
You can change or add the following information:
Details section
- Vehicle ID - the vehicle ID.
- Vehicle Type - the type, from a drop-down list.
- Vehicle Description - the description.
- Vehicle Make - the make.
- Vehicle Model - the model.
- Config ID - the vehicle axle configuration from a drop-down list.
Once created, you can change or assign the vehicle to customer locations using the Assignments section ![]() New button.
New button.
A panel will be displayed to enter details.
- Customer - the customer, through a lookup.
- Location - the customer location, through a lookup.
- Availability - a drop-down list of whether the vehicle is available for that customer location.
 Note: The vehicle can be available at only one location.
When changes have been made, you can use the following buttons on the section header:
 Save - save a new record or changes to an existing record.
 Clear - clear all fields.
The vehicle axles and tyres are generated automatically from the axle configuration selected.
Axles are shown in the Axle section. You can see the tyres on the axle by clicking the ![]() Detail button - the tyres will be shown in the Tyres section below.
Detail button - the tyres will be shown in the Tyres section below.
You can edit the recommended tyre size and pressure using the ![]() Edit button.
Edit button.
The Tyres section shows the following information:
- Position.
- Product.
- Description.
- Manufacturer.
- Brand.
- Model.
- Radius.
- Ply.
- Pattern.
- Product Size.
- Pressure - last recorded pressure.
- Depth - last recorded tread depth.
You can see a history of all inspections on the tyre by clicking the ![]() Detail button against the tyre. You can edit the pressure and tread depth using the
Detail button against the tyre. You can edit the pressure and tread depth using the ![]() Edit button.
Edit button.


