Data Import: Difference between revisions
m (moved Order Import to Data Import) |
(Updated from version 1.00.13) |
||
| Line 1: | Line 1: | ||
This screen allows you to import data from a file. | This screen allows you to import data from a file. | ||
| Line 17: | Line 15: | ||
Once you have selected a file, you must then upload the files to the system using the '''Upload''' button, and remove the files by clicking the '''Remove''' button next to the file name. | Once you have selected a file, you must then upload the files to the system using the '''Upload''' button, and remove the files by clicking the '''Remove''' button next to the file name. | ||
When uploaded, you can import the uploaded files using the '''Import Data''' button. The screen will display a confirmation of the uploaded files, indicating whether there have been any issues. You can see the issues (or the confirmation message) by clicking on the file name. | When uploaded, you can import the uploaded files using the '''Import Data''' button. The screen will display a confirmation of the uploaded files, indicating whether there have been any issues. You can see the issues (or the confirmation message) by clicking on the file name. Furthermore, you can use the [[EDI Log]] screen to check for more details of any processing errors. | ||
[[Category:Orders]] | [[Category:Orders]] | ||
[[Category:UG 331692 CTL-TMS Reference Guide|500]] | [[Category:UG 331692 CTL-TMS Reference Guide|500]] | ||
Latest revision as of 14:50, 18 August 2020
This screen allows you to import data from a file.
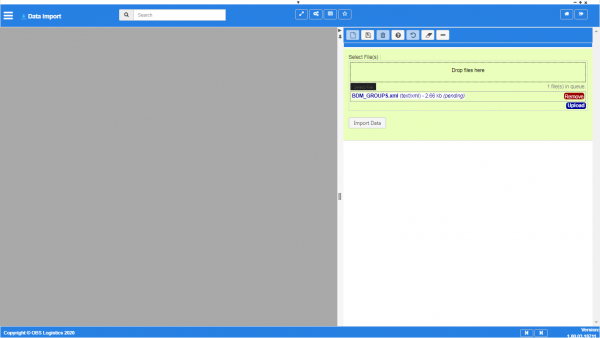
Data import

Currently, files must be created in XML format in a proscribed manner. You should contact your OBS Logistics support team for formats for uploading these files.
You import a file by either dragging the file from your local PC to the section marked "Drop files here", or you can use the Select File button to select files from your local PC. The screen will display an explorer to select files.
You can select several files to upload in this manner.
Once you have selected a file, you must then upload the files to the system using the Upload button, and remove the files by clicking the Remove button next to the file name.
When uploaded, you can import the uploaded files using the Import Data button. The screen will display a confirmation of the uploaded files, indicating whether there have been any issues. You can see the issues (or the confirmation message) by clicking on the file name. Furthermore, you can use the EDI Log screen to check for more details of any processing errors.