Call Logging - Tyres: Difference between revisions
(Minor correction) |
(Added Tyres information and screenshots) |
||
| Line 1: | Line 1: | ||
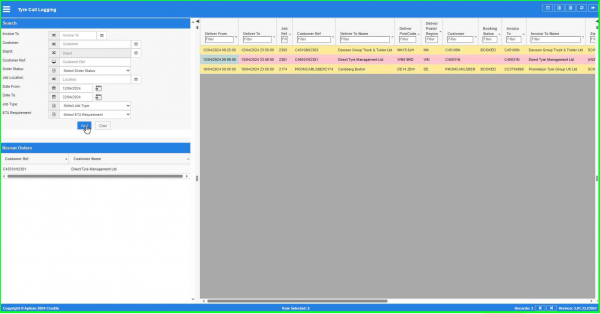
This screen allows you to control the booking process of an order, and control the continued contact with the customer to affect a seamless delivery. | This screen allows you to control the booking process of an order, and control the continued contact with the customer to affect a seamless delivery. | ||
<gallery widths=600px heights=340px perrow=1> | |||
Image:CTLTMS-CallLogging-FilterMain.png|''Call Logging'' | |||
</gallery> | |||
Here, you can: | Here, you can: | ||
| Line 23: | Line 27: | ||
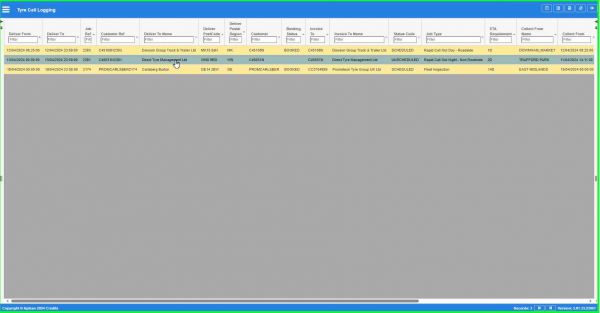
You can click the '''Find''' button to execute the query - the screen will display the matching orders in the results table. | You can click the '''Find''' button to execute the query - the screen will display the matching orders in the results table. | ||
<gallery widths=600px heights=340px perrow=1> | |||
Image:CTLTMS-CallLogging-Main.png|''Results after filtering'' | |||
</gallery> | |||
{{Note}} The last 10 orders you select will be shown in the Recent Orders list in the Search panel - you can quickly re-select a previous order (regardless of search criteria you now have) by clicking on the order row in this list - the screen will display the Details panel. | {{Note}} The last 10 orders you select will be shown in the Recent Orders list in the Search panel - you can quickly re-select a previous order (regardless of search criteria you now have) by clicking on the order row in this list - the screen will display the Details panel. | ||
| Line 66: | Line 74: | ||
You can select an order to view or edit by clicking on the row - the screen will display the Details panel. | You can select an order to view or edit by clicking on the row - the screen will display the Details panel. | ||
<gallery widths=600px heights=340px perrow=1> | |||
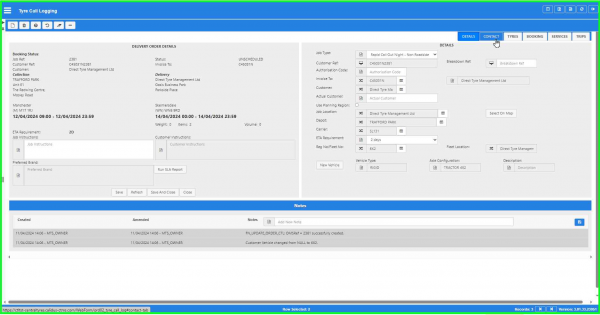
Image:CTLTMS-CallLogging-Details.png|''Detail panel, showing common details, details tab and notes'' | |||
</gallery> | |||
The Details panel is made up of multiple sections: | The Details panel is made up of multiple sections: | ||
| Line 124: | Line 137: | ||
=== Details tab === | === Details tab === | ||
This is where you enter all of the details for a new order, or amend details for an existing order. | This is where you enter all of the details for a new order, or amend details for an existing order. | ||
<gallery widths=600px heights=340px perrow=1> | |||
Image:CTLTMS-CallLogging-Details.png|''Details tab'' | |||
</gallery> | |||
* ''Job Type'' | * ''Job Type'' | ||
| Line 146: | Line 163: | ||
=== Contact tab === | === Contact tab === | ||
This tab shows all of the end customer contact information for the order in a table. | This tab shows all of the end customer contact information for the order in a table. | ||
<gallery widths=600px heights=340px perrow=1> | |||
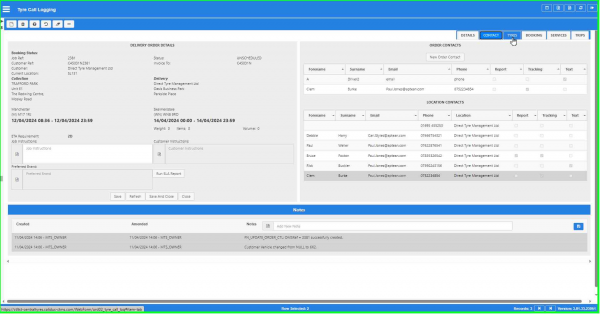
Image:CTLTMS-CallLogging-Contacts.png|''Contacts tab'' | |||
</gallery> | |||
The screen displays the following: | The screen displays the following: | ||
| Line 165: | Line 186: | ||
The screen displays the order summary (lines) in a table with the following fields: | The screen displays the order summary (lines) in a table with the following fields: | ||
* ''Work Type''. | * ''Work Type'' - one of Fit New, Fit Other, Services Only, Van Stock, Removal. | ||
* ''Position''. | * ''Position''. | ||
* ''Services''. | * ''Services'' - popup to show services booked on this line. | ||
* ''Product''. | * ''Product''. | ||
* ''Description''. | * ''Description''. | ||
| Line 174: | Line 195: | ||
* ''Price''. | * ''Price''. | ||
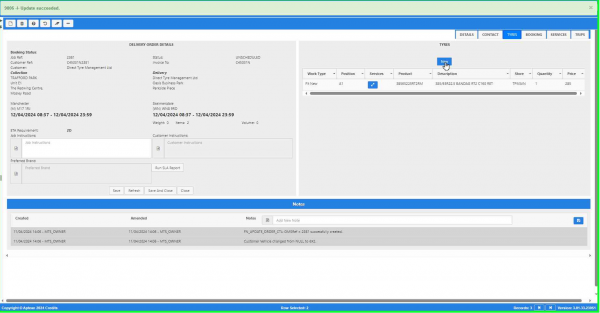
You can add new | <gallery widths=600px heights=340px perrow=1> | ||
Image:CTLTMS-CallLogging-Tyres3.png|''Tyres panel'' | |||
</gallery> | |||
You can click on an existing tyre to edit it, or add a new tyre with the {{Button|New}} button. In both cases, the screen will display the Items popup. | |||
You will be allowed to select the type of work being booked to a job when selecting tyres: | |||
* Fit New | |||
* Fit Other | |||
* Services Only | |||
* Van Stock | |||
In general, most deliverables work the same way: | |||
* Select a vehicle position | |||
* Select a product using the Part Search lookup | |||
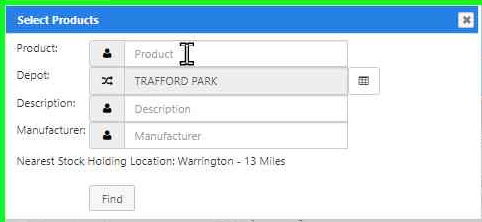
<gallery widths=600px heights=340px perrow=1> | |||
Image:CTLTMS-CallLogging-PartSearch1.png|''Part Search Parameters'' | |||
</gallery> | |||
The Part Search allows you to select parameters for the search - they are matched partially: | |||
* Product | |||
* Depot | |||
* Description | |||
* Manufacturer | |||
The screen also displays the nearest stock holding location, for information. | |||
Matching parts are displayed, and you can select the part you need. | |||
<gallery widths=600px heights=340px perrow=1> | |||
Image:CTLTMS-CallLogging-PartSearch2.png|''Part Search Results'' | |||
</gallery> | |||
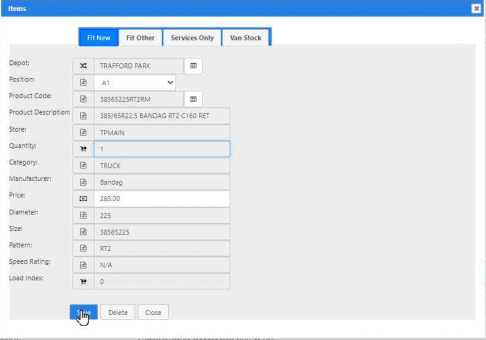
For Fit New: | |||
* Select a depot and position. | |||
* Search for a part using the part search. | |||
* Once selected, all of the details are displayed, and the quantity is defaulted to 1. | |||
<gallery widths=600px heights=340px perrow=1> | |||
Image:CTLTMS-CallLogging-Tyres2.png|''Fit New'' | |||
</gallery> | |||
Notes: | |||
* Work Type Option select one, default to Fit New | |||
* Depot: Defaulted | |||
* Position: Drop-down list based on customer vehicle, must select | |||
* Product Code: Lookup - part search | |||
* Product Description: Set from product | |||
* Store: Set from product | |||
* Quantity: Default to 1, cannot be changed | |||
* Manufacturer: Set from product | |||
* Price: Set from product, can be changed | |||
* Diameter: Set from product -label changed to Diameter | |||
* Size: Set from product | |||
* Pattern: Set from product | |||
* Speed Rating: Set from product | |||
* Load Index: Set from product | |||
On clicking save, the screen will add a tyre to the selected tyres and display the details. | |||
If new tyres are to be installed on the vehicle, then the user should book van stock against the job and write the position in the notes, so that the technician can see them and do the work required. Tyres should be booked as van stock. | |||
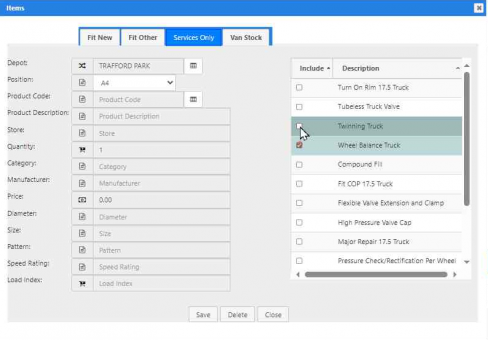
For Services Only, this popup works as follows: | |||
<gallery widths=600px heights=340px perrow=1> | |||
Image:CTLTMS-CallLogging-Tyres-ServicesOnly.png|''Services Only'' | |||
</gallery> | |||
Notes: | |||
* Depot: Not enabled, as not selecting a product to sell | |||
* Position: Drop-down list based on customer vehicle, must select | |||
* Product Code: Default from known product in position or blanknot enabled | |||
* Product Description: Set from productNot enabled | |||
* Store: Set from productNot enabled | |||
* Quantity: Default to 1, cannot be changed | |||
* Manufacturer: Set from product | |||
* Price: Zero, cannot be changed | |||
* Diameter: Set from product | |||
* Size: Set from product | |||
* Pattern: Set from product | |||
* Speed Rating: Set from product | |||
* Load Index: Set from product | |||
The screen will also show all services that can be supplied to that vehicle type that are related to a tyre position. The user must select at least one of these services, although several can be selected. | |||
On saving, the service supplied will be saved and displayed in the booked work list. | |||
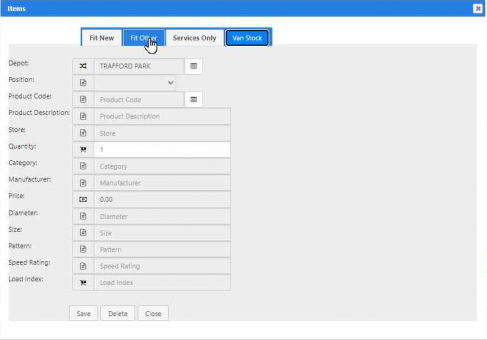
For Van Stock, this popup works as follows: | |||
<gallery widths=600px heights=340px perrow=1> | |||
Image:CTLTMS-CallLogging-Tyres-VanStock.png|''Van Stock'' | |||
</gallery> | |||
Notes: | |||
* Depot: Default to depot, select from drop-down list | |||
* Position: Disabled. | |||
* Product Code: Lookup - part search | |||
* Product Description: Set from product | |||
* Store: Set from product | |||
* Quantity: Must be entered with a quantity greater than 0 | |||
* Manufacturer: Set from product | |||
* Price: Zero, cannot be changed | |||
* Diameter: Set from product | |||
* Size: Set from product | |||
* Pattern: Set from product | |||
* Speed Rating: Set from product | |||
* Load Index: Set from product | |||
On clicking save, the screen will add the selected quantity of tyres and display the details. | |||
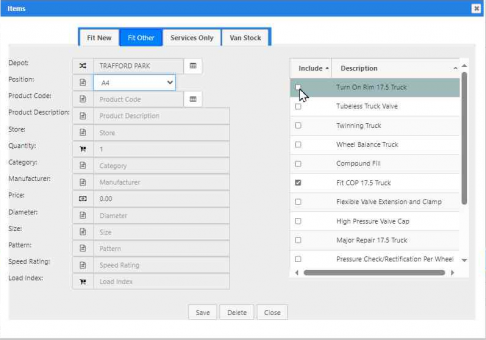
For Fit Other, this popup works as follows: | |||
<gallery widths=600px heights=340px perrow=1> | |||
Image:CTLTMS-CallLogging-Tyres-FitOther.png|''Fit Other'' | |||
</gallery> | |||
Notes: | |||
* Depot: Not enabled | |||
* Position: Drop-down list based on customer vehicle, must select | |||
* Product Code: Part search, but just for product, not store, can be left blank | |||
* Product Description: Set from product | |||
* Store: Blank | |||
* Quantity: Default to 1, cannot be changed | |||
* Manufacturer: Set from product | |||
* Price: Zero, cannot be changed | |||
* Diameter: Set from product | |||
* Size: Set from product | |||
* Pattern: Set from product | |||
* Speed Rating: Set from product | |||
* Load Index: Set from product | |||
The part search in this instance will be searching for any product code, not specifically those sold by the depot, just any known product, as this is intended to allow the user to book customer-owned product rather that sell them a tyre from depot stock. | |||
The screen will also show all services that can be supplied to that vehicle type that are related to a tyre position. The user must select at least one of these services, although several can be selected. | |||
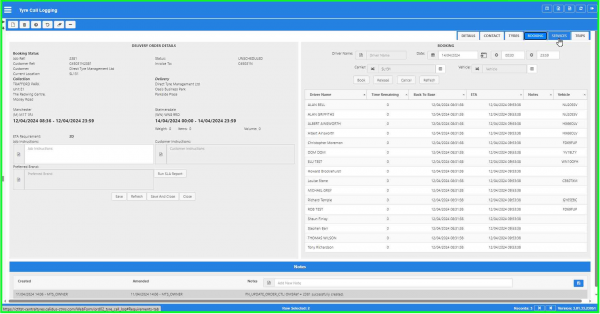
=== Booking tab === | === Booking tab === | ||
This tab allows you to modify the delivery date of the order based on the customer's requirements. | This tab allows you to modify the delivery date of the order based on the customer's requirements. | ||
<gallery widths=600px heights=340px perrow=1> | |||
Image:CTLTMS-CallLogging-Booking.png|''Booking tab'' | |||
</gallery> | |||
You can manually set a booking date and time window here. | You can manually set a booking date and time window here. | ||
| Line 194: | Line 356: | ||
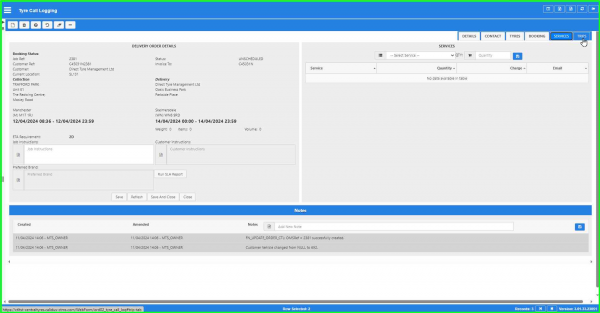
=== Services tab === | === Services tab === | ||
This tab allows you to set any additional equipment or services against the order. You can select from a drop-down list of configured services or equipment. | This tab allows you to set any additional equipment or services against the order. You can select from a drop-down list of configured services or equipment. | ||
<gallery widths=600px heights=340px perrow=1> | |||
Image:CTLTMS-CallLogging-Services.png|''Services tab'' | |||
</gallery> | |||
When you have selected the service or equipment, you can set the quantity and add it using the {{Button|New}} button provided. The screen will add this to the displayed list of equipment and services. | When you have selected the service or equipment, you can set the quantity and add it using the {{Button|New}} button provided. The screen will add this to the displayed list of equipment and services. | ||
| Line 200: | Line 366: | ||
=== Trips tab === | === Trips tab === | ||
The screen will display any trips onto which the order has been planned, showing all pickup and drop-off stops. You can use this information to quickly answer queries from the customer as to the planning status and progress of the delivery. | The screen will display any trips onto which the order has been planned, showing all pickup and drop-off stops. You can use this information to quickly answer queries from the customer as to the planning status and progress of the delivery. | ||
<gallery widths=600px heights=340px perrow=1> | |||
Image:CTLTMS-CallLogging-Trips.png|''Trips tab'' | |||
</gallery> | |||
The screen will display this information in a trips table, showing the following information: | The screen will display this information in a trips table, showing the following information: | ||
Revision as of 09:35, 12 April 2024
This screen allows you to control the booking process of an order, and control the continued contact with the customer to affect a seamless delivery.
Here, you can:
- Quickly find orders through a variety of criteria.
- See all pertinent information about the customer's order, to aid in responding to customer queries.
- Add instructions to the driver, including "Call X Minutes Before Arrival" information.
- Book an order.
- Add additional services.
You can query orders by entering criteria in the Search panel:
- Invoice To - a drop-down list of all configured parent customers in the system.
- Customer - the orders' customer code. You can enter the code directly or use the
 Lookup button to find a customer. The screen will display a pop-up customer search window, allowing you to search by Name, Address or Postcode. You can enter partials of any of these. You can cancel the query by closing the pop-up window, or display matching results by pressing the Find button. The screen will display a pop-up window of matching customers in a results table. You can return to the customer search window by closing the results window or clicking the Cancel button. You can select a customer by clicking on the row for that customer. The screen will close both the results and customer search windows and enter the customer code for you.
 - Depot - the depot that owns the order.
- Customer Ref - the order's customer reference.
- Order Status - a drop-down list of all order statuses configured in the system.
- Job Location - the location of the order.
- Date From - the date from which orders are selected. The screen will default this to today's date. You can enter the date directly or use the
 Calendar button to select a date. The date cannot be more than 7 days in the past.
 - Date To - the date up to which orders are selected. The screen will default this to 10 days into the future. You can enter the date directly or use the
 Calendar button to select a date. The date cannot be less than the date from.
 - Job Type - a drop-down list of all order types configured in the system.
- ETA Requirement - a drop-down list of all service levels configured in the system.
You can reset the query criteria to the default values by clicking the Clear button.
You can click the Find button to execute the query - the screen will display the matching orders in the results table.
![]() Note: The last 10 orders you select will be shown in the Recent Orders list in the Search panel - you can quickly re-select a previous order (regardless of search criteria you now have) by clicking on the order row in this list - the screen will display the Details panel.
Note: The last 10 orders you select will be shown in the Recent Orders list in the Search panel - you can quickly re-select a previous order (regardless of search criteria you now have) by clicking on the order row in this list - the screen will display the Details panel.
You can choose to display the following fields in the results table (using the ![]() Column Selector:
Column Selector:
- Deliver From.
- Deliver To.
- Job Ref.
- Customer Ref.
- Deliver To Name.
- Deliver PostCode.
- Deliver Postal Region.
- Customer.
- Booking Status.
- Invoice To
- Invoice To Name
- Status Code.
- Job Type
- ETA Requirement.
- Collect From Name.
- Collect From.
- Collect By.
- Order Type.
- Current Location.
- Mode
- Active.
- Customer Vehicle
- Technician
- Created By.
- Created Date.
- Last Updated By.
- Last Updated Date.
- Last Active Change By.
- Last Active Change Date.
- Last Process Id.
- Update Counter.
The list of jobs is colour coded:
- Unscheduled/Invalid - Red
- Booked/Scheduled - Amber
- Complete/Delivered - Green
- Failed/cancelled/On-hold - normal white/grey.
You can select an order to view or edit by clicking on the row - the screen will display the Details panel.
The Details panel is made up of multiple sections:
- Common order details, situated on the top-left of the screen.
- Additional details, situated in the top-right of the screen. You can select different detailed information to view or edit using the tab bar provided.
- Notes, situated at the bottom of the screen.
Common Order Details section
This section displays:
- Booking Status - the booking status.
- Job Ref - the TMS order reference.
- Customer Ref - the order's customer reference.
- Status - the order status.
- Customer Code - the customer of the order.
- Invoice To - the parent customer of the order.
- Collection details, including the address and collection window.
- Delivery details, including the address and delivery window.
- Weight - the total weight of all items on this order.
- Items - the number of items on this order.
- Volume - the total volume of the items on this order.
- ETA Requirement - the order's service level.
You can enter or amend the following:
- Driver Instructions - any general instructions to the driver.
You can also see:
- Customer instructions
- Preferred Brand
You can also click the Run SLA Report button to view any additional customer restrictions.
You can save the changed details of the order in this section using the Save button. The screen will leave the order open for further amendments. If you have finished with the order, you can click the Save and Close button instead to save the details and close the details window.
You can refresh the order details using the Refresh button.
You can close the details section without saving any changes using the Close button.
You can use the following buttons on this tab:
 New - create a new record.
 Delete - delete an existing record.
 Help - help on this screen.
 Undo - Undo any changes since last save.
 Clear - clear all fields.
 Toggle - toggle display of all accordion headers.
Additional Details section
The Additional Details section consists of the following tabs:
- Details - additional order details information.
- Contact - customer contact information.
- Tyres - deliverable tyres and services.
- Booking - book the dates and times of the job.
- Services - a facility to add equipment and services to the job.
- Trips - the booked trip for the job, in terms of pickup and drop-off times.
Details tab
This is where you enter all of the details for a new order, or amend details for an existing order.
- Job Type
- Customer Ref
- Breakdown Ref
- Authorisation Code
- Invoice To
- Customer
- Actual Customer
- Use Planning Region
- Job Location
- Depot
- Carrier
- ETA Requirement
- Reg No/Fleet No
You can also add a new vehicle for this customer and location using the New Vehicle button.
Once you have added these details and saved, you can move on to other details.
Contact tab
This tab shows all of the end customer contact information for the order in a table.
The screen displays the following:
- Order Contacts - any contacts you have added or amended against this order.
- Location Contacts - pre-saved contacts against the location.
The New Order Contact button will create a new order contact in the table below. You can also save this new contact to the location for re-use.
Location contacts are preconfigured for contact preferences:
- Report - use this contact to email the completed service report.
- Tracking - use this contact to email tracking emails.
Further, order contacts can be specified for Text, which will send the phone information against that contact to the EPOD system, so the technician can contact the customer directly via text or phone.
Any location contacts that are checked will be used - if you want to change that, select the contact and save as an order contact, and change the contact preferences.
Tyres tab
This section displays the summary of types of items on the order (the order lines) and can display each individual order item.
The screen displays the order summary (lines) in a table with the following fields:
- Work Type - one of Fit New, Fit Other, Services Only, Van Stock, Removal.
- Position.
- Services - popup to show services booked on this line.
- Product.
- Description.
- Store.
- Quantity.
- Price.
You can click on an existing tyre to edit it, or add a new tyre with the ![]() New button. In both cases, the screen will display the Items popup.
New button. In both cases, the screen will display the Items popup.
You will be allowed to select the type of work being booked to a job when selecting tyres:
- Fit New
- Fit Other
- Services Only
- Van Stock
In general, most deliverables work the same way:
- Select a vehicle position
- Select a product using the Part Search lookup
The Part Search allows you to select parameters for the search - they are matched partially:
- Product
- Depot
- Description
- Manufacturer
The screen also displays the nearest stock holding location, for information.
Matching parts are displayed, and you can select the part you need.
For Fit New:
- Select a depot and position.
- Search for a part using the part search.
- Once selected, all of the details are displayed, and the quantity is defaulted to 1.
Notes:
- Work Type Option select one, default to Fit New
- Depot: Defaulted
- Position: Drop-down list based on customer vehicle, must select
- Product Code: Lookup - part search
- Product Description: Set from product
- Store: Set from product
- Quantity: Default to 1, cannot be changed
- Manufacturer: Set from product
- Price: Set from product, can be changed
- Diameter: Set from product -label changed to Diameter
- Size: Set from product
- Pattern: Set from product
- Speed Rating: Set from product
- Load Index: Set from product
On clicking save, the screen will add a tyre to the selected tyres and display the details.
If new tyres are to be installed on the vehicle, then the user should book van stock against the job and write the position in the notes, so that the technician can see them and do the work required. Tyres should be booked as van stock.
For Services Only, this popup works as follows:
Notes:
- Depot: Not enabled, as not selecting a product to sell
- Position: Drop-down list based on customer vehicle, must select
- Product Code: Default from known product in position or blanknot enabled
- Product Description: Set from productNot enabled
- Store: Set from productNot enabled
- Quantity: Default to 1, cannot be changed
- Manufacturer: Set from product
- Price: Zero, cannot be changed
- Diameter: Set from product
- Size: Set from product
- Pattern: Set from product
- Speed Rating: Set from product
- Load Index: Set from product
The screen will also show all services that can be supplied to that vehicle type that are related to a tyre position. The user must select at least one of these services, although several can be selected.
On saving, the service supplied will be saved and displayed in the booked work list.
For Van Stock, this popup works as follows:
Notes:
- Depot: Default to depot, select from drop-down list
- Position: Disabled.
- Product Code: Lookup - part search
- Product Description: Set from product
- Store: Set from product
- Quantity: Must be entered with a quantity greater than 0
- Manufacturer: Set from product
- Price: Zero, cannot be changed
- Diameter: Set from product
- Size: Set from product
- Pattern: Set from product
- Speed Rating: Set from product
- Load Index: Set from product
On clicking save, the screen will add the selected quantity of tyres and display the details.
For Fit Other, this popup works as follows:
Notes:
- Depot: Not enabled
- Position: Drop-down list based on customer vehicle, must select
- Product Code: Part search, but just for product, not store, can be left blank
- Product Description: Set from product
- Store: Blank
- Quantity: Default to 1, cannot be changed
- Manufacturer: Set from product
- Price: Zero, cannot be changed
- Diameter: Set from product
- Size: Set from product
- Pattern: Set from product
- Speed Rating: Set from product
- Load Index: Set from product
The part search in this instance will be searching for any product code, not specifically those sold by the depot, just any known product, as this is intended to allow the user to book customer-owned product rather that sell them a tyre from depot stock.
The screen will also show all services that can be supplied to that vehicle type that are related to a tyre position. The user must select at least one of these services, although several can be selected.
Booking tab
This tab allows you to modify the delivery date of the order based on the customer's requirements.
You can manually set a booking date and time window here.
For the specified carrier, you can select a technician and vehicle from the list provided. This also provides some decision assistance to show when they might be able to complete the job.
Once selected, click the Book button.
If you want to change the technician or vehicle, click the Release button.
Services tab
This tab allows you to set any additional equipment or services against the order. You can select from a drop-down list of configured services or equipment.
When you have selected the service or equipment, you can set the quantity and add it using the ![]() New button provided. The screen will add this to the displayed list of equipment and services.
New button provided. The screen will add this to the displayed list of equipment and services.
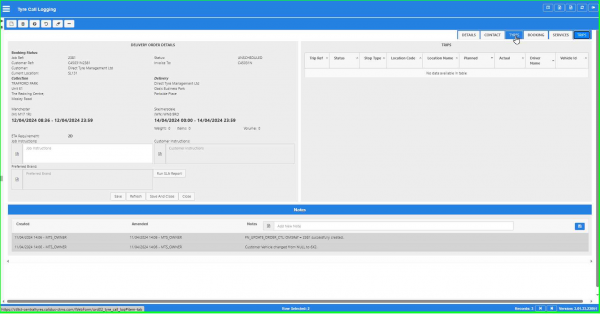
Trips tab
The screen will display any trips onto which the order has been planned, showing all pickup and drop-off stops. You can use this information to quickly answer queries from the customer as to the planning status and progress of the delivery.
The screen will display this information in a trips table, showing the following information:
- Trip Ref.
- Status.
- Stop Type.
- Location Code.
- Location Name.
- Planned.
- Actual.
Notes section
This section allows you to enter notes against the order. You can see all previously-entered notes in a list, with the most recent on the top.
Several of the actions that you take in this screen will automatically generate notes for you, to provide an audit trail of customer contact.
You can also enter any note, by keying the note in the Add New Note field and clicking the ![]() Save button when you have finished.
Save button when you have finished.
The screen logs the creation and amendment date, time and user of all entered notes, whether they were entered automatically or manually.
