Customer Vehicle Maintenance: Difference between revisions
(Expanded with new functionality) |
(Minor correction) |
||
| Line 106: | Line 106: | ||
=== | === Tyres section === | ||
The Tyres section shows the following information: | The Tyres section shows the following information: | ||
* ''Position''. | * ''Position''. | ||
Latest revision as of 13:48, 11 June 2024
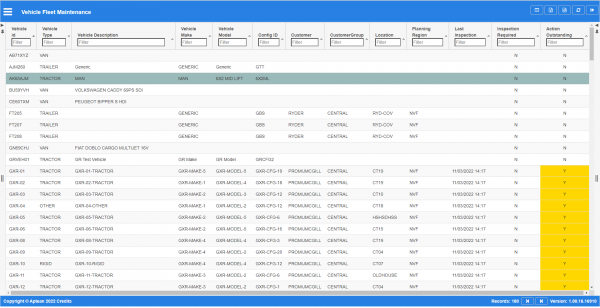
This is the customer vehicles fleet maintenance screen.
This screen allows you to maintain the customer vehicles in the system. You can create vehicles and assign to customers and customer locations.
Further, this screen allows you to maintain the fleet, searching for vehicles by customer and location, within or outside your planning group, with actions or inspections outstanding.
Configurations

The search panel is on the left of the screen - you can choose to find data using the following criteria:
- Vehicle Id
- Vehicle Type - a drop-down list of the vehicle types.
- Vehicle Description
- Customer - you can enter a partial customer code, or you can use the lookup provided with the
 Lookup button.
 - Planning Region - tick this box to limit to those vehicles in locations that are only for your planning group.
- Location - you can enter a partial customer code, or you can use the lookup provided with the Lookup button.
- Action Outstanding - tick this box to limit the vehicles to only those with outstanding actions against them.
- Inspection Required - tick this box to limit the vehicles to only those that have not had an inspection in the current period.
You can choose to display data as follows using the ![]() Column Selector button:
Column Selector button:
- Vehicle ID.
- Customer Id:
- Customer
- Vehicle Type.
- Vehicle Description.
- Vehicle Make.
- Vehicle Model.
- Config ID.
- Parent Code
- Parent
- Location.
- Planning Region.
- Last Inspection.
- Inspection Required.
- Action Outstanding.
- Carrier Code
- Based At
The following actions are available on the Details panel:
 New - create a new record.
 Save - save a new record or changes to an existing record.
 Delete - delete an existing record.
 Fleet Inspection - create a fleet inspection job for vehicles registered at this location.
 Help - help on this screen.
 Undo - Undo any changes since last save.
 Clear - clear all fields.
 Toggle - toggle display of all accordion headers.
If you want to create a fleet inspection for vehicles at this vehicle's location, then you can click the ![]() Fleet Inspection button. The screen will take you to the Call Logging screen and create an order for you for this vehicle at this location with most details pre-configured for you, to book this with the customer.
Fleet Inspection button. The screen will take you to the Call Logging screen and create an order for you for this vehicle at this location with most details pre-configured for you, to book this with the customer.
You can select an existing vehicle to edit the details, and you can add a vehicle by opening the Details panel on the right and clicking the ![]() New button.
New button.
Details section
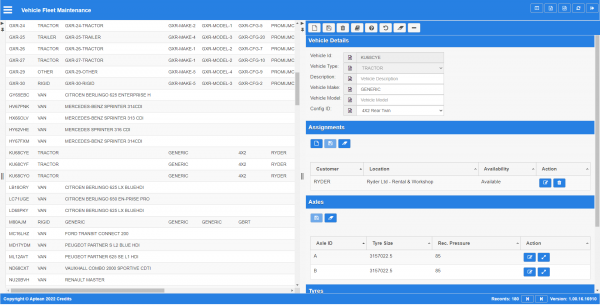
Details panel

- Customer - the customer, through a lookup.
- Vehicle ID - the vehicle ID.
- Vehicle Type - the type, from a drop-down list.
- Vehicle Description - the description.
- Vehicle Make - the make.
- Vehicle Model - the model.
- Config ID - the vehicle axle configuration from a drop-down list.
Once created, you can change or assign the vehicle to customer locations using the Assignments section ![]() New button.
New button.
An Assignments section will be displayed to enter assigned location details.
Assignments section
This section displays all locations to which the vehicle has been assigned. The section displays the following information:
- Customer.
- Location.
- Availability.
You can edit the assigned location using the ![]() Edit button, and delete the registered location using the
Edit button, and delete the registered location using the ![]() Delete button provided against that line.
Delete button provided against that line.
You can add a registered location using the ![]() New button in the Assignments section. When you add or edit a location assignment, the screen will pop open a section to add or edit the details with the following details:
New button in the Assignments section. When you add or edit a location assignment, the screen will pop open a section to add or edit the details with the following details:
- Location - the customer location, through a lookup.
- Availability - a drop-down list of whether the vehicle is available for that customer location.
 Note: The vehicle can be available at only one location.
When changes have been made, you can use the following buttons on the section header:
- Save - save a new record or changes to an existing record.
- Clear - clear all fields.
When creating a new vehicle, the vehicle axles and tyres are generated automatically from the axle configuration selected.
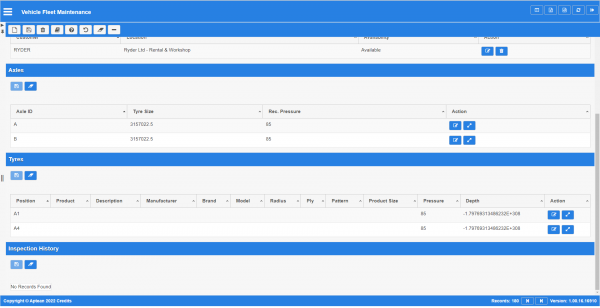
Axles section
This section displays all axles on the vehicle.
Axles and Tyres panels

You can see the tyres on the axle by clicking the ![]() Tyres button - the tyres will be shown in the Tyres section below.
Tyres button - the tyres will be shown in the Tyres section below.
- Axle ID
- Tyre Size
- Recommended Pressure
You can edit the recommended tyre size and pressure using the ![]() Edit button.
Edit button.
Tyres section
The Tyres section shows the following information:
- Position.
- Product.
- Description.
- Manufacturer.
- Brand.
- Model.
- Radius.
- Ply.
- Pattern.
- Product Size.
- Pressure - last recorded pressure.
- Depth - last recorded tread depth.
You can see a history of all inspections on the tyre by clicking the ![]() Inspection History button against the tyre. You can edit the pressure and tread depth using the
Inspection History button against the tyre. You can edit the pressure and tread depth using the ![]() Edit button.
Edit button.
Inspection History section
The Inspection History section initially shows all incomplete inspections over a 30-day period.
The details displayed in this panel can be changed using the criteria:
- Status - a drop-down list allowing you to select Incomplete, Pending, In Progress, Complete Cancelled or All.
- Date - a drop-down list of the period to display, selecting from Last 30, 60 or 180 days.
The section displays the following information:
- Service Date - the date and time this position was inspected.
- Pos. - the tyre position.
- Details - a Details button to pop up the details captured against this tyre on the inspection, including:
- Status - the status of the inspection, if any actions have been identified against the tyre.
- Action - any action to take captured against the tyre when inspected.
- Action Ref - the reference of any scheduled callout booked against this action.
- Action Status - the status of the scheduled callout booked against this action, if any.
- Notes - any noted captured or entered against the inspection.
The screen will show the following information when you press the Details button:
- Product.
- Pressure.
- Depth.
- New/ Remould.
- Regrooved.
- Reference - the internal order number on which the inspection was completed.
- Authority
- Resolution - any resolution details.
- Planned Delivery
- Actual Delivery
You can edit the resolution details against an inspection by clicking the ![]() Edit button against the inspection. The screen will open a panel showing you the following information:
Edit button against the inspection. The screen will open a panel showing you the following information:
- Service Date
- Position
- Resolution Note
- Resolution Reason
You can edit the resolution note and reason, selecting from a drop-down list of reasons.
If you want to create a scheduled callout for this vehicle, then you can click the ![]() Create Order button. The screen will take you to the Call Logging screen and create an order for you for this vehicle at this location with most details pre-configured for you, to book this with the customer.
Create Order button. The screen will take you to the Call Logging screen and create an order for you for this vehicle at this location with most details pre-configured for you, to book this with the customer.