Trip Debrief
You can use the debrief screen to find trips and enter 'actual' details of the execution of the trip. This includes:
- Trip-level debrief information, like overall start and end ODO readings from the vehicle, general comments, etc.
- Trip Stop-level debrief information, like the arrival and departure times from each stop on the trip.
- Order-level debrief information, for each activity (like loading or unloading) against each stop on the trip, for example actual quantities and weights against order lines and items.
- Changing the trip status, for example to show that the trip is now completed.
Debrief - Trip level
Debrief - Stop and Order level
Debrief - Order Line level


The system supports automatic debrief from external systems. For example, if CTL is integrated with CALIDUS ePOD, completion of the trips there will automatically enter the information in this screen for you. In this case, you can use the debrief screen to review or change what has automatically been entered.
Query section
You can access the query through the Query Filter button.
Query criteria:
- Trip Ref.
- Owning Depot.
- Carrier.
- Planned Date.
- Planned Date From - defaults to 7 days in the past. You can enter a date directly, use the up/down buttons to move forward/back a day, or use the calendar to select a date.
- Planned Date To - defaults to 7 days in the past. You can enter a date directly, use the up/down buttons to move forward/back a day, or use the calendar to select a date.
You can execute the query with the Refresh button, or close the query section with the Query Filter button.
Results
The screen shows a results table with the following information:
- Trip Reference.
- Status.
- Planned From.
- Planned To.
- Driver.
- Vehicle.
- Organization.
- Owning Depot.
- Route Reference.
- Carrier.
- Vehicle Description.
- Vehicle Make.
- Vehicle Model.
- Vehicle Type.
- Planned Distance.
You can debrief the trip or see details of the trip by clicking the row - the screen will display the details section.
Details section
The details section allows you to debrief the trip at all levels, and therefore displays sub-sections for:
- Trip-level.
- Stop-level, one for each stop.
- Order-level, within each stop, one for each order planned at that stop. This includes order line and item information.
The screen has the following buttons available on the header bar:
- Close.
- Refresh - refresh the results.
- Display options, to change or maximise the space used by the detail section:
- Max width.
- Half-width.
- Min width.
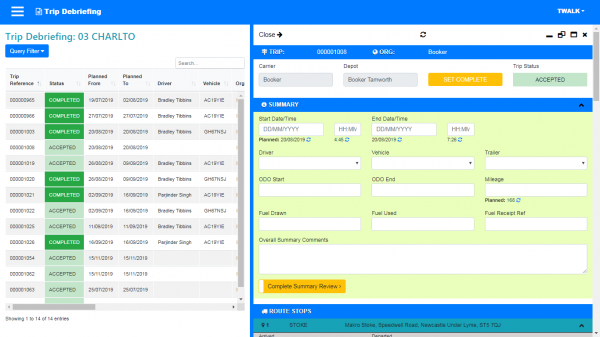
Trip sub-section
The header bar displays the following information:
- TRIP - the trip ID.
- ORG - the organisation.
The details show:
- Carrier.
- Depot.
- Trip Status.
You can set the trip to status Complete by clicking the SET COMPLETE button.
Summary sub-section
This is where the trip-level debrief information can be entered, consisting of:
- Start Date/Time - you can default the date/time to the planned date/time (shown below) with the button provided.
- End Date/Time - you can default the date/time to the planned date/time (shown below) with the button provided.
- Driver - drop-down list.
- Vehicle - drop-down list.
- Trailer - drop-down list.
- ODO Start.
- ODO End.
- Mileage - you can default the mileage to the planned mileage (shown below) with the button provided.
- Fuel Drawn.
- Fuel Used.
- Fuel Receipt Ref.
- Overall Summary Comments.
You can enter all the summary details with the Complete Summary Review button
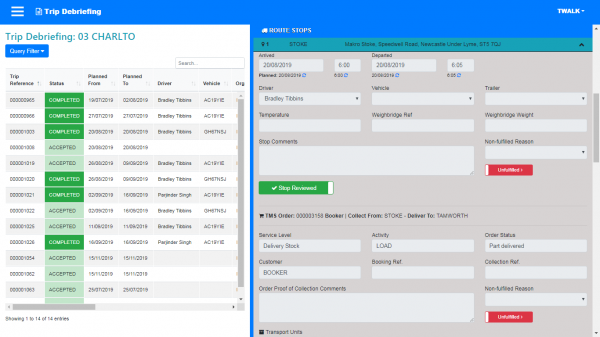
Stop sub-section
The screen displays each of the stops on the trip in sequence. These stop sections are closed by default - you can click them to show all of the stop details and the orders on that stop.
The sub-section header displays the following information:
- Stop sequence.
- Location.
- Location Address.
The details that you can change are:
- Arrived - you can default the date/time to the planned date/time (shown below) with the button provided.
- Departed - you can default the date/time to the planned date/time (shown below) with the button provided.
- Driver - drop-down list.
- Vehicle - drop-down list.
- Trailer - drop-down list.
- Temperature.
- Weighbridge Ref.
- Weighbridge Weight.
- Stop Comments.
- Non-fulfilled Reason.
You can confirm the stop has been completed using the Confirm Fulfilled button.
You can enter all the stop details with the Complete Stop Review button
Under each stop, the screen lists the orders at that stop:
The header displays the following information:
- TMS Order.
- Customer.
- Collect From.
- Deliver To.
The details that you can change are:
- Service Level.
- Delivery Stock.
- Activity.
- Order Status.
- Customer.
- Booking Ref..
- Collection Ref..
- Order Proof of Collection Comments.
- Non-fulfilled Reason - drop-down list.
You can confirm the order has been completed using the Confirm Fulfilled button.
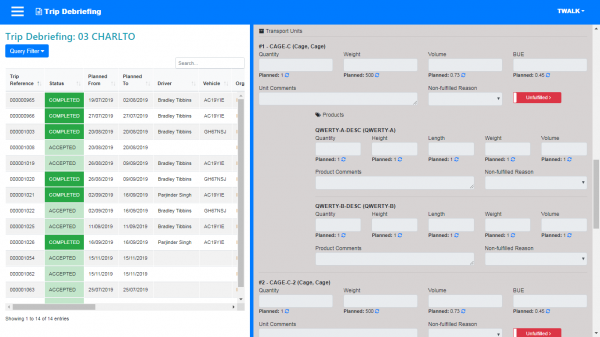
Under each order, the screen lists all transport units for that order.
The header displays the following information:
- Number.
- TU type .
- Descriptions.
The details that you can change are:
- Quantity - you can default the value to the planned value (shown below) with the button provided.
- Weight - you can default the value to the planned value (shown below) with the button provided.
- Volume - you can default the value to the planned value (shown below) with the button provided.
- BUE - you can default the value to the planned value (shown below) with the button provided.
- Unit Comments.
- Non-fulfilled Reason - drop-down list.
You can confirm the transport unit has been completed using the Confirm Fulfilled button.
Under each transport unit, the screen lists all products for that transport unit.
The header displays the following information:
- Description.
The details that you can change are:
- Quantity - you can default the value to the planned value (shown below) with the button provided.
- Height - you can default the value to the planned value (shown below) with the button provided.
- Length - you can default the value to the planned value (shown below) with the button provided.
- Weight - you can default the value to the planned value (shown below) with the button provided.
- Volume - you can default the value to the planned value (shown below) with the button provided.
- Product Comments
- Non-fulfilled Reason - drop-down list.