Call Logging - Tyres
This screen allows you to control the booking process of an order, and control the continued contact with the customer to affect a seamless delivery.
Call Logging

Here, you can:
- Quickly find orders through a variety of criteria.
- See all pertinent information about the customer's order, to aid in responding to customer queries.
- Add instructions to the driver, including "Call X Minutes Before Arrival" information.
- Book an order.
- Add additional services.
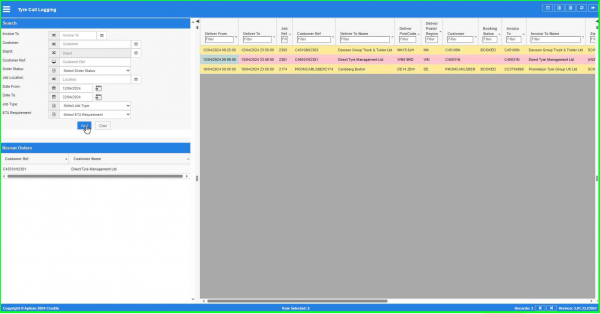
You can query orders by entering criteria in the Search panel:
- Invoice To - a drop-down list of all configured parent customers in the system.
- Customer - the orders' customer code. You can enter the code directly or use the
 Lookup button to find a customer. The screen will display a pop-up customer search window, allowing you to search by Name, Address or Postcode. You can enter partials of any of these. You can cancel the query by closing the pop-up window, or display matching results by pressing the Find button. The screen will display a pop-up window of matching customers in a results table. You can return to the customer search window by closing the results window or clicking the Cancel button. You can select a customer by clicking on the row for that customer. The screen will close both the results and customer search windows and enter the customer code for you.
 - Depot - the depot that owns the order.
- Customer Ref - the order's customer reference.
- Order Status - a drop-down list of all order statuses configured in the system.
- Job Location - the location of the order.
- Date From - the date from which orders are selected. The screen will default this to today's date. You can enter the date directly or use the
 Calendar button to select a date. The date cannot be more than 7 days in the past.
 - Date To - the date up to which orders are selected. The screen will default this to 10 days into the future. You can enter the date directly or use the Calendar button to select a date. The date cannot be less than the date from.
- Job Type - a drop-down list of all order types configured in the system.
- ETA Requirement - a drop-down list of all service levels configured in the system.
You can reset the query criteria to the default values by clicking the Clear button.
You can click the Find button to execute the query - the screen will display the matching orders in the results table.
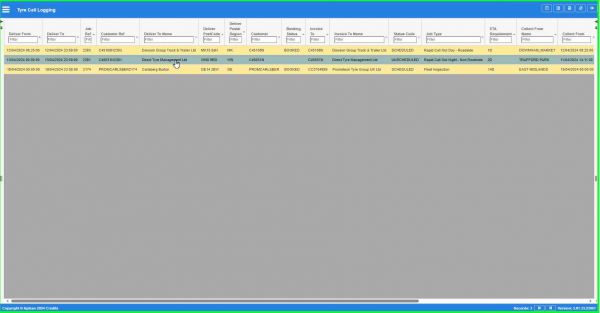
Results after filtering

![]() Note: The last 10 orders you select will be shown in the Recent Orders list in the Search panel - you can quickly re-select a previous order (regardless of search criteria you now have) by clicking on the order row in this list - the screen will display the Details panel.
Note: The last 10 orders you select will be shown in the Recent Orders list in the Search panel - you can quickly re-select a previous order (regardless of search criteria you now have) by clicking on the order row in this list - the screen will display the Details panel.
You can choose to display the following fields in the results table (using the ![]() Column Selector:
Column Selector:
- Deliver From.
- Deliver To.
- Job Ref.
- Customer Ref.
- Deliver To Name.
- Deliver PostCode.
- Deliver Postal Region.
- Customer.
- Booking Status.
- Invoice To
- Invoice To Name
- Status Code.
- Job Type
- ETA Requirement.
- Collect From Name.
- Collect From.
- Collect By.
- Order Type.
- Current Location.
- Mode
- Active.
- Customer Vehicle
- Technician
- Created By.
- Created Date.
- Last Updated By.
- Last Updated Date.
- Last Active Change By.
- Last Active Change Date.
- Last Process Id.
- Update Counter.
The list of jobs is colour coded:
- Unscheduled/Invalid - Red
- Booked/Scheduled - Amber
- Complete/Delivered - Green
- Failed/cancelled/On-hold - normal white/grey.
You can select an order to view or edit by clicking on the row - the screen will display the Details panel.
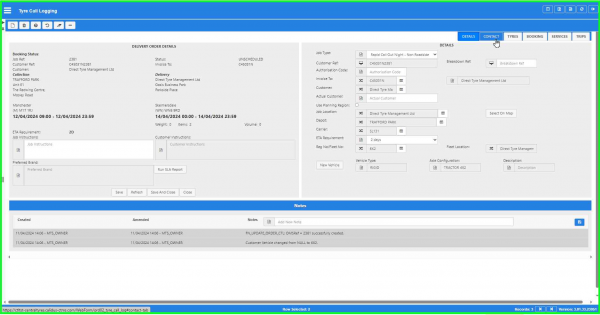
Detail panel, showing common details, details tab and notes

The Details panel is made up of multiple sections:
- Common order details, situated on the top-left of the screen.
- Additional details, situated in the top-right of the screen. You can select different detailed information to view or edit using the tab bar provided.
- Notes, situated at the bottom of the screen.
You can create a new order by opening the Details panel and clicking on the ![]() New button.
New button.
When creating or updating a job, the screen will check the credit status limit of the customer selected through the unique customer code. This will check with Elucid directly, and that credit status limit (of the child or parent account) will be used when checking whether products may be fitted, or services rendered. Note that this may also include unposted or incomplete sales invoices / credit notes.
This check on credit limits also applies when adding new lines to a job.
Common Order Details section
This section displays:
- Booking Status - the booking status.
- Job Ref - the TMS order reference.
- Customer Ref - the order's customer reference.
- Status - the order status.
- Customer Code - the customer of the order.
- Invoice To - the parent customer of the order.
- Collection details, including the address and collection window.
- Delivery details, including the address and delivery window.
- Weight - the total weight of all items on this order.
- Items - the number of items on this order.
- Volume - the total volume of the items on this order.
- ETA Requirement - the order's service level.
You can enter or amend the following:
- Driver Instructions - any general instructions to the driver.
You can also see:
- Customer instructions - any instructions configured against the customer.
- Preferred Brand - any preferred brand information configured against the custome.
You can also click the Run SLA Report button to view any additional customer restrictions if configured against the customer.
You can save the changed details of the order in this section using the Save button. The screen will leave the order open for further amendments. If you have finished with the order, you can click the Save and Close button instead to save the details and close the details window.
You can refresh the order details using the Refresh button.
You can close the details section without saving any changes using the Close button.
You can use the following buttons on this tab:
 New - create a new record.
 Delete - delete an existing record.
 Help - help on this screen.
 Undo - Undo any changes since last save.
 Clear - clear all fields.
 Toggle - toggle display of all accordion headers.
The screen allows you to reject (cancel) a job using the ![]() Delete button. In this case, you are requested to enter a reason why this was rejected.
For example, the call is taken, the user quotes a price to the customer, the customer rejects the price. The job will be captured, but the job will be cancelled with a reason code (e.g. too pricey).
Delete button. In this case, you are requested to enter a reason why this was rejected.
For example, the call is taken, the user quotes a price to the customer, the customer rejects the price. The job will be captured, but the job will be cancelled with a reason code (e.g. too pricey).
Additional Details section
The Additional Details section consists of the following tabs:
- Details - additional order details information.
- Contact - customer contact information.
- Tyres - deliverable tyres and services.
- Booking - book the dates and times of the job.
- Services - a facility to add equipment and services to the job.
- Trips - the booked trip for the job, in terms of pickup and drop-off times.
Details tab
This is where you enter all of the details for a new order, or amend details for an existing order.
Details tab
- Job Type
- Customer Ref - generated automatically by the system when the job is saved.
- Breakdown Ref - a third-party reference.
- Authorisation Code - required authorisation code from the customer.
- Invoice To - the parent customer. A lookup is provided with search criteria. If a parent customer is selected, this will filter the Customer lookup. If you enter a customer first, the Invoice To field will automatically populate.
- Customer - the customer. A lookup is provided with search criteria.
- Actual Customer - a text field for reporting purposes - only entered when the customer selected is a "slush account" combining many small customers. This will appear in the customer name on the service report if populated.
- Use Planning Region - limit the selection of locations to those your user is allowed to see.
- Job Location - the job location. A lookup is provided. The lookup will show only the addresses for that customer, and optionally only those within your user's configured planning region.
- Depot - the owning depot of the job - this will default to your configured depot. A lookup is provided. The lookup will sort based on the distance away from the callout location, and this distance is displayed.
- Carrier - the depot executing the job. This will default to your configured depot. A lookup is provided. The lookup will sort based on the distance away from the callout location, and this distance is displayed.
- ETA Requirement - the service level. A drop-down list of service levels is provided.
- Reg No/Fleet No - the vehicle being serviced for non-fleet inspection jobs. A lookup is provided with search criteria.
If the call-out is not at a known address, the user can search for and select a location from the map, which will create a new location for the job and customer. There are editing facilities to the address after selection.
You can also add a new vehicle for this customer and location using the New Vehicle button. You will be prompted to enter:
- Reg No/Fleet No: This is required.
- Vehicle Type: This is required. You can select from a drop-down list
- Description: This is freetext and optional.
- Axle Configuration: This is optional. See notes below.
- Fleet Location: This will default to the fleet location selected as the job destination location. You can change this through the lookup provided.
- Once a vehicle is created without a configuration in the call logging screen, this vehicle cannot then be amended in this screen to add the configuration. The Vehicle Fleet Maintenance screen can be used to modify the vehicle and add a configuration.
- The selected vehicle may now not have an axle configuration against it, so the tyre positions will not be known. In this case, the screen will check and will only allow van stock to be booked if the vehicle does not have an axle configuration associated to it.
- If fitment of new or other tyres, or services are to be installed on the vehicle, then you should write the position and required work in the notes, so that the technician can see them and do the work required. Tyres should be booked as van stock if required.
Once you have added these details and saved, you can move on to other details.
Contact tab
This tab shows all of the end customer contact information for the order in a table.
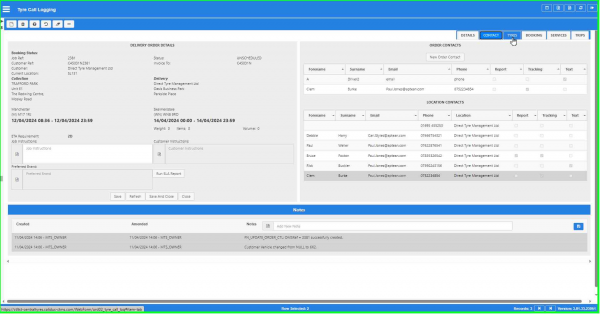
Contacts tab

The screen displays the following:
- Order Contacts - any contacts you have added or amended against this order.
- Location Contacts - pre-saved contacts against the from location, to location or against the customer's default (billing or invoice) location.
The New Order Contact button will create a new order contact in the table below. You can also save this new contact to the location for re-use.
Location contacts are preconfigured for contact preferences:
- Report - use this contact to email the completed service report.
- Tracking - use this contact to email tracking emails.
Further, order contacts can be specified for Text, which will send the phone information against that contact to the EPOD system, so the technician can contact the customer directly via text or phone.
Any location contacts that are checked will be used - if you want to change that, select the contact and save as an order contact, and change the contact preferences.
If you want to change the contacts used against an order, click on it in the bottom Location Contacts list and save - this will save this as an Order Contact (which will over-ride the Location contacts). They you can change the check boxes against the order contact.
Any location contacts that have been overridden in order contacts will be indicated by the row being greyed out - you will not be able to select that location contact again unless you delete the order contact.
![]() Warning: When you want to override a location contact, do not change the forename, surname, email or telephone details. If you do change these, this is then seen as a different order contact, and doesn't override the existing location contact. You will see that, because the location contact will not be greyed out.
Warning: When you want to override a location contact, do not change the forename, surname, email or telephone details. If you do change these, this is then seen as a different order contact, and doesn't override the existing location contact. You will see that, because the location contact will not be greyed out.
Examples:
If you want to email the completion report to all contacts that have been defaulted as "Report" against the order and locations, you don't have to change anything - all of the emails against those ticked contacts will be sent to EPOD for the sending of the completion report.
If you want to add a contact JUST FOR THIS ORDER ONLY, click the New Order Contact button and enter the details. Do not check the "Save as Location" check box and click ![]() Save. This will create a new order contact, for this order only, and will appear just in the Order Contacts table.
Save. This will create a new order contact, for this order only, and will appear just in the Order Contacts table.
If you want to add a contact for any orders to this location from this point forwards, click the New Order Contact button and enter the details. Check the "Save as Location" check box and click ![]() Save. This will create a new order contact, for this order only. This contact will appear in the Order Contacts table, and also in the Location Contacts table below, but greyed out (as there is an order contact over-riding it).
Save. This will create a new order contact, for this order only. This contact will appear in the Order Contacts table, and also in the Location Contacts table below, but greyed out (as there is an order contact over-riding it).
If you want to change a contact so that it doesn't send the report from this point forward for any jobs, select the contact in the Location Contacts table, then untick the Report box and click ![]() Save. This will update the location contact. This will also create this as an order contact, so you can change it on this order alone if you want to - the location contact will be greyed out.
Save. This will update the location contact. This will also create this as an order contact, so you can change it on this order alone if you want to - the location contact will be greyed out.
If you want to change a contact so that it doesn't send the report FOR THIS ORDER ONLY, select the contact in the Location Contacts table and click ![]() Save - that will create an order contact. Then select the order contact created and untick the Report box and click
Save - that will create an order contact. Then select the order contact created and untick the Report box and click ![]() Save. This will update the order contact only and over-ride the location contact. The contact will be greyed out in the Location Contacts section.
Save. This will update the order contact only and over-ride the location contact. The contact will be greyed out in the Location Contacts section.
If you want to add some more emails or phone numbers for an existing location contact, create a new order or location contact as described above, and change the phone and/or email information. You will end up with multiple order and/or location contacts, depending on which of the scenarios above you followed. Any matching location contacts will be greyed out and over-ridden if all of the contact information is the same in the order contact compared to the location contact (i.e. the forename, surname, phone and email).
Tyres tab
This section displays the summary of types of items on the order (the order lines) and can display each individual order item.
The screen displays the order summary (lines) in a table with the following fields:
- Work Type - one of Fit New, Fit Other, Services Only, Van Stock, Removal.
- Position.
- Services - popup to show services booked on this line.
- Product.
- Description.
- Store.
- Quantity.
- Price.

Tyres panel

You can click on an existing tyre to edit it, or add a new tyre with the ![]() New button. In both cases, the screen will display the Items popup.
New button. In both cases, the screen will display the Items popup.
You will be allowed to select the type of work being booked to a job when selecting tyres:
- Fit New
- Fit Other
- Services Only
- Van Stock
In general, most deliverables work the same way:
- Select a vehicle position
- Select a product using the Part Search lookup
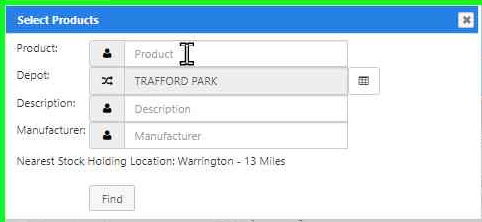
Part Search Parameters

The Part Search allows you to select parameters for the search - they are matched partially:
- Product
- Depot
- Description
- Manufacturer
The screen also displays the nearest stock holding location, for information.
Matching parts are displayed, and you can select the part you need.
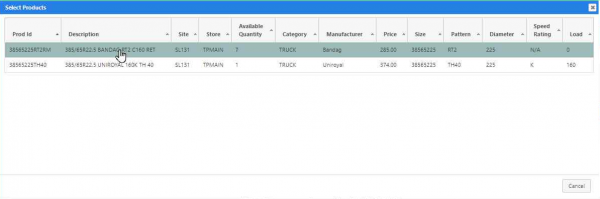
Part Search Results

For Fit New:
- Select a depot and position.
- Search for a part using the part search.
- Once selected, all of the details are displayed, and the quantity is defaulted to 1.
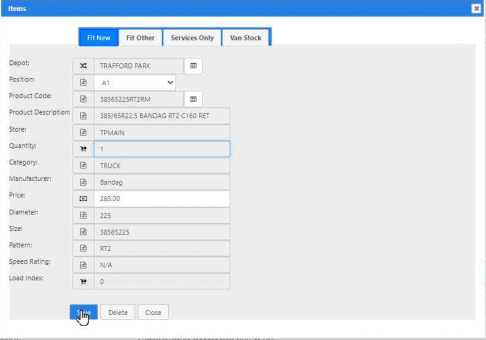
Fit New

Notes:
- Work Type Option select one, default to Fit New
- Depot: Defaulted
- Position: Drop-down list based on customer vehicle, must select
- Product Code: Lookup - part search
- Product Description: Set from product
- Store: Set from product
- Quantity: Default to 1, cannot be changed
- Manufacturer: Set from product
- Price: Set from product, can be changed
- Diameter: Set from product -label changed to Diameter
- Size: Set from product
- Pattern: Set from product
- Speed Rating: Set from product
- Load Index: Set from product
On clicking save, the screen will add a tyre to the selected tyres and display the details.
If new tyres are to be installed on the vehicle, then the user should book van stock against the job and write the position in the notes, so that the technician can see them and do the work required. Tyres should be booked as van stock.
For Services Only, this popup works as follows:
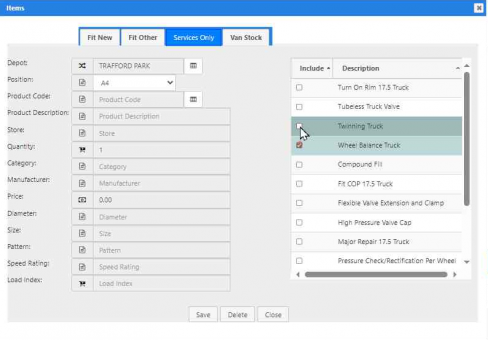
Services Only

Notes:
- Depot: Not enabled, as not selecting a product to sell
- Position: Drop-down list based on customer vehicle, must select
- Product Code: not enabled
- Product Description: Not enabled
- Store: Not enabled
- Quantity: Default to 1, cannot be changed
- Manufacturer: Set from product
- Price: Zero, cannot be changed
- Diameter: Set from product
- Size: Set from product
- Pattern: Set from product
- Speed Rating: Set from product
- Load Index: Set from product
The screen will also show all services that can be supplied to that vehicle type that are related to a tyre position. The user must select at least one of these services, although several can be selected.
On saving, the service supplied will be saved and displayed in the booked work list.
For Van Stock, this popup works as follows:
Van Stock

Notes:
- Depot: Default to depot, select from drop-down list
- Position: Disabled.
- Product Code: Lookup - part search
- Product Description: Set from product
- Store: Set from product
- Quantity: Must be entered with a quantity greater than 0
- Manufacturer: Set from product
- Price: Zero, cannot be changed
- Diameter: Set from product
- Size: Set from product
- Pattern: Set from product
- Speed Rating: Set from product
- Load Index: Set from product
On clicking save, the screen will add the selected quantity of tyres and display the details.
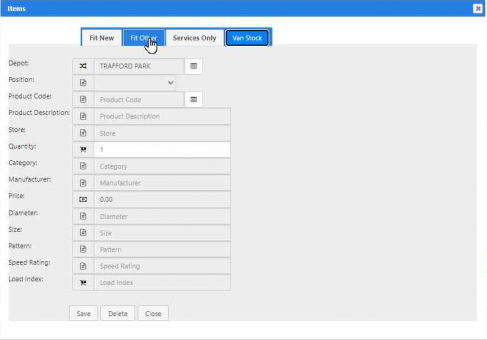
For Fit Other, this popup works as follows:
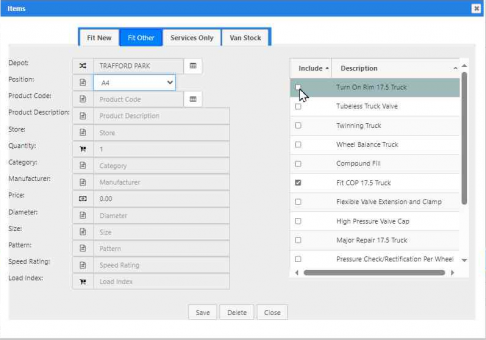
Fit Other

Notes:
- Depot: Not enabled
- Position: Drop-down list based on customer vehicle, must select
- Product Code: Part search, but just for product, not store, can be left blank
- Product Description: Set from product
- Store: Blank
- Quantity: Default to 1, cannot be changed
- Manufacturer: Set from product
- Price: Zero, cannot be changed
- Diameter: Set from product
- Size: Set from product
- Pattern: Set from product
- Speed Rating: Set from product
- Load Index: Set from product
The part search in this instance will be searching for any product code, not specifically those sold by the depot, just any known product, as this is intended to allow the user to book customer-owned product rather that sell them a tyre from depot stock.
The screen will also show all services that can be supplied to that vehicle type that are related to a tyre position. The user must select at least one of these services, although several can be selected.
Booking tab
This tab allows you to modify the delivery date of the order based on the customer's requirements, and to select the technician and vehicle.
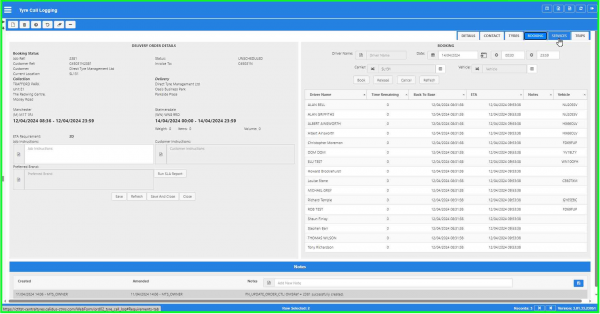
Booking tab

You can manually set a booking date and time window here. This will default to today’s date, and to the expected delivery time, based on the service level. For example, if the time is 1200, and the service level is 60-90 minutes, the book time will default to 1330.
When a job is created, a service level will be identified. This, along with the start/booked time, will determine the window for the job. For example, "60-90 minutes" may be a service level. If the job is booked at the correct time of 1200, the window will be 1200-1330. Alternatively, scheduled jobs will typically be scheduled at 0600 on the day and will be able to be completed at any time of the day. This will be used to determine whether the job was completed in time.
The screen will list the Technicians assigned to that selected carrier. The screen provides decision assistance to the operator to select the correct Technician.
The screen will use the current workload assigned to the Technician, how long they have been working on it, how long the job is expected to take and the current location of the Technician and progress through the current job and distance to the job in question to determine the potential arrival time. The screen will also show the shifts on which the technician is assigned, to aid in identifying the out-of-hours technician.
The system uses the hub location of the technician to determine travel time. It also uses the "from" and "to" locations of the order to determine the travel time from the hub location, to the "from" location (to pick up product) and then to the “to” location. The system uses average loading/fitment times depending on the number of tyres selected to determine the length of a job and factors this in, along with ETAs from the device if the job is in progress.
As the order may now be booked from an outside store location, this is the location that is used to calculate the ETA of the technician at that location.
The current job will be determined by the job in progress on the device. The current location will be determined from the device location. The length of the job will be determined from the actions taking place or items being delivered. This will be configured against the line type, with each configured for a number of minutes per item. There are expected to be 3:
- Tyre Fitment – for example, 15 minute per tyre fitted once the location is reached.
- Tyre Supply – for example, one minute per tyre being delivered.
- Inspection – for example, 5 minutes per vehicle to be inspected, with the quantity of the line set to the number of vehicles, to give finer control of how long the job is expected to be.
If the driver arrived 5 minutes ago, and the job is expected to take 30 minutes based on these calculations, the system will know that there is an expected 25 minutes remaining on that job before they can depart.
The screen will indicate the availability of that driver, using the assigned shift and resource availability calendar to determine whether the driver may be used. As noted, this is decision assistance - the driver may still be selected.
You may then assign the technician's van, if required. If the technician has a default vehicle or is already working in a van, then this will be defaulted to that van. You can change the van here.
Once selected, click the Book button.
If you want to change the technician or vehicle, click the Release button.
Once the call is logged, booked and assigned to the driver, the job will be planned onto the technician's workload and sent over to their device. This will generate a workload on the device (if one does not already exist), a collection job (if picking up van stock or installing a new tyre) and a service job of the type specified to do the work.
When a job is booked to a technician for the first job of that day, the system creates a workload for that technician, starting at the start-up time of that driver's shift, then factoring in the time as above from the specified start time of the job, to determine the ETA.
If the driver has a specific hub location (i.e. does not work directly in the carrier hub location), the system will use that specific hub location to determine the start and end points of the trip and therefore the travel time to the "from" location of the order.
Services tab
This tab allows you to view set any additional equipment or services against the order. You can select from a drop-down list of configured services or equipment.
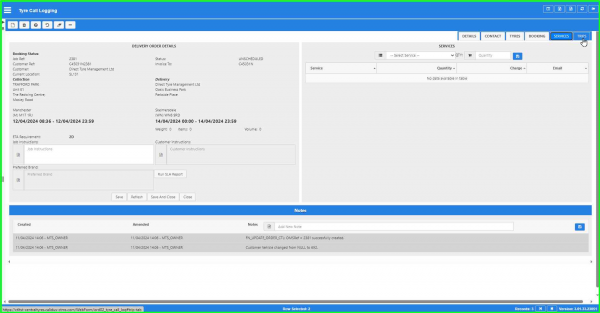
Services tab

For completed jobs, the services supplied against the job will be visible here.
When you have selected the service or equipment, you can set the quantity and add it using the ![]() New button provided. The screen will add this to the displayed list of equipment and services.
New button provided. The screen will add this to the displayed list of equipment and services.
Trips tab
The screen will display any trips onto which the order has been planned, showing all pickup and drop-off stops. You can use this information to quickly answer queries from the customer as to the planning status and progress of the delivery.
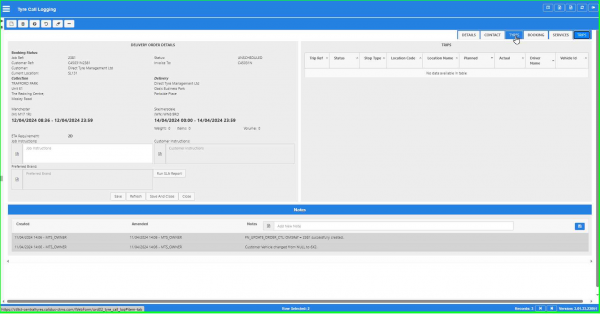
Trips tab

The screen will display this information in a trips table, showing the following information:
- Trip Ref.
- Status.
- Stop Type.
- Location Code.
- Location Name.
- Planned.
- Actual.
Notes section
This section allows you to enter notes against the order. You can see all previously-entered notes in a list, with the most recent on the top.
Several of the actions that you take in this screen will automatically generate notes for you, to provide an audit trail of customer contact.
You can also enter any note, by keying the note in the Add New Note field and clicking the ![]() Save button when you have finished.
Save button when you have finished.
The screen logs the creation and amendment date, time and user of all entered notes, whether they were entered automatically or manually.
Top-up Transfers
Top-up Transfers are a job type that allows tyres to be taken to a technician whilst on a job.
When creating a job in CTL, a new Job Type will be available called "Top-up Transfer".
When you select this, the screen will allow you to select a technician and an order on which they require additional product – the screen will show the orders on the selected technician's current trip and allow them to select to job.
The screen will then copy the basic order details for a new job to transfer product to that technician. That will be customer, destination location, customer vehicle, etc. The job will not be saved automatically – the details will just be copied into the screen for you to save if required.
You can then select depot and carrier like any other job. You can then select product to deliver to the selected technician - this job type will be limited to just selecting van stock and entering the quantity. This will be exactly as the process selects van stock now as shown above. This involves identifying the product (through part search), selecting the product (including the store from which the product is sourced, which may be a depot store or outside store) and confirming the quantity.
The job can then be booked to a technician to transport the product to the technician that needs it – this will be as per the normal booking process. This will be added to the transporting technician's work load, or a new work load created for this purpose.
Outside Stores
All depots and hubs are stock holding locations. There are also satellite stock holding locations linked to depots, as well as stock held at customers’ depots (BRANCH locations) or at an agreed third-party location (like in a container).
When searching for products to sell, these can be sourced at any of these outside locations as well as at the depot.
When selecting tyres to install, the user can also select the store from which the tyre is to be picked up.
The screen will check the store of the tyre selected against any set up outside store (OS_STORE) locations set up in CTMS. If the location is set up, then the location will be used as the "from" location of that order, instead of the depot location. This will be displayed on the left of the screen.
The screen will not allow selection of parts from any other location other than that outside store if it exists.
Note that the screen will allow selection of products from multiple stores if they do not have a corresponding outside store location set up.
So, for example, if there are three stores for SL67:
- BMAIN – the depot
- BCONTAINER – a container at the depot
- OSSTORE1 – an off-depot location 3 miles away.
OSSTORE1 is setup in CTMS as an OS_STORE location, whereas the others are not.
For an order, the user can select multiple tyres from both BMAIN and BCONTAINER together on the same order, as they are both considered to be located at the same place (the depot). They cannot also select product from OSSTORE1 on the same order. The order will be considered to be starting at the depot location SL67.
For a different order, the user can select multiple tyres from OSSTORE1. They cannot select any tyres from BMAIN or BCONTAINER. The order will be considered to be starting at the outside store location OSSTORE1.
Examples of Depot Locations and Outside Stores
Selecting to fit a tyre from SL67 to a known customer location CUSTLOC1, by carrier SL67, by a technician working out of SL67:
- Start of trip: SL67
- Pick up at SL67
- Delivery (service) at CUSTLOC1
- End of trip back at SL67
Selecting to fit a tyre from OSSL117 (outside store based at SL117) to a known customer location CUSTLOC1, by carrier SL67, by a technician working out of SL117:
- Start of trip: SL117
- Pick up at OSSL117
- Delivery (service) at CUSTLOC1
- End of trip back at SL117
Selecting to fit a tyre from SL67 to a known customer location CUSTLOC1, by carrier SL67, by a technician working out of SL117:
- Start of trip: SL117
- Pick up at SL67
- Delivery (service) at CUSTLOC1
- End of trip back at SL117
Selecting to fit a tyre from OSSTORE1 to a roadside location OMS1, by carrier SL67, by a technician working out of SL117:
- Start of trip: SL117
- Pick up at OSSTORE1
- Delivery (service) at OMS1
- End of trip back at SL117
Access Control and Configuration
Users will be set up through access control for access of CTMS and CTL systems.
The users should be assigned to an access control group – see standard functionality guides on this.
Users should have parameters set against them, especially the following:
- The existing BASED_AT will define the Central Tyre depot to which they have been assigned.
- If the user should have access to all depots, then the ALL_DEPOTS parameter should be set instead.
CTL users must have access to the CTL menus through their assigned group (typically CTL):
- FIA Reports - CTL-04-REP.CTL-04-REP-02
- Maintenance - CTL.CTL-01-MNT
- Process - CTL.CTL-03-ORD
- Reports - CTL.CTL-04-REP
- Root Menu - CTL.CTL-99-CTL
- Tasks - CTL.CTL-02-TSK
- Tyre Call Logging - CTL-03-ORD.CTL-02-ORD-01
- Vehicle Axle Configuration - CTL-01-MNT.CTL-01-MNT-01
- Vehicle Fleet Maintenance - CTL-02-TSK.CTL-02-TSK-01
Note that these menus should NOT have "In Menu?" ticked.
External (e.g. ITDN) users also require the following parameters:
- A new parameter "EXTERNAL_CALL_LOGGING" will be available. For external users of Call Logging (i.e. ITDN) this parameter should be set.
When locked to (based at) a single depot and creating a new order the depot (and from location of the order) will be defaulted to that depot.
If the user is set as All Depots or has multiple depots, then the user must select the depot first before the From location is locked to that order.
When a user is set as an external call logging user, the system will restrict the visibility and selection of price against a tyre.
- The price will be hidden when looking up a tyre.
- The price will not be displayed in product details
- The price will default to the selling price.
- There will be no facility to change or enter the price