Reason Codes
This screen provides all details of the codes in the CALIDUS ePOD system.
Codes are set up at many reasons, denoted by Type:
- Job - Reason Codes for cancelling whole jobs.
- Detail - Reason Codes for cancelling or short-delivering containers and items.
- Vehicle Damage codes - used exclusively for the bespoke Vehicle EPOD system. They are of types:
- Location
- Type
- Severity
- Claused Delivery reason codes - used when the system is configured for Claused Delivery codes.
- DU - Delivery Units or Asset Types
- UOM - Unit of Measure, typically used in bespoke job upload processes.
- Services codes - used exclusively for services systems. They are of types:
- Service
- Unit Type
- System Type
- Service Group
- Service Product Category
- Fleet management codes - used exclusively for Fleet Management services systems. They are of types:
- Tyre Actions
- Tyre Removal
- Tyre Work Type
![]() Note: Typically, an external ERP or TMS system would maintain this data and send it to CALIDUS ePOD as part of the data imported into the system, for example CALIDUS TMS. This data should not require any further maintenance. However, if the external system does not pass this information in, or CALIDUS ePOD/eSERV is being run as a stand-alone system, system administrators can use this screen.
Note: Typically, an external ERP or TMS system would maintain this data and send it to CALIDUS ePOD as part of the data imported into the system, for example CALIDUS TMS. This data should not require any further maintenance. However, if the external system does not pass this information in, or CALIDUS ePOD/eSERV is being run as a stand-alone system, system administrators can use this screen.
This screen provides functionality to view, create and edit all kinds of codes.
You can filter data by:
- Code
- Description
- Type - a drop down list of the types above.
- Job Group - a drop-down list of job groups.
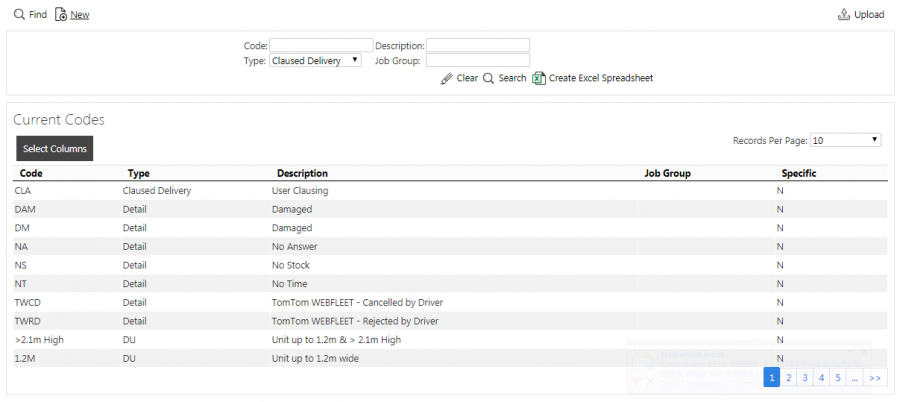
Once you have entered the criteria, click Search. The screen will display a table of all the matching data. Any plain text boxes will match data that contains what you enter as the criterion.

Codes Search Panel and Results table
Alternatively, if you click Create Excel Spreadsheet, the screen will export the codes data to a Microsoft Excel spreadsheet. The functionality differs per the browser you have used to access the Admin system, but the likely result is the spreadsheet file will offered for download.
Each code found is displayed per single line.
You can choose to hide or show almost all of the columns in the results table by using the Select Columns button on the header. The columns shown are:
- Code - the code itself.
- Type - as detailed above.
- Description - the description.
- Job Group - if this code is related to a job group, the job group will be identified here.
- Specific - Controls whether this code is specific to the owner of the job. If the configuration requires that only specific codes are shown on the device for these jobs, only codes marked specific will be shown.
You can sort the results table by clicking on the column header - clicking again will reverse the sort sequence.
Uploading Codes
The screen allows upload functions - you can access these by pressing the Upload button. You can hide the upload buttons by pressing the Hide button.
The screen allows you to upload codes through a spreadsheet template file. You can get this template by clicking the Obtain Upload Template button - results differ per browser used to access the Admin system, the likely result being that the template will be offered for download.
You can then enter codes data into this template and save it there, external to the CALIDUS ePOD application. Alternatively, an external system could generate a file to upload in this format. Regardless, you can then upload this data into the system by selecting the file (using the Choose File selector on the screen), then clicking Upload Excel Spreadsheet.
The screen will indicate the success or failure of the upload in a message on the button panel at the top of the screen - you can download detailed results using the provided Download Results Spreadsheet button.
New Codes
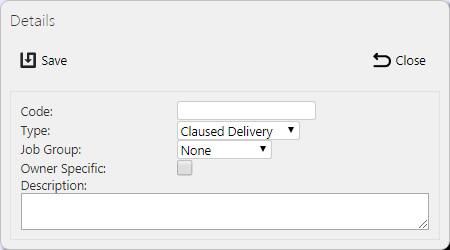
You can create new codes by clicking the provided New button at the top of the screen.
You can enter the following details:
- Code - the code itself. This must be unique for the type.
- Type - as detailed above, selected from a drop-down list.
- Job Group - if this code is related to a job group, select the job group from the drop-down list.
- Owner-Specific - Controls whether this code is specific to the owner of the job. If the configuration requires that only specific codes are shown on the device for these jobs, only codes marked specific will be shown.
- Description - the description.
![]() Note: If this is a UOM-type code, the screen will also allow you to enter conversion parameters.
Note: If this is a UOM-type code, the screen will also allow you to enter conversion parameters. ![]() Note: These parameters affect certain bespoke job upload processes only.
Note: These parameters affect certain bespoke job upload processes only.
- Conversion Type - what the bespoke upload process will do with the product quantities with lines of this UOM type when received - one of the following:
- Multiply - multiply the quantities by the Value parameter.
- Round - round the values to the nearest Value parameter.
- Exclude - do not upload.
- As Received - no action.
- Value - as described in Conversion Type above.
- Xref Code - this provides a drop-down list of all other UOM codes in the system for the site. If you select a code here, the UOM type will be converted to the selected UOM when received.
When changes are complete, you can click Save to save the changes, or Close to close the pop-up without saving the changes.
View/Edit Codes
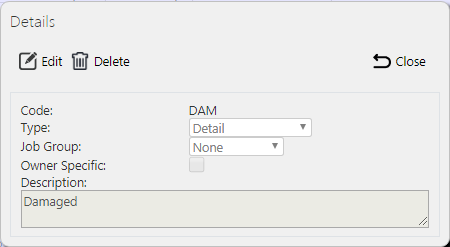
You can view and edit codes by clicking the Select button against the line in the table. The screen will display a pop-up showing all the details of the code.
You can edit the code by clicking the provided Edit button.
You can edit the following elements:
- Job Group.
- Owner-Specific.
- Description.
If this is a UOM-type code, you can also edit the following elements:
- Conversion Type.
- Value.
- Xref Code.
When changes are complete, you can click Save to save the changes. If you don't want to save your changes, you can click Cancel to stop editing, or Close to close the pop-up without saving the changes.
You can click the Delete button to delete the code - the screen will ask you to confirm before the code is deleted.

