Reason Codes: Difference between revisions
No edit summary |
(Updated from Admin v3.3.0.1) |
||
| Line 11: | Line 11: | ||
* DU - Delivery Units or Asset Types | * DU - Delivery Units or Asset Types | ||
{{Note}} Typically, this static data is part of the data imported into the system from external TMS system (for example ''CALIDUS'' TMS) and would not require any further maintenance. However, if the external system does not pass this information in, or ''CALIDUS'' ePOD/eSERV is being run as a stand-alone system, this screen can be used. | {{Note}} Typically, this static data is part of the data imported into the system from external ERP or TMS system (for example ''CALIDUS'' TMS) and would not require any further maintenance. However, if the external system does not pass this information in, or ''CALIDUS'' ePOD/eSERV is being run as a stand-alone system, this screen can be used. | ||
This page provides functionality to View, Create and Edit Codes. | This page provides functionality to View, Create and Edit Codes. | ||
The screen allows users to filter data by: | |||
* Code | * Code | ||
* Description | * Description | ||
* Type | * Type - a drop down list of the types above. | ||
* Job Group - a drop-down list of job groups. | |||
Once the filter information is entered and the '''Search''' button is pressed, all matching codes are displayed in a table below. | |||
[[File:EPOD-Codes1.png|600px|border]] | |||
<br />''Codes Search Panel and Results table''<br /> | |||
Alternatively, clicking Create Excel Spreadsheet will export the Codes data - functionality differs per browser used to access the Admin system, the likely result being that the resulting file will be offered for download. | |||
A single line is displayed per Code found. | A single line is displayed per Code found. | ||
Each column can be sorted by clicking on the column header - clicking again will reverse the sort sequence. | |||
Details shown are: | |||
* Code - the code itself. | |||
* Type - as detailed above. | |||
* Description - the description. | |||
* Job Group - if this code is related to a job group, the job group will be identified here. | |||
* Specific - Controls whether this code is specific to the owner of the job. If the configuration requires that only specific codes are shown on the device for these jobs, only codes marked specific will be shown. | |||
== Uploading Codes == | |||
The screen allows codes to be uploaded through a spreadsheet template file. This can be obtained by clicking the '''Obtain Upload Template''' button - results differ per browser used to access the Admin system, the likely result being that the template will be offered for download. | |||
The | Codes data may then be entered into the template and saved, external to the application. Alternatively, this template may be generated from an external system. Regardless, this data may then be uploaded into the system by selecting the file (using the '''Choose File''' selector on the screen), then clicking '''Upload Excel Spreadsheet''' | ||
The success or failure of the upload will be indicated in a message on the button panel at the top of the screen and detailed results may be downloaded using the provided '''Download Results Spreadsheet''' button. | |||
== New Codes == | |||
The screen allows new codes to be created, by pressing the provided '''New''' button at the top of the screen. | |||
[[File:EPOD-Codes2.png|border]] | |||
<br />''New Code Pop-up''<br /> | |||
The following details may be entered: | |||
* Code - the code itself. This must be unique for the type. | |||
* Type - as detailed above, selected from a drop-down list. | |||
* Job Group - if this code is related to a job group, select the job group from the drop-down list. | |||
* Owner-Specific - Controls whether this code is specific to the owner of the job. If the configuration requires that only specific codes are shown on the device for these jobs, only codes marked specific will be shown. | |||
* Description - the description. | |||
A '''Save''' button is provided to save | A '''Save''' button is provided to save the entered data. Clicking '''Close''' will discard the new code. | ||
== View/Edit Codes == | |||
The codes can be viewed and edited by clicking the '''Select''' button against the line in the table. The screen will display a pop-up showing all the details of the code. | |||
[[File:EPOD-Codes3.png|border]] | |||
<br />''View/Edit Code Pop-up''<br /> | |||
The code may be edited by clicking the provided '''Edit''' button. | |||
The Description may be edited here. | |||
A '''Save''' button is provided to save the edited values. | |||
A ''' | A '''Delete''' button is provided to delete the code. | ||
Changes may be discarded by clicking the '''Close''' or '''Cancel''' buttons. | |||
[[Category:UG 291094 EPOD Admin User Guide|300_100]] | [[Category:UG 291094 EPOD Admin User Guide|300_100]] | ||
Revision as of 11:04, 14 July 2016
This screen provides all details of the codes in the CALIDUS ePOD system.
Codes are set up at many reasons, denoted by Type:
- Job - Reason Codes for cancelling whole jobs.
- Detail - Reason Codes for cancelling or short-delivering containers and items.
- Vehicle Damage codes - used exclusively for the bespoke Vehicle EPOD system. They are of types:
- Location
- Type
- Severity
- Claused Delivery reason codes - used when the system is configured for Claused Delivery codes.
- DU - Delivery Units or Asset Types
![]() Note: Typically, this static data is part of the data imported into the system from external ERP or TMS system (for example CALIDUS TMS) and would not require any further maintenance. However, if the external system does not pass this information in, or CALIDUS ePOD/eSERV is being run as a stand-alone system, this screen can be used.
Note: Typically, this static data is part of the data imported into the system from external ERP or TMS system (for example CALIDUS TMS) and would not require any further maintenance. However, if the external system does not pass this information in, or CALIDUS ePOD/eSERV is being run as a stand-alone system, this screen can be used.
This page provides functionality to View, Create and Edit Codes.
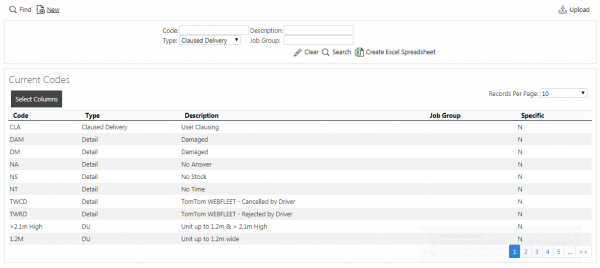
The screen allows users to filter data by:
- Code
- Description
- Type - a drop down list of the types above.
- Job Group - a drop-down list of job groups.
Once the filter information is entered and the Search button is pressed, all matching codes are displayed in a table below.

Codes Search Panel and Results table
Alternatively, clicking Create Excel Spreadsheet will export the Codes data - functionality differs per browser used to access the Admin system, the likely result being that the resulting file will be offered for download.
A single line is displayed per Code found.
Each column can be sorted by clicking on the column header - clicking again will reverse the sort sequence.
Details shown are:
- Code - the code itself.
- Type - as detailed above.
- Description - the description.
- Job Group - if this code is related to a job group, the job group will be identified here.
- Specific - Controls whether this code is specific to the owner of the job. If the configuration requires that only specific codes are shown on the device for these jobs, only codes marked specific will be shown.
Uploading Codes
The screen allows codes to be uploaded through a spreadsheet template file. This can be obtained by clicking the Obtain Upload Template button - results differ per browser used to access the Admin system, the likely result being that the template will be offered for download.
Codes data may then be entered into the template and saved, external to the application. Alternatively, this template may be generated from an external system. Regardless, this data may then be uploaded into the system by selecting the file (using the Choose File selector on the screen), then clicking Upload Excel Spreadsheet
The success or failure of the upload will be indicated in a message on the button panel at the top of the screen and detailed results may be downloaded using the provided Download Results Spreadsheet button.
New Codes
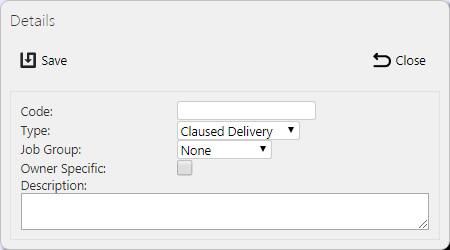
The screen allows new codes to be created, by pressing the provided New button at the top of the screen.
The following details may be entered:
- Code - the code itself. This must be unique for the type.
- Type - as detailed above, selected from a drop-down list.
- Job Group - if this code is related to a job group, select the job group from the drop-down list.
- Owner-Specific - Controls whether this code is specific to the owner of the job. If the configuration requires that only specific codes are shown on the device for these jobs, only codes marked specific will be shown.
- Description - the description.
A Save button is provided to save the entered data. Clicking Close will discard the new code.
View/Edit Codes
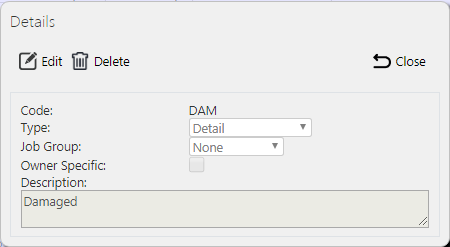
The codes can be viewed and edited by clicking the Select button against the line in the table. The screen will display a pop-up showing all the details of the code.
The code may be edited by clicking the provided Edit button.
The Description may be edited here.
A Save button is provided to save the edited values.
A Delete button is provided to delete the code.
Changes may be discarded by clicking the Close or Cancel buttons.

