Vehicle Check Responses: Difference between revisions
No edit summary |
(Updated from Admin v3.3.0.1) |
||
| Line 1: | Line 1: | ||
This screen allows users to view the Vehicle Checks completed against a vehicle. | This screen allows the users to view the Vehicle Checks completed against a vehicle. | ||
The screen | The screen allows selection of data by: | ||
* Vehicle | * Vehicle ID - a drop-down list of all vehicles for the site. | ||
* User | * User ID - a drop-down list of all users (i.e. drivers and engineers) for the site. | ||
* Date (From and To) | * Date (From and To) - a pop-up calendar is shown to select the dates. The dates default to showing the last month of checks. | ||
Once the filter information is entered and the '''Search''' button is pressed, all matching completed vehicle defect checks are displayed in a table below. | |||
[[File:EPOD-VehicleChecks1.PNG|600px|border]] | |||
<br />''Vehicle Defect Checks Search Panel and Results table''<br /> | |||
Alternatively, clicking '''Create Excel Spreadsheet''' will export the completed vehicle checks data - functionality differs per browser used to access the Admin system, the likely result being that the resulting file will be offered for download. | |||
A single line is displayed per completed vehicle check found. | |||
<!-- Each column can be sorted by clicking on the column header - clicking again will reverse the sort sequence. | |||
--> | |||
Details shown are: | |||
* Vehicle ID - the system's Vehicle ID. | |||
* Check Date/Time - the local device date and time that the vehicle check took place. | |||
* User - the system's User ID. | |||
== View Completed Vehicle Defect Checks == | |||
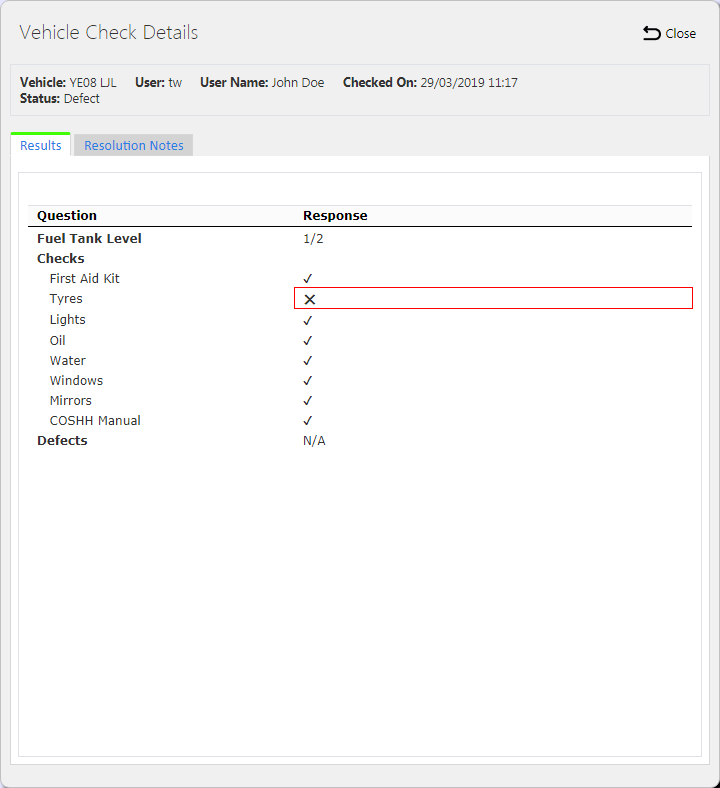
Completed Vehicle Defect Checks can be viewed by clicking the '''Select''' button against the line in the table. The screen will display a pop-up showing all the details of the completed vehicle defect check. | |||
[[File:EPOD-VehicleChecks3.PNG|border]] | |||
<br />''View Vehicle Checks Pop-up''<br /> | |||
The following fields are displayed here: | |||
* Vehicle - the system's Vehicle ID. | |||
* User - the system's User ID. | |||
* User Name - the name of the driver completing the check. | |||
* Checked On - the local device date and time that the vehicle check took place. | |||
A table is shown below, showing all the configured questions and the responses provided by the driver. | |||
The pop-up can be closed by clicking the '''Close''' button. | |||
== Vehicle Defect Checks Report == | |||
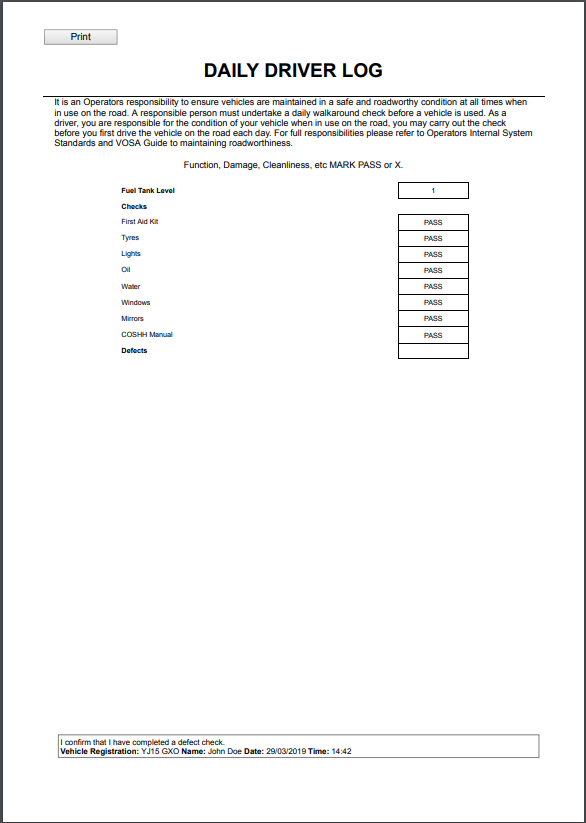
Completed vehicle checks can be viewed in a formatted report by clicking the '''Report''' button against the line in the table. The screen will display a pop-up window showing the report in the configured Site vehicle check report format. | |||
[[File:EPOD-VehicleChecks4.PNG|600px|border]] | [[File:EPOD-VehicleChecks4.PNG|600px|border]] | ||
<br />''Vehicle Defect Checks Report''<br /> | |||
The report can be printed by clicking the provided '''Print''' button. | |||
[[Category:UG 291094 EPOD Admin User Guide|400_135]] | [[Category:UG 291094 EPOD Admin User Guide|400_135]] | ||
Revision as of 10:04, 20 July 2016
This screen allows the users to view the Vehicle Checks completed against a vehicle.
The screen allows selection of data by:
- Vehicle ID - a drop-down list of all vehicles for the site.
- User ID - a drop-down list of all users (i.e. drivers and engineers) for the site.
- Date (From and To) - a pop-up calendar is shown to select the dates. The dates default to showing the last month of checks.
Once the filter information is entered and the Search button is pressed, all matching completed vehicle defect checks are displayed in a table below.

Vehicle Defect Checks Search Panel and Results table
Alternatively, clicking Create Excel Spreadsheet will export the completed vehicle checks data - functionality differs per browser used to access the Admin system, the likely result being that the resulting file will be offered for download.
A single line is displayed per completed vehicle check found.
Details shown are:
- Vehicle ID - the system's Vehicle ID.
- Check Date/Time - the local device date and time that the vehicle check took place.
- User - the system's User ID.
View Completed Vehicle Defect Checks
Completed Vehicle Defect Checks can be viewed by clicking the Select button against the line in the table. The screen will display a pop-up showing all the details of the completed vehicle defect check.
The following fields are displayed here:
- Vehicle - the system's Vehicle ID.
- User - the system's User ID.
- User Name - the name of the driver completing the check.
- Checked On - the local device date and time that the vehicle check took place.
A table is shown below, showing all the configured questions and the responses provided by the driver.
The pop-up can be closed by clicking the Close button.
Vehicle Defect Checks Report
Completed vehicle checks can be viewed in a formatted report by clicking the Report button against the line in the table. The screen will display a pop-up window showing the report in the configured Site vehicle check report format.
The report can be printed by clicking the provided Print button.

