PDA Service: Difference between revisions
No edit summary |
m (Picture resolution) |
||
| (8 intermediate revisions by 2 users not shown) | |||
| Line 1: | Line 1: | ||
The Service process is an entirely configurable process, all set up through the Admin front end. | The Service process is an entirely configurable process, all set up through the Admin front end. | ||
The | The application will be configured as to what functionality is required in this process and therefore what entry and validation is required. | ||
The main entry is through tabs and popup screens, as follows: | The main entry is through tabs and popup screens, as follows: | ||
| Line 15: | Line 15: | ||
* Post-work | * Post-work | ||
Each tab is configurable as to whether this appears in the system, usually depending on the process of the customer. The application style will define which stages are required, as well as server-side configuration. | |||
The '''Back''' button will return the user to the Job List. | |||
{{Note}} A variety of styles and devices have been used to show flexibility of display. | |||
<!-- NEW PAGE --> | <!-- NEW PAGE --> | ||
== Overview/Job Details== | |||
This tab will display the Fault Reported. This comes from the Job instruction. This tab is always displayed. | This tab will display the Fault Reported. This comes from the Job instruction. This tab is always displayed. | ||
<gallery widths= | <gallery widths=450px heights=300px perrow=2> | ||
File: | File:EPOD_Services1.PNG|''Job Details'' | ||
File: | File:EPOD_Services1a.PNG|''Job Address'' | ||
</gallery> | </gallery> | ||
The ''Job Details'' tab has multiple sections: | |||
* Contact information | |||
* Address information. | |||
* Planned Start and End Time, if provided. | |||
* Job Instructions. | |||
Additionally, this screen can display many other items to enter - this is customer-specific user-defined fields information configured by the admin staff. If configured, this information is displayed in a scroll-able list for entry here. In this screenshot, the number of engineers is requested. | |||
The entire service may be cancelled here by clicking the '''Cancel Service''' button - the [[PDA Exception|Exceptions]] screen will be displayed for the user to indicate the reasons. | |||
<!-- NEW PAGE --> | <!-- NEW PAGE --> | ||
== Info == | |||
This tab will prompt | This tab will prompt for information on the job. Configuration controls the fields shown for entry here. | ||
<gallery widths= | <gallery widths=450px heights=300px perrow=2> | ||
File:EPOD_Services2.PNG|''Info, showing multiple service items'' | |||
File:EPOD_Services2.PNG| | |||
</gallery> | </gallery> | ||
If there are multiple items to be serviced as part of this service job, this will be indicated on the title bar, with the ability of moving through and viewing each item using the buttons provided. | |||
As an example, the following information | As an example, the following information may prompted for: | ||
*Unit Type - Drop-down selection of | *Service Type - a display of the type of service. This may be allowed to be changed by the user, depending on configuration. | ||
*Unit Type - Drop-down selection of service item model or group | |||
*Reg ID - Numeric Only | *Reg ID - Numeric Only | ||
*VIN No - Numeric Only | *VIN No - Numeric Only | ||
*Mileage - Numeric Only. | *Mileage - Numeric Only. | ||
Alternatively, these items may be labelled differently or not present in the configuration. This is part of the styling service offered. | |||
Additionally, user-defined fields can be added to this tab, configured in the Admin system. The fields prompted for can be linked to the product or model being serviced. For example, a service of a gas burner may require entry of the specific model, whereas service of a parasol may require entry of the height and width. All of this is user-configurable within the system. | |||
The current service item may be cancelled here by clicking the '''Cancel Item''' button - the [[PDA Exception|Exceptions]] screen will be displayed for the user to indicate the reasons. | |||
<!-- NEW PAGE --> | <!-- NEW PAGE --> | ||
== Pre-work Checks == | |||
This information can be entered either as a | This information can be entered either as a button from the ''Info'' tab. | ||
This displays the pre-work checks that are required before performing a service. | This displays the pre-work checks that are required before performing a service. If configured, these must be checked before being allowed to continue. Details may be entered in the text field if additional information needs to be recorded. | ||
<gallery widths= | <gallery widths=450px heights=300px perrow=2> | ||
File:EPOD_Services3.PNG|''Sample pre-work checks'' | |||
File:EPOD_Services3.PNG| | |||
</gallery> | </gallery> | ||
The checks are completely configurable through user-defined fields. The checks can be related to the group or model selected on the ''Info'' tab. The button name is related to the type of pre-work checks being performed. | |||
For example, if a site survey is required before servicing an item, the button may be labelled ''Site Survey (incomplete)'', with a series of questions requiring completion. Equally, these could be site waivers, permit to work, etc. | |||
Buttons on these pre-work checks are user-configurable. For example, a site survey or permit to work may not be required if one has already been completed. Usually there will be a button to confirm or save, and button to mark the check as not required. | |||
Once the checks are | Once the checks are completes, the user will be allowed to move on. | ||
<!-- NEW PAGE --> | <!-- NEW PAGE --> | ||
== Activities == | |||
This tab allows | This tab allows activities to be specified that were completed during the service. Activities are any task set up through the Admin system, and will appear on a drop-down list. | ||
<gallery widths= | <gallery widths=450px heights=300px perrow=2> | ||
File:EPOD_Services4.PNG|''Activities'' | |||
File:EPOD_Services4.PNG| | |||
</gallery> | </gallery> | ||
| Line 80: | Line 101: | ||
Activities can be added multiple times with the '''Add''' button, to increase the quantity. | Activities can be added multiple times with the '''Add''' button, to increase the quantity. | ||
To remove activities from the list, press the activity to display a pop-up menu, allowing ''Remove 1'' or ''Remove All'' options. | |||
Once the activities are added as required, click | Once the activities are added as required, click the next tab to move on. | ||
<!-- NEW PAGE --> | <!-- NEW PAGE --> | ||
== Installed/Removed Products== | |||
This tab allows | This tab allows identification of the parts that were used as part of the service job. | ||
<gallery widths= | <gallery widths=450px heights=300px perrow=2> | ||
File: | File:EPOD_Services5.PNG|''Products Tab'' | ||
File:EPOD_Services5A.PNG|''Other Products search'' | |||
File: | File:EPOD_Services5B.PNG|''Other Products entry'' | ||
File: | |||
</gallery> | </gallery> | ||
To install a | To install a part the part must be selected from the list of items and the '''Installed''' button clicked. If the same product is added more than once the quantity field will be updated to reflect this. | ||
Products can be removed from this list by long-pressing the row on the table to display a pop-up menu, allowing ''Remove 1'' or ''Remove All'' options. | |||
Parts may be pre-allocated to the job and will appear on the list already, awaiting use. | |||
Parts may be removed in the same way as the above. | |||
Should there be limited vehicle stock, or a capability required to use parts that are not on the system, these may be added through the '''Other Products''' button. | |||
This screen allows the user to select products from other models or other engineer's van stock. It also allows products to be used ad-hoc, by entering the description of the product. | |||
Products identified in this way can be removed or installed. | |||
{{Note}} It is not required that any parts are entered at all on this screen. | |||
<!-- NEW PAGE --> | <!-- NEW PAGE --> | ||
== MC Refs == | |||
This information can be entered | This information can be entered directly from the ''Diagnosis'' tab. | ||
This prompts you to enter the MC Reference fields. These are a series of part serials (up to 4) that can optionally be entered. | This prompts you to enter the MC Reference fields. These are a series of part serials (up to 4) that can optionally be entered. | ||
<gallery widths= | <gallery widths=450px heights=300px perrow=2> | ||
File: | File:EPOD_Services6.PNG|''MC Refs as part of the Diagnosis Tab'' | ||
</gallery> | </gallery> | ||
| Line 124: | Line 150: | ||
If this is configured, either a narrative or refs must be entered. | If this is configured, either a narrative or refs must be entered. | ||
MC Narrative is free text entry. | MC Narrative is free text entry. | ||
<!-- NEW PAGE --> | <!-- NEW PAGE --> | ||
== Post-work Checks == | |||
This information can be entered | This information can be entered through a button from the ''Diagnosis'' tab. | ||
This allows | This allows confirmation that the post-work checks have been completed. | ||
<gallery widths= | <gallery widths=450px heights=300px perrow=2> | ||
File:EPOD_Services8.PNG|''Post-work Checks'' | |||
File:EPOD_Services8.PNG| | |||
</gallery> | </gallery> | ||
Similarly to pre-work checks, these are completely user-configurable, in terms of the fields requested, buttons and labels. They can differ per item or model. | |||
These fields are required and must be checked for the user to continue. As with pre-work checks the user can add additional information in the text fields. | These fields are required and must be checked for the user to continue. As with pre-work checks the user can add additional information in the text fields. | ||
<!-- NEW PAGE --> | <!-- NEW PAGE --> | ||
== Diagnosis == | |||
This tab allows | This tab allows entry of problem diagnosis/resolution information. | ||
<gallery widths= | <gallery widths=450px heights=300px perrow=2> | ||
File: | File:EPOD_Services7.PNG|''Diagnosis information'' | ||
</gallery> | </gallery> | ||
The application will prompt to specify the results of the service and any relating details that are required. | |||
Diagnosis must be entered - all other fields are optional. | Diagnosis must be entered - all other fields are optional. | ||
Alternatively, these items may be labelled differently or not present in the configuration. This is part of the styling service offered. | |||
Additionally, user-defined fields can be added to this tab, configured in the Admin system. | |||
<!-- NEW PAGE --> | <!-- NEW PAGE --> | ||
== Completion == | |||
Once | Once all details have been captured for this service item, the service item may be completed from the clicking the '''OK''' button. You will be taken to the [[PDA Job Confirmation|Job Confirmation]] screen, where you (the engineer) and the customer will be required to review the job and sign as confirmation that it is complete. | ||
[[Category:UG 291097 EPOD Client User Guide|330]] | [[Category:UG 291097 EPOD Client User Guide|330]] | ||
Latest revision as of 11:43, 29 November 2017
The Service process is an entirely configurable process, all set up through the Admin front end.
The application will be configured as to what functionality is required in this process and therefore what entry and validation is required.
The main entry is through tabs and popup screens, as follows:
- Overview/Job Details - Always displayed
- Info
- Pre-work
- Activities
- Installed Products
- Returned Products
- MC Refs
- Diagnosis
- Post-work
Each tab is configurable as to whether this appears in the system, usually depending on the process of the customer. The application style will define which stages are required, as well as server-side configuration.
The Back button will return the user to the Job List.
![]() Note: A variety of styles and devices have been used to show flexibility of display.
Note: A variety of styles and devices have been used to show flexibility of display.
Overview/Job Details
This tab will display the Fault Reported. This comes from the Job instruction. This tab is always displayed.
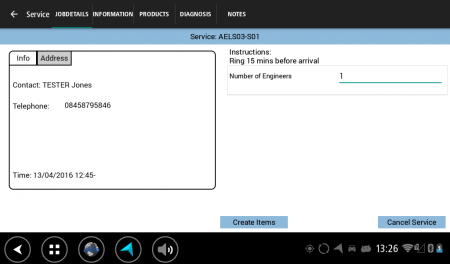
Job Details
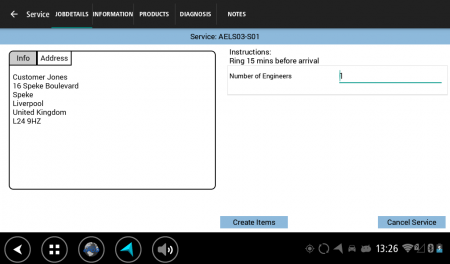
Job Address


The Job Details tab has multiple sections:
- Contact information
- Address information.
- Planned Start and End Time, if provided.
- Job Instructions.
Additionally, this screen can display many other items to enter - this is customer-specific user-defined fields information configured by the admin staff. If configured, this information is displayed in a scroll-able list for entry here. In this screenshot, the number of engineers is requested.
The entire service may be cancelled here by clicking the Cancel Service button - the Exceptions screen will be displayed for the user to indicate the reasons.
Info
This tab will prompt for information on the job. Configuration controls the fields shown for entry here.
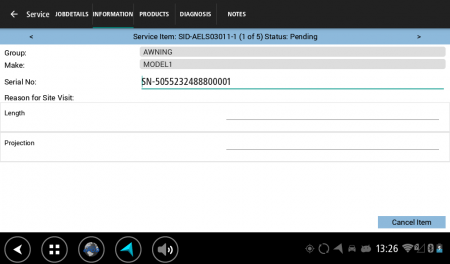
Info, showing multiple service items

If there are multiple items to be serviced as part of this service job, this will be indicated on the title bar, with the ability of moving through and viewing each item using the buttons provided.
As an example, the following information may prompted for:
- Service Type - a display of the type of service. This may be allowed to be changed by the user, depending on configuration.
- Unit Type - Drop-down selection of service item model or group
- Reg ID - Numeric Only
- VIN No - Numeric Only
- Mileage - Numeric Only.
Alternatively, these items may be labelled differently or not present in the configuration. This is part of the styling service offered.
Additionally, user-defined fields can be added to this tab, configured in the Admin system. The fields prompted for can be linked to the product or model being serviced. For example, a service of a gas burner may require entry of the specific model, whereas service of a parasol may require entry of the height and width. All of this is user-configurable within the system.
The current service item may be cancelled here by clicking the Cancel Item button - the Exceptions screen will be displayed for the user to indicate the reasons.
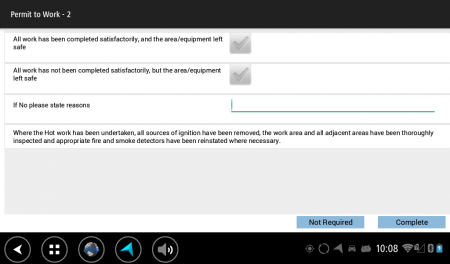
Pre-work Checks
This information can be entered either as a button from the Info tab.
This displays the pre-work checks that are required before performing a service. If configured, these must be checked before being allowed to continue. Details may be entered in the text field if additional information needs to be recorded.
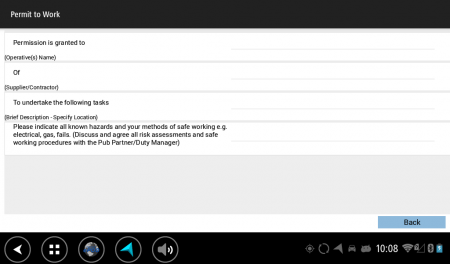
Sample pre-work checks

The checks are completely configurable through user-defined fields. The checks can be related to the group or model selected on the Info tab. The button name is related to the type of pre-work checks being performed.
For example, if a site survey is required before servicing an item, the button may be labelled Site Survey (incomplete), with a series of questions requiring completion. Equally, these could be site waivers, permit to work, etc.
Buttons on these pre-work checks are user-configurable. For example, a site survey or permit to work may not be required if one has already been completed. Usually there will be a button to confirm or save, and button to mark the check as not required.
Once the checks are completes, the user will be allowed to move on.
Activities
This tab allows activities to be specified that were completed during the service. Activities are any task set up through the Admin system, and will appear on a drop-down list.
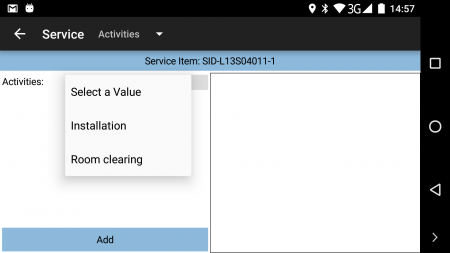
Activities

Activities can be added multiple times with the Add button, to increase the quantity.
To remove activities from the list, press the activity to display a pop-up menu, allowing Remove 1 or Remove All options.
Once the activities are added as required, click the next tab to move on.
Installed/Removed Products
This tab allows identification of the parts that were used as part of the service job.
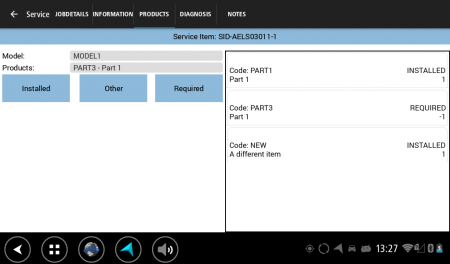
Products Tab
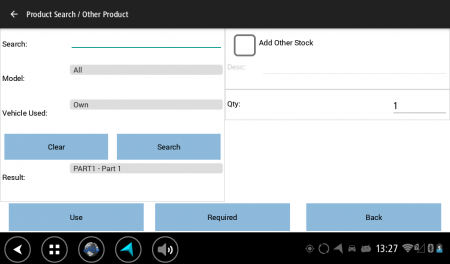
Other Products search

Other Products entry


To install a part the part must be selected from the list of items and the Installed button clicked. If the same product is added more than once the quantity field will be updated to reflect this.
Products can be removed from this list by long-pressing the row on the table to display a pop-up menu, allowing Remove 1 or Remove All options.
Parts may be pre-allocated to the job and will appear on the list already, awaiting use.
Parts may be removed in the same way as the above.
Should there be limited vehicle stock, or a capability required to use parts that are not on the system, these may be added through the Other Products button.
This screen allows the user to select products from other models or other engineer's van stock. It also allows products to be used ad-hoc, by entering the description of the product.
Products identified in this way can be removed or installed.
![]() Note: It is not required that any parts are entered at all on this screen.
Note: It is not required that any parts are entered at all on this screen.
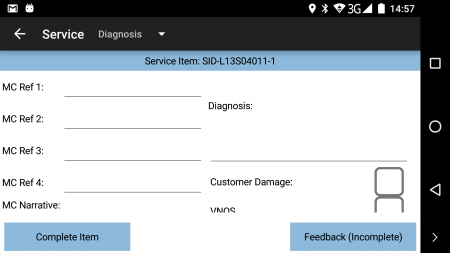
MC Refs
This information can be entered directly from the Diagnosis tab.
This prompts you to enter the MC Reference fields. These are a series of part serials (up to 4) that can optionally be entered.
MC Refs as part of the Diagnosis Tab

If this is configured, either a narrative or refs must be entered.
MC Narrative is free text entry.
Post-work Checks
This information can be entered through a button from the Diagnosis tab.
This allows confirmation that the post-work checks have been completed.
Post-work Checks

Similarly to pre-work checks, these are completely user-configurable, in terms of the fields requested, buttons and labels. They can differ per item or model.
These fields are required and must be checked for the user to continue. As with pre-work checks the user can add additional information in the text fields.
Diagnosis
This tab allows entry of problem diagnosis/resolution information.
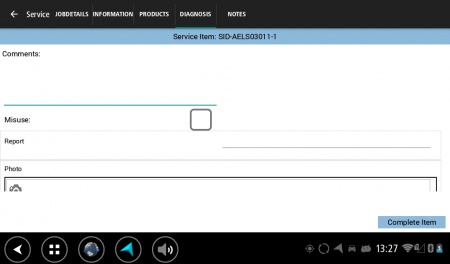
Diagnosis information

The application will prompt to specify the results of the service and any relating details that are required.
Diagnosis must be entered - all other fields are optional.
Alternatively, these items may be labelled differently or not present in the configuration. This is part of the styling service offered.
Additionally, user-defined fields can be added to this tab, configured in the Admin system.
Completion
Once all details have been captured for this service item, the service item may be completed from the clicking the OK button. You will be taken to the Job Confirmation screen, where you (the engineer) and the customer will be required to review the job and sign as confirmation that it is complete.