Loads: Difference between revisions
m (Picture resolution) |
(Updated based on version 4.0.02.00) |
||
| Line 15: | Line 15: | ||
A single line will be displayed per Load found. | A single line will be displayed per Load found. | ||
The columns shown in the results table can be shown or hidden using the '''Select Columns''' button on the header. The columns are: | |||
* Load ID (Always displayed) | |||
* Planned Start | |||
* Planned End | |||
* Actual Start | |||
* Actual End | |||
* Mileage Start | |||
* Mileage End | |||
* Trailer | |||
* Vehicle | |||
* User | |||
* Status | |||
Each column can be sorted by clicking on the column header - clicking again will reverse the sort sequence. | Each column can be sorted by clicking on the column header - clicking again will reverse the sort sequence. | ||
Navigation of the table to different pages is controlled by the bottom bar buttons. The top bar allows setting of the number of records displayed on each page. | Navigation of the table to different pages is controlled by the bottom bar buttons. The top bar allows setting of the number of records displayed on each page. | ||
| Line 32: | Line 46: | ||
You can select the load and drill through to the [[Jobs|Job Details]] page with the '''Details''' button against each line. | You can select the load and drill through to the [[Jobs|Job Details]] page with the '''Details''' button against each line. | ||
If a load has been completed, you can view the tracking information by clicking the '''Tracking''' button against the line. This will take you to the [[User Tracking]] screen. | |||
This page gives users the ability to edit, delete and create a new load, if the user is a full admin user. {{Note}} Only loads not in progress may be deleted or edited. | This page gives users the ability to edit, delete and create a new load, if the user is a full admin user. {{Note}} Only loads not in progress may be deleted or edited. | ||
[[File:EPOD-Load2.PNG| | [[File:EPOD-Load2.PNG|600px|border]] | ||
[[File:EPOD-Load3.PNG| | [[File:EPOD-Load3.PNG|600px|border]] | ||
The user can edit the Load through a pop-up screen by clicking '''Select''' then '''Edit''' and save the changes using the '''Save''' button provided. Changes can be discarded by clicking '''Close''' or '''Cancel'''. | The user can edit the Load through a pop-up screen by clicking '''Select''' then '''Edit''' and save the changes using the '''Save''' button provided. Changes can be discarded by clicking '''Close''' or '''Cancel'''. | ||
| Line 54: | Line 70: | ||
A '''New''' button is provided on the header to allow you to enter new loads. | A '''New''' button is provided on the header to allow you to enter new loads. | ||
[[File:EPOD-Load4.PNG| | [[File:EPOD-Load4.PNG|600px|border]] | ||
When this is pressed, the screen will allow you to enter the following fields: | When this is pressed, the screen will allow you to enter the following fields: | ||
Revision as of 09:36, 20 December 2017
This screen provides details of the Loads for your site.
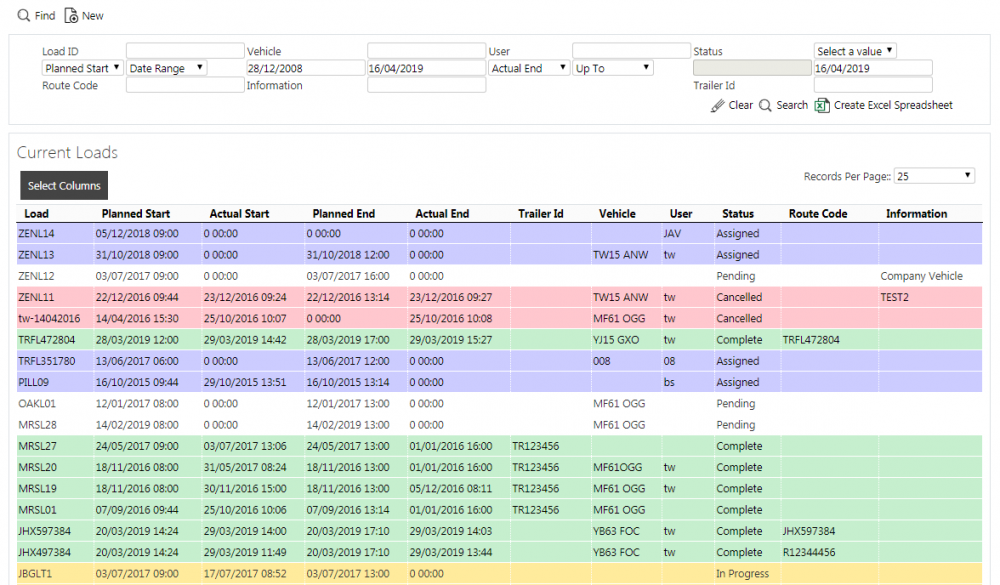
On entry to the Load Maintenance screen you will be shown a filter, to find your loads.
You can filter through:
- Load ID
- Vehicle ID
- User ID
- Start Date (Planned and Actual)
- Load Status (Pending, Assigned, In Progress, Complete, Cancelled)
Once you have entered the criteria, click Search. The screen will display a table of all the matching data. Alternatively, clicking Create Excel Spreadsheet will export the Load data - functionality differs per browser used to access the Admin system, the likely result being that the resulting file will be offered for download.
A single line will be displayed per Load found.
The columns shown in the results table can be shown or hidden using the Select Columns button on the header. The columns are:
- Load ID (Always displayed)
- Planned Start
- Planned End
- Actual Start
- Actual End
- Mileage Start
- Mileage End
- Trailer
- Vehicle
- User
- Status
Each column can be sorted by clicking on the column header - clicking again will reverse the sort sequence.
Navigation of the table to different pages is controlled by the bottom bar buttons. The top bar allows setting of the number of records displayed on each page.
Depending on the status of the line, the line will be RAG coloured:
- Pending - No colour
- Assigned - Grey
- In Progress - Amber
- Complete - Green
- Cancelled - Red
You can set the status of a load to Cancelled by clicking the Cancel button against that line. ![]() Warning: This will cancel all of the jobs under the Load as well, so care should be taken with this option. You will be asked to confirm before this happens.
Warning: This will cancel all of the jobs under the Load as well, so care should be taken with this option. You will be asked to confirm before this happens.
You can select the load and drill through to the Job Details page with the Details button against each line.
If a load has been completed, you can view the tracking information by clicking the Tracking button against the line. This will take you to the User Tracking screen.
This page gives users the ability to edit, delete and create a new load, if the user is a full admin user. ![]() Note: Only loads not in progress may be deleted or edited.
Note: Only loads not in progress may be deleted or edited.
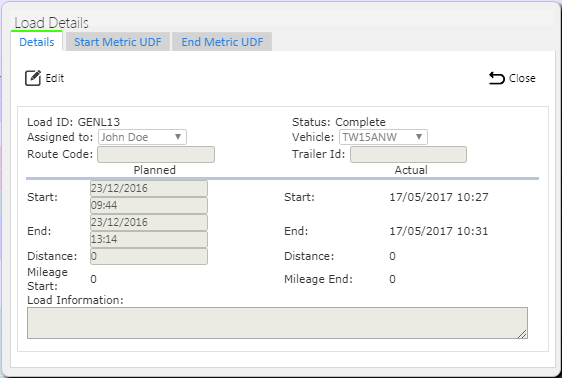
The user can edit the Load through a pop-up screen by clicking Select then Edit and save the changes using the Save button provided. Changes can be discarded by clicking Close or Cancel.
Within this pop-up, Drivers and Vehicles can be assigned to a load which can then be transferred to the device. This can be accomplished by changing the User ID and Vehicle against the Load, using the provided drop-down lists. The start and end planned date and time and trailer ID for the load can also be maintained here.
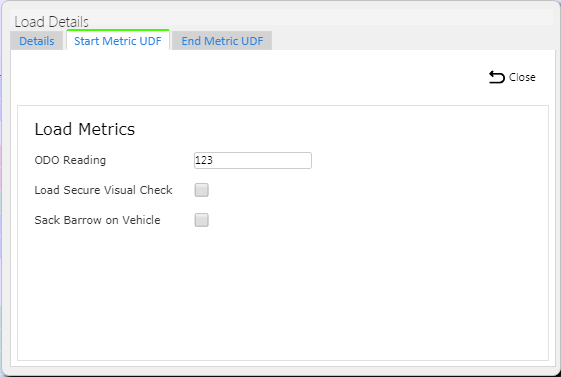
Multiple tabs may be available on this screen to view and edit UDF (User-defined Forms) data, depending on the system configuration:
- Start Metrics - configurable data entry when the load is started, typically used to record metrics (e.g. Odometer) information.
- End Metrics - configurable data entry when the load is completed.
A Delete button is provided on the header of this screen to delete the Load.
A Cancel button is provided on the header of this screen to set the status of the Load to Cancelled.
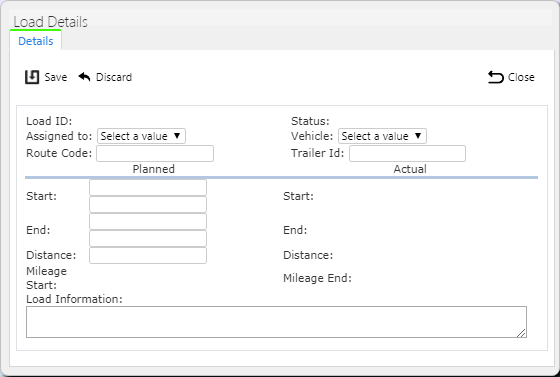
A New button is provided on the header to allow you to enter new loads.
When this is pressed, the screen will allow you to enter the following fields:
- Assigned User, selected from a list.
- Assigned Vehicle, selected from a list.
- A Trailer ID
- Planned load start date and time
- Planned Load end date and time
- Distance planned
The Load Status will default to "Pending" and the Site will default to your logged-in site.
A Save button is provided to save the data - the Load ID will be generated automatically. You can discard your changes with the Cancel or Close button.


