Admin User Guide: Difference between revisions
(Minor correction) |
m (Text replacement - "1000px" to "900px") |
||
| (2 intermediate revisions by the same user not shown) | |||
| Line 2: | Line 2: | ||
The ''CALIDUS'' ePOD system provides functionality to handle the process of Proof of Delivery electronically. The system aids this process by providing both a management interface and a client application for use completing tasks. | The ''CALIDUS'' ePOD system provides functionality to handle the process of Proof of Delivery electronically. The system aids this process by providing both a management interface and a client application for use completing tasks. | ||
The ePOD administration software is a web-based application that handles all of the administrative side of the ePOD | The system supports three job types at this point, which encompass the functionality to complete many more tasks with them. You can use the system to complete and record; Deliveries, Collections and Services. | ||
The C-ePOD administration software is a web-based application that handles all of the administrative side of the tasks completed on mobile devices by the C-ePOD mobile device application. | |||
The purpose of the application can be broken down into the following sections: | The purpose of the application can be broken down into the following sections: | ||
* To create and maintain users of the ePOD devices. | * To create and maintain users of the ePOD devices. | ||
* To create and maintain reference data for the system (e.g. Reason Codes, Vehicles, Customers). | * To create and maintain reference data for the system (e.g. Reason Codes, Vehicles, Customers). | ||
| Line 14: | Line 14: | ||
* To view the Jobs and Workloads created. | * To view the Jobs and Workloads created. | ||
* To print or email a POD. | * To print or email a POD. | ||
==Basic Functionality== | ==Basic Functionality== | ||
The header of each page shows who is logged in and to what site, as well as (if configured) a link to provide detailed help on each screen. | The header of each page shows who is logged in and to what site, as well as (if configured) a link to provide detailed help on each screen. | ||
In the details of each page, all pages within the system are setup in a similar way | In the details of each page, all pages within the system are setup in a similar way. They consist of a search filter, a panel to add new data and a panel to display data from the filter and edit existing data. | ||
You can access the menu by clicking the Menu button on the top left of the screen - it will pop-out on the left. You can use this to navigate around the system by clicking on the screen you require: | |||
[[File:EPOD-Basic2. | [[File:EPOD-Basic2.PNG|border]] | ||
{{Note}} | |||
{{Note}} If you click on the icon to the right of the menu, the application will open the selected screen in a new tab in your browser, or a new browser window, depending on the settings of your chosen browser. | |||
All screens have a Search panel which is shown immediately upon entering the screen - here you enter the data you need and search for the relevant data. You can also hide or show this panel by clicking the '''Find''' button: | All screens have a Search panel which is shown immediately upon entering the screen - here you enter the data you need and search for the relevant data. You can also hide or show this panel by clicking the '''Find''' button: | ||
[[File:EPOD-Basic3. | [[File:EPOD-Basic3.PNG|900px|border]] | ||
When you need to enter details for new records, you can access this by clicking the '''New''' button where provided: | |||
[[File:EPOD-Basic4. | [[File:EPOD-Basic4.PNG|border]] | ||
The most common buttons you will find on the system are below: | The most common buttons you will find on the system are below: | ||
* '''Back''' - this will take you back to the previous screen. | * '''Back''' - this will take you back to the previous screen. | ||
* '''Find''' - this opens up the Search panel where you can then enter your search criteria for the relevant screen. | * '''Find''' - this opens up the Search panel where you can then enter your search criteria for the relevant screen. When you have entered this, you can click the '''Search''' button on this panel to retrieve the data matching the criteria entered. | ||
* '''New''' - this opens up the new Record creation panel where you can enter all details required | * '''New''' - this opens up the new Record creation panel where you can enter all details required | ||
* '''Save''' - this creates a new record with all of the inputted information | * '''Save''' - this creates a new record with all of the inputted information | ||
All data is managed on a data table. Within this table you can | |||
All data found is shown and managed on a results data table. Within this table you can edit, delete and cancel records dependant on your user access status. | |||
[[File:EPOD-Basic5. | [[File:EPOD-Basic5.PNG|900px|border]] | ||
Depending on the configuration of the system, the system may not show you these buttons on the rows themselves. You can access them by clicking on the row of the data table - a popup action window will show all of the available actions. Note that, if all you can do is select the record to edit it, the screen will not show the popup, but will instead immediately display the details of the record. | |||
[[File:EPOD-Basic5a.PNG|border]] | |||
Some screens allow the columns in the results table to be shown or hidden using a '''Select Columns''' button. When you press this button, a popup is shown of all the columns that can be selected: | |||
[[File:EPOD-Basic5b.PNG|border]] | |||
Most screens require that one or more columns are always shown - they may not be hidden and will not be shown on this list. | |||
You can check or un-check the items in the list to show or hide the columns respectively. When you click '''Save''', the changes will be applied to the results table. If you click '''Close''' (or anywhere else on the screen behind the pop-up), the columns will ''not'' make the changes. | |||
The application will remember your settings for this screen when run from the same browser on the machine. | The application will remember your settings for this screen when run from the same browser on the machine. | ||
You can modify data by clicking the '''Select''' button to access the relevant record: | |||
[[File:EPOD-Basic6. | [[File:EPOD-Basic6.PNG|border]] | ||
The screen will show a pop-up of the details, usually with further options of '''Edit''' and '''Delete''', along with others specific to that screen. | |||
==Using the System== | ==Using the System== | ||
Latest revision as of 12:29, 4 March 2020
Introduction
The CALIDUS ePOD system provides functionality to handle the process of Proof of Delivery electronically. The system aids this process by providing both a management interface and a client application for use completing tasks.
The system supports three job types at this point, which encompass the functionality to complete many more tasks with them. You can use the system to complete and record; Deliveries, Collections and Services.
The C-ePOD administration software is a web-based application that handles all of the administrative side of the tasks completed on mobile devices by the C-ePOD mobile device application.
The purpose of the application can be broken down into the following sections:
- To create and maintain users of the ePOD devices.
- To create and maintain reference data for the system (e.g. Reason Codes, Vehicles, Customers).
- To create Jobs of all types and group them together onto Loads/Workloads.
- To assign Loads (to Users and/or Vehicles).
- To view the Jobs and Workloads created.
- To print or email a POD.
Basic Functionality
The header of each page shows who is logged in and to what site, as well as (if configured) a link to provide detailed help on each screen.
In the details of each page, all pages within the system are setup in a similar way. They consist of a search filter, a panel to add new data and a panel to display data from the filter and edit existing data.
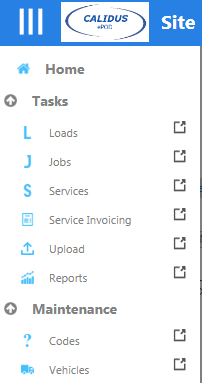
You can access the menu by clicking the Menu button on the top left of the screen - it will pop-out on the left. You can use this to navigate around the system by clicking on the screen you require:
![]() Note: If you click on the icon to the right of the menu, the application will open the selected screen in a new tab in your browser, or a new browser window, depending on the settings of your chosen browser.
Note: If you click on the icon to the right of the menu, the application will open the selected screen in a new tab in your browser, or a new browser window, depending on the settings of your chosen browser.
All screens have a Search panel which is shown immediately upon entering the screen - here you enter the data you need and search for the relevant data. You can also hide or show this panel by clicking the Find button:
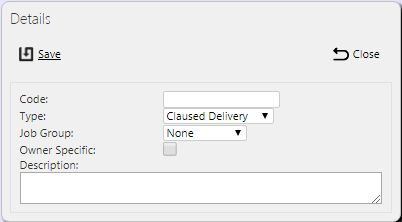
When you need to enter details for new records, you can access this by clicking the New button where provided:
The most common buttons you will find on the system are below:
- Back - this will take you back to the previous screen.
- Find - this opens up the Search panel where you can then enter your search criteria for the relevant screen. When you have entered this, you can click the Search button on this panel to retrieve the data matching the criteria entered.
- New - this opens up the new Record creation panel where you can enter all details required
- Save - this creates a new record with all of the inputted information
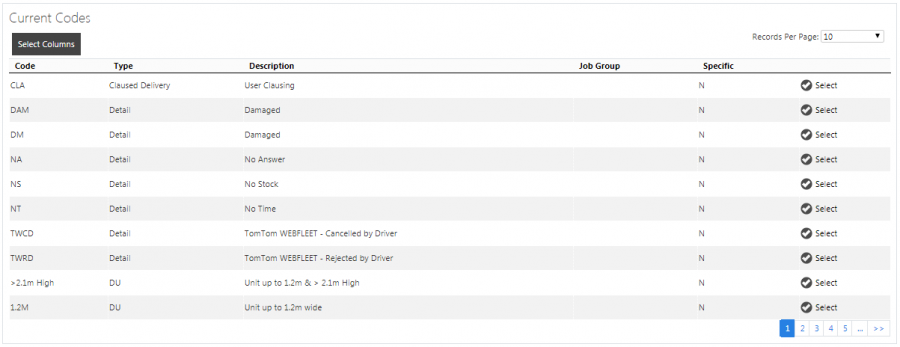
All data found is shown and managed on a results data table. Within this table you can edit, delete and cancel records dependant on your user access status.
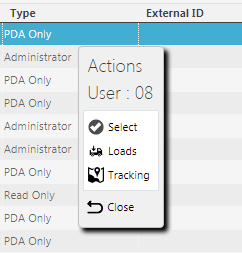
Depending on the configuration of the system, the system may not show you these buttons on the rows themselves. You can access them by clicking on the row of the data table - a popup action window will show all of the available actions. Note that, if all you can do is select the record to edit it, the screen will not show the popup, but will instead immediately display the details of the record.
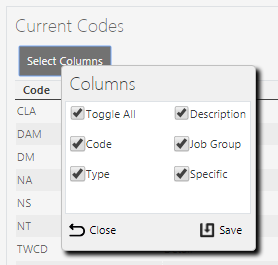
Some screens allow the columns in the results table to be shown or hidden using a Select Columns button. When you press this button, a popup is shown of all the columns that can be selected:
Most screens require that one or more columns are always shown - they may not be hidden and will not be shown on this list.
You can check or un-check the items in the list to show or hide the columns respectively. When you click Save, the changes will be applied to the results table. If you click Close (or anywhere else on the screen behind the pop-up), the columns will not make the changes.
The application will remember your settings for this screen when run from the same browser on the machine.
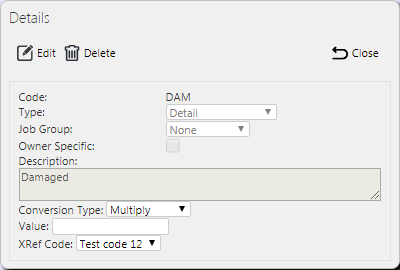
You can modify data by clicking the Select button to access the relevant record:
The screen will show a pop-up of the details, usually with further options of Edit and Delete, along with others specific to that screen.
Using the System
To start the system, point your chosen browser to the provided URL and log in.
