CSV Upload: Difference between revisions
(Formatting changes) |
m (Text replacement - "1000px" to "900px") |
||
| (8 intermediate revisions by the same user not shown) | |||
| Line 1: | Line 1: | ||
{{ #vardefine: Figure | 0 }}{{ #vardefine: Example | 0 }} | {{ #vardefine: Figure | 0 }}{{ #vardefine: Example | 0 }} | ||
== Inbound CSV Upload == | == Inbound CSV Upload == | ||
| Line 104: | Line 103: | ||
The import screen lists the following options: | The import screen lists the following options: | ||
[[File:EPOD- | [[File:EPOD-CSV-UploadExample2.PNG|border|900px]] | ||
{{Xref | {{Xref | ||
|Type=Figure | |Type=Figure | ||
| Line 120: | Line 119: | ||
The upload screen will list the result of the CSV upload, showing the upload information in the additional 'Validation' and 'Reason for Failure' columns: | The upload screen will list the result of the CSV upload, showing the upload information in the additional 'Validation' and 'Reason for Failure' columns: | ||
[[File:EPOD- | [[File:EPOD-CSV-UploadExample2Results.PNG|border|900px]] | ||
{{Xref | {{Xref | ||
|Type=Figure | |Type=Figure | ||
| Line 130: | Line 129: | ||
The details of the Job created can be checked by entering the job details screen and searching for the Job Code. | The details of the Job created can be checked by entering the job details screen and searching for the Job Code. | ||
[[File:EPOD- | [[File:EPOD-CSV-JobExample2.PNG|border|900px]] | ||
{{Xref | {{Xref | ||
|Type=Figure | |Type=Figure | ||
| Line 136: | Line 135: | ||
|Text=Job Details - Uploaded job, load number defaulted.}} | |Text=Job Details - Uploaded job, load number defaulted.}} | ||
{{Note}} | {{Note}} A 'Load Id' was not specified in the upload file. In this case, the system has generated a load number 'YTE-0010844O'. | ||
| Line 142: | Line 141: | ||
It is possible to setup an inbound polling process that will automatically upload files from a certain folder. In the "Export Config" screen within C-ePOD, a record should be defined as follows: | It is possible to setup an inbound polling process that will automatically upload files from a certain folder. In the "Export Config" screen within C-ePOD, a record should be defined as follows: | ||
[[File:EPOD- | [[File:EPOD-CSV-XFConfig1.PNG|border|900px]] | ||
{{Xref | {{Xref | ||
|Type=Figure | |Type=Figure | ||
| Line 163: | Line 162: | ||
Enter the 'Export Audit' screen and search for records created on the current date: | Enter the 'Export Audit' screen and search for records created on the current date: | ||
[[File:EPOD- | [[File:EPOD-CSV-XFAuditExample1.PNG|border|900px]] | ||
{{Xref | {{Xref | ||
|Type=Figure | |Type=Figure | ||
| Line 173: | Line 172: | ||
In order to fix this error, the Customer should be manually created within the C-ePOD system. Enter the Customer Maintenance screen and create a new record for 'J Bloggs': | In order to fix this error, the Customer should be manually created within the C-ePOD system. Enter the Customer Maintenance screen and create a new record for 'J Bloggs': | ||
[[File:EPOD- | [[File:EPOD-CSV-CustomerExample1.PNG|border|900px]] | ||
{{Xref | {{Xref | ||
|Type=Figure | |Type=Figure | ||
| Line 181: | Line 180: | ||
The previous example1.csv file can now be re-uploaded. In order to do this, the file should be moved from the error folder (e.g. C:\Inbound\errors\) back into the upload folder. Once the file has re-processed, check the 'Export Audit' screen again: | The previous example1.csv file can now be re-uploaded. In order to do this, the file should be moved from the error folder (e.g. C:\Inbound\errors\) back into the upload folder. Once the file has re-processed, check the 'Export Audit' screen again: | ||
[[File:EPOD- | [[File:EPOD-CSV-XFAuditExample2.PNG|border|900px]] | ||
{{Xref | {{Xref | ||
|Type=Figure | |Type=Figure | ||
| Line 193: | Line 192: | ||
An extra line can be included at the front of the file to include Header Text for each column. This makes it much easier to create records within Excel or another spreadsheet tool. For this example (example3.csv) we will create a new upload file with a header row and two new job codes: | An extra line can be included at the front of the file to include Header Text for each column. This makes it much easier to create records within Excel or another spreadsheet tool. For this example (example3.csv) we will create a new upload file with a header row and two new job codes: | ||
<code>EPL_LOAD_START_PLANNED_DATE,EPL_LOAD_START_PLANNED_TIME,EPL_LOAD_END_PLANNED_DATE,EPL_LOAD_END_PLANNED_TIME, EPL_USER_ID,EPL_JOB_CODE,EPL_CUST_REF,EPL_JOB_TYPE,EPL_JOB_INSTRUCTION,EPL_START_PLANNED_DATE,EPL_START_PLANNED_TIME, EPL_END_PLANNED_DATE,EPL_END_PLANNED_TIME,EPL_CUSTOMER_NAME,EPL_ADDRESS_1,EPL_ADDRESS_2,EPL_ADDRESS_3,EPL_ADDRESS_4, EPL_ADDRESS_5,EPL_POSTCODE,EPL_CONTACT,EPL_TELEPHONE,EPL_EMAIL,EPL_CONTAINER_ID,EPL_PRODUCT,EPL_DESCRIPTION, EPL_DESCRIPTION_LONG,EPL_PLANNED_QTY,EPL_SITE_ID, EPL_JOB_GROUP,EPL_LOAD_ID, EPL_CUST_CODE | <code>EPL_LOAD_START_PLANNED_DATE, EPL_LOAD_START_PLANNED_TIME, EPL_LOAD_END_PLANNED_DATE, EPL_LOAD_END_PLANNED_TIME, EPL_USER_ID, EPL_JOB_CODE, EPL_CUST_REF, EPL_JOB_TYPE, EPL_JOB_INSTRUCTION, EPL_START_PLANNED_DATE, EPL_START_PLANNED_TIME, EPL_END_PLANNED_DATE, EPL_END_PLANNED_TIME, EPL_CUSTOMER_NAME, EPL_ADDRESS_1, EPL_ADDRESS_2, EPL_ADDRESS_3, EPL_ADDRESS_4, EPL_ADDRESS_5, EPL_POSTCODE, EPL_CONTACT, EPL_TELEPHONE, EPL_EMAIL, EPL_CONTAINER_ID, EPL_PRODUCT, EPL_DESCRIPTION, EPL_DESCRIPTION_LONG, EPL_PLANNED_QTY, EPL_SITE_ID, EPL_JOB_GROUP, EPL_LOAD_ID, EPL_CUST_CODE | ||
</code> | |||
<code> | |||
,,,,,JOBCODE3,CR3,D,,10072014,901,10072014,901,J Smith,1 High Street,Wimbledon,,,London,W12 8TZ,Mr J Smith,01234,[email protected],C3,,,,,TEST,TEST,, | ,,,,,JOBCODE3,CR3,D,,10072014,901,10072014,901,J Smith,1 High Street,Wimbledon,,,London,W12 8TZ,Mr J Smith,01234,[email protected],C3,,,,,TEST,TEST,, | ||
</code> | |||
<code> | |||
,,,,,JOBCODE4,CR4,D,,10072014,901,10072014,901,J Smith,1 High Street,Wimbledon,,,London,W12 8TZ,Mr J Smith,01234,[email protected],C4,,,,,TEST,TEST,, | ,,,,,JOBCODE4,CR4,D,,10072014,901,10072014,901,J Smith,1 High Street,Wimbledon,,,London,W12 8TZ,Mr J Smith,01234,[email protected],C4,,,,,TEST,TEST,, | ||
</code> | </code> | ||
| Line 203: | Line 208: | ||
Browse to this file from the upload screen, this time setting the 'Header Row' as 'Yes': | Browse to this file from the upload screen, this time setting the 'Header Row' as 'Yes': | ||
[[File:EPOD- | [[File:EPOD-CSV-UploadExample3.PNG|border|900px]] | ||
{{Xref | {{Xref | ||
|Type=Figure | |Type=Figure | ||
| Line 211: | Line 216: | ||
Uploading this file using the manual upload screen gives the following result: | Uploading this file using the manual upload screen gives the following result: | ||
[[File:EPOD- | [[File:EPOD-CSV-UploadExample3Results.PNG|border|900px]] | ||
{{Xref | {{Xref | ||
|Type=Figure | |Type=Figure | ||
| Line 222: | Line 227: | ||
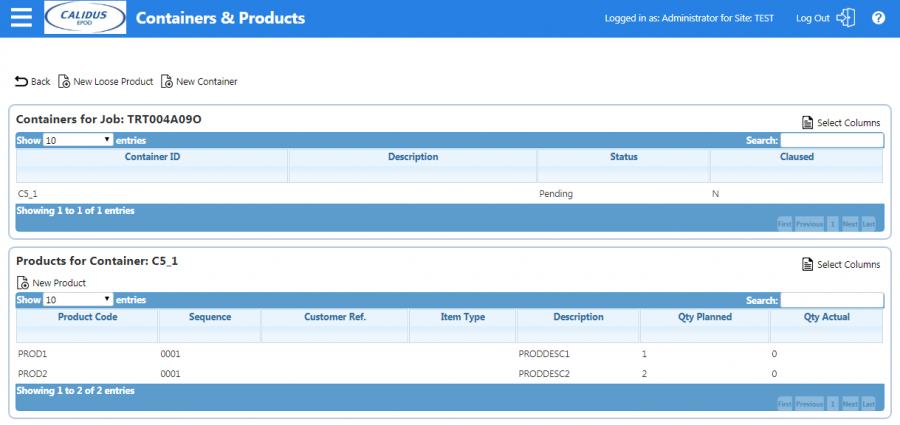
For the jobs created so far, product details have not been included. If we examine the Job with Job Code 'JOBCODE1', we can see that a job was created with a container with Id 'C1' but the container does not have any corresponding products: | For the jobs created so far, product details have not been included. If we examine the Job with Job Code 'JOBCODE1', we can see that a job was created with a container with Id 'C1' but the container does not have any corresponding products: | ||
[[File:EPOD- | [[File:EPOD-CSV-ProductsExample1.PNG|border|900px]] | ||
{{Xref | {{Xref | ||
|Type=Figure | |Type=Figure | ||
| Line 232: | Line 237: | ||
<code> | <code> | ||
,,,,,JOBCODE5,CR5,D,,10072014,901,10072014,901,J Smith,1 High Street,Wimbledon,,,London,W12 8TZ,Mr J Smith,01234,[email protected],C5_1,PROD1,PRODDESC1,LONGDESC1,1,TEST,TEST,, | ,,,,,JOBCODE5,CR5,D,,10072014,901,10072014,901,J Smith,1 High Street,Wimbledon,,,London,W12 8TZ,Mr J Smith,01234,[email protected],C5_1,PROD1,PRODDESC1,LONGDESC1,1,TEST,TEST,, | ||
</code> | |||
<code> | |||
,,,,,JOBCODE5,CR5,D,,10072014,901,10072014,901,J Smith,1 High Street,Wimbledon,,,London,W12 8TZ,Mr J Smith,01234,[email protected],C5_1,PROD2,PRODDESC2,LONGDESC2,2,TEST,TEST,, | ,,,,,JOBCODE5,CR5,D,,10072014,901,10072014,901,J Smith,1 High Street,Wimbledon,,,London,W12 8TZ,Mr J Smith,01234,[email protected],C5_1,PROD2,PRODDESC2,LONGDESC2,2,TEST,TEST,, | ||
</code> | </code> | ||
| Line 238: | Line 246: | ||
|Text=Single Job, Single Container, Multiple Products.}} | |Text=Single Job, Single Container, Multiple Products.}} | ||
[[File:EPOD- | [[File:EPOD-CSV-UploadExample4Results.PNG|border|900px]] | ||
{{Xref | {{Xref | ||
|Type=Figure | |Type=Figure | ||
| Line 246: | Line 254: | ||
Check the Job created in the 'Job Details' screen: | Check the Job created in the 'Job Details' screen: | ||
[[File:EPOD- | [[File:EPOD-CSV-JobExample4.PNG|border|900px]] | ||
{{Xref | {{Xref | ||
|Type=Figure | |Type=Figure | ||
| Line 252: | Line 260: | ||
|Text=Job Details - Uploaded Job.}} | |Text=Job Details - Uploaded Job.}} | ||
[[File:EPOD- | [[File:EPOD-CSV-ProductsExample4.PNG|border|900px]] | ||
{{Xref | {{Xref | ||
|Type=Figure | |Type=Figure | ||
| Line 272: | Line 280: | ||
Uploading the file and check the load created: | Uploading the file and check the load created: | ||
[[File:EPOD- | [[File:EPOD-CSV-UploadExample5Results.PNG|border|900px]] | ||
{{Xref | {{Xref | ||
|Type=Figure | |Type=Figure | ||
| Line 281: | Line 289: | ||
This time the load has been created with status 'Assigned' with the user set as 'User1': | This time the load has been created with status 'Assigned' with the user set as 'User1': | ||
[[File:EPOD- | [[File:EPOD-CSV-LoadExample5.PNG|border|900px]] | ||
{{Xref | {{Xref | ||
|Type=Figure | |Type=Figure | ||
| Line 289: | Line 297: | ||
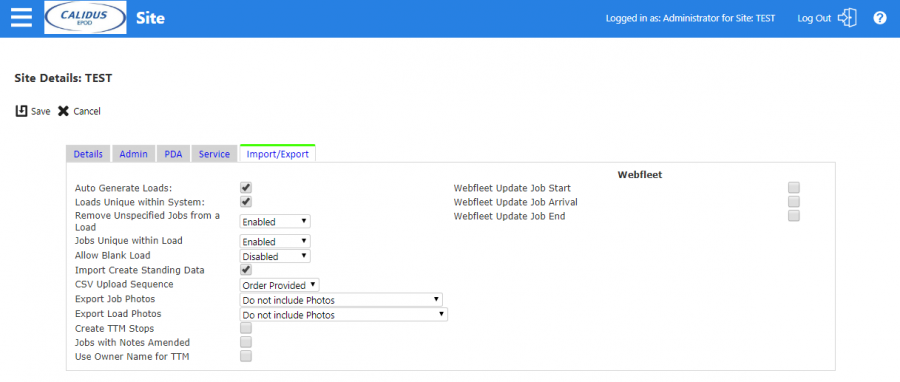
{{Note}} The site parameter 'Import Create Standing Data' has to be checked in order for new users to be created: | {{Note}} The site parameter 'Import Create Standing Data' has to be checked in order for new users to be created: | ||
[[File:EPOD-Site1.PNG|border]] | [[File:EPOD-CSV-Site1.PNG|border|900px]] | ||
{{Xref | {{Xref | ||
|Type=Figure | |Type=Figure | ||
| Line 301: | Line 309: | ||
<code> | <code> | ||
,,,,User1,JOBCODE7,CR7,D,,10072014,901,10072014,901,J Smith,1 High Street,Wimbledon,,,London,W12 8TZ,Mr J Smith,01234,[email protected],C7,,,,,TEST,TEST,, | ,,,,User1,JOBCODE7,CR7,D,,10072014,901,10072014,901,J Smith,1 High Street,Wimbledon,,,London,W12 8TZ,Mr J Smith,01234,[email protected],C7,,,,,TEST,TEST,, | ||
</code> | |||
<code> | |||
,,,,User2,JOBCODE8,CR8,D,,10072014,901,10072014,901,J Smith,1 High Street,Wimbledon,,,London,W12 8TZ,Mr J Smith,01234,[email protected],C8,,,,,TEST,TEST,, | ,,,,User2,JOBCODE8,CR8,D,,10072014,901,10072014,901,J Smith,1 High Street,Wimbledon,,,London,W12 8TZ,Mr J Smith,01234,[email protected],C8,,,,,TEST,TEST,, | ||
</code> | </code> | ||
| Line 309: | Line 320: | ||
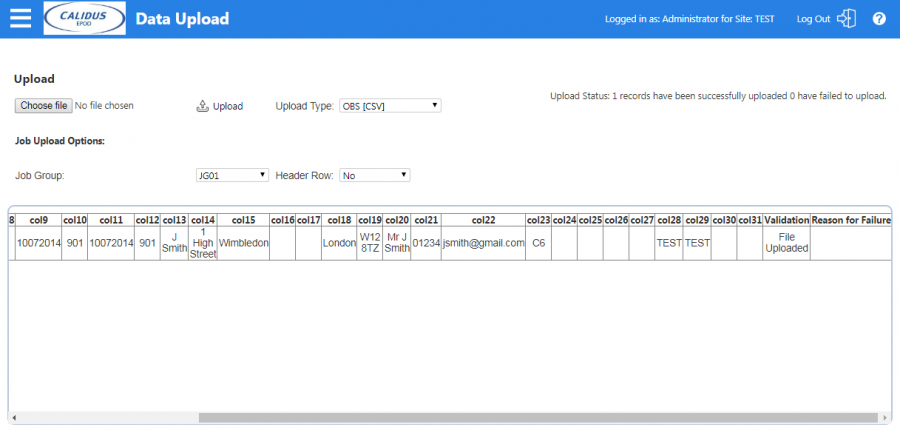
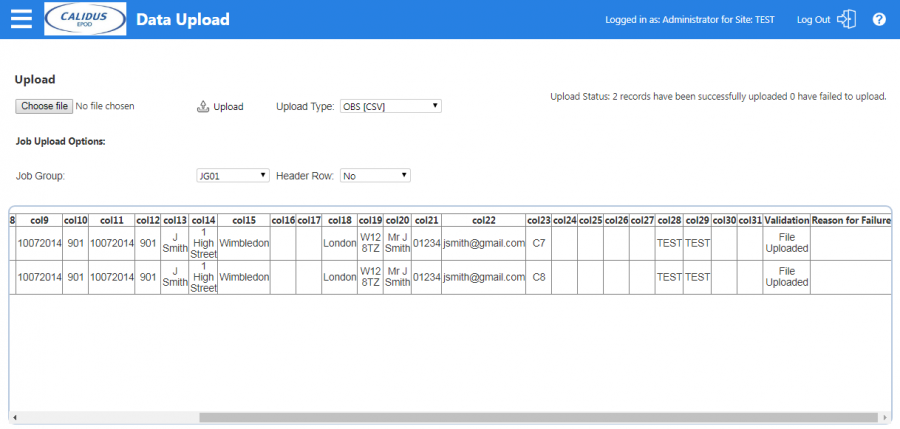
Uploading this file results in two separate loads being created: | Uploading this file results in two separate loads being created: | ||
[[File:EPOD- | [[File:EPOD-CSV-UploadExample6Results.PNG|border|900px]] | ||
{{Xref | {{Xref | ||
|Type=Figure | |Type=Figure | ||
| Line 315: | Line 326: | ||
|Text=Data Upload - Validation.}} | |Text=Data Upload - Validation.}} | ||
[[File:EPOD- | [[File:EPOD-CSV-JobExample6.PNG|border|900px]] | ||
{{Xref | {{Xref | ||
|Type=Figure | |Type=Figure | ||
| Line 321: | Line 332: | ||
|Text=Job Details - Load One.}} | |Text=Job Details - Load One.}} | ||
[[File:EPOD- | [[File:EPOD-CSV-JobExample6_2.PNG|border|900px]] | ||
{{Xref | {{Xref | ||
|Type=Figure | |Type=Figure | ||
| Line 340: | Line 351: | ||
|Text=Single Job, Updating Customer Reference information.}} | |Text=Single Job, Updating Customer Reference information.}} | ||
[[File:EPOD- | [[File:EPOD-CSV-UploadExample7Results.PNG|border|900px]] | ||
{{Xref | {{Xref | ||
|Type=Figure | |Type=Figure | ||
| Line 346: | Line 357: | ||
|Text=Data Upload - Validation.}} | |Text=Data Upload - Validation.}} | ||
[[File:EPOD- | [[File:EPOD-CSV-JobExample7.PNG|border|900px]] | ||
{{Xref | {{Xref | ||
|Type=Figure | |Type=Figure | ||
|Num={{ #vardefineecho: Figure| {{ #expr: {{ #var: Figure}} + 1 }} }} | |Num={{ #vardefineecho: Figure| {{ #expr: {{ #var: Figure}} + 1 }} }} | ||
|Text=Job Details - Updated Information.}} | |Text=Job Details - Updated Information.}} | ||
=== Moving Jobs to a new load === | === Moving Jobs to a new load === | ||
| Line 359: | Line 371: | ||
<code> | <code> | ||
,,,,User1,JOBCODE9,CR9,D,,10072014,901,10072014,901,J Smith,1 High Street,Wimbledon,,,London,W12 8TZ,Mr J Smith,01234,[email protected],C9,,,,,TEST,TEST,Load1, | ,,,,User1,JOBCODE9,CR9,D,,10072014,901,10072014,901,J Smith,1 High Street,Wimbledon,,,London,W12 8TZ,Mr J Smith,01234,[email protected],C9,,,,,TEST,TEST,Load1, | ||
</code> | |||
<code> | |||
,,,,User1,JOBCODE10,CR10,D,,10072014,901,10072014,901,J Smith,1 High Street,Wimbledon,,,London,W12 8TZ,Mr J Smith,01234,[email protected],C10,,,,,TEST,TEST,Load1, | ,,,,User1,JOBCODE10,CR10,D,,10072014,901,10072014,901,J Smith,1 High Street,Wimbledon,,,London,W12 8TZ,Mr J Smith,01234,[email protected],C10,,,,,TEST,TEST,Load1, | ||
</code> | |||
<code> | |||
,,,,User1,JOBCODE11,CR11,D,,10072014,901,10072014,901,J Smith,1 High Street,Wimbledon,,,London,W12 8TZ,Mr J Smith,01234,[email protected],C11,,,,,TEST,TEST,Load1, | ,,,,User1,JOBCODE11,CR11,D,,10072014,901,10072014,901,J Smith,1 High Street,Wimbledon,,,London,W12 8TZ,Mr J Smith,01234,[email protected],C11,,,,,TEST,TEST,Load1, | ||
</code> | </code> | ||
| Line 366: | Line 384: | ||
|Text=Three Jobs, Single Load.}} | |Text=Three Jobs, Single Load.}} | ||
[[File:EPOD- | [[File:EPOD-CSV-UploadExample8Results.PNG|border|900px]] | ||
{{Xref | {{Xref | ||
|Type=Figure | |Type=Figure | ||
| Line 372: | Line 390: | ||
|Text=Data Upload - Validation.}} | |Text=Data Upload - Validation.}} | ||
[[File:EPOD- | [[File:EPOD-CSV-JobExample8.PNG|border|900px]] | ||
{{Xref | {{Xref | ||
|Type=Figure | |Type=Figure | ||
| Line 387: | Line 405: | ||
|Text=Existing Job, New User, New Load.}} | |Text=Existing Job, New User, New Load.}} | ||
[[File:EPOD- | [[File:EPOD-CSV-UploadExample9Results.PNG|border|900px]] | ||
{{Xref | {{Xref | ||
|Type=Figure | |Type=Figure | ||
| Line 395: | Line 413: | ||
Job code 'JOBCODE10' is now assigned to 'Load2': | Job code 'JOBCODE10' is now assigned to 'Load2': | ||
[[File:EPOD- | [[File:EPOD-CSV-JobExample9.PNG|border|900px]] | ||
{{Xref | {{Xref | ||
|Type=Figure | |Type=Figure | ||
| Line 403: | Line 421: | ||
'Load 1' now consists of only two jobs: | 'Load 1' now consists of only two jobs: | ||
[[File:EPOD- | [[File:EPOD-CSV-JobExample2.PNG|border|900px]] | ||
{{Xref | {{Xref | ||
|Type=Figure | |Type=Figure | ||
| Line 417: | Line 435: | ||
Within the Site Maintenance screen, in the Admin tab there is a 'CSV Upload Sequence' list: | Within the Site Maintenance screen, in the Admin tab there is a 'CSV Upload Sequence' list: | ||
[[File:EPOD-Site5.PNG|border]] | [[File:EPOD-Site5.PNG|border||900px]] | ||
{{Xref | {{Xref | ||
|Type=Figure | |Type=Figure | ||
| Line 426: | Line 444: | ||
The value 'Order Provided' will cause the jobs to be added in the sequence they are included in the file. | The value 'Order Provided' will cause the jobs to be added in the sequence they are included in the file. | ||
<noinclude> | |||
== Example Files == | |||
The following list links to the example files used in this user guide. | |||
* [[file:example1.csv]] | |||
* [[file:example2.csv]] | |||
* [[file:example3.csv]] | |||
* [[file:example4.csv]] | |||
* [[file:example5.csv]] | |||
* [[file:example6.csv]] | |||
* [[file:example7.csv]] | |||
* [[file:example8.csv]] | |||
* [[file:example9.csv]] | |||
</noinclude> | |||
Latest revision as of 12:29, 4 March 2020
Inbound CSV Upload
The inbound CSV Upload file format is specified below and can be created with the following fields:
| Col No. | Sheet Col. | Field | Type | Max Length | Example | Required |
|---|---|---|---|---|---|---|
| 1 | A | Load Delivery Date | Date | 8 digits (DDMMYYYY) | 10072014 | N |
| 2 | B | Load Delivery Time | Time | 4 digits (HHMM) | 1001 | N |
| 3 | C | End Delivery Date | Date | 8 digits (DDMMYYYY) | 10072014 | N |
| 4 | D | End Delivery Time | Time | 4 digits (HHMM) | 1759 | N |
| 5 | E | User Id | Character | 10 | JSmith | N |
| 6 | F | Job Code | Character | 20 | JOBCODE1 | Y |
| 7 | G | Cust Ref | Character | 30 | CR1 | Y |
| 8 | H | Job Type | Character | 2 | D | Y |
| 9 | I | Job Instruction | Character | 255 | Leave Next Door | N |
| 10 | J | Job Delivery Date | Date | 8 digits (DDMMYYYY) | 10072014 | Y |
| 11 | K | Job Delivery Time | Time | 4 digits (HHMM) | 1001 | Y |
| 12 | L | Job End Delivery Date | Date | 8 digits (DDMMYYYY) | 10072014 | Y |
| 13 | M | Job End Delivery Time | Time | 4 digits (HHMM) | 1031 | Y |
| 14 | N | Customer Name | Character | 50 | J Bloggs | Y |
| 15 | O | Address 1 | Character | 40 | 1 High Street | Y |
| 16 | P | Address 2 | Character | 40 | Trumpton | N |
| 17 | Q | Address 3 | Character | 40 | Lincoln | N |
| 18 | R | Address 4 | Character | 40 | Lincolnshire | N |
| 19 | S | Address 5 | Character | 40 | N | |
| 20 | T | Postcode | Character | 8 | L23 4hg | Y |
| 21 | U | Contact | Character | 40 | J Bloggs | N |
| 22 | V | Telephone | Character | 50 | 01234 34567 | N |
| 23 | W | Character | 255 | [email protected] | N | |
| 24 | X | Container Id | Character | 30 | C1 | Y |
| 25 | Y | Product Id | Character | 40 | P1 | N |
| 26 | Z | Product Description | Character | 40 | Prod 1 | N |
| 27 | AA | Long Prod Description | Character | 255 | Long Prod 1 | N |
| 28 | AB | Planned Qty | Character | Max value: 2147483647 | 1 | N |
| 29 | AC | Site | Character | 10 | Site1 | Y |
| 30 | AD | Job Group | Character | 10 | Group1 | Y |
| 31 | AE | Load Id | Character | 20 | LOAD1 | N |
| 32 | AF | Cust Code | Character | 20 | CUST CODE1 | N |
| 33 | AG | Vehicle Id | Character | 10 | VEH1 | N |
Files can be created using Excel or another spreadsheet and saved as CSV format.
For example a simple 1 line upload could be created as follows:
,,,,,JOBCODE1,CR1,D,,10072014,901,10072014,901,J Bloggs,,,,,,,,,,C1,,,,,TEST,TEST,,
Example 1: Single Job, Single Container.
These examples can be pasted into Notepad and then 'saved as' a .csv file by specifying a .csv extension (e.g. example1.csv).
Uploading this would create a Job with 'JOBCODE1' for customer 'J Bloggs' with a single container record. Note: this assumes that the customer 'J Bloggs' already exists on the C-ePOD database.
An example of an upload for a customer that does not exist would be as follows:
,,,,,JOBCODE2,CR2,D,,10072014,901,10072014,901,J Smith,1 High Street,Wimbledon,,,London,W12 8TZ,Mr J Smith,01234,[email protected],C1,,,,,TEST,TEST,,
Example 2: Single Container, Customer Information.
This could be saved as example2.csv.
Upload via Import screen
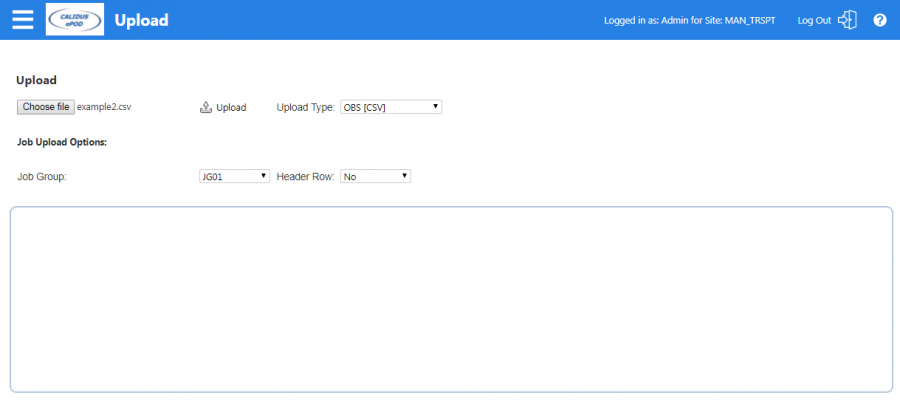
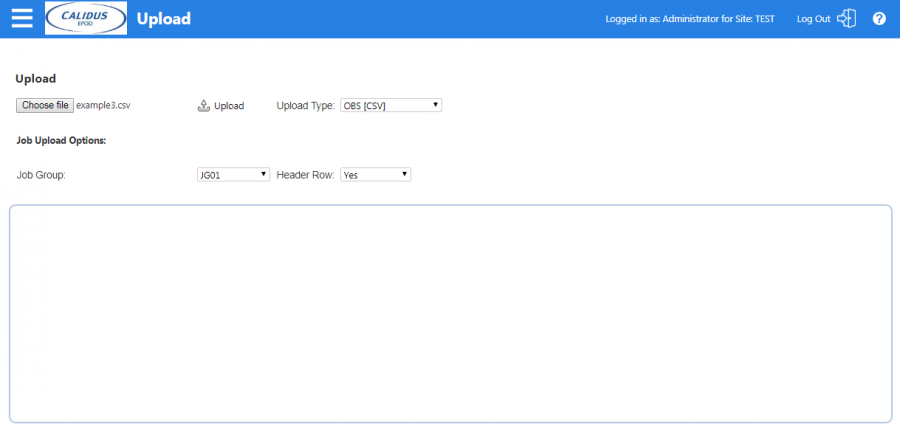
The import screen lists the following options:
Figure 1: Data Upload - Import screen.
- Job Group: Sets the Job Group the jobs are to be created for. Job Group is a method of separating Jobs for the same site.
- Upload Type: Should be set to 'OBS [CSV]'.
- Header Row: Should be set to 'Yes' if the first row of the CSV file contains a header row. The above examples do not so for these this value should be set to 'No'.
Once these values are set, click the 'Choose File' button and browse to the relevant folder for the file (e.g. example2.csv). Once it has been found, click 'Upload' to upload the data onto C-ePOD.
Validating Upload
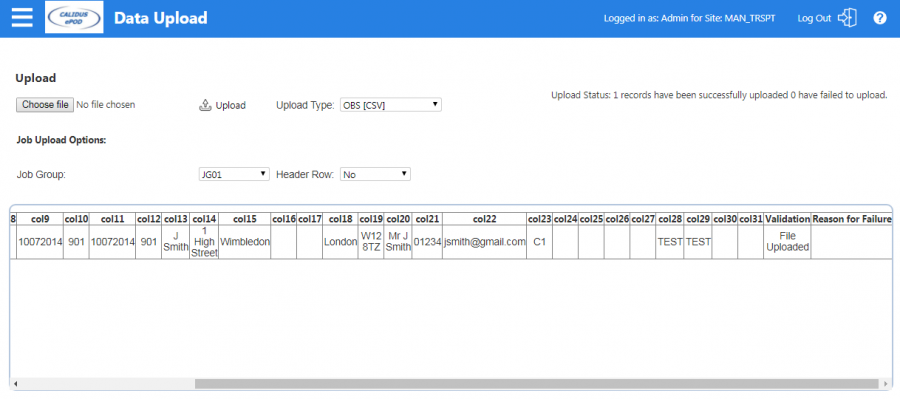
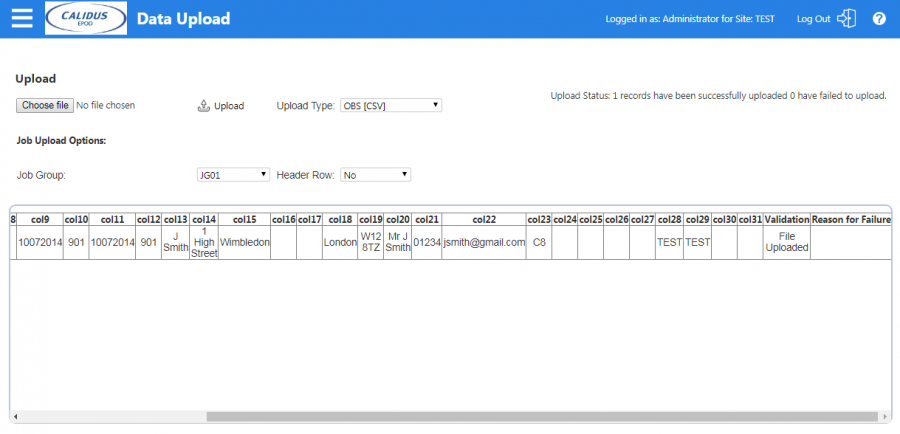
The upload screen will list the result of the CSV upload, showing the upload information in the additional 'Validation' and 'Reason for Failure' columns:
Figure 2: Data Upload - Validation.
In this case, there was only one record to upload and the Validation field indicates the record was successfully uploaded.
The details of the Job created can be checked by entering the job details screen and searching for the Job Code.
Figure 3: Job Details - Uploaded job, load number defaulted.
![]() Note: A 'Load Id' was not specified in the upload file. In this case, the system has generated a load number 'YTE-0010844O'.
Note: A 'Load Id' was not specified in the upload file. In this case, the system has generated a load number 'YTE-0010844O'.
Automatic Upload
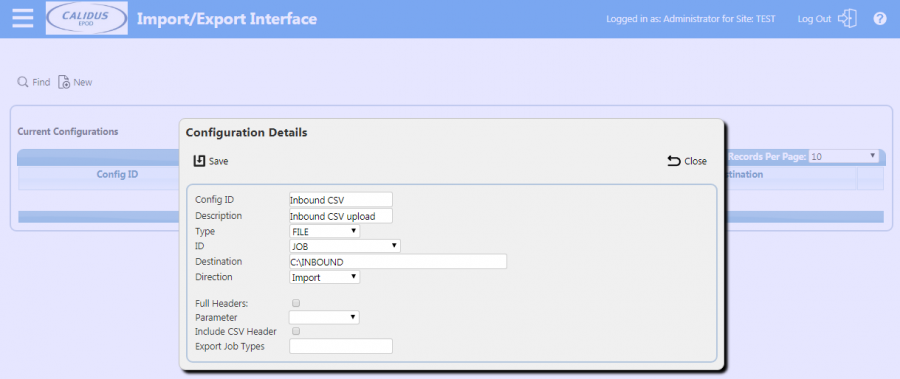
It is possible to setup an inbound polling process that will automatically upload files from a certain folder. In the "Export Config" screen within C-ePOD, a record should be defined as follows:
Figure 4: Export Configuration - Configuration Details.
- Config ID: Inbound CSV
- Description: Inbound CSV Upload
- Type: FILE
- ID: JOB
- Destination: Upload Folder (C:\Inbound in this example)
- Direction: I (Inbound)
This indicates that files copied to the 'C:\Inbound' folder on the server which C-ePOD is running will be uploaded automatically into C-ePOD. ![]() Note: Some additional configuration is required to schedule an inbound polling job which picks up this configuration.
Note: Some additional configuration is required to schedule an inbound polling job which picks up this configuration.
Validating Upload
For example, if we copy the example1.csv file mentioned above into the C:\Inbound folder.
Enter the 'Export Audit' screen and search for records created on the current date:
Figure 5: Export Audit - Verify upload.
In this example, the description field indicates that the record could not be uploaded. This is due to the fact that for the data listed above for example1 does not contain customer address details.
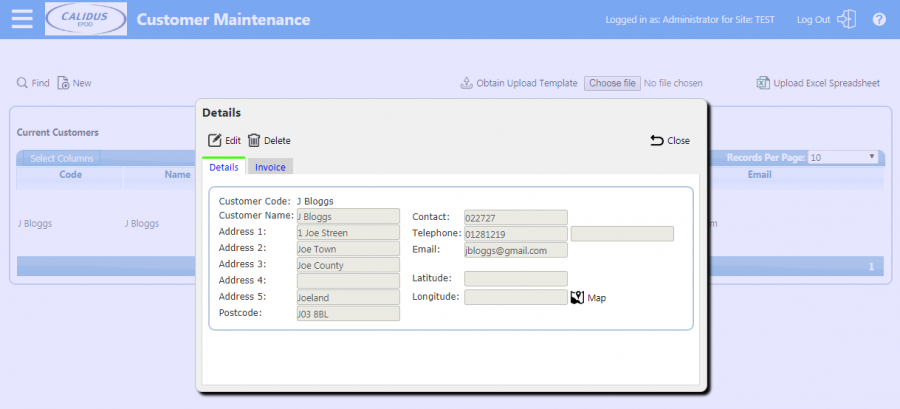
In order to fix this error, the Customer should be manually created within the C-ePOD system. Enter the Customer Maintenance screen and create a new record for 'J Bloggs':
Figure 6: Customer Maintenance - New Customer.
The previous example1.csv file can now be re-uploaded. In order to do this, the file should be moved from the error folder (e.g. C:\Inbound\errors\) back into the upload folder. Once the file has re-processed, check the 'Export Audit' screen again:
Figure 7: Export Audit - Verify upload.
The Description field of 'Uploaded' on the last line indicates that the job was successfully created.
Import File Examples
Including a Header Record
An extra line can be included at the front of the file to include Header Text for each column. This makes it much easier to create records within Excel or another spreadsheet tool. For this example (example3.csv) we will create a new upload file with a header row and two new job codes:
EPL_LOAD_START_PLANNED_DATE, EPL_LOAD_START_PLANNED_TIME, EPL_LOAD_END_PLANNED_DATE, EPL_LOAD_END_PLANNED_TIME, EPL_USER_ID, EPL_JOB_CODE, EPL_CUST_REF, EPL_JOB_TYPE, EPL_JOB_INSTRUCTION, EPL_START_PLANNED_DATE, EPL_START_PLANNED_TIME, EPL_END_PLANNED_DATE, EPL_END_PLANNED_TIME, EPL_CUSTOMER_NAME, EPL_ADDRESS_1, EPL_ADDRESS_2, EPL_ADDRESS_3, EPL_ADDRESS_4, EPL_ADDRESS_5, EPL_POSTCODE, EPL_CONTACT, EPL_TELEPHONE, EPL_EMAIL, EPL_CONTAINER_ID, EPL_PRODUCT, EPL_DESCRIPTION, EPL_DESCRIPTION_LONG, EPL_PLANNED_QTY, EPL_SITE_ID, EPL_JOB_GROUP, EPL_LOAD_ID, EPL_CUST_CODE
,,,,,JOBCODE3,CR3,D,,10072014,901,10072014,901,J Smith,1 High Street,Wimbledon,,,London,W12 8TZ,Mr J Smith,01234,[email protected],C3,,,,,TEST,TEST,,
,,,,,JOBCODE4,CR4,D,,10072014,901,10072014,901,J Smith,1 High Street,Wimbledon,,,London,W12 8TZ,Mr J Smith,01234,[email protected],C4,,,,,TEST,TEST,,
Example 3: Two Jobs for Single Containers with Customer Information and Header Row.
Browse to this file from the upload screen, this time setting the 'Header Row' as 'Yes':
Figure 8: Data Upload - Import screen.
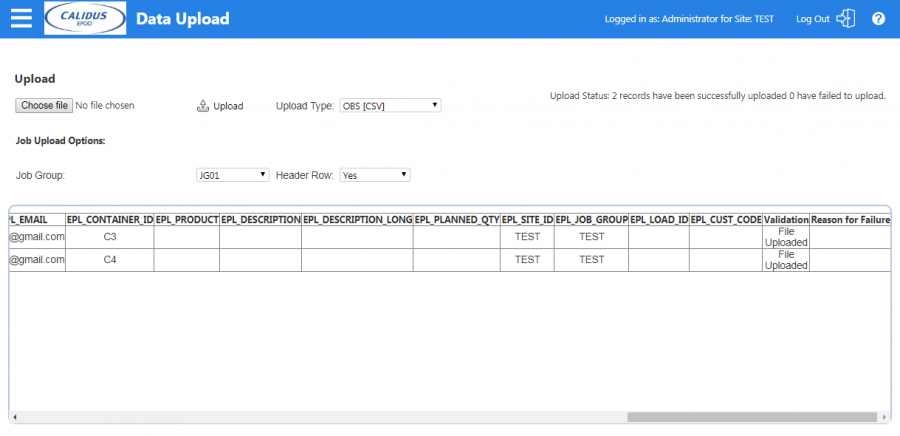
Uploading this file using the manual upload screen gives the following result:
Figure 9: Data Upload - Validation.
This shows both records were successfully created.
Creating New Products
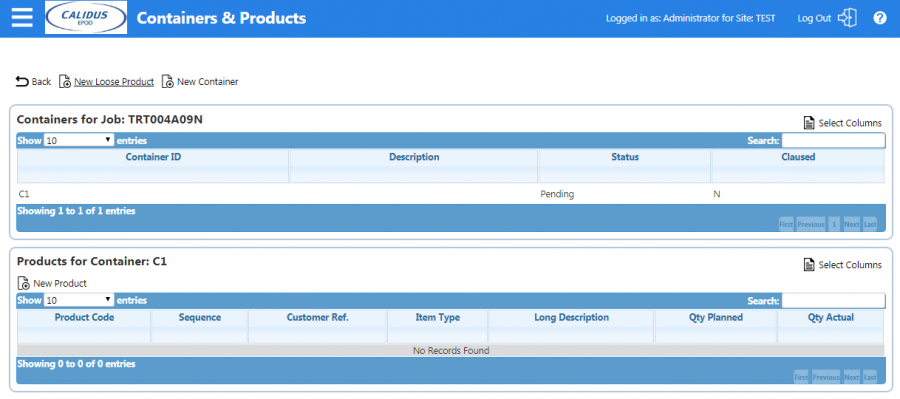
For the jobs created so far, product details have not been included. If we examine the Job with Job Code 'JOBCODE1', we can see that a job was created with a container with Id 'C1' but the container does not have any corresponding products:
Figure 10: Data Upload - Import screen.
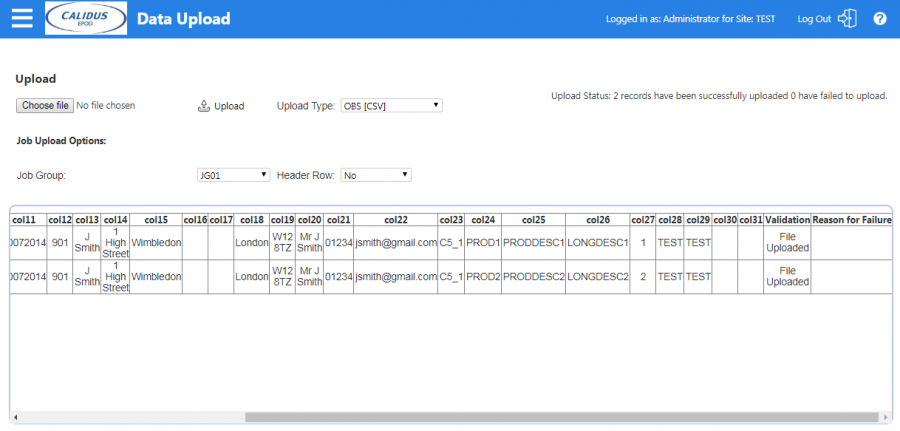
If more details are required to be stored against each job, then it is possible to create product records for each container. This example will create a job with one container and 2 product codes:
,,,,,JOBCODE5,CR5,D,,10072014,901,10072014,901,J Smith,1 High Street,Wimbledon,,,London,W12 8TZ,Mr J Smith,01234,[email protected],C5_1,PROD1,PRODDESC1,LONGDESC1,1,TEST,TEST,,
,,,,,JOBCODE5,CR5,D,,10072014,901,10072014,901,J Smith,1 High Street,Wimbledon,,,London,W12 8TZ,Mr J Smith,01234,[email protected],C5_1,PROD2,PRODDESC2,LONGDESC2,2,TEST,TEST,,
Example 4: Single Job, Single Container, Multiple Products.
Figure 11: Data Upload - Validation.
Check the Job created in the 'Job Details' screen:
Figure 12: Job Details - Uploaded Job.
Figure 13: Job Details - Container and Product Details.
This shows the two product records that were created.
Assigning to Users
For the examples we have created so far, the User Id has not been specified. This means the Loads created have been set at status 'Pending'. In reality, the load may already have been assigned a driver for delivery. This example shows a Job that has a user 'User1' already assigned to it:
,,,,User1,JOBCODE6,CR6,D,,10072014,901,10072014,901,J Smith,1 High Street,Wimbledon,,,London,W12 8TZ,Mr J Smith,01234,[email protected],C6,,,,,TEST,TEST,,
Example 5: Single Job, Single Container, assigned to user.
Uploading the file and check the load created:
Figure 14: Data Upload - Validation.
This time the load has been created with status 'Assigned' with the user set as 'User1':
Figure 15: Loads Screen - User assigned.
![]() Note: The site parameter 'Import Create Standing Data' has to be checked in order for new users to be created:
Note: The site parameter 'Import Create Standing Data' has to be checked in order for new users to be created:
Figure 16: Site Maintenance - Import Create Standing Data.
Multiple Loads
For the example so far, a single load has been created for each upload. If two different usernames are included, then two separate Load Ids will be generated:
,,,,User1,JOBCODE7,CR7,D,,10072014,901,10072014,901,J Smith,1 High Street,Wimbledon,,,London,W12 8TZ,Mr J Smith,01234,[email protected],C7,,,,,TEST,TEST,,
,,,,User2,JOBCODE8,CR8,D,,10072014,901,10072014,901,J Smith,1 High Street,Wimbledon,,,London,W12 8TZ,Mr J Smith,01234,[email protected],C8,,,,,TEST,TEST,,
Example 6: Two Jobs, Two Users, two separate Loads.
Uploading this file results in two separate loads being created:
Figure 17: Data Upload - Validation.
Figure 18: Job Details - Load One.
Figure 19: Job Details - Load Two.
Modifying and Re-uploading loads
If a job is at status 'Pending' or 'Assigned' then it is possible to modify the details of that job by uploading another file.
For example the Customer Reference field could be modified for 'JOBCODE8' from the original 'CR8' to 'CR8v2' using the data below:
,,,,User2,JOBCODE8,CR8v2,D,,10072014,901,10072014,901,J Smith,1 High Street,Wimbledon,,,London,W12 8TZ,Mr J Smith,01234,[email protected],C8,,,,,TEST,TEST,,
Example 7: Single Job, Updating Customer Reference information.
Figure 20: Data Upload - Validation.
Figure 21: Job Details - Updated Information.
Moving Jobs to a new load
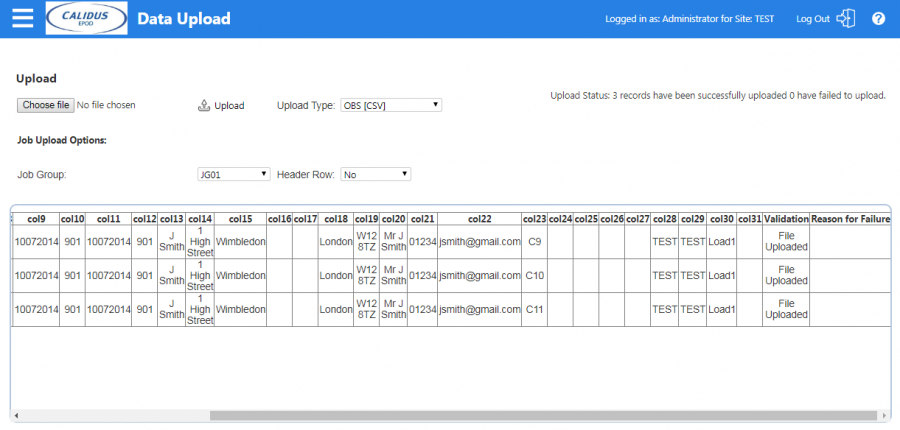
It is possible to swap a Job from one Load to another Load by changing the user and load data. In order to do this, we have to specify the load id the jobs will belong to.
Firstly, we create a new load with three jobs by assigning them all to the same load 'LOAD1':
,,,,User1,JOBCODE9,CR9,D,,10072014,901,10072014,901,J Smith,1 High Street,Wimbledon,,,London,W12 8TZ,Mr J Smith,01234,[email protected],C9,,,,,TEST,TEST,Load1,
,,,,User1,JOBCODE10,CR10,D,,10072014,901,10072014,901,J Smith,1 High Street,Wimbledon,,,London,W12 8TZ,Mr J Smith,01234,[email protected],C10,,,,,TEST,TEST,Load1,
,,,,User1,JOBCODE11,CR11,D,,10072014,901,10072014,901,J Smith,1 High Street,Wimbledon,,,London,W12 8TZ,Mr J Smith,01234,[email protected],C11,,,,,TEST,TEST,Load1,
Example 8: Three Jobs, Single Load.
Figure 22: Data Upload - Validation.
Figure 23: Job Details - Load One.
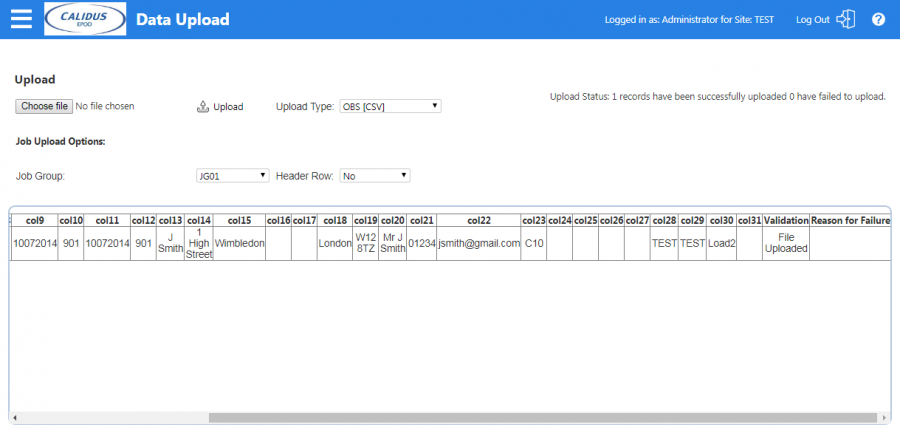
Then if we change the load of one of the records and re-upload it, the record will be moved to a different load:
,,,,User2,JOBCODE10,CR10,D,,10072014,901,10072014,901,J Smith,1 High Street,Wimbledon,,,London,W12 8TZ,Mr J Smith,01234,[email protected],C10,,,,,TEST,TEST,Load2,
Example 9: Existing Job, New User, New Load.
Figure 24: Data Upload - Validation.
Job code 'JOBCODE10' is now assigned to 'Load2':
Figure 25: Job Details - Load2.
'Load 1' now consists of only two jobs:
Figure 26: Job Details - Load1.
Note that a job that is added to an existing load will be added with the highest sequence number, so that job will be the last job to be processed on the device.
Sequencing Jobs on a new load
If multiple jobs are added to a load, the sequence the jobs appear on the device can be determined by setting a Site level parameter.
Within the Site Maintenance screen, in the Admin tab there is a 'CSV Upload Sequence' list:
Figure 27: Site Maintenance - CSV Upload Sequence setting.
The value 'Default' will cause the jobs to be added in the order of the Load Planned Start Date/Time passed in, e.g. columns 1 and 2.
The value 'Order Provided' will cause the jobs to be added in the sequence they are included in the file.
Example Files
The following list links to the example files used in this user guide.
