Jobs: Difference between revisions
(Updated with latest screen layout) |
No edit summary |
||
| Line 17: | Line 17: | ||
* Job Code | * Job Code | ||
* Planned Date | * Planned Date | ||
* Hours until SLA Breached | |||
* Actual Date | * Actual Date | ||
* Job Status | * Job Status | ||
| Line 35: | Line 36: | ||
A single line is displayed per Job found. | A single line is displayed per Job found. | ||
A '''Cancel''' button against each line allows the user to set the status of the specific job to Cancelled. | |||
A '''Details''' button against each line allows the user to see the details of the specific job: | A '''Details''' button against each line allows the user to see the details of the specific job: | ||
| Line 41: | Line 43: | ||
The Job can be assigned to or deassigned from a load from here, by changing the Load ID against the Job - click '''Select''' then '''Edit''' against the line to be assigned and change the User against the load in the provided Pop-up screen. | The Job can be assigned to or deassigned from a load from here, by changing the Load ID against the Job - click '''Select''' then '''Edit''' against the line to be assigned and change the User against the load in the provided Pop-up screen. | ||
[[File:EPOD-Job3.PNG|600px|border]] | |||
{{Note}} Only jobs with a customer with (at least) a post code can be assigned, and only to Loads that are not in progress. | {{Note}} Only jobs with a customer with (at least) a post code can be assigned, and only to Loads that are not in progress. | ||
| Line 48: | Line 52: | ||
A '''Delete''' button is provided in this pop-up, if the Load the job is associated to is not in progress. When clicked, this will delete the job. | A '''Delete''' button is provided in this pop-up, if the Load the job is associated to is not in progress. When clicked, this will delete the job. | ||
If the user has found jobs by drilling down through a Load, jobs can be assigned to this load in bulk - click the Assign button on the header and a grid will be displayed of all Pending jobs - simply check the jobs that are to be assigned, then click '''Assign'''. | |||
[[File:EPOD- | [[File:EPOD-Job4.PNG|600px|border]] | ||
If the job is complete, the user can print the [[POD]] from here in the site format by clicking the '''Report''' button against each Job line in the grid at this status. | If the job is complete, the user can print the [[POD]] from here in the site format by clicking the '''Report''' button against each Job line in the grid at this status. | ||
A '''Link''' button is provided in the header of this pop-up, to allow the user to specify a job that in linked to this one (for example, the delivery job associated with a collection job). | |||
[[File:EPOD- | The screen allows the user to create a new Job, by pressing the provided "New" button at the top of the screen. | ||
The user can enter all the details below except the Job ID, which will be generated for them, and Site ID which will be defaulted. | |||
[[File:EPOD-Job5.PNG|600px|border]] | |||
The user can select a customer from a list or choose to create a new customer. If a new customer is selected, the customer maintenance screen will be called to generate the customer code. The screen will then return to this screen with the customer populated and the address displayed. | |||
If no customer is specified, or | If no customer is specified, or there is a different delivery address for this job, a Job address may be entered here. | ||
Instructions against the Job or Back Office can be entered using the tabbed display. | Instructions against the Job or Back Office can be entered using the tabbed display. | ||
Revision as of 14:10, 16 October 2014
The Job Details screen shows the Jobs associated to the Load. Jobs can be created, edited or deleted, if the user is a full admin user.
This screen is common to all job types (Services, Deliveries or Collections).
The data displayed is only that for the user’s default site.
When this screen is called from the Load screen, the screen displays a grid of all Jobs that are assigned to the specific Load. Data is not be allowed to be filtered.
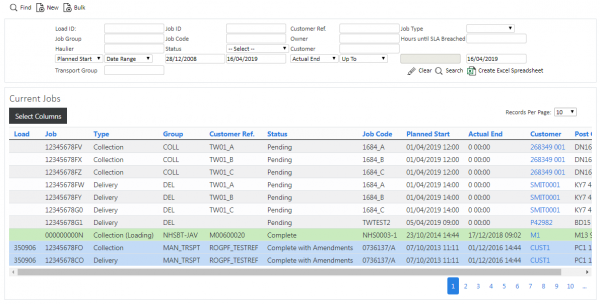
If the Job screen is called from the main menu, the screen allows the user to filter the data by:
- Load Id
- Job Id
- Customer Ref
- Job Type, with a Drop-down list
- Job Group
- Job Code
- Planned Date
- Hours until SLA Breached
- Actual Date
- Job Status
- Customer Code
Once the filter information is entered at the top of the screen, all matching jobs are displayed in a grid below.
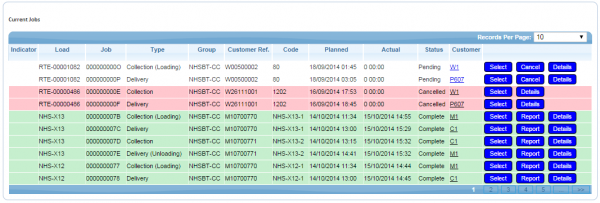
Depending on the status of the line, the line will be RAG coloured:
- Pending - No colour
- Complete - Green
- Cancelled - Red. Also, if the line has a Reason Code entered against it.
A single line is displayed per Job found.
A Cancel button against each line allows the user to set the status of the specific job to Cancelled.
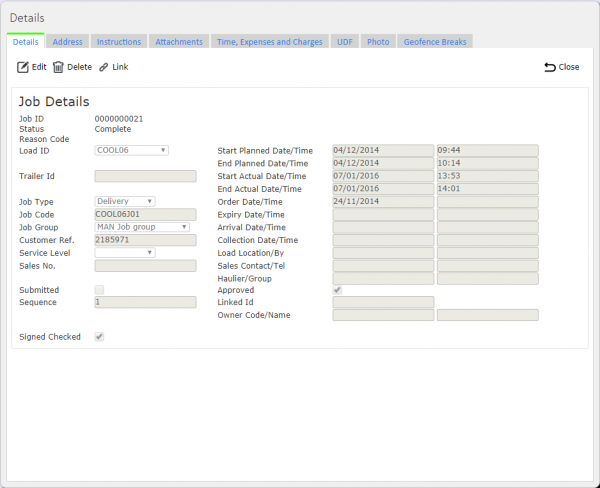
A Details button against each line allows the user to see the details of the specific job:
- The user can drill down into the Container Details page if this is a delivery or collection type.
- If the job is a service, the link will allow the user to drill down to the Service Details page.
The Job can be assigned to or deassigned from a load from here, by changing the Load ID against the Job - click Select then Edit against the line to be assigned and change the User against the load in the provided Pop-up screen.
![]() Note: Only jobs with a customer with (at least) a post code can be assigned, and only to Loads that are not in progress.
Note: Only jobs with a customer with (at least) a post code can be assigned, and only to Loads that are not in progress.
The Save button will save the Load ID and Sequence to the Job.
A Delete button is provided in this pop-up, if the Load the job is associated to is not in progress. When clicked, this will delete the job.
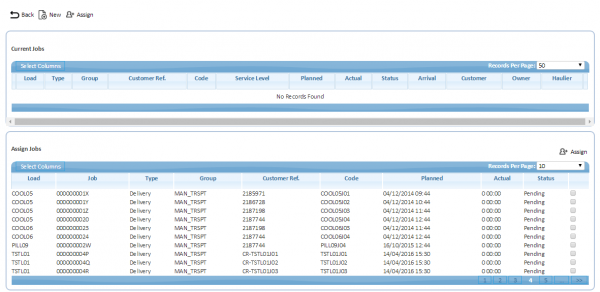
If the user has found jobs by drilling down through a Load, jobs can be assigned to this load in bulk - click the Assign button on the header and a grid will be displayed of all Pending jobs - simply check the jobs that are to be assigned, then click Assign.
If the job is complete, the user can print the POD from here in the site format by clicking the Report button against each Job line in the grid at this status.
A Link button is provided in the header of this pop-up, to allow the user to specify a job that in linked to this one (for example, the delivery job associated with a collection job).
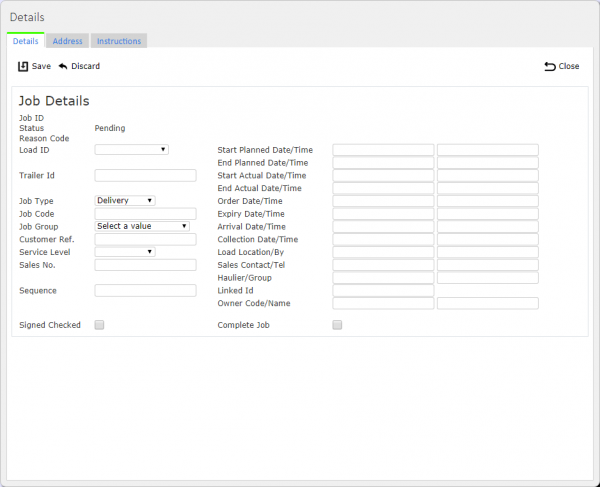
The screen allows the user to create a new Job, by pressing the provided "New" button at the top of the screen.
The user can enter all the details below except the Job ID, which will be generated for them, and Site ID which will be defaulted.
The user can select a customer from a list or choose to create a new customer. If a new customer is selected, the customer maintenance screen will be called to generate the customer code. The screen will then return to this screen with the customer populated and the address displayed.
If no customer is specified, or there is a different delivery address for this job, a Job address may be entered here.
Instructions against the Job or Back Office can be entered using the tabbed display.
The Status is set as "Pending".
The Load will be set to the Load of the calling screen, if the load has been passed in. If not, the load will be left blank.
A Save button is provided to save the entered data.
