Users: Difference between revisions
No edit summary |
No edit summary |
||
| Line 1: | Line 1: | ||
This page allows the user to create a new user, edit details of the key fields or delete a user. | This page allows the user to create a new user, edit details of the key fields or delete a user. | ||
{{Note}} Typically, this static data is part of the data imported into the system from external TMS system (for example ''CALIDUS'' TMS) and would not require any further maintenance. However, if the external system does not pass this information in, or ''CALIDUS'' ePOD/eSERV is being run as a stand-alone system, this screen can be used. | |||
On entry, a filter is displayed so the user can select users by: | On entry, a filter is displayed so the user can select users by: | ||
Revision as of 10:22, 17 October 2014
This page allows the user to create a new user, edit details of the key fields or delete a user.
![]() Note: Typically, this static data is part of the data imported into the system from external TMS system (for example CALIDUS TMS) and would not require any further maintenance. However, if the external system does not pass this information in, or CALIDUS ePOD/eSERV is being run as a stand-alone system, this screen can be used.
Note: Typically, this static data is part of the data imported into the system from external TMS system (for example CALIDUS TMS) and would not require any further maintenance. However, if the external system does not pass this information in, or CALIDUS ePOD/eSERV is being run as a stand-alone system, this screen can be used.
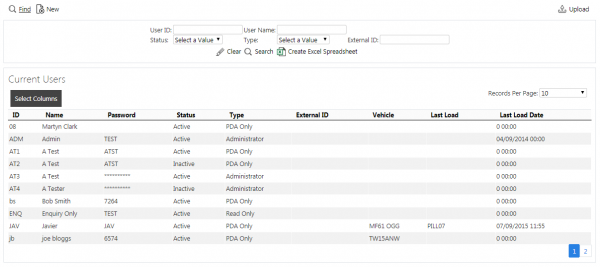
On entry, a filter is displayed so the user can select users by:
- User ID
- User Name
- Status
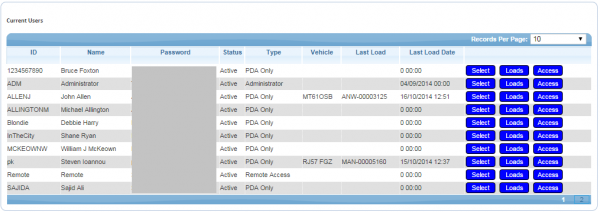
Once criteria have been entered, clicking the Search button will display a grid:
One line is displayed for each user found matching the criteria.
If the user logged on is a Full Admin user, they will be able to see the password, edit the user details and add new users. Enquiry-only users can only see the users - the passwords will be hidden.
Clicking the Select then Edit buttons allows the user entry to be modified.
The data that can be modified here is:
- User Name
- Password
- Active (through a drop-down list)
- Type (through a drop-down list)
Once modified, the changes can be saved using the Save button, whereas the changes can be discarded using the Close or Cancel button.
The user may be deleted in the pop-up screen using he Delete button provided in the header.
Loads can be assigned to a user here, by clicking the Loads button against the user in the grid.
User Access rights can be maintained by clicking the Access button against the user in the grid.
A New button is provided on the header to add a new user. When this is clicked, a Grid will be displayed allowing the user to enter:
- User Id
- User Name
- Password
- Active
- Admin Flag
The Site ID will default to the Site the user entered at log on.
The Active flag controls whether a user is available for use at all - if the user is not active, it cannot be used to log onto the Client or Admin applications, regardless of any other settings.
The Admin flag can be set against the user for different access types:
- Administrative - Complete access to edit, amend and delete across all screens, and access to the configuration menu within the PDA, although they cannot complete tasks on the PDA.
- Non-Administrative: The user can access and complete jobs through the PDA.
- Enquiry-Only: The user has access to view all data within the management system, and can access and complete jobs through the PDA.
- Remote Access: For external system access only.
A Save button is provided to allow the user to save the newly-created user. The entered data will be validated that this user is not a duplicate for a site. If so, an error will be displayed and the data will not be saved.


