Device Installation
 Windows Mobile Devices
Initial Device Setup
If CoPilot is to be installed, you will need to install the MicroSD card into the device - follow the device-specific instructions on installing an SD card.
- Turn on the device.
- Set up the touch screen.
- Set the Region, Date and Time.
- Skip Encryption and Email set up.
Copilot Installation
If CoPilot is to be installed, you will need:
- A MicroSD Card with CoPilot installed on it.
- A Product Key (From ALK)
- An Activation Email and Password (for the client)
![]() Note: Always choose to install CoPilot on the SD Card.
Note: Always choose to install CoPilot on the SD Card.
The CoPilot installation should begin immediately after completing the initial device setup - follow the instructions on the device.
- Start CoPilot.
- Choose the default Language (UK English).
- Choose the default Voice (Emily).
- Enter the Product Key.
- Register for CoPilot Live with the client's email and password. You should not choose to be updated by Email.
- Choose the registered map packs (usually UK/N. Ireland).
- Choose Imperial Unit of Measure
- Accept the License agreement
- Skip the Quick Start Help
- Accept the device warning
Print out the CoPilot registration key and include this in the device's box.
Application Installation
The created CAB files for the application are as follows:
- 1.NETCFv35.wm.armv4i.cab
- 2.NETCFv35.Messages.EN.wm.cab
- 3.sqlce.ppc.wce.arm4i.CAB
- 4.sqlce.repl.ppc.wce5.armv4i.CAB
- 5.sqlce.dev.ENU.ppc.wce5.armv4i.CAB
- 6.EPODClientInstallerComplete.CAB
You must have a PC or Server with ActiveSync v4.5+ or Windows Mobile Device Center installed. Note that this must allow the device to connect to the Internet.
Connect the device via the supplied cable. On the PC:
- When ActiveSync pops up on the PC, choose to not make a partnership by clicking Cancel.
- Click the Explore button.
- When Windows Explorer pops up, double-click My Windows Mobile-Based Device.
- Double-click Program Files
- Copy all the CAB files listed above to this directory.
You can now disconnect from the PC.
On the device:
- From the Start menu (the Windows icon), select File Explorer.
- Click Program Files or My Device.
- Click on each of the CAB files in sequence.
 Note: If prompted, always choose to install these applications on the device.
![]() Note: If a particular CAB file says that there is already a later version on the device, you can skip the installation of that CAB file.
Note: If a particular CAB file says that there is already a later version on the device, you can skip the installation of that CAB file.
When completed, the application is installed, and can be found on the Start menu or the Programs screen.
Device Configuration
HTC Touch 2
- Set the clock and regionality through Settings.
 Note: Region should be set to United Kingdom, which is not automatically set during start-up - it defaults to United States. If this is changed, you must then re-start the device.
 - Set up GPRS (consult your provider for set-up information) if the device has a SIM card attached.
- Ensure that the network connectivity is always on.
- Set up desktop item on programs page (Remove YouTube, add EPOD in its place, top left).
Motorola ES400
- Set the clock and regionality through Settings.
 Note: Region should be set to United Kingdom, which is not automatically set during start-up - it defaults to United States.
 - Set up GPRS (consult your provider for set-up information) if the device has a SIM card attached.
- Ensure that the network connectivity is always on. This can be accomplished through clicking the top bar, then clicking the Battery Icon, and choosing profile Top Performance. Click OK when done, then the top bar again to remove the quick menu.
- Set up Barcode Scanning, through Settings/System/DataWedge, as follows:
- On Basic Configuration:
- Ensure KeyStroke Output options 1 and 2 are set.
- Ensure Basic Format options 1, 4 and 7 are set.
- On Advanced Configuration, ensure Settings option 4 is set.
- Click Running to start the Datawedge application.
- On Basic Configuration:
- Set up My Apps and Dock Bar from the Home screen, as follows:
- Click My Apps
- Click Edit
- Click View
- Click the arrow next to Favourites
- Select the Apps to show as favourites. Recommended is:
- ActiveSync
- Calculator
- Contacts
- CoPilot
- File Explorer
- Notes
- Phone
- Search Phone
- Text
- EPODClient
- Click Save
- Click Back
- Click Dock
- Change the 4 quick apps on the dock. Recommended is:
- EPODClient
- CoPilot
- Calculator
- Internet Explorer
- Click OK
- Reboot the device at this stage - it's likely that the region change has affected the date and time settings. Upon reboot, check these and reset if necessary.
- {note} Always shut down the device once configuration is complete - as with any smart phone, leaving the device in stand-by mode for a few days without charging will deplete the battery.
EPOD Application Configuration
You will need:
- A live network connection, either through GPRS, WIFI or ActiveSync (recommended)
- A client-specific URL for the PDA to connect to.
- A Site ID
- Admin and PDA users and passwords (usually ADM/TEST and PDA/PDA).
Follow these steps:
- Start the EPOD client.
- Log on as the default ADM client and vehicle.
- When at the Configuration screen, enter the WebService URL for the client server.
- Enter the client's Site ID.
- Click OK
If everything has been set up correctly, the device will download the standing data from the server. If the PDA Client is out of date, the server will prompt for updating the client at this time - follow the instructions on screen to complete this.
SIM and GPRS Settings
In general, the SIM card should be configured with the correct settings - this should be tested with Internet Explorer after all other configuration is completed.
If there are issues, the following guide may help to fix issues.
![]() Warning: OBS Logistics accepts no responsibility that the following information is correct. Incorrect settings may result in charges from your provider. It is strongly recommended that you contact your service provider to confirm the settings required to connect to the internet.
Warning: OBS Logistics accepts no responsibility that the following information is correct. Incorrect settings may result in charges from your provider. It is strongly recommended that you contact your service provider to confirm the settings required to connect to the internet.
Motorola ES400
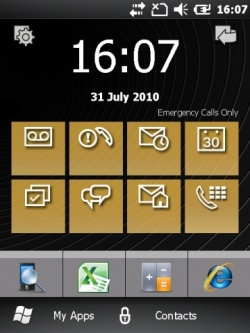
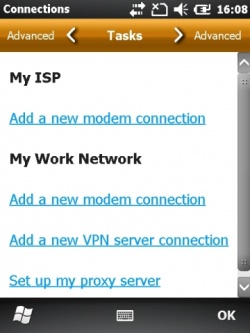
In order to configure a cellular Internet connection on the ES400, tap on the Start icon from the Home Screen:
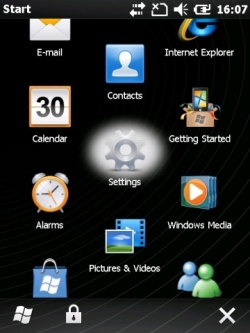
Select Settings
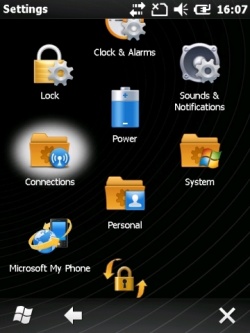
Select Connections
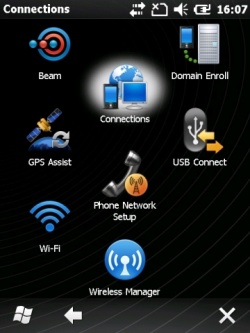
Select Connections again
Tap on the option to Add a new modem connection
![]() Note: If you have already entered details or the SIM card has created them for you, click on Manage Existing Connection, click the settings in the table shown and click Edit instead.
Note: If you have already entered details or the SIM card has created them for you, click on Manage Existing Connection, click the settings in the table shown and click Edit instead.
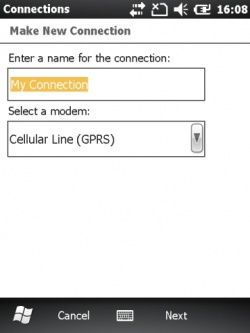
Enter in a name for the connection, this can be anything to identify the connection to you. From the "Select a modem" drop-down menu, select "Cellular Line (GPRS)"
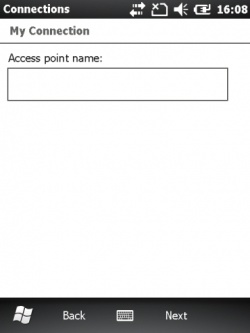
Tap Next. Enter in the Access Point Name (APN) for your mobile operator:
- Vodafone - internet
- Orange - orangeinternet
- O2 - mobile.o2.co.uk
- T-Mobile - general.t-mobile.uk
- Three - three.co.uk
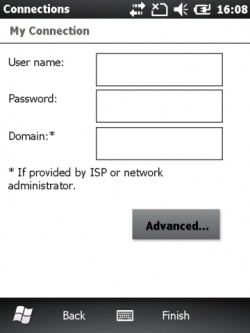
Tap Next. Enter in the username and password for your mobile operator:
- Vodafone - "web" for both
- Orange - leave blank
- T-Mobile - leave blank
- O2 - "web" for both
- Three - leave blank
Leave the Domain field blank unless specifically instructed by your operator.
Tap Finish.
 Android Devices
- Ensure GPS is enabled for all location checks.
- Ensure the device is registered to a Google account, either for the specific customer account or a generic account for that customer generated and registered by OBS e.g. [email protected]. If an account is created, note the password, set the recovery email to [email protected] and the security question to "Managers name at first job", answer as "Dave Renshaw".
- Do not configure any other device-specific or cloud accounts.
- Ensure where possible that apps are installed through the Google Play application link (currently this is the generic CALIDUS ePOD app, but there may be customer-specific app releases in the future i.e. CALIDUS ePOD for CustomerName).
- Download all device software updates.
Optional:
- Ensure Wifi is enabled, but not linking to unknown sources.
Installing the CALIDUS App
If the new version is released through the Google Play market, the update should be available to download through that application within a few hours of being published.
Alternatively, installations could be being performed in other ways:
- Through MDM software
- Through side-loading
MDM
Send the APK file (in P:\EPOD\_Development\ePOD Release to Google Play\Distro) to the MDM company administering the devices for that client - they will handle the installation and distribution of the app.
Side-Loading
Side-loading is the action of installing applications without using the official Google Play market.
![]() Note: Check Settings/Security/Unknown Sources to allow side-loading on the device.
Note: Check Settings/Security/Unknown Sources to allow side-loading on the device.
There are several methods:
- Email the APK to the email address of the user of the device.
- Download the application from the mail application.
- Click on the downloaded APK file (from the status bar or the Downloads app.
Bluetooth
- Enable Bluetooth on the device.
- Pair with the PC or other device that has access to the APK.
- Share the file via Bluetooth, using a File Explorer app.
SD Card
- Place the APK file on an SD card compatible with the device.
- Put the SD card in the device.
- Install the APK file from a File Explorer app.
File Copying through a PC/Mac
- Connect the device to a PC or Mac using the supplied USB.
- Enable USB sharing on the device.
- The device should automatically connect - if not, ensure you install any required USB device drivers. For example, for Samsung, you may need to install Samsung Kies - download from the internet.
- Copy the APK to the mounted internal or external SD card of the device, when mounted.
- Install the APK file from a File Explorer app.
Android Debug Bridge (ADB)
- Connect the device to a PC or Mac using the supplied USB.
- Enable USB sharing on the device.
- The device should automatically connect - if not, ensure you install any required USB device drivers. For example, for Samsung, you may need to install Samsung Kies - download from the internet.
- When started, install the apk through adb command line from the directory containing the APK, with the following command:
{Android SDK}\platform-tools\adb.exe install "CALIDUS ePOD.apk"
- Note that this installation can take some time to complete.
Hosted File The file may be hosted on your server in the following location:
http://your.url.com/webservices/calidus_epod/PDAUpdates/CALIDUSePODv2.apk
If so you can access this through the url.
The device requires:
- internet access
- browser access
- access to the Downloads app
- The settings enabled to allow installation of packages from unknown sources.
- You may need to uninstall any previous versions of the application first.
Unknown sources:
- Check Settings/Security and tick Unknown Sources to allow side-loading on the device.
![]() Note: Developer options may be required to enable unknown sources. To enable these:
Note: Developer options may be required to enable unknown sources. To enable these:
- Go to Settings/About
- Click anything 7 times in a row.
Instructions for installation
- Using the URL:
- Start the Browser (or Chrome).
- Enter the URL provided - the file will start to download.
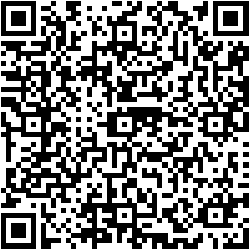
- Using a QR Code
- Use a Barcode scanner application to scan the provided QR Code with the link encoded.
- Click the link scanned - the download will proceed
- When the download is complete, click the app downloaded from the Download dialogue. If this is not visible, this may be found from the drag-down notifications tab or from the Downloads app (from the app folder or from the status bar). Click on the apk file.
- Confirm you want to install the file (depending on the setup of the device, this may require several confirmations).
- When complete, you can either open the app from the installer, or exit and open the app normally.
Configuring the CALIDUS App
- On start-up of the application, you will be requested to do some set-up. Choose Yes.
- The device will request whether the settings should be set through a QR barcode scan or manual entry. If Barcode is pressed, scan the provided CALIDUS ePOD Settings QR barcode. If Manual is pressed, set up via the Configuration screen as below:
- Enter the Site of the installed user system.
- Language does not currently change anything.
- Style is the customer's choice, Default is OBS standard.
- Enter the Webservice - this will be the URL of the installed user system. For test purposes, this is usually one of:
- http://www.calidus-web.com:9093/epod_dev
- http://www.calidus-web.com:9093/epod_test
- http://www.calidus-web.com:9091/epod_uat
- http://www.calidus-web.com:9091/epod_trial
- http://www.calidus-web.com:9091/epod_demo
- Additional settings regarding Vibration and Alerts can be set a required.
- All other settings should default to reasonable values.
- Exit with the Back button on the device.
- Clear the confirmation pop-up with the Back button on the device.
To create a QR Settings Barcode:
- Place all the settings into a java object string, as follows. Note that only the following settings may be set through the string. At this time, DO NOT attempt to set the GEOTAG setting to true or false - this does not work.
"SITEID":"TEST",
"WEBSERVICE":"http://www.calidus-web.com:9093/epod_test/",
"LANGUAGE":"en",
"STYLE":"PLINK",
"WSINTERVAL":"60",
"UPINTERVAL":"300",
"GEOMSGINTERVAL":"0"
- Remove all returns/line-feeds from the string.
- Create a QR barcode from the result, using an on-line QR barcode generator. There are two types:
- Plain: http://goqr.me/
- With embedded image: http://www.qrcode-monkey.com/. For this site, load up a customer logo to embed in the image. Ensure there is sufficient white-space around the logo, or the resulting QR barcode will not scan. You may need to adjust the density of the resulting barcode or the resolution of the image to achieve best results.
Examples:
CoPilot Truck installation
- Side-Load the CoPilot Truck application - see instructions for Side-loading above.
- Start the application and register for CoPilot Live using the customer Gmail address used when setting up the device.
- Download the required maps.
SureLock installation
- Install SureLock from the Google Play store.
 Note: There is a specific SureLock application for Samsung devices, so choose the correct one.
 - Select SureLock from the App List.
- Follow the instructions to start SureLock.
- Press the screen 5 times in quick succession, then enter '0000' as the password.
- Select Import/Export Settings
- Choose Import from File
- Enter the web address of the settings file for this installation.
- Click Done or the Back button twice.
![]() Note: If a background has been created for the SureLock application, these can be downloaded and placed in the /sdcard/Downloads folder, or the backgrounds can be hosted on the server, like the settings files.
Note: If a background has been created for the SureLock application, these can be downloaded and placed in the /sdcard/Downloads folder, or the backgrounds can be hosted on the server, like the settings files.
![]() Note: To create a new customer-specific SureLock settings file:
Note: To create a new customer-specific SureLock settings file:
- Create customer-specific backgrounds and download onto a device.
- Follow the SureLock installation guide, using the OBS.txt or OBS_Samsung.txt settings files.
- Change the settings as follows:
- Background (Portrait and landscape if provided) to the new Backgrounds. These can be set to URLs from the hosting system e.g. http://www.calidus-web.com:9093/epod_test/SureLock/BIU.PNG
- Enable or Disable any applications that are not required, and any other settings.
- Change the 'Automatic Import File' to the hosting system's SureLock URL, plus '<customer>.txt', e.g. http://www.calidus-web.com:9093/epod_test/SureLock/BIU.txt
- Enter the Activation ID in the 'About SureLock' menu.
- Check the 'Export Activation' in 'Import/Export Settings'
- Export settings to file (accept the default).
- Exit SureLock.
- Connect the device to a PC and download the saved settings file.
 Note: The file sometimes does not export in full - please check.
 - Copy to the SureLock directory in the hosting machine.
- Rename to <customer>.txt
Device-Specific Configurations
The following sections show options that should be enabled for each specific device.
Samsung Galaxy Note
- Ensure that the time-out on the capacitive action buttons is set to the longest, or no time-out.
- Ensure that the Camera is set to Lowest Resolution and Highest Compression/Lowest Quality.
- Run the camera app.
- Select the 'Settings button' bottom left hand corner.
- Select Edit Shortcuts.
- Add Image quality and Resolution to the top bar by dragging the icons.
- Exit out of Shortcuts.
- Click the Image Quality Icon and change to 'Normal'.
- Click the resolution icon and change to '800x480'.
Samsung Galaxy Mega
- No DropBox or Samsung account.
- All Samsung features left as default
- SBeam and NFC turned off when started.
- Settings:
- Display:
- Screen timeout: 1 or 2 minutes
- Touch Key Light Duration: 6 seconds or Always On.
- Display:
- Camera:
- Change Image Resolution down to 3.2Mp or less.
![]() Note: To enable developer settings on the Samsung Galaxy devices (especially the S4 and Mega) (for application testing or to enable Unknown Sources for Side-Loading apps):
Note: To enable developer settings on the Samsung Galaxy devices (especially the S4 and Mega) (for application testing or to enable Unknown Sources for Side-Loading apps):
- Settings/more/About
- Click anything 7 times in a row.
- Back
- Developer Options
