PDA Configuration
![]() Administrative users cannot complete jobs on the PDA, but they are required to configure the device. By default this user will be ADM. Logging in as ADM, will present the user with the configuration screen.
Administrative users cannot complete jobs on the PDA, but they are required to configure the device. By default this user will be ADM. Logging in as ADM, will present the user with the configuration screen.
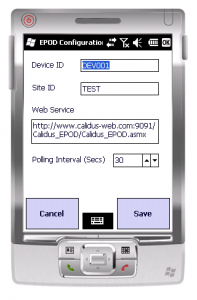
![]() When the user presses the settings icon on the login screen or from the Job List menu, the device will request whether the settings should be set through a QR barcode scan or manual entry. If Barcode is pressed, users will be prompted to scan the provided CALIDUS ePOD Settings QR barcode. If Manual is pressed, the Configuration screen below is shown.
When the user presses the settings icon on the login screen or from the Job List menu, the device will request whether the settings should be set through a QR barcode scan or manual entry. If Barcode is pressed, users will be prompted to scan the provided CALIDUS ePOD Settings QR barcode. If Manual is pressed, the Configuration screen below is shown.
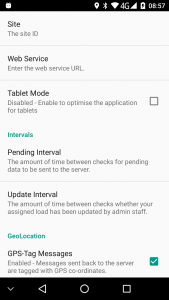
Here the user can change:
 The Device ID
- (Default) Site - Only needed if working in a multiple site configuration
- Web Service (URL) - Point to the main server
 Polling /
  Update Interval - how often the web service can be polled
 Language - The language used by the application.
 Style - The styling of the application (colours, layout, etc).
 Pending Interval - the amount of time between checks for pending data to be sent to the server.
 GPS-Tag Messages - Indicates whether messages sent back to the server are tagged with GPS co-ordinates.
 Send GPS Tracking Message - Whether and how often GPS tracking messages should be sent back to the server. Note that this will leave the GPS unit enabled and may drain the battery.
 Alert Sound - The sound made on a critical alert.
 Vibration Alerts - Indicated whether critical alerts vibrate the device.
 Log Debug Messages - if enabled, logs application messages to the system log.
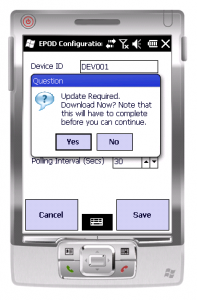
| Clicking Cancel will redirect the user back to the login menu. Clicking Save will connect to the web service if possible. If successful, it will check for updates for the PDA client. If present, it will prompt the user if they would like to update the device.
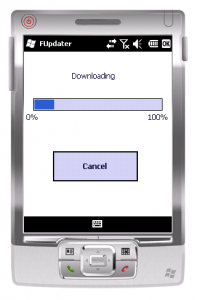
If an update is required to the PDA Client, the user will be prompted at this time. Clicking Yes will start the download, clicking Cancel will continue with normal operations. Once the update is complete the user will be returned to the login menu. At this point the user must exit the application, navigate to the My Documents folder and run the Installer application. |
| All changes will be saved automatically once you have made them. The Back button will return you to the login prompt, where style changes will be applied and a confirmation message will be displayed. |


