Pallet Building: Difference between revisions
No edit summary |
No edit summary |
||
| Line 22: | Line 22: | ||
When an item is scanned the user is given the option to create a New Pallet on which the item will be placed. This is done by clicking the | When an item is scanned the user is given the option to create a New Pallet on which the item will be placed. This is done by clicking the 'New Pallet' button which then takes the user to the label print screen. The user can then select the printer from a drop down list or scan a barcode which contains the printer ID to then trigger the pallet label print | ||
<gallery widths=200px heights=320px perrow=3> | <gallery widths=200px heights=320px perrow=3> | ||
| Line 37: | Line 37: | ||
Further items can now be scanned onto the pallet. If an alternative pallet is required the user can click the | Further items can now be scanned onto the pallet. If an alternative pallet is required the user can click the 'Change Pallet' button. When this button is clicked the user can then scan another pallet label. A list of available pallets (pallets already created) is visible on the screen as a reference | ||
<gallery widths=200px heights=320px perrow=3> | <gallery widths=200px heights=320px perrow=3> | ||
| Line 44: | Line 44: | ||
If at any point when an item is being placed onto a pallet and it is damaged the | If at any point when an item is being placed onto a pallet and it is damaged, the 'Damaged' button can be clicked which takes the user to the damages screen - see the [[Damages]] section for details. | ||
Revision as of 12:14, 25 August 2017
Pallet Building

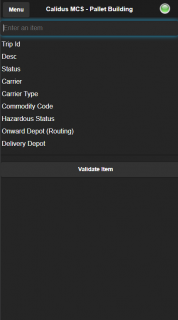
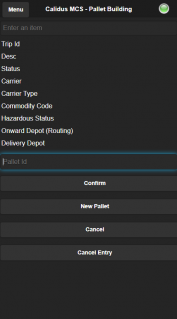
The pallet building screen contains the following information:
- Enter an Item (Scanned Item)
- Trip ID (Trip ID the item is on)
- Desc (Description of the item scanned)
- Status of the item
- Carrier – (Carrier the item will be transported by)
- Carrier Type - (whether it is own fleet or 3rd party etc)
- Commodity Code
- Hazardous Status
- Onward Depot (Routing)
Once an item is scanned all of the above information is populated:
Pallet Building - Item Scanned

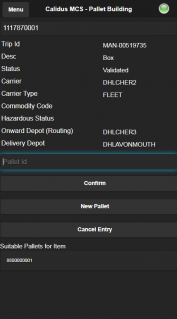
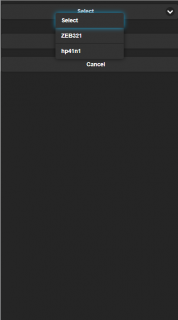
When an item is scanned the user is given the option to create a New Pallet on which the item will be placed. This is done by clicking the 'New Pallet' button which then takes the user to the label print screen. The user can then select the printer from a drop down list or scan a barcode which contains the printer ID to then trigger the pallet label print

Pallet Print
Printer Select


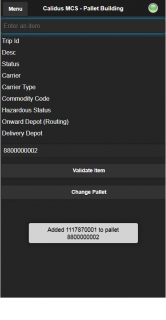
Once the pallet label has been printed the item is added to the new pallet. The destination of this pallet is now based on where the scanned item is destined for. Items which are destined for different locations cannot be scanned on to the pallet
Item assigned to pallet

Further items can now be scanned onto the pallet. If an alternative pallet is required the user can click the 'Change Pallet' button. When this button is clicked the user can then scan another pallet label. A list of available pallets (pallets already created) is visible on the screen as a reference
Change Pallet

If at any point when an item is being placed onto a pallet and it is damaged, the 'Damaged' button can be clicked which takes the user to the damages screen - see the Damages section for details.