Development Notes: Difference between revisions
(Categorisation of document pages) |
(Updated Project and Oracle installation details.) |
||
| (2 intermediate revisions by the same user not shown) | |||
| Line 15: | Line 15: | ||
== Oracle Set-up == | == Oracle Set-up == | ||
Install the Oracle Client. | Install the Oracle Client. | ||
{{Note}} Ensure that the client is installed into a folder within the C:\app structure, for example: | |||
C:\app\UserName\product\11.2.0\client_1 | |||
Install Oracle ODT into same base folder. | Install Oracle ODT into same base folder. | ||
| Line 24: | Line 27: | ||
{{Note}} You must be provided access to the correct source control library - contact your .NET development manager for details. The following instructions show an example - TFS settings may vary. | {{Note}} You must be provided access to the correct source control library - contact your .NET development manager for details. The following instructions show an example - TFS settings may vary. | ||
1) Copy \\ | 1) Copy \\spekefs2012\Projects\Development\MCS\# Source\Start\Calidus MCS to where you want your project setup locally. {{Note}} This was correct at the time of document creation. There may be updated projects to copy, depending on the version - check the folder \\spekefs2012\Projects\Development\MCS\# Source for updated folders or zip files | ||
2) Startup Visual Studio | 2) Startup Visual Studio. | ||
3) Configure TFS server. | 3) Configure TFS server. | ||
| Line 33: | Line 36: | ||
4) ''CALIDUS'' MCS source can be found underneath Calidus MCS | 4) ''CALIDUS'' MCS source can be found underneath Calidus MCS. | ||
[[File:MCS_DevNotes_TFS2.png|Border|600px]] | [[File:MCS_DevNotes_TFS2.png|Border|600px]] | ||
5) Once that is setup, open the project from source control | 5) Once that is setup, open the project from source control. | ||
[[File:MCS_DevNotes_TFS3.png|Border|600px]] | [[File:MCS_DevNotes_TFS3.png|Border|600px]] | ||
| Line 49: | Line 52: | ||
(You might need to specify a local path at this point – match it up to where you put you local copy of MCS earlier | (You might need to specify a local path at this point – match it up to where you put you local copy of MCS earlier). The system will prompt if you should overwrite existing files – elect to overwrite. | ||
6) Once that’s done, you should have access to all the code. | 6) Once that’s done, you should have access to all the code. | ||
| Line 59: | Line 62: | ||
8) Remove OracleDataAccess. | 8) Remove OracleDataAccess. | ||
9) Right-click on References and add reference to the installed Oracle.DataAccess.dll, usually here: | 9) Right-click on References and add reference to the installed Oracle.DataAccess.dll. This will be located within the Oracle home directory, usually here: | ||
:a. C:\product\11.2.0\ | :a. C:\app\UserName\product\11.2.0\client_1\odp.net\bin\4\Oracle.DataAccess.dll | ||
10) Repeat these steps for the DatabaseClassLibrary project. | 10) Repeat these steps for the DatabaseClassLibrary project. | ||
11) Build the solution | 11) Build the solution. | ||
== Runtime Set-up == | == Runtime Set-up == | ||
12) Configure your web.config | 12) Configure your web.config. | ||
These 2 settings need to point to the files under App_Data | |||
These 2 settings need to point to the files under App_Data. | |||
<appSettings> | <appSettings> | ||
| Line 80: | Line 84: | ||
Advise that you change it to automatic startup if it is currently set to "Manual" | Advise that you change it to automatic startup if it is currently set to "Manual". | ||
[[File:MCS_DevNotes_Runtime2.png|Border|300px]] | [[File:MCS_DevNotes_Runtime2.png|Border|300px]] | ||
14) Run the app | 14) Run the app. | ||
[[Category:Developer]] | [[Category:Developer Guides]] | ||
[[Category:Technical]] | |||
Latest revision as of 11:42, 4 September 2019
![]() Note: This is a developer guide.
Note: This is a developer guide.
Pre-Requisites
- Visual Studio 2017
- .NET Framework 4.7 Runtime
- Oracle Client 11.0.2 or 11.0.3
- Oracle ODT with ODAC 11.2.0.3
Installers are available here: See here:
- \\scansrv1\Global\OBS Logistics\Installs\ODTwithODAC112030.zip
- \\scansrv1\Global\OBS Logistics\Installs\win32_11gR2_client.zip
Oracle Set-up
Install the Oracle Client.
![]() Note: Ensure that the client is installed into a folder within the C:\app structure, for example:
Note: Ensure that the client is installed into a folder within the C:\app structure, for example:
C:\app\UserName\product\11.2.0\client_1
Install Oracle ODT into same base folder.
Set up TNS Names.
Code Set-up
![]() Note: You must be provided access to the correct source control library - contact your .NET development manager for details. The following instructions show an example - TFS settings may vary.
Note: You must be provided access to the correct source control library - contact your .NET development manager for details. The following instructions show an example - TFS settings may vary.
1) Copy \\spekefs2012\Projects\Development\MCS\# Source\Start\Calidus MCS to where you want your project setup locally. ![]() Note: This was correct at the time of document creation. There may be updated projects to copy, depending on the version - check the folder \\spekefs2012\Projects\Development\MCS\# Source for updated folders or zip files
Note: This was correct at the time of document creation. There may be updated projects to copy, depending on the version - check the folder \\spekefs2012\Projects\Development\MCS\# Source for updated folders or zip files
2) Startup Visual Studio.
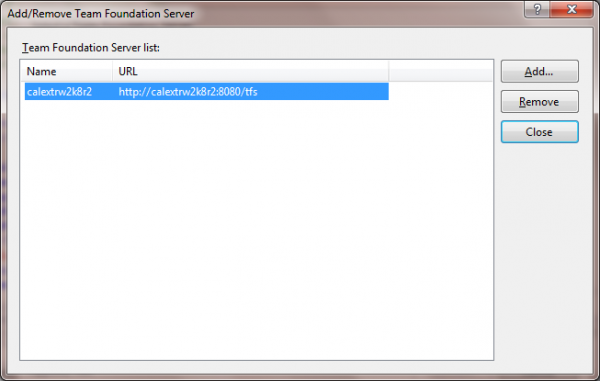
3) Configure TFS server.
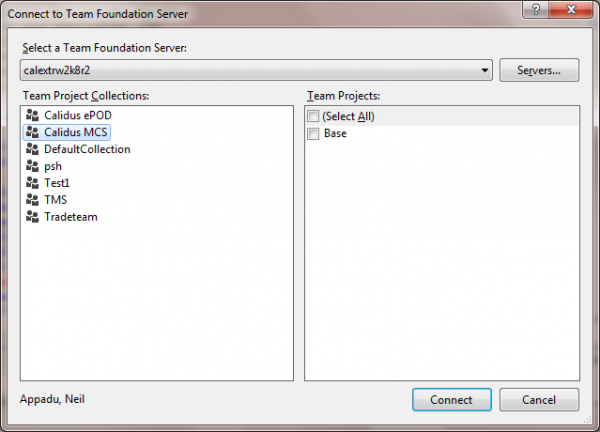
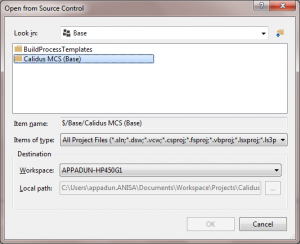
4) CALIDUS MCS source can be found underneath Calidus MCS.
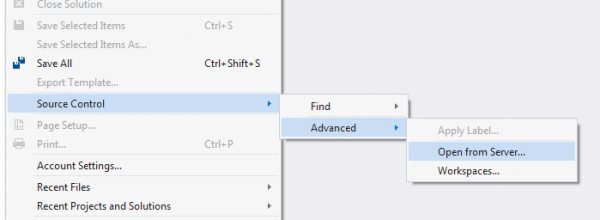
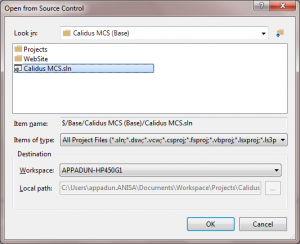
5) Once that is setup, open the project from source control.
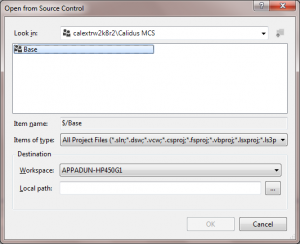
(You might need to specify a local path at this point – match it up to where you put you local copy of MCS earlier). The system will prompt if you should overwrite existing files – elect to overwrite.
6) Once that’s done, you should have access to all the code.
Project Set-up
7) Click on the CustomServerControls project and open References.
8) Remove OracleDataAccess.
9) Right-click on References and add reference to the installed Oracle.DataAccess.dll. This will be located within the Oracle home directory, usually here:
- a. C:\app\UserName\product\11.2.0\client_1\odp.net\bin\4\Oracle.DataAccess.dll
10) Repeat these steps for the DatabaseClassLibrary project.
11) Build the solution.
Runtime Set-up
12) Configure your web.config.
These 2 settings need to point to the files under App_Data.
 <appSettings>
   <add key="MessageFile" value="C:\Users\appadun.ANISA\Documents\Workspace\Projects\Calidus MCS\WebSite\App_Data\msg_file.txt"/>
   <add key="KnownBadListFile" value="C:\Users\appadun.ANISA\Documents\Workspace\Projects\Calidus MCS\WebSite\App_Data\knownBadList.txt"/>
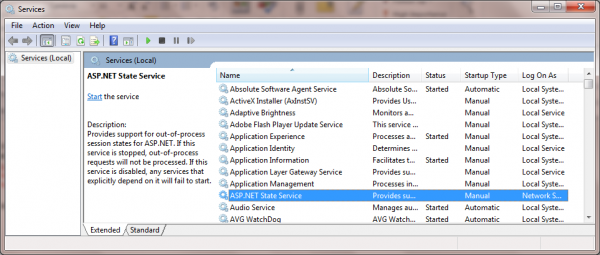
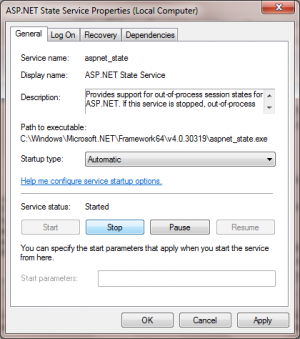
13) The application uses the ASP session state service to handle sessions. You’ll need to ensure that the session state service is enabled and started on your PC.
Advise that you change it to automatic startup if it is currently set to "Manual".
14) Run the app.
