Pallet Building: Difference between revisions
(Created page with "<gallery widths=200px heights=320px perrow=3> Image:MCS_PalletBuild1.png|''Pallet Building'' </gallery> The pallet building screen contains the following information: * Enter a...") |
m (Minor formatting changes.) |
||
| (6 intermediate revisions by the same user not shown) | |||
| Line 1: | Line 1: | ||
Pallet Building is the process of bringing individual items for despatch from this depot together, so that they can be handled more easily in a single scan, rather than having to scan each item onto a vehicle. | |||
{{Note}} Although this is referred to as pallet building, that is just the C-MCS terminology for collating and items together under a single scannable label. Although most commonly this might be placing packages onto a pallet, equally this could be into a cage, tote or other media. For simplicitly, C-MCS refers to these as "PALLET". | |||
This is an optional process - you don't need to palletise (or otherwise collate) items together in order to despatch them. Equally, your transport operation might only track pallets or cages, not the individual contents. In that case, no pallet building is necessary. | |||
<gallery widths=200px heights=320px perrow=3> | <gallery widths=200px heights=320px perrow=3> | ||
Image:MCS_PalletBuild1.png|''Pallet Building'' | Image:MCS_PalletBuild1.png|''Pallet Building'' | ||
</gallery> | </gallery> | ||
The pallet building screen | The pallet building screen starts by requesting you to ''Enter an Item''. If your device has a built-in scanner, using that to scan the item will enter the data for you and validate the item with the transport system. Regardless, you can use the keyboard to enter the data here. | ||
If you scan the item (and your device is set up correctly), or press the Enter/Return key on the keyboard, the application will validate the item with the transport system. Alternatively, you can click the '''Validate Item''' button to do this. | |||
When the item is validated, the application will display the package details below. Your administrators can configure what is displayed here: | |||
* ''Trip ID'' - the Trip ID of the trip departing this depot that the item is on. | |||
* ''Desc'' - the Description of the item scanned. | |||
* ''Status'' - the status of the item. | |||
* ''Carrier'' – the Carrier executing the trip. | |||
* ''Carrier Type'' - whether the trip is being executed by own fleet or a 3rd party. | |||
* ''Product Type'' - the product type in the package. | |||
* ''Commodity Code'' - the commodity code of the product in the package. | |||
* ''Hazardous Status'' - indicating whether the content is hazardous and what type. | |||
* ''Onward Depot (Routing)'' - the depot to which the package is next expected to arrive in. | |||
* ''Delivery Depot'' - the last depot in your transport network that this package will pass through before it goes out for final delivery. | |||
<gallery widths=200px heights=320px perrow=3> | <gallery widths=200px heights=320px perrow=3> | ||
Image:MCS_PalletBuild2.png|''Pallet Building - Item Scanned'' | Image:MCS_PalletBuild2.png|''Pallet Building - Item Scanned'' | ||
</gallery> | </gallery> | ||
If there is any problem with validating the item, the application will display this here in a pop-up. | |||
If this package is not one you want to palletise right now, you can click the '''Cancel Entry''' button to scan a new package. | |||
Once you have scanned an item, you can either: | |||
* select an existing pallet for the package. | |||
* create a new pallet for the package. | |||
The screen will display suitable pallets for the item in a list at the bottom of the screen. This list is built by checking any open pallets being built at that depot that contain items that match the criteria by which you are building pallets at this depot. Your system administrators can control what kind of pallets can be palletised together, but in general. | |||
* The package must be leaving this depot on the same trip, or be travelling to the same next destination. | |||
* Product types must compatible with other product types on the pallet. | |||
* Commodity codes must be compatible with other commodity codes on the pallet. | |||
Additionally, this depot might have other validation, such as: | |||
* All items on this pallet must be being delivered out of the same final delivery depot. | |||
* All items on this pallet must be being delivered on the same trip out of the final delivery depot. | |||
Regardless, the system takes this configuration into account when producing the list of suitable pallets. | |||
You can put this item on a pallet by scanning the pallet ID from the pallet label or entering the pallet ID and clicking the '''Confirm''' button. | |||
Again, the application will check whether this package is valid, using the same criteria as the suggested list above. | |||
If you want to create a new empty pallet onto which the item will be placed, you can click the '''New Pallet''' button. | |||
Your system administrators can configure whether you are printing new pallet labels or using pre-printed stationary at this depot. | |||
If your depot is using pre-printed pallet labels, the application will display a screen to enter the new pallet ID. You can scan this off the new label, or you can enter it manually and click the '''Select''' button. | |||
If your depot is printing pallet labels, the application will allow you to select a label printer from a drop-down list of your configured printers. | |||
<gallery widths=200px heights=320px perrow=3> | <gallery widths=200px heights=320px perrow=3> | ||
Image: | Image:MCS_PalletBuild3a.png|''Pallet Print'' | ||
Image:MCS_PalletBuild3b.png|''Printer Select'' | |||
Image:MCS_PalletBuild3c.png|''Enter pre-printed pallet ID'' | |||
</gallery> | </gallery> | ||
Regardless of how you create new pallets, if you tried to create one by mistake, you can click the '''Cancel''' button on this screen to return to the pallet building package details where you left it. | |||
Once the pallet | Once the pallet has been entered or created, the package is added to the pallet. Any other packages you attempt to scan onto this pallet will will now be limited by the package you have just scanned onto the pallet, as described above. | ||
<gallery widths=200px heights=320px perrow=3> | <gallery widths=200px heights=320px perrow=3> | ||
Image:MCS_PalletBuild4.png|''Item assigned to pallet'' | Image:MCS_PalletBuild4.png|''Item assigned to pallet'' | ||
</gallery> | </gallery> | ||
Once you have identified or created a new pallet, the application will stick to that pallet. You can now scan further items onto the pallet. If you want to change to another pallet you can click the '''Change Pallet''' button, so you can either scan another pallet or create a new pallet. | |||
<gallery widths=200px heights=320px perrow=3> | <gallery widths=200px heights=320px perrow=3> | ||
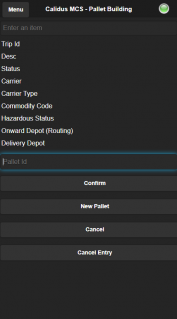
Image:MCS_PalletBuild5.png|''Change Pallet'' | Image:MCS_PalletBuild5.png|''Change Pallet'' | ||
</gallery> | </gallery> | ||
If you want to move a package to another pallet, simply scan the item and select the new pallet - the application will move the item from the first pallet to the second. | |||
If you have already started building a pallet, and the package that you have scanned cannot be placed on that pallet, the system expects that you will want to place it on another (valid) pallet instead. Therefore the screen will blank the current pallet allowing you to either enter another pallet (by scanning an existing pallet ID), or create a new pallet (with the '''New Pallet''' button). | |||
If this package is not one you want to palletise right now, you can click the '''Cancel Entry''' button to scan a new package. | |||
<!-- | |||
If at any point when you scan an item you notice it is damaged, you can click the '''Damaged''' button can be clicked which takes the user to the damages screen - see the [[Damages]] section for details. | |||
--> | |||
[[Category:UG 320722 CALIDUS MCS Device User Guide|200]] | |||
Latest revision as of 12:35, 29 January 2020
Pallet Building is the process of bringing individual items for despatch from this depot together, so that they can be handled more easily in a single scan, rather than having to scan each item onto a vehicle.
![]() Note: Although this is referred to as pallet building, that is just the C-MCS terminology for collating and items together under a single scannable label. Although most commonly this might be placing packages onto a pallet, equally this could be into a cage, tote or other media. For simplicitly, C-MCS refers to these as "PALLET".
Note: Although this is referred to as pallet building, that is just the C-MCS terminology for collating and items together under a single scannable label. Although most commonly this might be placing packages onto a pallet, equally this could be into a cage, tote or other media. For simplicitly, C-MCS refers to these as "PALLET".
This is an optional process - you don't need to palletise (or otherwise collate) items together in order to despatch them. Equally, your transport operation might only track pallets or cages, not the individual contents. In that case, no pallet building is necessary.
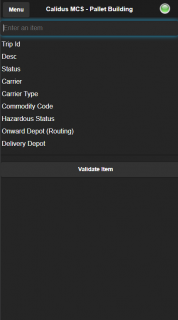
Pallet Building

The pallet building screen starts by requesting you to Enter an Item. If your device has a built-in scanner, using that to scan the item will enter the data for you and validate the item with the transport system. Regardless, you can use the keyboard to enter the data here.
If you scan the item (and your device is set up correctly), or press the Enter/Return key on the keyboard, the application will validate the item with the transport system. Alternatively, you can click the Validate Item button to do this.
When the item is validated, the application will display the package details below. Your administrators can configure what is displayed here:
- Trip ID - the Trip ID of the trip departing this depot that the item is on.
- Desc - the Description of the item scanned.
- Status - the status of the item.
- Carrier – the Carrier executing the trip.
- Carrier Type - whether the trip is being executed by own fleet or a 3rd party.
- Product Type - the product type in the package.
- Commodity Code - the commodity code of the product in the package.
- Hazardous Status - indicating whether the content is hazardous and what type.
- Onward Depot (Routing) - the depot to which the package is next expected to arrive in.
- Delivery Depot - the last depot in your transport network that this package will pass through before it goes out for final delivery.
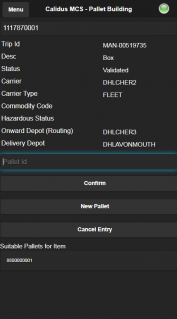
Pallet Building - Item Scanned

If there is any problem with validating the item, the application will display this here in a pop-up.
If this package is not one you want to palletise right now, you can click the Cancel Entry button to scan a new package.
Once you have scanned an item, you can either:
- select an existing pallet for the package.
- create a new pallet for the package.
The screen will display suitable pallets for the item in a list at the bottom of the screen. This list is built by checking any open pallets being built at that depot that contain items that match the criteria by which you are building pallets at this depot. Your system administrators can control what kind of pallets can be palletised together, but in general.
- The package must be leaving this depot on the same trip, or be travelling to the same next destination.
- Product types must compatible with other product types on the pallet.
- Commodity codes must be compatible with other commodity codes on the pallet.
Additionally, this depot might have other validation, such as:
- All items on this pallet must be being delivered out of the same final delivery depot.
- All items on this pallet must be being delivered on the same trip out of the final delivery depot.
Regardless, the system takes this configuration into account when producing the list of suitable pallets.
You can put this item on a pallet by scanning the pallet ID from the pallet label or entering the pallet ID and clicking the Confirm button.
Again, the application will check whether this package is valid, using the same criteria as the suggested list above.
If you want to create a new empty pallet onto which the item will be placed, you can click the New Pallet button.
Your system administrators can configure whether you are printing new pallet labels or using pre-printed stationary at this depot.
If your depot is using pre-printed pallet labels, the application will display a screen to enter the new pallet ID. You can scan this off the new label, or you can enter it manually and click the Select button.
If your depot is printing pallet labels, the application will allow you to select a label printer from a drop-down list of your configured printers.

Pallet Print
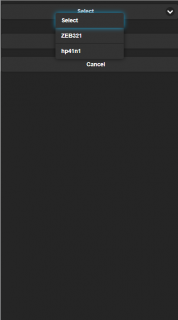
Printer Select
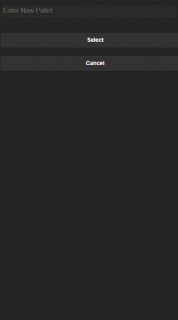
Enter pre-printed pallet ID


Regardless of how you create new pallets, if you tried to create one by mistake, you can click the Cancel button on this screen to return to the pallet building package details where you left it.
Once the pallet has been entered or created, the package is added to the pallet. Any other packages you attempt to scan onto this pallet will will now be limited by the package you have just scanned onto the pallet, as described above.
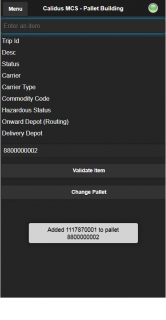
Item assigned to pallet

Once you have identified or created a new pallet, the application will stick to that pallet. You can now scan further items onto the pallet. If you want to change to another pallet you can click the Change Pallet button, so you can either scan another pallet or create a new pallet.
Change Pallet

If you want to move a package to another pallet, simply scan the item and select the new pallet - the application will move the item from the first pallet to the second.
If you have already started building a pallet, and the package that you have scanned cannot be placed on that pallet, the system expects that you will want to place it on another (valid) pallet instead. Therefore the screen will blank the current pallet allowing you to either enter another pallet (by scanning an existing pallet ID), or create a new pallet (with the New Pallet button).
If this package is not one you want to palletise right now, you can click the Cancel Entry button to scan a new package.