Customers: Difference between revisions
(Merged from training document) |
(Split) |
||
| Line 113: | Line 113: | ||
=== Consolidation === | === Consolidation === | ||
{{:Customer Invoice Consolidation}} | |||
{ | |||
{ | |||
Revision as of 15:39, 17 May 2024
Maintenance of Customers and Cost Centres functionality is used within C-TMS software to maintain data related to Customers, Customer group and Cost Centres. Customer and Cost Centre maintenance form can be accessed from Maintenance Menu
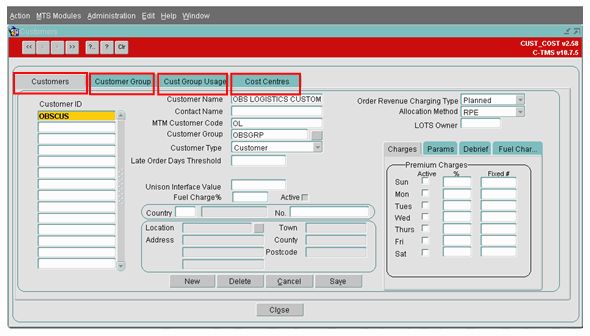
The "Customer and Cost Centre" maintenance form has 4 tabs as shown below. In this document, the functionality and the use of each of the tabs i.e. Customer, Customer Group, Cust Group Usage and Cost Centres are described in detail.
![]() Note: A 5th bespoke tab "New Supplier" has been added, but is not covered in detail in this document, as this is bespoke functionality.
Note: A 5th bespoke tab "New Supplier" has been added, but is not covered in detail in this document, as this is bespoke functionality.
![]() Note: When setting up a new customer or entire new contract, the tabs should be used in the following order:
Note: When setting up a new customer or entire new contract, the tabs should be used in the following order:
- Cost Centre - set up a cost centre first.
- Customer Group - set up a customer group for the customer.
- Customer - set up the customer.
Please refer to the Initial Setup Guide for more information on setting up a new operation from scratch.
Customers
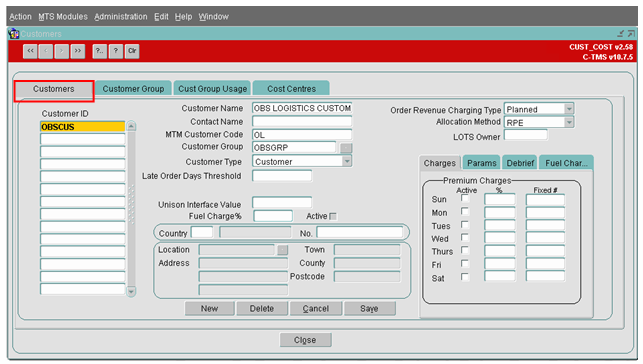
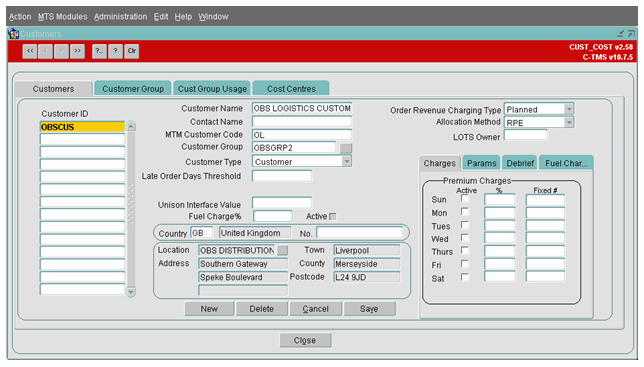
The 'Customer' tab is used to create, maintain or delete a customer. To create a customer, simply place the cursor on the 'Customer ID' column and press the 'New' button. Enter the details of the customer as shown below.
Customer ID - Enter a Customer ID up to 12 Alpha numeric characters
Customer Name - The full name of the Customer up to 35 Alpha numeric characters
Contact Name - Enter the name of the person to be contacted in the case of any discrepancies. Up to 35 Alpha numeric characters
MTM Customer Code - This was originally used for an interface with Manugistics but is now used as a prefixed two Character reference in the system generated order reference
Customer Group - This should be populated if the customer is to be grouped by a customer group name. This is explained in the below section under 'Customer Group'. To select a group the user needs to click the button to the right of the Customer Group field. This will give the user a list of values (if more than one group is within the database)
Customer Type - must be set 'Customer'.
Unison Interface Value - must be entered only if the Order details related to the customer will be interfaced from Unison (WMS) into C-TMS. If there is no interface from Unison into C-TMS for this particular customer, then leave this field as blank.
Fuel Charge% - Enter a percentage if a payment is to be added to an order in addition to that of the contract found against the Customer. Note -The active checkbox must be selected if using this function rather than the 'Fuel Char' to the right of the form. In order for this checkbox to be editable then a system parameter (MINIMUM_COLLECTION) needs to be set to 'N'
Country Code - The associated Country Code should be entered. The 'No' field is the customers registered VAT number
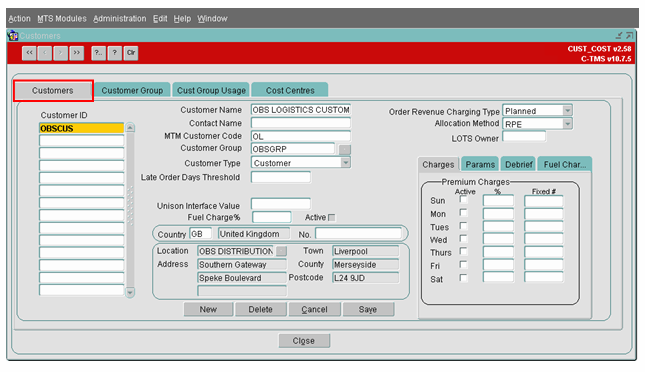
Location - Click on the Location associated with this customer. The address details will be populated based on the location address details and then press the 'Save' button. The example is shown below.
Order Revenue Charging Type - Can be set as:-
- Actual Delivered - Will not generate order revenue until the Actual Delivered Quantity has been entered against the order
- Actual Despatched - Will not generate order revenue until the Actual Despatched Quantity has been entered against the order
- Greatest - Will generate order revenue based on the Greatest Quantity. Whether this be at planned or delivered
- Planned - Will Generate order revenue based on the planned Quantity
Allocation Method - Can be setup as RPE or Weight. This is only set if the 'Consolidate Orders' checkbox is ticked. It allows the order charges to be consolidated when delivering more than one order to the same destination on the same trip by either Weight or RPE
![]() Note: Customers added through the Customer Onboarding Interface will have had the majority of this information pre-set for it when created through that interface. This includes an account and currency configured for it automatically.
Note: Customers added through the Customer Onboarding Interface will have had the majority of this information pre-set for it when created through that interface. This includes an account and currency configured for it automatically.
There are many additional tabs available for configuration of the customer:
- Params
- Debrief
- Carrier Preferences
- Fuel Charges
- Charges
- Cut Offs
- EPOD Params
- Portal Params
- TTM Params
- Security Charges
- Sched Thresh
- Document Output
- Fuel
- Security
- Trans Mode
- Minimums
- Cost Plus
- Pain Gain Rules
- Complete Trips
- Countries
- Standard Instructions
- WMS Params
- Remote Printer
- Handover Locations
- Screening
- Additional Text
- Prod DU CutOffs
Some of these are covered in more detail below.
Charges Tab
This Tab allows the user to add additional charges on any given day by either a % on top of the contract or a fixed fee. This adds an extra payment onto the order when the order revenue is generated.
Parameters Tab
Consolidate Orders
The 'Consolidate Order' flag should be checked when the customer orders needs to be consolidated for charge benefits. See the Consolidation section below for more details.
POD Document Available
The 'POD document available' flag should be checked only if the POD documents are to be stored in TOKAIRO for this customer.
TTM Params
LOTS Owner - This is the Owner (Usually the Unison WMS Owner) for the Live order Tracking System and if set against the Customer, will send any orders created in the database to the LOTS (Portal TTM) system.
You should also check the messages that should be sent for orders for this customer.
Editing a Customer
To edit a customer place the cursor on the Customer ID column and then edit the customer details on the right hand side of the form and click on the 'Save' button to save your changes.
Deleting a customer
A customer can be deleted by placing the cursor on a particular customer in the Customer ID flag and then click on the 'Delete' button. A confirmation prompt will be shown after which the customer will be deleted. Note that the Customer cannot be deleted if there are child records associated to the customer i.e. Orders and Trips. This is kept this way for audit purposes
Consolidation
The CIC screen is accessible through the PO Detail tab on the Trip Screens.
Trips Screens
This screen is also accessible from Planning and Trip Manipulation, Trip Planning and Execution screens.
A CIC button calls the CIC screen passing through the information from the tab, for example, the trip ID.
This will retrieve any details that have been added for the PO's on this trip.
Within the Trip Screens PO Tab, a check box labelled CIC will be added to each order line.
CIC Screen
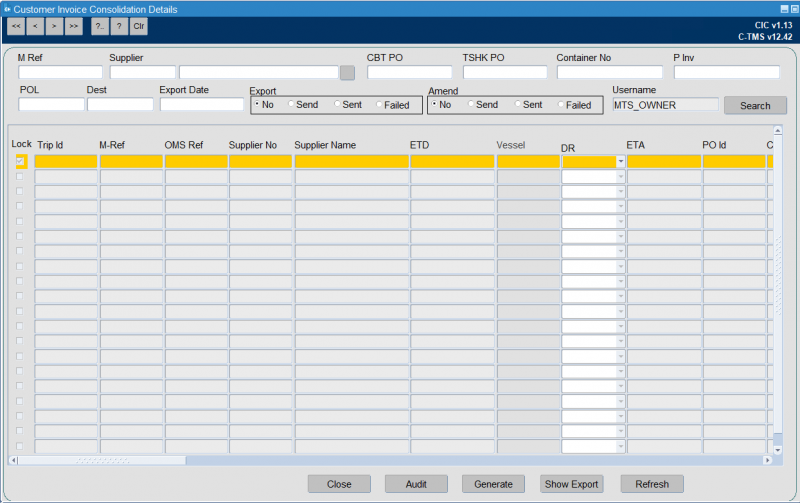
The CIC screen shows the following data:
| Field | Source | Updateable |
|---|---|---|
| M-Ref | SCH_TRIP.BILL_OF_LADING | N |
| Supplier No | SCH_PURCHASE_ORDER.SOURCE | N |
| Supplier Name | GEO_LOCATION.LOCATION_NAME for Source | N |
| ETD | SCH_TRIP_STOP.ACTUAL_DEPART | N |
| Vessel | Trailer or Vessel | Y |
| DR | Manual Entry | Y |
| ETA | SCH_TRIP_STOP.ARRIVE | N |
| PO ID | N | |
| CBT PO | SCH_PURCHASE_ORDER.MATCH_CBTPO | N |
| TSHK PO | SCH_PURCHASE_ORDER.PO_NUMBER | N |
| Seaway BL NO / CMR NO | SCH_TRIP.SWB | Y |
| Container No / Trailer No | SCH_TRIP.CONTAINER_NO / SCH_TRIP.VEHICLE_ID | Y |
| Desc 1 | E Book field | Y |
| Carton | SCH_PURCHASE_ORDER.SUB_TRANSIT_DU_QTY | Y |
| Qty | SCH_PURCHASE_ORDER.BOOKING_DU_QTY | Y |
| P INV | SCH_ORD_PO_DATA.INVOICE_NUMBER | Y |
| P INV Date | SCH_ORD_PO_DATA.DOCS_RECEIVED_DATE | Y |
| Export Licence No | Manual Entry | Y |
| Cert of Origin No | Manual Entry | Y |
| POL | GEO_LOCATION.COUNTRY_CODE for source | N |
| Dest | GEO_LOCATION.COUNTRY_CODE for destination | N |
| Unit | E Book field | Y |
| Net Weight | E Book field | Y |
| Gross Weight | E Book field | Y |
| Order Ref No | Manual Entry | Y |
| Pack Code | Manual Entry | Y |
| So HTS Code | E Book field | Y |
| PO Unit Price | SCH_PURCHASE_ORDER.UNIT_COST | Y |
| FCR No | Manual Entry | Y |
| FCR Date | Manual Entry | Y |
| Chargeable Weight Air | Manual Entry | Y |
| Freight Cost Price Air | Manual Entry | Y |
| Remark | Manual Entry | Y |
| Export No | Generated | N |
| Export Send | Y' or 'N' as checkbox | Y |
| Export Sent | Y' or 'N' updated automatically as checkbox | N |
| Export Sent Date | Generated | N |
| Adjust No | ?? | N |
| Adjust Send | Y' or 'N' updated automatically as checkbox | N |
| Adjust Sent | Y' or 'N' updated automatically as checkbox | N |
| Locked | Y' or 'N' as checkbox | Y |
The screen shows a line for each purchase order that has been ticked in the trip screens, and each line will be assigned a unique sequence. This sequence will be used to link this table with the audit information and will form the primary key of the table.
The items listed as updatable are available for the user to make changes. The fields that are not marked as updatable are display only.
The user that initially triggered the data, from the trip screens, will be stored in a created by field along with the date/time.
The screen contains a checkbox labelled "Locked" which indicates if the current record is available for update. Once a user unlocks a record, by unchecking this box, their username will be stored against the record, in a column called USERNAME and used later to identify which records are to be sent.
Once the user has finished making the required changes they will tick the Export Send flag on the line. This will indicate that this record is to be included in the file when generated. The user will be prompted to confirm that the row is to be included and at this point the record will be saved.
The screen will also be accessible through the menus. When accessed this way the user will be able to search the data using the following fields.
- M_REF
- Supplier No – Source
- CBTPO – Matched CBTPO
- TSHK PO – PO number
- Container No
- P_Inv – Invoice Number
- POL – Collection from country
- DEST – Deliver to country
- Export No
- Export Send (Yes or No)
- Export Sent (Yes or No)
- Export Sent Date
- Amend No
- Amend Send (Yes or No)
- Amend Sent (Yes or No)
- Amend Failed (Yes or No)
- Username – will default to current users name and should not be updatable.
![]() Note: This section of the screen will only be enabled when the screen is accessed from the menus, and will be disabled when coming from the trip screens.
Note: This section of the screen will only be enabled when the screen is accessed from the menus, and will be disabled when coming from the trip screens.
Using the above search criteria the user will be able to retrieve the records they wish to send in the file. If the user retrieves records by choosing the Export Sent flag as 'Y' the records will not be available to be sent in the file but will be displayed only.
A Generate button is available - this will be used to produce the XML file and the export. When pressing this button all records that meet the search criteria and where the Export Send flag is set to 'Y' will be included in the file.
A right click option is available on each record in the screen which contains a 'CIC Audit' option. Choosing this will display a pop up screen that contains an audit record for the current row. The audit will show the following columns.
- CIC_ID – CIC id link to INT_PO_CIC table
- CIC_AUDIT_ID – Unique ID for each audit record.
- Created Date – Date of action
- Created By – User who performed the action.
- Audit Message – text description of the action performed.
When a record is changed, the field changed along with the old and new values will be stored in the audit message. The user name and time will also be stored. An audit message will also be written when the Export is sent.
Output Files
The XML file will be created at the time the button is pressed and will use the selections in the screen, the XML file will contain a section for each of the records in the interface table that meet the criteria. An XSD is available for the new XML message.
Once the file has been created the Export Sent flag will be set to 'Y' for each record.
At the same time the XML file is created, a CSV file containing the same data will be displayed on the screen. This can then be saved by the user.
Both the XML and the CSV file will contain all the fields displayed on the screen (see above).
The XML file will be placed in the directory listed in the system parameter POM_OUTBOUND_PATH, and a copy kept in the directory listed in the parameter POM_OUTBOUND_ARCH.
Interface Errors
A tab is available on the Interface Errors screen. This tab shows
- Filename
- Date and time
- Status – sent or failed
- Trip Id
- PO Number
- PO ID
There is a View button that will show a details screen for the message, including all the information that has been sent. This will be similar in structure to the existing PO Outbound message.
Customer Group
Customer Group is used within C-TMS to group a number of Customer ID into a single group. This will allow access control of the locations/sites to view and manipulate orders.
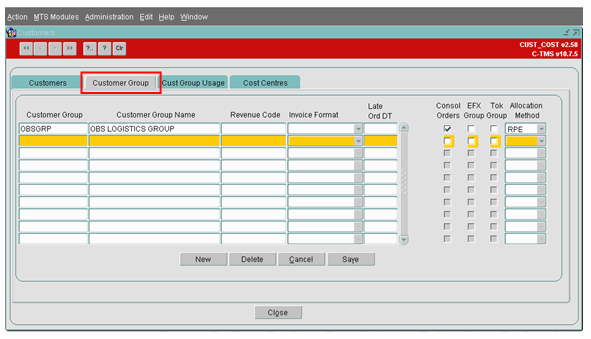
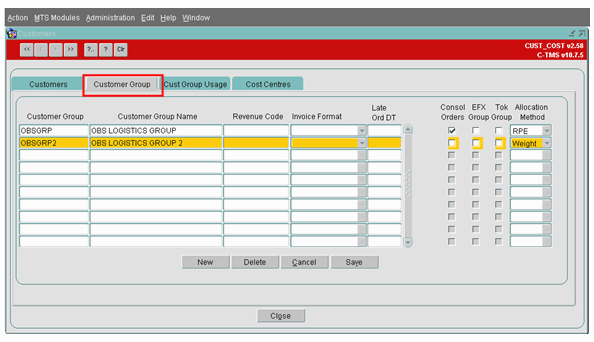
To create a 'Customer Group', place the cursor on the Customer Group column and click on the 'New' button. The samples given below demonstrate the creation of a Customer Group.
Consol Orders - This works the same as the Consolidate orders section at the Customer Level accept the user can set it Group level rather than individual Customers
EFX Group - This box should be Checked if the Customer is using EFX for internal carrier charging between different businesses operating under the same Company banner
TOK Group - This flag should be checked only if the POD documents are to be stored in TOKAIRO for this Customer Group
Allocation Method - Can be setup as RPE or Weight. This is only set if the 'Consolidate Orders' checkbox is ticked. It allows the order charges to be consolidated when delivering more than one order to the same destination on the same trip by either Weight or RPE
In the example given below, the Customer has been associated to the Customer Group that was created as part of this exercise.
Deleting a Customer Group
A Customer Group can be deleted by placing the cursor on a particular customer group and then click on the 'Delete' button. A confirmation prompt will be shown after which the customer group will be deleted. Note that the Customer Group cannot be deleted if there are child records associated to the customer group i.e. Orders and Trips. This is kept this way for audit purposes
Customer Group Usage
Customer Group Usage is usually used when a company has several businesses operating within the same database.
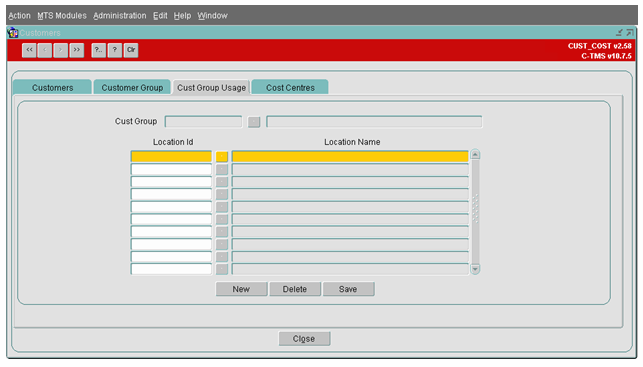
The customer group usage screen allows users to associate locations with a customer group for segregation purposes.
Location Usage can be defined at a customer or a customer group level. If defined at a customer group level, then this screen will show the locations assigned to this group.
The tab is only visible when the system parameter ‘MTS_LOCATION_USAGE’ is set to either the value ‘CUST_GROUP’ for Customer Group usage level or ‘CUST’ for a Customer usage level.
This allows the user to add Locations to a specific Customer Group and if the user is setup to only see that particular Customer Group then they will only be able to create orders and trips using the locations assigned within this Tab page.
To add locations to a customer group:
Select the button next to the 'Cust Group' field and select the relevant Customer Group from the list of values that is populated
Then select the button next to the 'Location Id' field and select the relevant Location from the list of values that is populated
To add more locations select the 'New' Button. This will highlight another line in Yellow and allow the user to repeat the same process. Delete a location by highlighting the required Location and then click the 'Delete' Button.
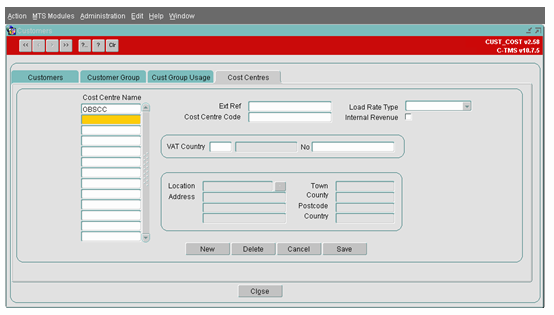
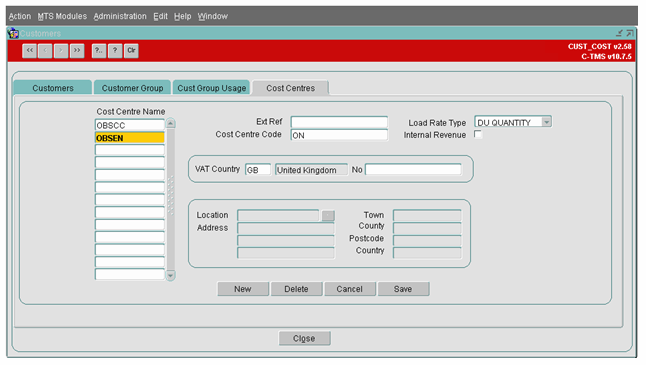
Cost Centre
A 'Cost Centre' is associated to an Order based on the set up done in this form.
Creating a new Cost Centre
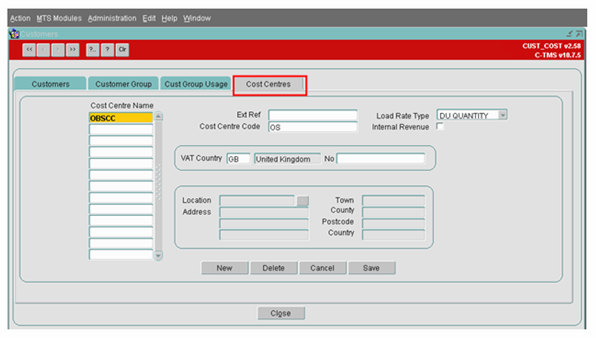
Select the New Button; this will highlight a new line to allow the user to enter the new data
Enter the Cost Centre name; this can be 12 alpha numeric characters
Cost Centre Code - This is a prefixed two Character reference will be shown in system generated order reference
Load Rate Type - This can be DU Quantity or Weight. This decides which load rates to look at within the resource maintenance screen. Load rates are entered against every location and it defines the load and un-load times. The times can be entered against the Despatch unit or the weight.
When the Transport Planner plans the trip with an order or orders it will calculate the load rates as well as time and distance and enter the appropriate times against each stop to best fit the order time windows.
Internal Revenue - 'Internal Revenue' flag is checked, and when a 'Trip Status' is changed from 'Planned' to 'Accepted' then the system would validate to check if an contract exists between the two 'Cost Centres' that are involved in the trip.
VAT Country - The country code the Cost Centre falls within. The 'No' field is the Registered VAT Number
Location - Click on the Location associated with this Cost Centre. The address details will be populated based on the location address details and then press the 'Save' button. This Location is used on the invoice when printed.
Deleting a cost centre
A Cost Centre can be deleted by placing the cursor on a particular Cost Centre Name and then click on the 'Delete' button. A confirmation prompt will be shown after which the Cost Centre will be deleted. Note that the Cost Centre cannot be deleted if there are child records associated to it i.e. Orders and Trips. This is kept this way for audit purposes
New Supplier
This screen can be used to create a new supplier.
