Trailers: Difference between revisions
(Initial Creation) |
(Merged from training document) |
||
| (One intermediate revision by the same user not shown) | |||
| Line 7: | Line 7: | ||
<center>[[Image:res_trailers_2.png|800px]]</center> | <center>[[Image:res_trailers_2.png|800px]]</center> | ||
The Trailer ID can be entered and a Trailer type selected. You can also identify the tracking system used for this particular trailer. | |||
Click '''Save''' and the system will confirm the trailer has been saved - if you haven't entered a carrier group, the screen will tell you it needs to be allocated to a trailer group. Click '''OK'''. You can then enter a subsequent trailer or click '''Cancel''' to return to the main form. | |||
The Trailer ID can be linked to a particular Carrier Group for ownership purposes. This controls the visibility of trailer ID selection based on the user's access parameters. | |||
You can do this in this popup screen. Click in the Carrier Groups table and hit CTRL-L to see a lookup of all carrier groups. Select one and click '''OK''' - the carrier group will be assigned. | |||
Click '''New''' in "Allocate to Resources" section to add to a Carrier Group (or '''Edit''' the Trailer ID). Allocate a carrier group to the trailer as described above. This will normally be "Fleet" for own fleet or "Hauliers" for 3rd party carriers. | |||
Click '''Save'''. The trailer is now allocated to a carrier group. The trailer will now be available to assign to a trip. | Click '''Save'''. The trailer is now allocated to a carrier group. The trailer will now be available to assign to a trip. | ||
The Trailer ID can also be linked to one or more Tractor IDs - this will limit which Trailer IDs can be assigned to a trip where a Tractor ID is first applied. It denotes which trailer can be drawn be which tractor. It can also be used as a one-to-one link where a tractor/trailer represent a rigid vehicle. Click '''New''' in the "Tractors linked to Trailers" section (or '''Edit''' the Trailer ID). | |||
| Line 18: | Line 28: | ||
Using the search buttons find the trailer you want to make inactive and click '''Edit''' from the Allocation to Resources box. | Using the search buttons find the trailer you want to make inactive and click '''Edit''' from the Allocation to Resources box. | ||
Click in the "Inactive" check box, so a tick appears. | Click in the "Inactive" check box, so a tick appears to inactivate the whole trailer or mark the specific Tractor links or Carrier Group links as inactive "Y". | ||
Click '''Save'''. The trailer id is now inactive. | Click '''Save'''. The trailer id is now inactive. | ||
You can also import trailers through [[Imports]]: | |||
* [[Imports_Details#TRAILER|TRAILER]] | |||
Latest revision as of 08:52, 5 June 2024
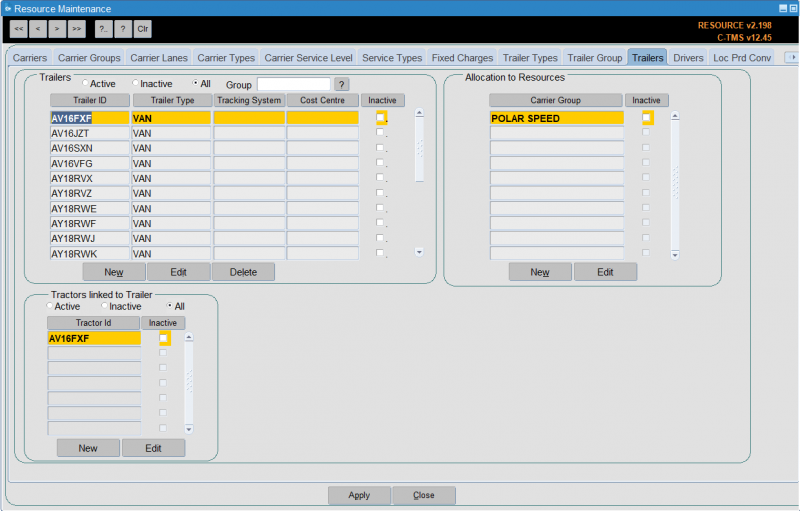
This allows configuration of instances of trailers. This can be used for tracking trailers throughout the system. This tab also allows Trailers to be linked to a particular Carrier Group to control who is able to user the Trailer.

To enter a new trailer click New:

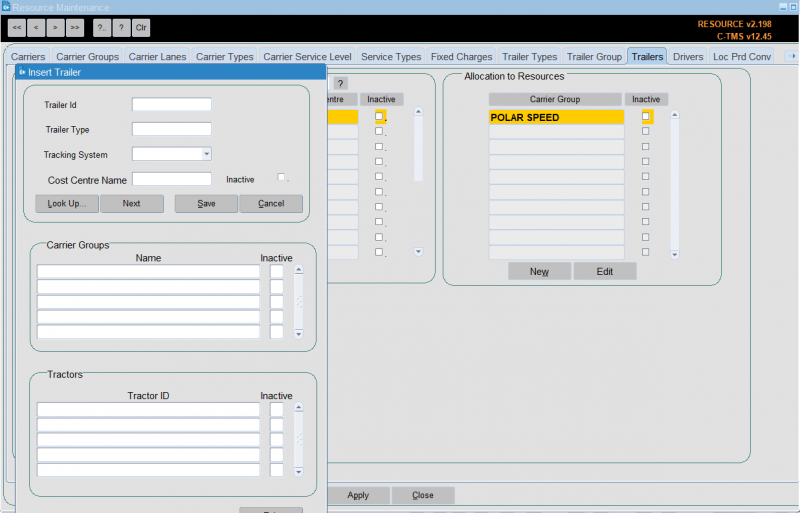
The Trailer ID can be entered and a Trailer type selected. You can also identify the tracking system used for this particular trailer.
Click Save and the system will confirm the trailer has been saved - if you haven't entered a carrier group, the screen will tell you it needs to be allocated to a trailer group. Click OK. You can then enter a subsequent trailer or click Cancel to return to the main form.
The Trailer ID can be linked to a particular Carrier Group for ownership purposes. This controls the visibility of trailer ID selection based on the user's access parameters.
You can do this in this popup screen. Click in the Carrier Groups table and hit CTRL-L to see a lookup of all carrier groups. Select one and click OK - the carrier group will be assigned.
Click New in "Allocate to Resources" section to add to a Carrier Group (or Edit the Trailer ID). Allocate a carrier group to the trailer as described above. This will normally be "Fleet" for own fleet or "Hauliers" for 3rd party carriers.
Click Save. The trailer is now allocated to a carrier group. The trailer will now be available to assign to a trip.
The Trailer ID can also be linked to one or more Tractor IDs - this will limit which Trailer IDs can be assigned to a trip where a Tractor ID is first applied. It denotes which trailer can be drawn be which tractor. It can also be used as a one-to-one link where a tractor/trailer represent a rigid vehicle. Click New in the "Tractors linked to Trailers" section (or Edit the Trailer ID).
If a trailer id is no longer required you are able to make it inactive.
Using the search buttons find the trailer you want to make inactive and click Edit from the Allocation to Resources box.
Click in the "Inactive" check box, so a tick appears to inactivate the whole trailer or mark the specific Tractor links or Carrier Group links as inactive "Y".
Click Save. The trailer id is now inactive.
You can also import trailers through Imports: