T2A
Introduction
This system is intended to be used by the Hospital Services team within each depot, for the following purposes:
- to place the picked stock for orders into reusable assets.
- To create bookings
- To despatch trips and confirm items despatched for 3PC and customer-own transport trips.
- To bulk forward items in large media e.g. cages.
- To upload large media of bulk forwarded items.
Access Control
Your user must be configured, have a valid password and be set up for a default depot.
Login
Users will be prompted to login through a standard EPOD screen. The screen will prompt you to enter their username and password. This controls the depot under which the user is logged on and the access control.
Only if a user is set up for this application and if the user name and password are correct will you be allowed to continue.
Enter your user and password then click Login. You will be taken to the default page for the application, namely "T2A" - Tag to Asset scanning.
Menu
The menu shows all accessible screens in the system.
- Bookings
- T2A
- Despatch
- Asset Return
- Forward Items
- Asset Content Unloading
Exiting the System
Click the Log Out link on the top right of the screen.
There is a timed (session-based) log-off process built into the system to ensure that you are taken tack to the login screen if the session has not been active for longer than a proscribed time (for example 30 minutes).
Bookings
The screen will allow the users to enter a new booking, identifying an existing C-TMS (Pulse) order through the C-TMS OMS Reference or the Pulse Order Reference – any unbooked orders will be displayed with a Book button. Clicking this will show a popup and will prompt the user to enter the booking times, Carrier (for example, TNT, Hospital Collect, etc) and the P/O reference if required, although this is optional at this stage.
A C-TMS Trip will be automatically created for the order if one does not exist.
The users will also be able to find created bookings through a variety of search criteria, expected to include Schedule (defaulting to the current day), Carrier, Delivery Location, Order Reference, External Reference or Carrier Reference (expected to be the P/O number for external carriers).
Any matching bookings will be displayed – see the following prototype page design for details of the layout.
Once found, the user can then input arrival details of a created booking, including the Driver Name, Driver Badge (if required) and Vehicle Registration, by clicking the Arrive button. The arrival date and time will be automatically captured.
Once arrived, the details of the orders on the trip can be found by clicking on the Despatch button to display the Items to be despatched on that trip. This will use the existing Despatch Details screen, as shown below:
If no assets exist to be passed to the driver, then Tag to Asset may not have been completed for the orders yet. In this case, this can be seen on this screen. Furthermore, the existing Tag to Asset (T2A) screen can be used to pack the items, at which point they will subsequently be displayed on this screen.
Each item to be despatched can be scanned to determine that it has been despatched. As per the existing screen functionality and items may be removed.
Once all items are scanned, the Accept and Despatch button can be clicked. If a Carrier Reference is required but has not yet been entered, this screen will prompt for it to be entered at this stage.
If entered, a pop-up screen will request the signature and display the Name and Vehicle as previously entered.
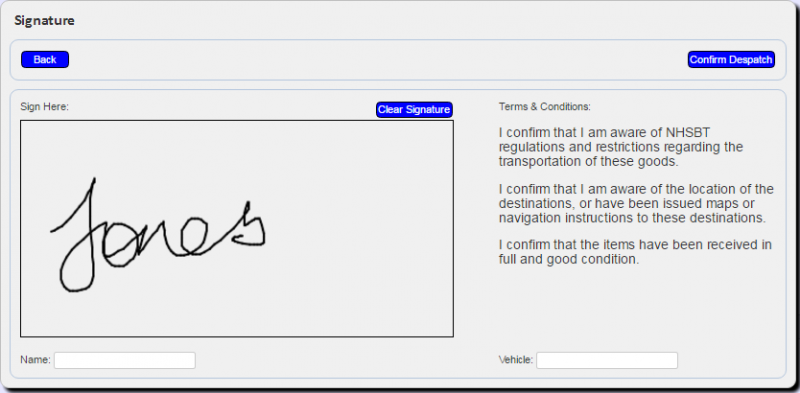
The device can then be passed to the driver for signing. It is expected that Terms and Conditions for the acceptance of the load will be displayed here and a count of the items and a list of their id’s. The T&C’s wording will be designed to confirm that the driver knows the destination(s) or has been issued a map and in signs for that as well as the expected "Boxes received in good condition...".
![]() Note: This process also works with Topaz Signature Tablets.
Note: This process also works with Topaz Signature Tablets.
Once signed for, the orders will be confirmed as despatched for the 3PC.
For HOT, the items wil also be marked as delivered.
The trip will be set to EN-ROUTE for 3PC and COMPLETED for HOT.
The Signatory (i.e. 3PC Driver Name) and Signature is stored on C-TMS. This is visible through the POC button against the order at Debrief.
Once the signature is confirmed and saved, the summary list of trips screen is re-displayed.
T2A
When an order is packed into the appropriate box for delivery, Hospital Services will scan both the buff tags for the delivery and the asset box into which the delivery has been packed, this information will then be used to update C-TMS to indicate which order items have been packed into a particular asset.
The aim of these processes is that they have been written to ensure hands-free operation if possible (where there are no issues with either the orders for the items or the assets being scanned).
The process flow is as follows:
- Scan Tag 1
- Scan Tag 2
- Scan Tag 3
- Scan Asset 1 - marks tags 1-3 as in Asset 1
- Scan Tag 4
- Scan Tag 5
- Scan Asset 2 - marks tags 4-5 in Asset 2
The user of the system will not be allowed to continue until all scanned tags are marked as in an Asset.
The screen will display with several sections and buttons:
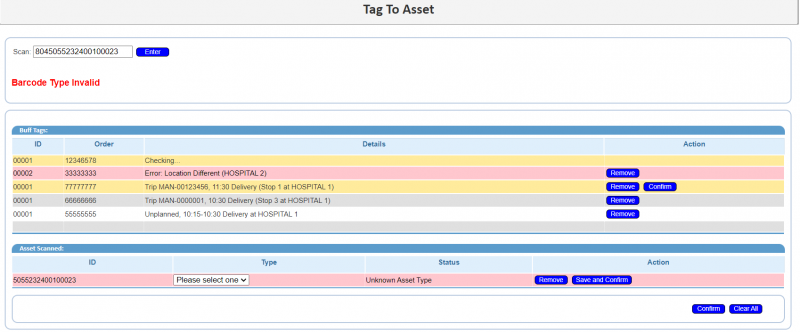
- Prompt for Asset entry and an Enter button. The asset entry text box will be focused for entry.
- An Error display section, below the text entry.
- A Buff Tags section, containing a table, initially empty.
- An Assets Scanned section, containing a table with a single row, initially empty.
- A Clear All button.
The user will be able to scroll through the buff tags, if there are more than 6 tags scanned against an asset.
The Assets Scanned table will be a single header and row.
The Clear All button can be used to clear any already-entered details (Asset and Buff Tag table rows) - pressing the button will request confirmation before clearing the data.
Scan the Buff Tags
Scan the barcode on the Buff Tag (or if not recognised the barcode text can be keyed in through the keyboard – followed by a Return/Enter key).
If the barcode is invalid then it will display a warning (in large, red text format) under the barcode entry line, displaying "Barcode Type Invalid". The system will also sound an audible warning tone. The alert will quickly fade after 2 seconds.
Once the Buff tag barcode is recognised, the user can then continue and scan subsequent Buff tags associated to the Asset.
The details of the Buff Tag are displayed in the second panel with a displayed message ‘Checking….’ – this validates with CTMS that the order is available and the details will be passed back and displayed.
The details in the Buff Tag panel are coloured coded indicating an error has occurred and the user needs intervene with an action or confirm/remove the details entered as follows –
If the scanned item passes the validation, the line will be added with a simple Remove button which, when clicked, will remove the row.
Validation Checks are as follows – for any errors the User can then determine whether to remove the Buff tag or confirm that should be agreed.
| Issue | Status | Detail | Option |
|---|---|---|---|
| The order doesn't exist | Red | Error:" plus the reason for the error " | Remove |
| The order has already been confirmed | Red | Error:" plus the reason for the error " | Remove |
| The collection stop for the planned trip for this order has an actual depart time (i.e. the item has already been loaded | Red | Error:" plus the reason for the error " | Remove |
| Destination Location different to other Buff Tags scanned | Red | Details - "Error: Location Different" | Remove |
| If the scanned item is planned, the application will check the trip and stop information of this item against any previous items scanned. If they are different, the line with the later delivery will be require confirmation that the item may be moved onto the earlier delivery. To reflect this | Amber | Text to show that this item will be planned with these other items | Remove or Confirm can be moved to an earlier delivery |
| If the scanned item is not planned, the application will check the planned order times against those of tags already scanned. If the planned times do not exist within the same range, this line will be changed to show this | Amber | Text to show that this item will be planned with these other items | Remove or Confirm that this item will be planned with these other items. |
| The application will check whether the item has already been scanned into an asset (by checking the returned asset ID from the message). If set, the line will be changed to show this | Amber | Text to show that this item will has already been scanned and the Asset ID | Remove |
The user can continue to scan items, which will follow the process and validation above. To associate all of the items together and update C-TMS with the details, a valid permanent asset must then be scanned.
Scan the Permanent Asset
If it is a valid asset number and there are no issues with the barcode scanned, the details of the asset type will be displayed (for visual recognition), however the user will have the opportunity to Remove this asset if required.
| Issue | Status | Detail | Option |
|---|---|---|---|
| asset is marked as inactive | Red | Asset X is inactive and cannot be used | Scan another Asset Barcode |
| active orders already in the asset | Red | Asset already has tags - please confirm | Validate all tags on assets and confirm or Scan another Asset barcode |
| the asset not found | Red | Status - "Unknown Asset | Select asset type from Dropdown list and confirm or Scan another Asset Barcode |
| the asset has no defined asset type | Red | Status - "Unknown Asset | Select asset type from Dropdown list and confirm or Scan another Asset Barcode |
If a change is made to the asset details, once entered the user has the option to press the Save and Confirm button.
Confirm Details
If the asset had no issues, or the Confirm button at the bottom of the screen is pressed, the application validates:
- No buff tags are in error (i.e. red background).
- The asset must be entered and valid, with asset type details.
- There must be buff tags entered.
If any validation is not passed, an appropriate error message is displayed in the error section, showing all the issues, for example:
- "Invalid buff tags must be removed"
- "You must enter an asset type or remove the asset"
- "Buff tags must be entered for the asset."
The User will then be required to resolve these problems.
The application will check if there are any warnings outstanding (i.e. buff tags that are planned for a different time or trip than others in the asset). If this is a case, a confirmation dialogue will be shown, showing all the details:
- The asset
- The buff tags with warnings and their details
- The trip and stop (or planned time window) into which these items will be moved.
- A Confirm and a Cancel button.
By clicking the Cancel button will return you the main screen, with all data preserved, allowing any modifications to be made and then confirm again.
Despatch
The Third Party Carrier (3PC) process, comprising external carriers / couriers like TNT and Hospital Own Transport (HOT) requires functionality in three areas to support processes for operations through a system accessible on a tablet or other portable computer, or a work station:
- Despatch
- Inbound
- Empty Assets
The Despatch process and supporting functionality comprises the following principle features:
- Easy selection and filtering of trips by carrier type.
- Finding trips by PULSE or manual order references assigned to 3PC.
- Scanning of items for despatch using a tethered or Bluetooth wireless bar code scanner.
- Modifications and error corrections of despatching items.
- Capture of driver name and Id and vehicle registration.
- Display of orders and delivery units by delivery location to help brief the driver.
- Signatory and Signature capture to confirm despatch.
- Store Signatory and Signature in C-TMS and display from show POC button.
- Update C-TMS to confirm the despatch at Trip, Order and Item.
The 3PC process is designed assuming the following system pre-requisites concerning C-TMS:
- Orders will be planned to Trips assigned to a third party carrier (e.g. Hospital-Own Transport or TNT). These trips might represent a single ad-hoc order (or a consolidation of orders) from a depot to a single destination delivery or routine regular rounds from depot to deliver to a list of destinations in turn. The trips will have been planned and scheduled and assigned to an external carrier.
- Transport Orders (through EDI or manually entered into C-TMS or Portal) assigned to 3PC carriers will require the agreed order reference to be keyed into the Booking Reference field of each order in C-TMS; and the 3PC order reference to be keyed into the trip PO reference in C-TMS.
- The C-TMS order Booking Reference and trip PO reference will be modifiable after acceptance of the trip.
This Despatch Screen displays a list of the trips loading for that centre for the selected day schedule, filterable by the carriers assigned to the depot of the user that is signed on and the carrier type.
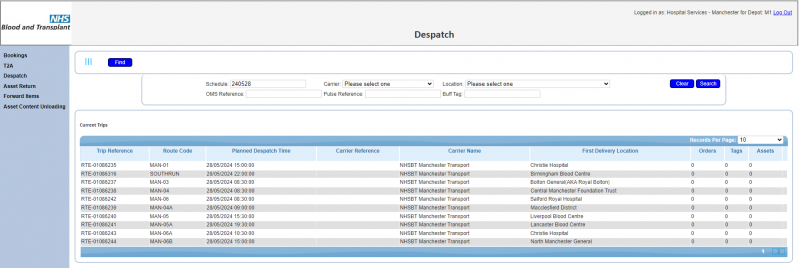
A Find button allows a trip to be selected based on a known order reference. Each trip not yet despatched will be displayed, so PLANNED, TENDERED and ACCEPTED trips.
The find criteria are:
- Schedule
- Carrier
- Location
- OMS Reference
- External (PULSE) Order Reference
- Buff Tag
The list of trips shows:
- Trip Reference
- Route Code
- Planned Despatch Time
- Carrier Reference
- Carrier Name
- First delivery location
- Count of Orders
- Count of Tags (increment by order issued from PULSE)
- Count of Assets / Items (increment by T2A scanning)
The carrier reference will be captured from the 3PC interface or manually keyed against the trip PO Reference and Order Booking Reference in C-TMS once the booking is made by transport.
The user signed on will then be able to drill into the trip to see the Details of all the PULSE orders to be despatched, the status of T2A for each order, and the asset id’s similar to the existing Box Status Screen in C-TMS.
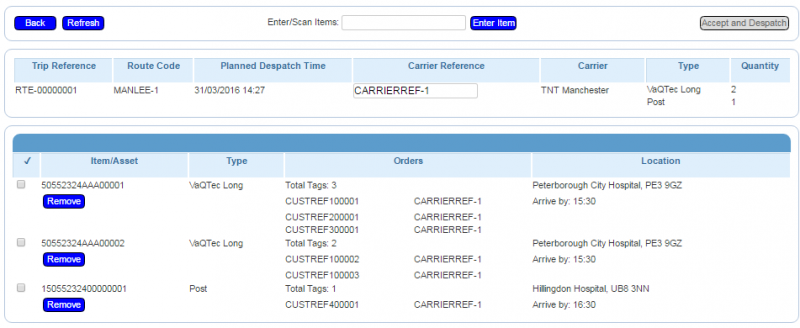
The heading shows the same trip details as above confirming the selection from the trip list.
The detail list shows each delivery order in drop sequence:
- Asset Item Code or one way label number
- Delivery Unit (DU) Type
- PULSE Order References (Request No) and Box Numbers (Tag Reference)
- Carrier reference
- Destination Location Code, Name and Address
Note that this list will repeat Asset Item Codes where consolidation across orders has been determined through T2A scanning.
A box / item summary will be displayed showing the count of each asset/item type to be handed over to the driver.
A Scan button and input field will be presented that will allow asset/items to be scanned to assist the reconciliation process. The scan function will allow label scan and validation against a list of known permanent asset numbers (assigned to orders planned to the trip from the T2A packing function). As each asset is scanned, the display checkbox will be ticked and the asset number will be displayed in green as confirmation the asset is accounted for.
Once all the expected assets are scanned, a reconciled status icon will be displayed to confirm the scanning is complete and the user can then move on to the next stage of the process.
If an asset is scanned that is not recognised for the despatch, an appropriate error will be displayed and the user prompted to check the asset and to use the T2A screen to add the asset if it is to be despatched.
Note: 3PC references are most likely assigned per trip, so the reference for all orders on a trip is likely to be the same.
The user will have access to the existing T2A screen to resolve any issues with the assets shown on the screen, for example:
- If an order is found in an Asset that is not shown on the screen, the user can use T2A to add this order buff tag to the asset.
- If an order is missing from an Asset (i.e. shown in the screen but not in the Asset), the user can use T2A to remove the tag(s) from the asset.
If an order is to be added to the trip despatch representing an additional location, the users will request transport to make the change to plan using C-TMS and then users can use the T2A screen (if not already done) and then scan for despatch. This is unlikely to happen in practice unless the booking with TNT has been re-negotiated.
Where delivery orders are planned for a destination drop, an ad-hoc one way label item can be added to the despatch, for example an envelope of paperwork, and the screen will provide an ad-hoc item scan button and field to support this action. Once the additional item is scanned and validated as the correct label type, the screen will then prompt for the destination location from a drop down list. Only locations on the current trip route as planned by transport will be available.
If any asset/items are to be removed from the trip and not despatched, a Remove button against the asset/item is available.
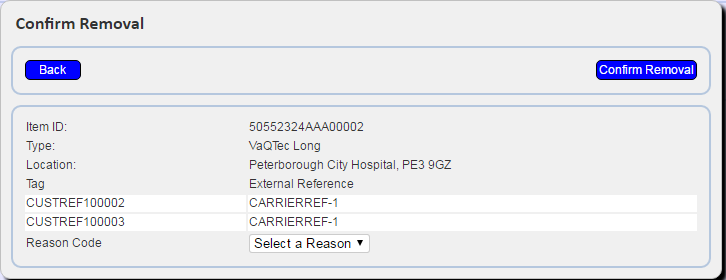
This will require the user to enter a reason code, and on Save, the screen will remove the asset/item from the order. This action will retain the order on the trip (assuming other assets have been T2A assigned to the same order) and will retain the order issued information should that have been captured through the normal interface between PULSE and C-TMS.
If an order is to be removed from the trip and not despatched, the users should request transport to make the change to plan using C-TMS.
Once any additions or deletions from the trip are entered, a Refresh button is available to display the current list asset/items, scan confirmations and totals. The user will be asked for confirmation, as this may result in items scanned so far being lost.
The screen allows the facility to enter the 3PC driver id and name here.
If a 3PC reference is not present, that can optionally be entered or changed at this stage of the process.
The checkboxes against the items will be monitored for changes - when all checkboxes for non-removed items are ticked (either through scanning or manually ticking the items), the Accept and Despatch button will become enabled, allowing the user to confirm the despatch.
This will pop up a despatch signature entry screen.

The device can then be passed to the driver for signing. It is expected that Terms and Conditions for the acceptance of the load will be displayed here and a count of the items and a list of their id’s. The T&C’s wording will be designed to confirm that the driver knows the destination(s) or has been issued a map and in signs for that as well as the expected "Boxes received in good condition...".
![]() Note: This process also works with Topaz Signature Tablets.
Note: This process also works with Topaz Signature Tablets.
Once signed for, the orders will be confirmed as despatched for the 3PC.
For HOT, the items wil also be marked as delivered.
The trip will be set to EN-ROUTE for 3PC and COMPLETED for HOT.
The Signatory (i.e. 3PC Driver Name) and Signature is stored on C-TMS. This is visible through the POC button against the order at Debrief.
Once the signature is confirmed and saved, the summary list of trips screen is re-displayed.
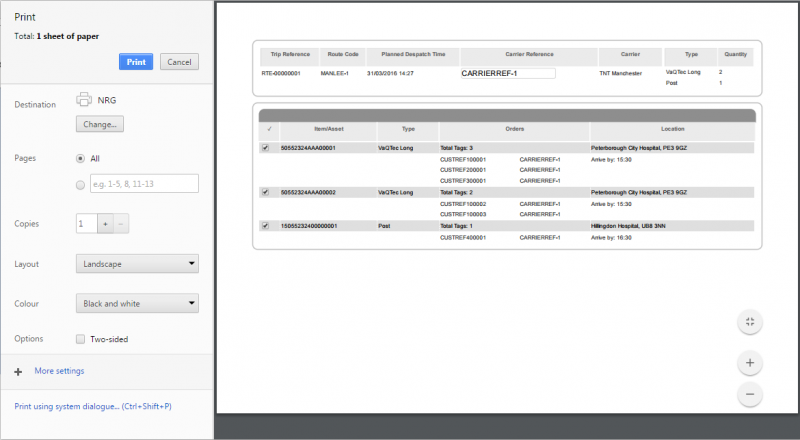
Once a trip is despatched, no further updates can be made to it. However, the user can still drill into the trip and see details. The Confirm and Despatch button is replaced with a Print button, which will start the printing process from the browser. Only the trip header and details will be printable.
Asset Return

An operative in depot will scan all returned assets to the asset store (on arrival or at end of day) using a tethered laser scanner linked to this screen.
The screen will operate similarly to the T2A screen - the user will be prompted for a barcode to scan.
When scanned, the screen will identify the asset - any errors will be displayed visibly and audibly in the screen.
If an asset is found, this will be updated as back in the depot into which it has been scanned, maintaining the history of the asset at this time.
This screen will also allow correction of asset details, or entry of assets that are not found.
Once scanned, the asset details will be checked, and the screen will allow the asset to be updated by this process, allowing the user to enter or change:
- Asset Type
- Active/Inactive
These details can then be saved.
Forward Items
This screen will allow:
- Scanning of items onto orders.
- Scanning of items on orders into primary transport assets.
- Identifying the primary transport asset type (if this is not a permanent asset).
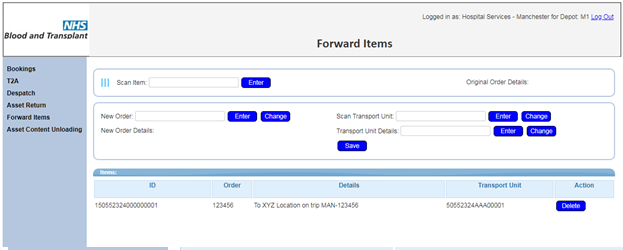
Items or assets scanned into primary transport assets must be planned onto the same trip and for the same destination as each other. This includes assets being scanned into a primary transport asset that is already en-route on a trip through the network (for example, co-loading items into a cage at a cross-dock location, although it should be noted that NHSBT will not encourage this process).
It is expected that most items will be physically available to be consolidated into primary transport assets, but not all, depending on size, type and volume.
Permanent assets placed on orders and planned this way (either primary or inner) will update the asset history of that permanent asset, so that the operation can see assets moving through the network. This will be done for primary transport assets in the same way that normal permanent assets are tracked.
As items are added to or removed from a primary transport asset, the system will write order items reasons against the order, to audit the fact that the item has been placed in a transport unit.
Asset Content Unloading
This screen will:
- Allow the user to scan a primary transport asset ID.
- Find the contents of the primary transport asset and display the contents on the screen (an electronic manifest). The primary transport asset information will include the primary transport type, trip on which this was delivered to the depot, the location of the stop at which this transport unit was built and date/time arrived at the depot. The contents will display the inner asset ID and DU type.
- Scan the items inside the primary transport asset to mark them as unloaded.
- Mark any items not found with a reason code as to why.
- Add items to the asset if found and not on the electronic manifest, with a reason code.
- Confirm unloading complete.

An audit trail will be maintained of every item scanned, found or not found in the primary transport asset, and this information will be visible through the order items reasons against the order.
Further Configuration
The following System Parameters affect this functionality:
| Parameter | Description | Level |
|---|---|---|
| T2A_ASSET_ARRIVED_OFFSET_DAYS | A number of offset days from the current date to select orders that have arrived at the depot for T2A Forward Items. | SYSTEM |
| T2A_ASSET_DUE_OFFSET_DAYS | A number of offset days from the current date to select orders that are due arrive at the depot for T2A Forward Items. | SYSTEM |
| TAG_TO_ASSET_SCANNING | Allow scanning and recording of Tags | SYSTEM |
| OMS_TAG_TO_ASSET_TYPE | Order types to be validated in TAG to Asset Scanning | SYSTEM |