Resources
The Resources module encompasses the maintenance of the Resources used throughout the C-TMS system. Resources define the various core entities used in the transport system to enable trips to be made. These are entities such as Carriers, Trailers, Despatch Unit Types and Drivers. Resources data is used by many of the key functions in C-TMS including Trip Manipulation, Generate TI's and Bookings.
The data can be viewed, created, edited and maintained through the accompanying Resource Maintenance form.
Key Functionality
Carriers
This section allows carrier information to be configured. Carriers can be connected to carrier groups and can be of a certain type. For example, FLEET type is part of the business or client using C-TMS whereas HAULIER may be deemed to be 3rd parties.
One use of the carrier records is to record typical fleet routes or groups so that planning personnel in other areas of the system, such as when using Trip Manipulation can easily identify them.
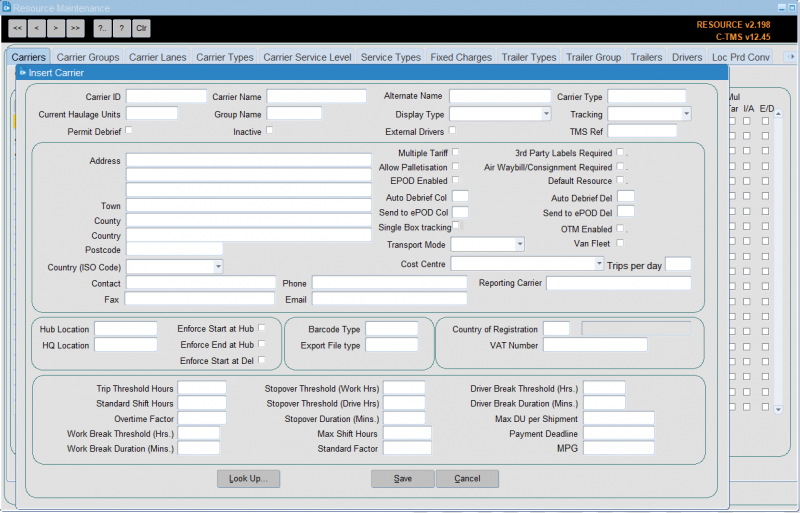
You can click New Carrier to create a new carrier:

A variety of attributes are configured here for each Carrier record such as V.A.T. number, hub location, maximum shift time, fixed costs and head quarters.
Note that the "Display Type" can be set to either "Poplist" or "Freetext", the latter will allow free text entry of data into the trips allocated to this carrier (driver, vehicle etc) and the former will force you to select data from predetermined lists which we will see later in this section. Save will save the changes, note a message at the bottom of the form will confirm the save.
You can continue entering your next haulier or click Cancel to close the form.
The haulier is now visible in the carrier tab.
"Fleet" resources should be set up with a "Hub Location" and the "Enforce Start at Hub" and "Enforce End at Hub" boxes ticked to enable them to operate correctly. This will ensure that all trips allocated to these carriers will start and end at this location as opposed to hauliers who will generally be utilized from location to location rather than round trips.
Note that the "Display Type" is normally set to "Poplist" for internal fleet carriers, as the assets should be fixed and can therefore be pre-populated. Additionally the "Trip Threshold Hours", "Standard Shift Hours", "Overtime Factor", "Max Shift Hours" and "Standard Factor" should populated with default fleet data.
Carrier records can also be created and updated by synchronisation between the external applications and C-TMS, especially where the client offers the trips for tender to third-party hauliers, and, where new hauliers may bid for business.
Carrier Groups
The "Carrier Groups" are used to define reporting priorities.
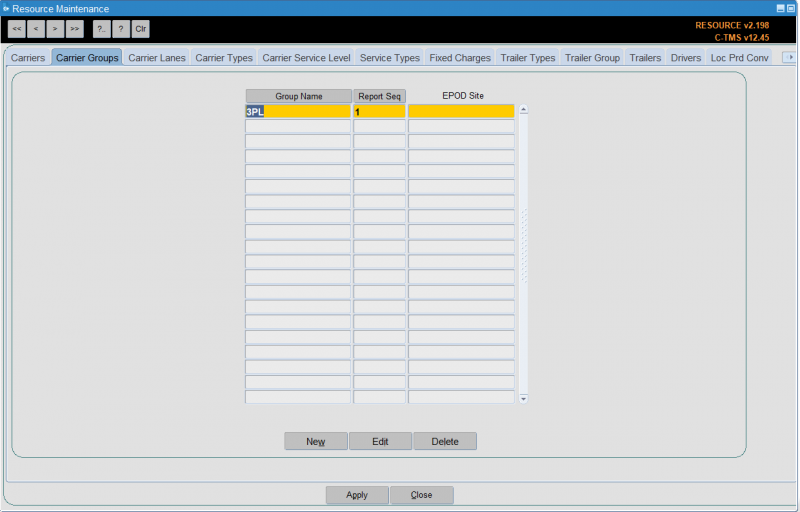
To create a new group, click on New to open the form. Enter the "Name" and "Report Seq" which controls the priority and then click Save to return to the main form. You can click on Cancel to cancel your entry.
You can also enter an EPOD Site - this is the general grouping of carriers within your Calidus EPOD system, if you have it and if it is configured for carrier-level sites.
The Edit button can be used to edit the groups and therefore change the reporting sequence. Generally two "Carrier Groups" require mandatory set up: a "Fleet" and "Haulier". Old Groups can be deleted using the Delete button provided that there are no associated records.
Carrier Lanes
This tab allows you to configure different carrier lanes. This is bespoke to carrier lanes functionality for third-party carriers.
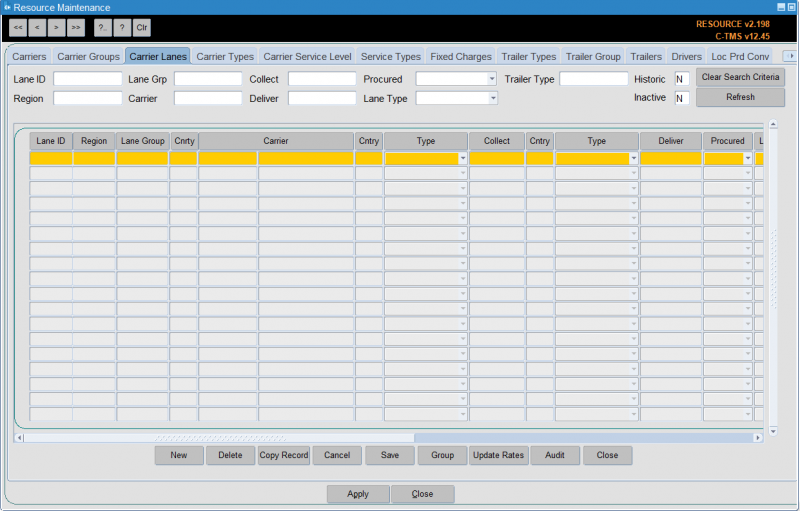
You can search by the following criteria:
- Lane ID
- Lane Group
- Region - a planning group lookup is provided.
- Carrier
- Collect
- Deliver
- Procured
- Lane Type
- Trailer Type - a trailer type lookup is provided.
- Historic
- Inactive
You can refresh the data shows using the Refresh button, and clear the criteria using the Clear Search Criteria button.
You can view the following information:
- Lane ID
- Region - a planning group lookup is provided.
- Lane Group
- Country
- Carrier
- Country
- Collect
- Country
- Type - A drop-down list, one of Postcode, Postal Region, Planning Region, Distance Greater, Distance Less or Anywhere.
- Deliver
- Procured
- Lane Type
- Action - A drop-down list, one of Manual Planning, Create Trip or Brief Trip.
- Currency
- Cost
- Trips
- Rate Ref
- Tariff
- Start Date
- End Date
- Trailer Type - a trailer type lookup is provided.
- Cost Centre - a cost centre lookup is provided.
- Inactive
Actions are available through the following buttons:
- New - create a new record, entering all of the above data.
- Delete - delete the selected record.
- Copy Record - copy the selected record
- Cancel - discard any changes.
- Save - save changes
- Group
- Update Rates
- Audit
Carrier Types
Configuration of the different Carrier Types in the system is possible here. This information can be typically used to distinguish between a client's own fleet and external carriers. Areas such as Accounting and Profit & Loss to determine where to assign revenue and costs can use this information.

The carrier type is linked to the carrier and also the various costing methods associated with freight payment. To set up a new type click New.
Enter the "Carrier Type" and then the "Trip Cost Method" and "Order Cost Method" - these are optional.
There are four types of cost method that can be applied to the carrier, these are:
- "MANUAL" whereby the cost can be allocated to the trip manually,
- "EXTERNAL" whereby the trip cost will be allocated from an external source like MTM,
- "CONTRACT" whereby the trip cost will be calculated within CT<S via contracts and tariffs and
- "EXT_CONTRACT" which looks for an external value and if one is not found it uses the "CONTRACT" method.
Carrier Service Level
This allows you to specify a cross-reference of carrier service levels.
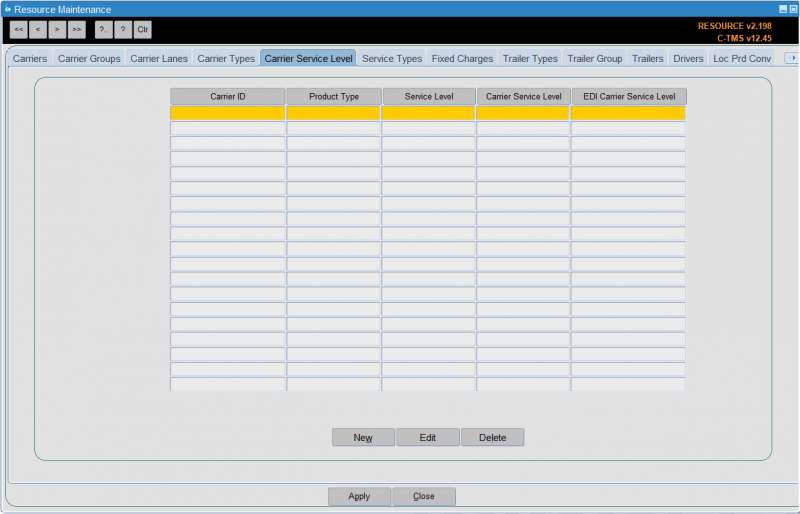
You can enter:
- Carrier ID - a lookup is provided.
- Product Type - a drop-down list is provided.
- Service Level - a lookup is provided.
- Carrier Service Level - the carrier service level to use.
- EDI Carrier Service Level - the carrier service level to use in EDI messages.
Service Types
The different services that carriers may supply can be maintained here. These can be linked to the delivery type of orders to enable calculation of the cost of deliveries for particular order types.

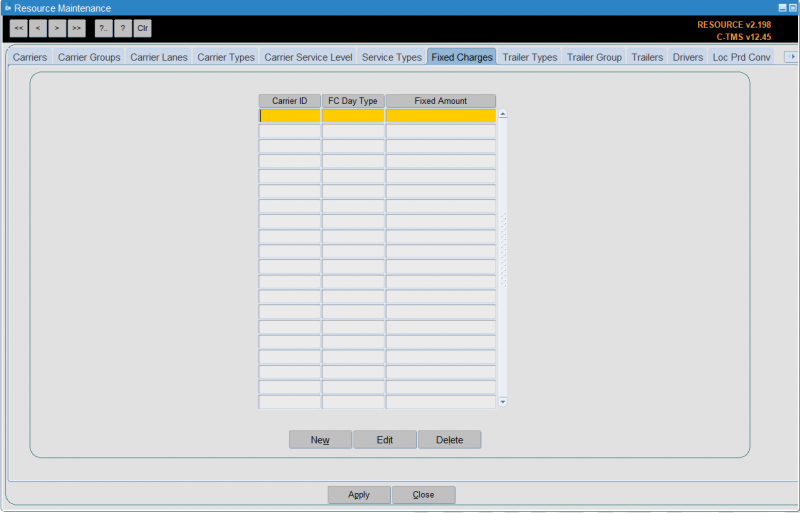
Fixed Charges
This section allows set costs to be configured for groups of carriers, such as own fleet for a certain depot.
Trailer Types
This section allows configuration of different trailer types used in the system. Various parameters for each trailer are set here and affect how a trailer is chosen in processes such as Generate Transport Instructions and Trip Manipulation. Details such as maximum RPE constrain how much that type can hold. This section also allows configuration of the types of compartment present in a trailer type and how the different temperature types can be combined together.

To set up a new Trailer Type click New.

Note that the "Drive Time Modifier" defaults to a value of "1.00" this can be used to factor speeds for vehicles such as vans and make them faster than articulated Lorries. For example, a vehicle with the "Drive Time Modifier" set to "0.5" would be twice as fast as one with a value of "1.0".
Click Save to save your changes and return to the main form, or Close to close and return without saving changes.
The trailer also has to have the compartments defined. This is shown on the right hand section of the screen, which enables you to allocate temperature compatibilities to the trailer types dependent on the site configuration and utilization. For example it may be possible to run with Chilled products on the headboard of the trailer and Ambient goods on the rear but not the other way round, this can be specified per trailer type. N.B. this section must be completed in order for trailers to be allocated to trips. Click New:

Temperature types represent certain types of goods that require storage at a certain temperature range. The temperature combination entries determine how the temperature types can be combined and in which compartments on a trailer they should be stored.
Click Save to save your changes and return to the main form, or Close to close and return without saving changes.
When setting up a new trailer type you have to specify the length, volume and maximum RPE (Regular Pallet Equivalent) capabilities for that trailer which will be used when allocating the trailer to trips. The Trailer Type should give an abbreviated but concise description of the trailer as this will appear in Trip Manipulation and on reports, and the Description should be more detailed so that it is evident to transport departments exactly which trailer is required for the trip.
In most cases it will be the RPE value that governs the capacity of the trailer and once this has been set a trailer will not automatically allocate to a trip if its RPE capacity has been exceeded. There is also further validation with regard to trip creation and trailer validation, for example the smallest feasible trailer will be allocated to a trip in the first instance and if the largest possible trailer type is allocated and the capacity exceeded the trailer type will be maintained.
The trailer type allocated to the trip governs the Trailer ID which can be allocated if a carrier set to "Poplist" is being used and the "Refrigerated" and "Cost" boxes will restrict the usage of the trailers as it will use others first unless otherwise constrained (via restrictions set up by location). Constraints are generally defined by length which is why this is an important field to populate.
Trailer Group
You can specify trailer groups here. These are used when specifying trailer types.
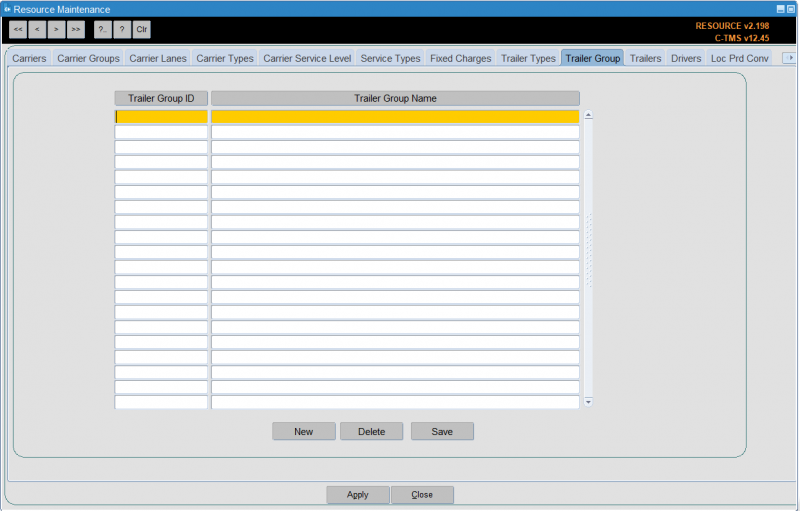
You can enter the group ID and name here.
Trailers
This allows configuration of instances of trailers. This can be used for tracking trailers throughout the system. This tab also allows Trailers to be linked to a particular Carrier Group to control who is able to user the Trailer.
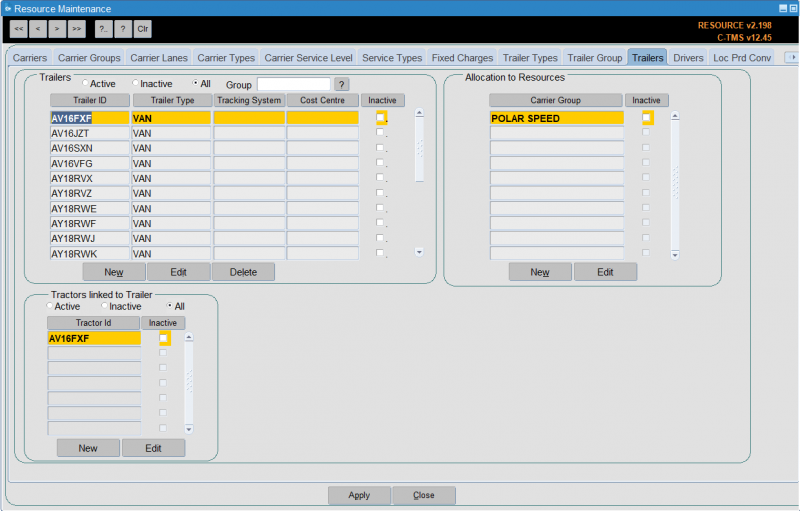
To enter a new trailer click New:
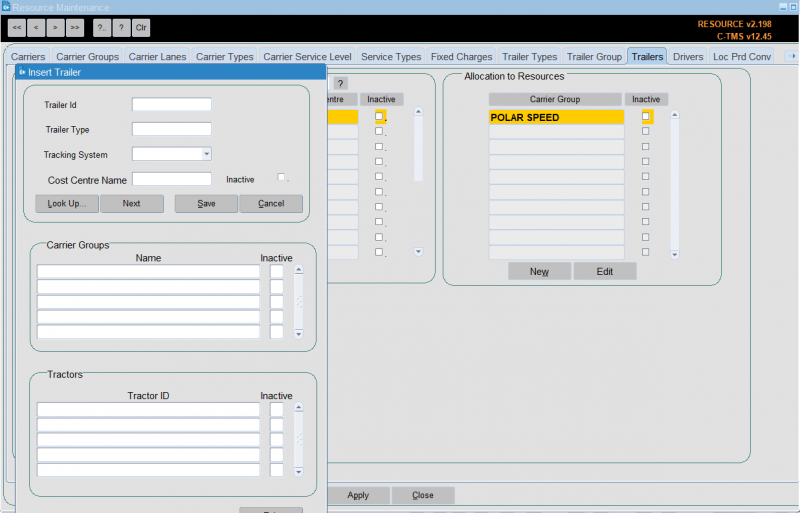
Click Save and the system will confirm the trailer has been saved, but needs to be allocated to a trailer group. Click OK. You can then enter a subsequent trailer or click Cancel to return to the main form.
From the allocation to resources box click New. Allocate a carrier group to the trailer. This will normally be "Fleet" for own fleet or "Hauliers" for 3rd party carriers.
Click Save. The trailer is now allocated to a carrier group. The trailer will now be available to assign to a trip.
If a trailer id is no longer required you are able to make it inactive.
Using the search buttons find the trailer you want to make inactive and click Edit from the Allocation to Resources box.
Click in the "Inactive" check box, so a tick appears.
Click Save. The trailer id is now inactive.
Drivers
This allows a record to be kept of each driver in the system. Typically, this allows reports to show which drivers are assigned to which trips.
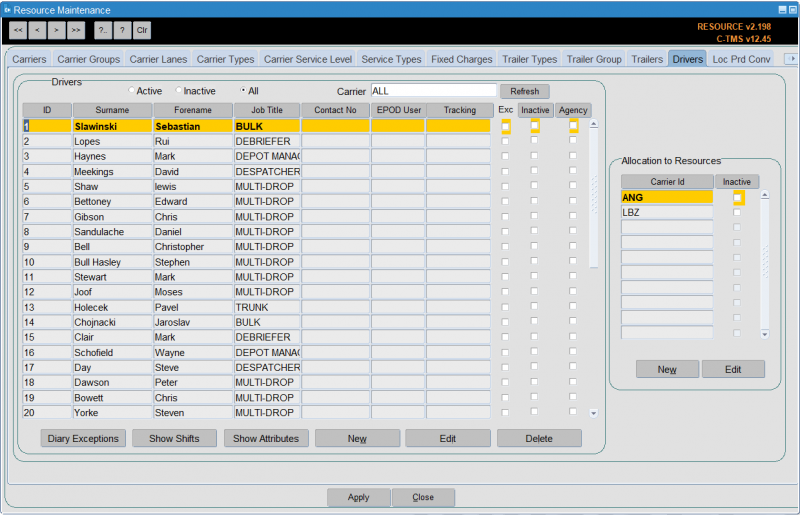
In much the same way as the "Trailers" tab enables specific trailer resources to be set up, the "Drivers" tab enables the actual drivers to be set up so that they can be allocated to trips with vehicles.
New drivers can be entered using the New button and existing drivers either edited or inactivated using the Edit button.
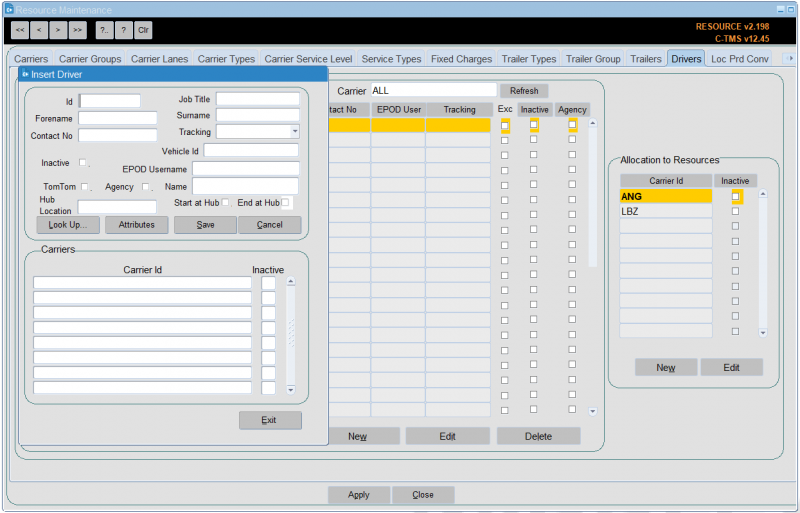
From the Drivers box click New:

Enter the "Id" this is a free text field and would normally be the drivers payroll number, "Job Title" which is a system value and will generally be "DRIVER" enter D and return, "Forename" and "Surname" are both free text fields. You can allocate to resources (carriers) here as well.
Click Save and the system will confirm the driver has been saved, but needs to be linked to a carrier. Click OK. You can then enter a subsequent driver or click Cancel to return to the main form.
To allocate to resources, select the driver and from the Allocation to Resources section, click New. Allocate a carrier id to the driver. This will be the carrier id of the depot where the driver is based.
Click Save. The driver is now allocated to the carrier id. The driver will now be available to assign to trips using the chosen carrier.
If the driver id is no longer required you are able to make it inactive. This follows the same process as making a trailer id inactive.
Using the search buttons find the driver you want to make inactive and click Edit from the Allocation to Resources box.
Click in the "Inactive" check box, so a tick appears.
Click Save. The driver id is now inactive.
Isotrak's Manifest system, used by some client's transport personnel, allows drivers to be assigned to trips. Isotrak updates C-TMS with this information as trips are assigned to and accepted by drivers.
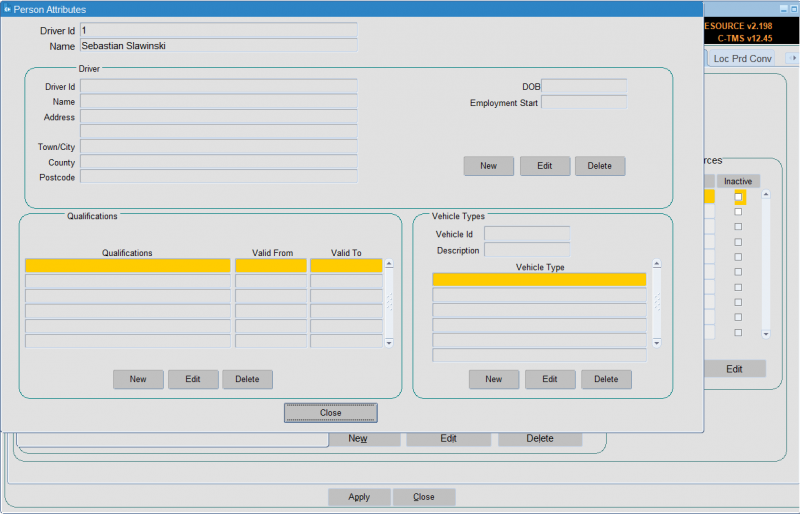
You can maintain driver attributes from here:
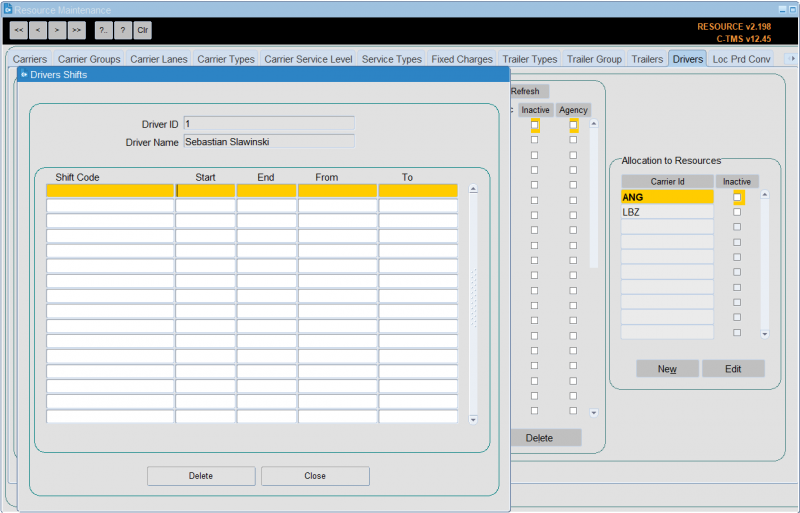
You can maintain drivers shifts from here:
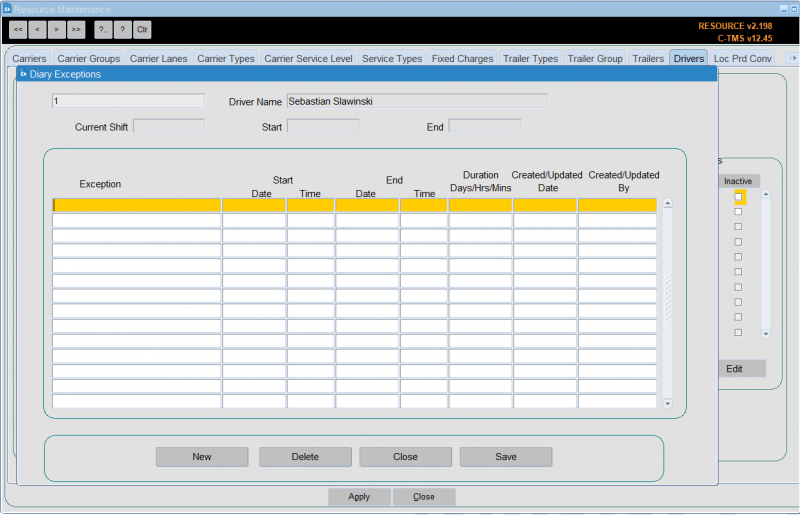
You can also maintain resource diary exceptions here.
Loc Prd Conv
This allow you to enter product type conversion factors per location.
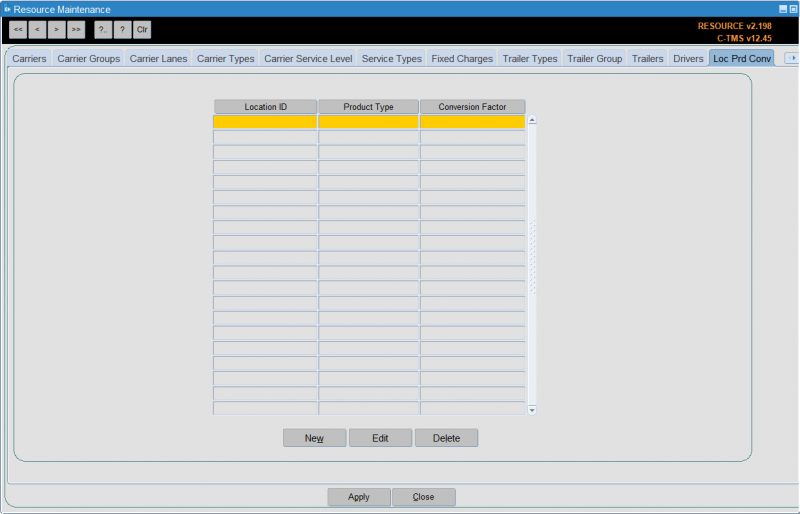
You can enter:
- Location ID - a lookup is provided.
- Product Type - a lookup is provided.
- Conversion Factor - a number to multiply.
Despatch Unit Types
This allows configuration of dispatch unit types.

Despatch Unit Types are the physical resources on which goods are despatched and delivered; e.g. pallets or roll cages. When setting up the DU Type the volume and maximum weight capacities need to be known and entered. The RPE value will be used when orders are being generated and if using Pallets rather than Roll Pallets (Cages) this value should be set to one so as to enable a direct conversion. If both Roll Pallets and Pallets are being used then this value should be the correct conversion factor applicable to the DU Types being used.
It also contains a flag to indicate whether quantities of each type can be decimal values. This determines whether the quantity values throughout the system in following forms will be allowed to be a decimal value: Orders, Trip Summary, Lane Based Order Entry, Order Entry Target, Order Templates, Order Tracking, Debrief by Invoice, Trip Manipulation and Trip Debrief.
To enter a new DU type click New:

Key in the required information and click Save or Cancel to return to the main form.
You can use the search buttons to find the new DU Type and the edit to make any changes.
Standardised DU's
This allows you to cross-reference customer DUs with standard DUs.
You can enter the customer Du and the standard DU.
RPEs
This allows you to maintain RPE combinations.
You can enter:
- DU Type - a lookup is provided.
- Product Type - a lookup is provided.
- Loc Type - a lookup is provided.
- Volume
- Vol Collapsed
- Max KG
- RPE
- Priority
RPE Cust
This allows you to maintain RPE combinations for customers.
You can enter:
- DU Type - a lookup is provided.
- Product Type - a lookup is provided.
- Customer
- From Loc - a lookup is provided.
- To Loc - a lookup is provided.
- Volume
- Vol Collapsed
- Max KG
- RPE
- Priority
- Dry Ice
- Gel Packs
- Weight
- Charge
- Charge Point
Load Rates
Configuration of the rates taken to load different DU types is provided in this section. Typically, this section is used to represent the particular dispatch units onto Trailers and also includes categories such as default start-up and close-down times.
Despatch Units
Despatch Units can be configured here. This can be used to track individual DUs such as when, say, pallets are tracked to prevent loss and maximise re-use.
Tractors
Tractor units can be configured on this screen. A registration number should be used as the Id to identify the trailer. The Trip Manipulation forms then use this information to provide a list of valid vehicles that can be assigned to a Trip. A Tractor can be assigned to a Carrier to ensure they are assigned to appropriate Trip.
Vessels
This allows you to maintain carrier vessels.
You can enter the vessel ID, Name and Carrier ID.
Resource Availability
This allows you to maintain resource availability per hour.
![]() Note: When using vehicles, this is superseded by the use of shifts and the resource availability calendar.
Note: When using vehicles, this is superseded by the use of shifts and the resource availability calendar.
You can find resource availability by Depot, Date, Resource Type or ID.
The screen will display the resource type and ID for that criteria. The resource availability is colour coded green (available) and red (unavailable).
You can then maintain whether that resource is available in that hour of that day by clicking on the cell - the colour will flip between green (available) and red (unavailable).
You can switch to previous and next days using the buttons provided.
You can view a day, tear and month summary using the Summary button provided.
Carrier Routing
![]() Warning: This is an incomplete guide.
Warning: This is an incomplete guide.
Carrier Routing UKMail
![]() Warning: This is an incomplete guide.
Warning: This is an incomplete guide.
Carrier Formats
This allows you to maintain carrier formats (manifest and Zebra labels) used by carriers.
Carrier Tracking
This allows you to maintain carrier tracking IDs used by carriers for carrier manifests and labels.
Carrier Config
This allows you to configure carriers as to which manifest and label formats can be used, along with some cross-reference information that can be used on those formats.
Vehicles
![]() Warning: This is an incomplete guide.
Warning: This is an incomplete guide.
This allows you to maintain fixed vehicles (e.g. vans).
Fixed vehicles consist of a tractor and trailer, linked together. The tractor and trailer will have the same ID. You will enter all details related to tractor and trailer in one screen.
You can also maintain resource diary exceptions here.
Carrier Hazard Qty
This tab is used to maintain the maximum quantities of hazardous classes that a carrier can carry.
Carrier Formats Mapping
![]() Warning: This is an incomplete guide.
Warning: This is an incomplete guide.
Prd DU Load
![]() Warning: This is an incomplete guide.
Warning: This is an incomplete guide.