Allocate Resources (Diary)
The Allocate Resources (Diary) screen is accessible via the Alloc Resource button in the PLANNED and ACCEPTED sections of the Trip Overview screen and through the Planning screen.
In order for this functionality to be available, the system parameter RES_AVAILABILITY_ALLOC must be set to "Y" for the applicable cost centre - you can use the System Parameters screen to do this.
From the Waterfall screen. select a trip from the well, that you want to allocate resources to, then click the Alloc Resource button.
From the Planning screen, select to resource a driver, tractor or trailer against a trip or trip stop.
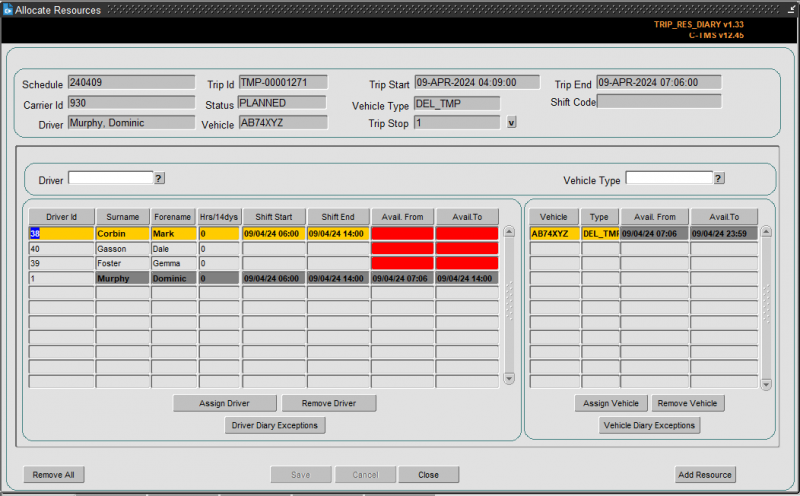
The screen below will be displayed:

![]() Note: All fields on the driver and vehicle part can be sorted by clicking on the button above that column.
Note: All fields on the driver and vehicle part can be sorted by clicking on the button above that column.
The Drivers and Vehicles that appear in the bottom of the screen are those available to be allocated to the current trip.
Only Drivers and Vehicles linked to the Carrier assigned to the trip are available for selection.
If a Trailer Type has already been assigned to the trip then only Vehicles of that Trailer Type are available for selection. Only Drivers that can drive that Trailer Type will be available for selection.
If no Trailer Type has been assigned, then all Drivers and Vehicles will be available.
See the Resources screen for the set up of these links.
You can filter drivers and vehicles using the filters above each panel, and then clicking the ? button to the right.
The screen displays the availability of the drivers, based on their assigned shifts and resource diary. If the driver has been assigned to another trip, this will be accounted for in the availability.
The screen displays the availability of the vehicles, based on their assigned trips and VOR/Inactive status.
RAG colouration is applied to make it easy to see which drivers and vehicles are available.
- GREEN - available
- RED - unavailable for any of the reasons above.
The Driver column marked Hrs/14dys is an indication of the hours the driver has worked in the last 14 days, allowing you to take into account a driver working too many hours.
The currently allocated driver and vehicle are displayed in the top of the screen, and darkened in the driver and vehicles lists.
If a Trailer Type has not been assigned, this can be done using the V lookup button next to that field in the header.
Those resources that are currently in use between the trips start time and finish time are high-lighted in grey to show the user they are currently in use, although they can still be allocated.
To assign a resource, select it from the list and click the associated Assign ... button. When assigned, the name/id will appear in the header. Use the Remove ... button if a resource needs to be removed.
You can remove all resources applied to the trip using the Remove All button provided.
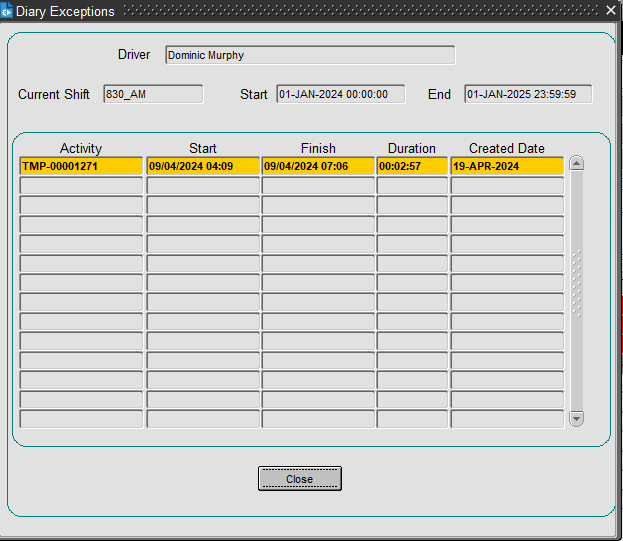
You can view the resource availability in detail using the ... Diary Exceptions buttons provided.

![]() Note: When you add the last resource for this carrier, the screen will warn you of this in a pop-up.
Note: When you add the last resource for this carrier, the screen will warn you of this in a pop-up.
Whilst in this screen, you may need to add or change a resource to make them available for the trip. You can do this by clicking on the Add Resource button - you will be taken to the Resources maintenance screen.
Once happy that resources have been added, click Save. If during a Save, all resources have been added to a PLANNED trip, the system will automatically update the trip status to ACCEPTED.