|
|
| (7 intermediate revisions by the same user not shown) |
| Line 4: |
Line 4: |
| {{#vardefine:System|''CALIDUS'' eSERV}} | | {{#vardefine:System|''CALIDUS'' eSERV}} |
| {{#vardefine:Doc_Title|UDF Modifications}} | | {{#vardefine:Doc_Title|UDF Modifications}} |
| {{#vardefine:Version|0.3}} | | {{#vardefine:Version|0.4}} |
| {{#vardefine:Date|5th September 2013}} | | {{#vardefine:Date|4th October 2013}} |
| {{#vardefine:Reference|311636 309371-1}} | | {{#vardefine:Reference|311636 309371-1}} |
| {{#vardefine:Year|2013}} | | {{#vardefine:Year|2013}} |
| Line 128: |
Line 128: |
| * Export the new fields in XML requests | | * Export the new fields in XML requests |
| * Read the new fields | | * Read the new fields |
| {{Note}} It is not necessary to add this flag as a searchable item. However, if allowing this keeps the packages and DAL objects standard in design, then this can also be done, within the DAL and the packages. | | {{Note}} It is not necessary to add this flag as a searchable item. However, if allowing this keeps the packages and DAL objects standard in design, then this can also be done, within the DAL and the packages. |
| | |
| | The XML Export of services will now look as follows: |
| | <EPOD_SERVICES> |
| | <EPOD_SERVICE> |
| | <EPL_SITE_ID></EPL_SITE_ID> |
| | <EPL_JOB_ID></EPL_JOB_ID> |
| | <EPL_SERVICE_ID></EPL_SERVICE_ID> |
| | <EPL_SERVICE_TYPE></EPL_SERVICE_TYPE> |
| | <EPL_PREWORK_INTERIOR></EPL_PREWORK_INTERIOR> |
| | <EPL_PREWORK_EXTERIOR></EPL_PREWORK_EXTERIOR> |
| | <EPL_PREWORK_ELECTRIC></EPL_PREWORK_ELECTRIC> |
| | <EPL_POSTWORK_INTERIOR></EPL_POSTWORK_INTERIOR> |
| | <EPL_POSTWORK_EXTERIOR></EPL_POSTWORK_EXTERIOR> |
| | <EPL_POSTWORK_ELECTRIC></EPL_POSTWORK_ELECTRIC> |
| | <EPL_UNIT_TYPE></EPL_UNIT_TYPE> |
| | <EPL_REG_NUMBER></EPL_REG_NUMBER> |
| | <EPL_VIN_NUMBER></EPL_VIN_NUMBER> |
| | <EPL_MILEAGE>0</EPL_MILEAGE> |
| | <EPL_SIM_NUMBER></EPL_SIM_NUMBER> |
| | <EPL_MC_REF_1></EPL_MC_REF_1> |
| | <EPL_MC_REF_2></EPL_MC_REF_2> |
| | <EPL_MC_REF_3></EPL_MC_REF_3> |
| | <EPL_MC_REF_4></EPL_MC_REF_4> |
| | <EPL_MC_REF_NARRATIVE></EPL_MC_REF_NARRATIVE> |
| | <EPL_DIAGNOSIS_NARRATIVE></EPL_DIAGNOSIS_NARRATIVE> |
| | <EPL_SPEC_REQUIRED></EPL_SPEC_REQUIRED> |
| | <EPL_FAULT></EPL_FAULT> |
| | <EPL_CUSTOMER_DAMAGE></EPL_CUSTOMER_DAMAGE> |
| | <EPL_VNOS></EPL_VNOS> |
| | <EPL_SERVICE_GROUP></EPL_SERVICE_GROUP> |
| | <EPL_SYSTEM_TYPE></EPL_SYSTEM_TYPE> |
| | <EPL_UDF_INFO></EPL_UDF_INFO> |
| | <EPL_UDF_DIAGNOSIS></EPL_UDF_DIAGNOSIS> |
| | <EPL_UDF_PREWORK></EPL_UDF_PREWORK> |
| | <EPL_UDF_POSTWORK></EPL_UDF_POSTWORK> |
| | <EPL_LAST_CHANGED_DATE>0</EPL_LAST_CHANGED_DATE> |
| | <EPL_LAST_CHANGED_TIME>0</EPL_LAST_CHANGED_TIME> |
| | </EPOD_SERVICE> |
| | </EPOD_SERVICES> |
|
| |
|
| == Server == | | == Server == |
| Line 145: |
Line 184: |
| </EPOD_CONFIGS> | | </EPOD_CONFIGS> |
| This section will be added after all existing sections. | | This section will be added after all existing sections. |
| | |
| | When receiving JOB_UPDATE messages back from the device in the same web service, the new EPL_UDF fields should be saved with the values as sent back from the PDA. Note that the content of these elements will be XML and should not be translated, but stored as text in the fields - see the storage of Terms and Conditions XML within the same update to see how this should be achieved. |
| | | |
| == Admin == | | == Admin == |
| Line 151: |
Line 192: |
| A new menu item will be added to the main menu, on sub-menu ''Administration'', labelled as ''UDF Config''. | | A new menu item will be added to the main menu, on sub-menu ''Administration'', labelled as ''UDF Config''. |
|
| |
|
| This screen will allow a user to add, search for and edit UDF configurations in the system. | | This screen will allow a user to add, search for and edit UDF configurations in the system. The main title should display as "User-Defined Forms Configuration" |
|
| |
|
| This screen will work in all ways like the rest of the Admin screens in that: | | This screen will work in all ways like the rest of the Admin screens in that: |
| Line 174: |
Line 215: |
| ** Description - A required description of the configuration being created. | | ** Description - A required description of the configuration being created. |
| ** Key Type - the level at which this is being created. Currently one of: | | ** Key Type - the level at which this is being created. Currently one of: |
| *** Site | | *** Site (value "S") |
| *** Job Group | | *** Job Group (value "J") |
| *** Product Group | | *** Product Group (value "P") |
| ** Key Value - the key item from the key type selected. This will be displayed as a drop-down list and will be populated with values when a Key Value has been chosen. | | ** Key Value - the key item from the key type selected. This will be displayed as a drop-down list and will be populated with values when a Key Value has been chosen. |
| | ** Config Type - one of: |
| | *** "INFO" - labelled as "Service - Info" |
| | *** "PREWORK" - labelled as "Service - Pre-work Checks" |
| | *** "POSTWORK" - labelled as "Service - Post-work Checks" |
| | *** "DIAGNOSIS" - labelled as "Service - Diagnosis/Completion" |
| {{Note}} Changing the Key Type should blank the Key Value and require the value to be entered again. | | {{Note}} Changing the Key Type should blank the Key Value and require the value to be entered again. |
|
| |
|
| Line 190: |
Line 236: |
|
| |
|
| * Field Detail - shown when a field is selected from a list, or a new field is requested through the '''Add Field''' button, showing: | | * Field Detail - shown when a field is selected from a list, or a new field is requested through the '''Add Field''' button, showing: |
| ** ID - An ID for the field. This is required entry. Up to 30 characters may be entered, using only alphanumeric and the underscore character only. This does not have to be unique. | | ** ID - An ID for the field. This is required entry. Up to 30 characters may be entered, using only alphanumeric and the underscore character only. This must be unique. |
| | ** Linked? - a check-box to show that this item is linked to the previous item in the list. |
| ** Label - A label displayed against the field when it is being entered on the device. There is no limit to the number of characters, but users should be made aware that excessively long labels will result in less-than-usable data entry on the device. Required entry. | | ** Label - A label displayed against the field when it is being entered on the device. There is no limit to the number of characters, but users should be made aware that excessively long labels will result in less-than-usable data entry on the device. Required entry. |
| ** Sub-Label - A smaller-font label under the main label when this field is being entered on the device. | | ** Sub-Label - A smaller-font label under the main label when this field is being entered on the device. |
| Line 218: |
Line 265: |
| {{Note}} All fields in this pop-up should have hover-help and appropriate validators attached to them. Validators should be applied at the minimum to check maximum length of each of the fields. Also, attempting to exist the screen after making changed but without saving should prompt the user to confirm or save. | | {{Note}} All fields in this pop-up should have hover-help and appropriate validators attached to them. Validators should be applied at the minimum to check maximum length of each of the fields. Also, attempting to exist the screen after making changed but without saving should prompt the user to confirm or save. |
|
| |
|
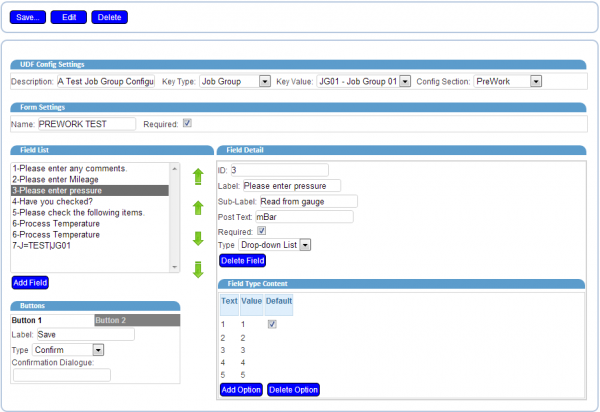
| The following is a prototype screen-shot of how the pop-up screen would look when editing a configuration similar to that shown in [[#Appendix B: TEST UDF FILE|Appendix B]]:
| | If the record already exists and is being edited, the details should be created and pre-populated from the details held in the EPL_UDF_FIELDS object, extracted from the XML following the schema for the XML, as follows: |
| | |
| [[file:FS_311636_2.PNG|border|600px]]
| |
| | |
| == Android Client ==
| |
| The database will be modified to add the new table EPOD_UDF_CONFIG.
| |
| | |
| The Webservices.LOGON_RESPONSE processing function will be modified to add all new EPOD_UDF_CONFIG messages.
| |
| | |
| {{Note}} The function should be written not to delete all items, but just to add or update items.
| |
| | |
| A new DAL object will be added, called PDA_UDF_CONFIG. This will include all the options required to maintain the EPOD_UDF_CONFIG table, using:
| |
| * Update
| |
| * Add
| |
| * Delete
| |
| There will also be global functions to process additions and updates to the table through logon, as follows:
| |
| * InsertAllUDFConfigs
| |
| * InsertUDFConfig
| |
| The format and functions required should be copied from an existing PDA DAL object, for example PDA_REASON_CODES.
| |
| | |
| The DAL object should include an ability to get the configuration matching certain Job configurations. So, a function is required to return a single EPOD_CONFIG item, when passed in the following parameters:
| |
| * EPL_CONFIG_TYPE (required)
| |
| * EPL_SITE_ID (required)
| |
| * EPL_JOB_GROUP
| |
| * EPL_PRODUCT_GROUP
| |
| The function should retrieve all records found for the Config Type required, matching against the key elements provided. {{Note}} Any null or blank optional parameters should be ignored when fetching UDF Configurations. All would be sorted so that the hierarchy below is followed:
| |
| * Product Group - 1
| |
| * Job Group - 2
| |
| * Site - 3
| |
| The highest available configuration in the hierarchy will be returned as a PDA_UDF_GROUP object. If one is not found, null will be returned.
| |
| | |
| The suggested name for this function is GetUDFConfig.
| |
| | |
| Example:
| |
| | |
| If the following parameters are provided:
| |
| * EPL_CONFIG_TYPE - "INFO"
| |
| * EPL_SITE_ID - "TEST"
| |
| * EPL_JOB_GROUP - "JG01"
| |
| * EPL_PRODUCT_GROUP - "PG01"
| |
| The procedure should fetch all configurations for key elements as follows:
| |
| * EPL_CONFIG_TYPE = "INFO" AND EPL_KEY_TYPE = "SITE" and EPL_KEY_VALUE = "TEST"
| |
| * EPL_CONFIG_TYPE = "INFO" AND EPL_KEY_TYPE = "JOB_GROUP" and EPL_KEY_VALUE = "JG01"
| |
| * EPL_CONFIG_TYPE = "INFO" AND EPL_KEY_TYPE = "PROD_GROUP" and EPL_KEY_VALUE = "PG01"
| |
| The lowest hierarchical record found will be returned, in this case, the Product Group record, as a DAL object.
| |
|
| |
| | |
| A generic UDF object will be used in the project, in Style.js, to allow the creation and validation of UDF fields. This will:
| |
| * Create a sizeable, scrollable entry frame
| |
| * Display Labels
| |
| * Display Post-labels (e.g. UOMs)
| |
| * Validate entry (optional or required entry against individual fields)
| |
| * Allow entry of different Field Types, such as:
| |
| ** DDL (Drop-down List)
| |
| ** Text entry (plus barcode)
| |
| ** Numeric entry (plus barcode)
| |
| ** Option entry
| |
| ** Check Field Group entry
| |
| * Produce Results in a pre-defined XML format
| |
| {{Note}} An object has already been written to do this, utilising Titanium Tables, and is used in Vehicle Checks. This object should be modified to allow the additional functionality specified above, whilst maintaining compatibility with the Vehicle Checks functionality.
| |
| | |
| The fields shown in the object itself are subject to a configuration XML string, which will be found in the new UDF_CONFIG table.
| |
| | |
| The configuration must conform to the following XSD:
| |
| <xsd:schema attributeFormDefault="unqualified" elementFormDefault="qualified" xmlns:xsd="http://www.w3.org/2001/XMLSchema"> | | <xsd:schema attributeFormDefault="unqualified" elementFormDefault="qualified" xmlns:xsd="http://www.w3.org/2001/XMLSchema"> |
| <xsd:element name="FORM"> | | <xsd:element name="FORM"> |
| Line 329: |
Line 313: |
| </xsd:element> | | </xsd:element> |
| </xsd:sequence> | | </xsd:sequence> |
| <xsd:attribute name="ID" use="required"> | | <xsd:attribute name="ID" type="xsd:string" use="required" /> |
| <xsd:simpleType>
| | <xsd:attribute name="LINK" type="xsd:string" use="optional" /> |
| <xsd:restriction base="xsd:string">
| |
| <xsd:maxLength value="10" />
| |
| </xsd:restriction>
| |
| </xsd:simpleType>
| |
| </xsd:attribute>
| |
| </xsd:complexType> | | </xsd:complexType> |
| </xsd:element> | | </xsd:element> |
| Line 362: |
Line 341: |
| </xsd:element> | | </xsd:element> |
| </xsd:schema> | | </xsd:schema> |
| | A sample is provided in [[#Appendix B: TEST UDF FILE|Appendix B]] for reference. |
|
| |
|
| {{Note}} Comparing this to the existing UDF and VEHICLE_CHECK XDS: | | When all details have been edited, the user can press the '''Save''' button. This should then generate a XML configuration as per the user's details, saving this to the EPOD_CONFIG record. |
| | |
| | |
| | The following is a prototype screen-shot of how the pop-up screen would look when editing a configuration similar to that shown in [[#Appendix B: TEST UDF FILE|Appendix B]]: |
| | |
| | [[file:FS_311636_2.PNG|border|600px]] |
| | |
| | {{Note}} This prototype may not contain all changes specified above and should be used as a guideline only. |
| | |
| | == Android Client == |
| | The database will be modified to add the new table EPOD_UDF_CONFIG. |
| | |
| | The existing EPOD_SERVICE table will be modified to add new fields as follows: |
| | * EPL_UDF_INFO - ntext |
| | * EPL_UDF_DIAGNOSIS - ntext |
| | * EPL_UDF_PREWORK - ntext |
| | * EPL_UDF_POSTWORK - ntext |
| | |
| | The existing PDA_SERVICE DAL object will be changed to: |
| | * Export the new fields in XML requests |
| | * Read the new fields |
| | |
| | {{Note}} As the database structure is changing with this version, the default values must be carefully set and the database creation script modified to ensure that the standing data is re-downloaded from the server after the changes have been made. This is achieved by setting the "last version changed" variable (lngLastVersionDB) in DBConnection to the latest version number. |
| | |
| | The XML Export of EPOD_SERVICE records will now look as follows: |
| | <SERVICE> |
| | <PREWORK> |
| | <EPL_PREWORK_INTERIOR></EPL_PREWORK_INTERIOR> |
| | <EPL_PREWORK_EXTERIOR></EPL_PREWORK_EXTERIOR> |
| | <EPL_PREWORK_ELECTRIC></EPL_PREWORK_ELECTRIC> |
| | <EPL_UDF_PREWORK></EPL_UDF_PREWORK> |
| | </PREWORK> |
| | <POSTWORK> |
| | <EPL_POSTWORK_INTERIOR></EPL_POSTWORK_INTERIOR> |
| | <EPL_POSTWORK_EXTERIOR></EPL_POSTWORK_EXTERIOR> |
| | <EPL_POSTWORK_ELECTRIC></EPL_POSTWORK_ELECTRIC> |
| | <EPL_UDF_POSTWORK></EPL_UDF_POSTWORK> |
| | </POSTWORK> |
| | <INFO> |
| | <EPL_UNIT_TYPE></EPL_UNIT_TYPE> |
| | <EPL_REG_NUMBER></EPL_REG_NUMBER> |
| | <EPL_VIN_NUMBER></EPL_VIN_NUMBER> |
| | <EPL_MILEAGE></EPL_MILEAGE> |
| | <EPL_SIM_NUMBER></EPL_SIM_NUMBER> |
| | <EPL_SPEC_REQUIRED></EPL_SPEC_REQUIRED> |
| | <EPL_SERVICE_GROUP></EPL_SERVICE_GROUP> |
| | <EPL_SYSTEM_TYPE></EPL_SYSTEM_TYPE> |
| | <EPL_UDF_INFO></EPL_UDF_INFO> |
| | </INFO> |
| | <MC_REF> |
| | <EPL_MC_REF_1></EPL_MC_REF_1> |
| | <EPL_MC_REF_2></EPL_MC_REF_2> |
| | <EPL_MC_REF_3><EPL_MC_REF_3> |
| | <EPL_MC_REF_4></EPL_MC_REF_4> |
| | <EPL_MC_REF_NARRATIVE></EPL_MC_REF_NARRATIVE> |
| | </MC_REF> |
| | <DIAGNOSIS> |
| | <EPL_DIAGNOSIS_NARRATIVE></EPL_DIAGNOSIS_NARRATIVE> |
| | <EPL_CUSTOMER_DAMAGE></EPL_CUSTOMER_DAMAGE> |
| | <EPL_VNOS></EPL_VNOS> |
| | <EPL_CHECKBOX_1></EPL_CHECKBOX_1> |
| | <EPL_CHECKBOX_2></EPL_CHECKBOX_2> |
| | <EPL_CHECKBOX_3></EPL_CHECKBOX_3> |
| | <EPL_UDF_DIAGNOSIS></EPL_UDF_DIAGNOSIS> |
| | </DIAGNOSIS> |
| | <PRODUCT> |
| | <EPL_PRODUCT_ID></EPL_PRODUCT_ID> |
| | <EPL_QUANTITY></EPL_QUANTITY> |
| | <EPL_DIRECTION></EPL_DIRECTION> |
| | <EPL_RETURN></EPL_RETURN> |
| | </PRODUCT> |
| | <ACTIVITY> |
| | <EPL_SITE_ID></EPL_SITE_ID> |
| | <EPL_SERVICE_ID></EPL_SERVICE_ID> |
| | <EPL_ACTIVITY_CODE></EPL_ACTIVITY_CODE> |
| | <EPL_QUANTITY></EPL_QUANTITY> |
| | </ACTIVITY> |
| | </SERVICE> |
| | |
| | {{Note}} This format includes the changes made under reference 311636. |
| | |
| | The Webservices.LOGON_RESPONSE processing function will be modified to add all new EPOD_UDF_CONFIG messages. |
| | |
| | {{Note}} The function should be written not to delete all items, but just to add or update items. |
| | |
| | A new DAL object will be added, called PDA_UDF_CONFIG. This will include all the options required to maintain the EPOD_UDF_CONFIG table, using: |
| | * Update |
| | * Add |
| | * Delete |
| | There will also be global functions to process additions and updates to the table through logon, as follows: |
| | * InsertAllUDFConfigs |
| | * InsertUDFConfig |
| | The format and functions required should be copied from an existing PDA DAL object, for example PDA_REASON_CODES. |
| | |
| | The DAL object should include an ability to get the configuration matching certain Job configurations. So, a function is required to return a single EPOD_CONFIG item, when passed in the following parameters: |
| | * EPL_CONFIG_TYPE (required) |
| | * EPL_SITE_ID (required) |
| | * EPL_JOB_GROUP |
| | * EPL_PRODUCT_GROUP |
| | The function should retrieve all records found for the Config Type required, matching against the key elements provided. {{Note}} Any null or blank optional parameters should be ignored when fetching UDF Configurations. All would be sorted so that the hierarchy below is followed: |
| | * Product Group - 1 |
| | * Job Group - 2 |
| | * Site - 3 |
| | The highest available configuration in the hierarchy will be returned as a PDA_UDF_GROUP object. If one is not found, null will be returned. |
| | |
| | The suggested name for this function is getUDFConfig. |
| | |
| | Example: |
| | |
| | If the following parameters are provided: |
| | * EPL_CONFIG_TYPE - "INFO" |
| | * EPL_SITE_ID - "TEST" |
| | * EPL_JOB_GROUP - "JG01" |
| | * EPL_PRODUCT_GROUP - "PG01" |
| | The procedure should fetch all configurations for key elements as follows: |
| | * EPL_CONFIG_TYPE = "INFO" AND EPL_KEY_TYPE = "S" and EPL_KEY_VALUE = "TEST" |
| | * EPL_CONFIG_TYPE = "INFO" AND EPL_KEY_TYPE = "J" and EPL_KEY_VALUE = "JG01" |
| | * EPL_CONFIG_TYPE = "INFO" AND EPL_KEY_TYPE = "P" and EPL_KEY_VALUE = "PG01" |
| | The lowest hierarchical record found will be returned, in this case, the Product Group record, as a DAL object. |
| | |
| | |
| | A generic UDF object will be used in the project, in Style.js, to allow the creation and validation of UDF fields. This will: |
| | * Create a sizeable, scrollable entry frame |
| | * Display Labels |
| | * Display Post-labels (e.g. UOMs) |
| | * Validate entry (optional or required entry against individual fields) |
| | * Allow entry of different Field Types, such as: |
| | ** DDL (Drop-down List) |
| | ** Text entry (plus barcode) |
| | ** Numeric entry (plus barcode) |
| | ** Option entry |
| | ** Check Field Group entry |
| | * Pre-populate the value, if already entered |
| | * Produce Results in a pre-defined XML format |
| | {{Note}} An object has already been written to do this, utilising Titanium Tables, and is used in Vehicle Checks. This object should be modified to allow the additional functionality specified above, whilst maintaining compatibility with the Vehicle Checks functionality. |
| | |
| | The fields shown in the object itself are subject to a configuration XML string, which will be found in the new UDF_CONFIG table. |
| | |
| | The configuration must conform to the schema XSD, as shown in the previous section. |
| | |
| | {{Note}} Comparing this to the existing UDF and VEHICLE_CHECK XSD: |
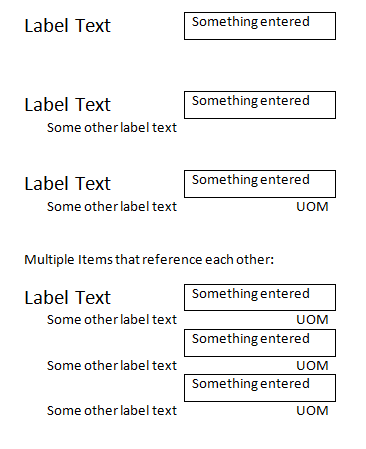
| * New elements have been added to the FIELD element: | | * New elements have been added to the FIELD element: |
| ** TEXT if the main label. | | ** TEXT is the main label. |
| ** SUBTEXT is a sub-label, that should be under the main label. | | ** SUBTEXT is a sub-label, that should be under the main label. |
| ** POST is a small 'UOM' label that, if present, should be placed after the text entry item. | | ** POST is a small 'UOM' label that, if present, should be placed after the text entry item. |
| ** As the current system allows for only one label and one item, this will require a restructure of the layout of the view containing these elements. | | ** As the current system allows for only one label and one item, this will require a restructure of the layout of the view containing these elements. |
| | *New attribute LINK has been added to the field, to identify the FIELD ID that this field is linked to. |
| * The new element BUTTON controls what buttons are on the form: | | * The new element BUTTON controls what buttons are on the form: |
| ** TEXT - the label on the button | | ** TEXT - the label on the button |
| Line 381: |
Line 502: |
|
| |
|
| These new attribute items apply to the object that calls the UDF form, whereas the buttons apply to the object itself. | | These new attribute items apply to the object that calls the UDF form, whereas the buttons apply to the object itself. |
| | |
| | The VALUE tag will now be checked - if this is present on the field, the value of the entry object will be preset to the value in the VALUE tag. For DDL items, this vaue will take precedence over any default item. |
|
| |
|
| {{Note}} See existing test code in Pre- and Post-work checks in Services for information as to how this object works in its original form, and guidance as to how this will change applying the changes in this specification. | | {{Note}} See existing test code in Pre- and Post-work checks in Services for information as to how this object works in its original form, and guidance as to how this will change applying the changes in this specification. |
|
| |
|
| {{Note}} If a new UDF object is written, it should be written without the use of the Titanium tables, as these are notoriously memory-hungry - instead, use multiple Views in a vertical layout, as can be seen in Signature Container list. | | {{Note}} The existing DLL code is a prototype of how this is expected to work and has not yet been fully tested. This code must also be modified to check whether a CODE attribute has been provided - if not, the tag value should be used as the code in the DLL. |
| | |
| | {{Note}} If a new UDF object is written, it should be written without the use of the Titanium tables, as these are notoriously memory-hungry - instead, use multiple Views in a vertical layout, as can be seen in Signature Container list. This will also minimise risk of change affecting the existing Vehicle Checks code. |
|
| |
|
| The layout of the fields will change with the new labels, as follows: | | The layout of the fields will change with the new labels, as follows: |
| Line 394: |
Line 519: |
| For Check-box fields, the values in SUBTEXT and POST does not apply and should not be added. | | For Check-box fields, the values in SUBTEXT and POST does not apply and should not be added. |
|
| |
|
| Items which have the same ID as the previous item in the list are considered linked - in this instance, the TEXT field need not be displayed, but SUBTEXT and POST should be. | | Items which have a LINK attribute equal to the ID of the previous FIELD item in the list are considered linked - in this instance, the TEXT field need not be displayed, but SUBTEXT and POST should be. |
|
| |
|
| A sample test XML file is provided in [[#Appendix B: TEST UDF FILE|Appendix B]]. | | A sample test XML file is provided in [[#Appendix B: TEST UDF FILE|Appendix B]]. |
| Line 415: |
Line 540: |
| * PDA_UDF_DIAGNOSIS | | * PDA_UDF_DIAGNOSIS |
|
| |
|
| In the Diagnosis section, A fixed-size, vertical-layout UDF form will be added to the view under any existing fields. This will be created with the passed-configuration, if the configuration is not null. | | In the Diagnosis section, A fixed-size, vertical-layout UDF form will be added to the view under any existing fields. This will be created with the value in the new field EPL_UDF_DIAGNOSIS from the in-progress EPOD_SERVICE record, if this contains a value, or using EPL_FIELDS of the PDA_UDF_DIAGNOSIS object, if this object is not null. |
|
| |
|
| In the Info section, the section will be modified to be contained within a scrolling vertical-layout view. {{Note}} This is similar to how the existing Diagnosis tab is structured now, so this code should be used as source. A fixed-size, vertical-layout UDF form will be added to the view under any existing fields, if the configuration is not null. | | In the Info section, the section will be modified to be contained within a scrolling vertical-layout view. {{Note}} This is similar to how the existing Diagnosis tab is structured now, so this code should be used as source. A fixed-size, vertical-layout UDF form will be added to the view under any existing fields, if the configuration is not null. This will be created with the value in the new field EPL_UDF_INFO from the in-progress EPOD_SERVICE record, if this contains a value, or using EPL_FIELDS of the PDA_UDF_INFO object, if this object is not null. |
|
| |
|
| {{Note}} If the Service Group is being entered on the Info screen, PDA_UDF_POSTWORK configuration item should be refreshed, as this will affect the UDF fields configuration. | | {{Note}} If the Service Group is being entered on the Info screen, all UDF configuration items should be refreshed, as this could potentially affect the UDF fields configuration. Once refreshed, the old and new configurations should be compared and, if different, the UDF objects affected should be rebuilt. As this may take some time, an Activity Indicator should be displayed. |
|
| |
|
| The Info section should also check the Post-work UDF configuration. If this is present, the Post-work button should be created with the label as defined in the configuration. The Post-work pop-up should be triggered from this, passing in the configuration setting. | | The Info section should also check the Pre-work UDF configuration. If this is present, the Pre-work button should be created with the label as defined in the configuration. The Pre-work pop-up should be triggered from this, passing the value in the new field EPL_UDF_PREWORK from the in-progress EPOD_SERVICE record, if this contains a value, or using EPL_FIELDS of the PDA_UDF_PREWORK object, if this object is not null. |
|
| |
|
| The Post-work pop-up screen will be modified to replace the current fields and buttons with a scrolling vertical-layout view, if the flag PDAJOBGROUP.EPL_SERVICE_POSTWORK is not "Y" or "N". The view should be 70% height, allowing for up to 2 buttons and a title on the screen. The title should be set to the NAME parameter of the configuration settings. The buttons should be created from the buttons passed in in the configuration settings. The button type will define what actions are to be taken: | | The Pre-work pop-up screen will be modified to replace the current fields and buttons with a scrolling vertical-layout view, if the flag PDAJOBGROUP.EPL_SERVICE_PREWORK is not "Y" or "N". The view should be 70% height, allowing for up to 2 buttons and a title on the screen. The title should be set to the NAME parameter of the configuration settings. The buttons should be created from the buttons passed in in the configuration settings. The button type will define what actions are to be taken: |
| * If this is a Confirm button, the changes will be validated and, if OK, will be saved, the confirm attribute will be set to the type and the pop-up will exit. | | * If this is a '''Confirm''' button, the changes will be validated and, if OK, will be saved, the confirm attribute will be set to the type and the pop-up will exit. |
| * If this is an Ignore button, the changes will be saved, the confirm attribute will be set to the type and the pop-up will exit. | | * If this is an '''Ignore''' button, the changes will be saved, the confirm attribute will be set to the type and the pop-up will exit. |
| * If this is a Cancel button, the changes will not be saved, the confirm attribute will be set to the type and the pop-up will exit. | | * If this is a '''Cancel''' button, the changes will not be saved, the confirm attribute will be set to the type and the pop-up will exit. |
| In all cases, if the Confirm attribute is present on the button, a Yes/No confirmation message will be displayed before the actions, displaying the message configured on the device. If the user chooses Yes, the actions above will be taken. If the user chooses No, they will be returned to the pop-up screen. | | In all cases, if the Confirm attribute is present on the button, a Yes/No confirmation message will be displayed before the actions, displaying the message configured on the device. If the user chooses Yes, the actions above will be taken. If the user chooses No, they will be returned to the pop-up screen. |
|
| |
|
| When exiting the Pre-work pop-up screen, the value of the Confirm parameter and the returned XML string should be stored, for validating later. | | When exiting the Pre-work pop-up screen, the value of the Confirm parameter and the returned XML string should be stored, for validating later. |
|
| |
|
| The Diagnosis section should also check the Pre-work UDF configuration. If this is present, the Pre-work button should be created with the label as defined in the configuration. The Pre-work pop-up should be triggered from this, passing in the configuration setting. | | The Diagnosis section should also check the Post-work UDF configuration. If this is present, the Post-work button should be created with the label as defined in the configuration. The Post-work pop-up should be triggered from this, passing the value in the new field EPL_UDF_POSTWORK from the in-progress EPOD_SERVICE record, if this contains a value, or using EPL_FIELDS of the PDA_UDF_POSTWORK object, if this object is not null. |
|
| |
|
| The Pre-work pop-up screen will be modified to replace the current fields and buttons with a scrolling vertical-layout view, if the flag PDAJOBGROUP.EPL_SERVICE_PREWORK is not "Y" or "N". The view should be 70% height, allowing for up to 2 buttons and a title on the screen. The title should be set to the NAME parameter of the configuration settings. The buttons should be created from the buttons passed in in the configuration settings. The button type will define what actions are to be taken: | | The Post-work pop-up screen will be modified to replace the current fields and buttons with a scrolling vertical-layout view, if the flag PDAJOBGROUP.EPL_SERVICE_POSTWORK is not "Y" or "N". The view should be 70% height, allowing for up to 2 buttons and a title on the screen. The title should be set to the NAME parameter of the configuration settings. The buttons should be created from the buttons passed in in the configuration settings. The button type will define what actions are to be taken: |
| * If this is a Confirm button, the changes will be validated and, if OK, will be saved, the confirm attribute will be set to the type and the pop-up will exit. | | * If this is a '''Confirm''' button, the changes will be validated and, if OK, will be saved, the confirm attribute will be set to the type and the pop-up will exit. |
| * If this is an Ignore button, the changes will be saved, the confirm attribute will be set to the type and the pop-up will exit. | | * If this is an '''Ignore''' button, the changes will be saved, the confirm attribute will be set to the type and the pop-up will exit. |
| * If this is a Cancel button, the changes will not be saved, the confirm attribute will be set to the type and the pop-up will exit. | | * If this is a '''Cancel''' button, the changes will not be saved, the confirm attribute will be set to the type and the pop-up will exit. |
| In all cases, if the Confirm attribute is present on the button, a Yes/No confirmation message will be displayed before the actions, displaying the message configured on the device. If the user chooses Yes, the actions above will be taken. If the user chooses No, they will be returned to the pop-up screen. | | In all cases, if the Confirm attribute is present on the button, a Yes/No confirmation message will be displayed before the actions, displaying the message configured on the device. If the user chooses Yes, the actions above will be taken. If the user chooses No, they will be returned to the pop-up screen. |
|
| |
|
| When exiting the Post-work pop-up screen, the value of the Confirm parameter and the returned XML string should be stored, for validating later. | | When exiting the Post-work pop-up screen, the value of the Confirm parameter and the returned XML string should be stored, for validating later. |
|
| |
|
| The validation against the OK button should check whether any of the above configurations are present. If so, the following validation checks should be added to the validateService function: | | The validation against the '''OK''' button should check whether any of the above configurations are present. If so, the following validation checks should be added to the validateService function: |
| * If PDA_UDF_PREWORK is not null and the Confirm property of the Pre-work pop-up is I (Ignore) or unset, a message should be displayed requiring the user to enter the Pre-work checks, referred to by the Name element of the Pre-work configuration. The device should return the user to the services screen on clearing this message. | | * If PDA_UDF_PREWORK is not null and the Confirm property of the Pre-work pop-up is I (Ignore) or unset, a message should be displayed requiring the user to enter the Pre-work checks, referred to by the Name element of the Pre-work configuration. The device should return the user to the services screen on clearing this message. |
| * If PDA_UDF_POSTWORK is not null and the Confirm property of the Pre-work pop-up is I (Ignore) or unset, a message should be displayed requiring the user to enter the Post-work checks, referred to by the Name element of the Post-work configuration. The device should return the user to the services screen on clearing this message. | | * If PDA_UDF_POSTWORK is not null and the Confirm property of the Pre-work pop-up is I (Ignore) or unset, a message should be displayed requiring the user to enter the Post-work checks, referred to by the Name element of the Post-work configuration. The device should return the user to the services screen on clearing this message. |
| Line 452: |
Line 577: |
| * If PDA_UDF_DIAGNOSIS is not null, save the resulting XML from the Diagnosis UDF object into the new Service field EPL_UDF_DIAGNOSIS. | | * If PDA_UDF_DIAGNOSIS is not null, save the resulting XML from the Diagnosis UDF object into the new Service field EPL_UDF_DIAGNOSIS. |
|
| |
|
| <!-- MEDIA LANDSCAPE YES --> | | <!-- MEDIA LANDSCAPE YES --> |
| | |
| = Appendix A: TEST PLAN = | | = Appendix A: TEST PLAN = |
| {{TestPlan_Header | | {{TestPlan_Header |
| Line 732: |
Line 858: |
| <SKIPABLE>Y</SKIPABLE> | | <SKIPABLE>Y</SKIPABLE> |
| </FIELD> | | </FIELD> |
| <FIELD ID="0006"> | | <FIELD ID="0007" LINK="0006"> |
| <TEXT>Process Temperature</TEXT> | | <TEXT>Process Temperature</TEXT> |
| <SUBTEXT>(All Systems) deg C</SUBTEXT> | | <SUBTEXT>(All Systems) deg C</SUBTEXT> |
| Line 739: |
Line 865: |
| <SKIPABLE>Y</SKIPABLE> | | <SKIPABLE>Y</SKIPABLE> |
| </FIELD> | | </FIELD> |
| <FIELD ID="0007"> | | <FIELD ID="0008"> |
| <TEXT>EPL_KEY_TYPE=EPL_KEY_VALUE</TEXT> | | <TEXT>EPL_KEY_TYPE=EPL_KEY_VALUE</TEXT> |
| <FORMAT>B</FORMAT> | | <FORMAT>B</FORMAT> |

Lanemark
UDF Modifications
CALIDUS eSERV
4th October 2013 - 0.4
Reference: FS 311636 309371-1
Functional Overview
Client Requirement
Allow user-defined variable field entry against Services processing of Pre-work, Post-work, Info and Diagnosis. This should be configurable against Site, Job Group and Product Group, in this sequence.
Solution Overview
A new User-defined Field (UDF) configuration table will be added, to allow UDF configuration.
This configuration will be through a defined XML format, similar to the existing Vehicle Checks configuration.
The configurations will be passed through to the PDA client for storage. This client will also be modified to read these configurations and store them for use at points during the Service processing.
The configuration will be applied to a particular key type, as follows:
- Product Group
- Job Group
- Site
The order of these is important, as the settings are hierarchical. In other words, if a setting for a particular process exists against as Product Group, this would be used in preference to one created for the same process against the Job Group or Site.
The configuration will be marked as being of a particular type, as follows:
- Info
- Diagnosis
- Pre-check
- Post-check
If a configuration exists for a particular process, the fields contained within it will be added to the existing Service tab. The validation of the Service will be modified to ensure that any required fields have been entered.
A generic UDF type will be added to the project, to allow the creation and validation of UDF fields. This will include:
- Create a sizeable, scrollable entry frame
- Display Labels
- Display Post-labels (e.g. UOMs)
- Validate entry (optional or required entry against individual fields)
- Allow entry of different Field Types, such as:
- DDL (Drop-down List)
- Text entry (plus barcode)
- Numeric entry (plus barcode)
- Option entry
- Check Field Group entry
- Produce Results in a pre-defined XML format
In a second phase, a new Admin Maintenance screen will be created for maintaining these UDF configurations. This will include the abilities to:
- Create a new configuration
- Specify button names and types of validation required
- Add or modify variable fields to be entered, including such elements as:
- Labels
- Post-labels (e.g. UOMs)
- Validation (optional or required entry)
- Field Types, such as:
- DDL (Drop-down List)
- Text entry
- Numeric entry
- Option entry
- Check Field Group entry
- Delete fields.
- Change the sequence of fields.
Scope
- These changes will be made in the latest version of the CALIDUS eSERV product only.
- The changes will be made to the Android eSERV client only.
 Note: This solution combines a number of the generic UDF requirements and the Lanemark-specific requirements into one document, for clarity. Some of these elements have already been completed, some are being completed as Product Enhancements, and some are completed as bespoke additions required for the Lanemark process.
- Note: Although there is some description of an Admin screen, this is NOT included in the estimates provided in this specification - this will be completed at a later data through Product enhancements.
Set-up
Pre-requisites
Data
Functional Description
Database and DAL
A new table will be created, EPOD_UDF_CONFIG, as follows:
- EPL_CONFIG_ID - long numeric, auto-incrementing.
- EPL_DESCRIPTION - nvarchar(50), required not-null.
- EPL_UDF_FIELDS - nvarchar(max), required not-null
- EPL_KEY_TYPE - nvarchar(10), required not-null.
- EPL_KEY_VAL - nvarchar(50), required not-null.
- EPL_CONFIG_TYPE - nvarchar(50), required not-null.
- EPL_LAST_CHANGED_DATE - long numeric, required not-null.
- EPL_LAST_CHANGED_TIME - long numeric, required not-null.
Indexes and Keys:
- Primary Index: EPL_CONFIG_ID
- Unique Alternate: EPL_KEY_TYPE, EPL_KEY_VAL, EPL_CONFIG_TYPE
A DAL object (EPOD_UDF_CONFIG) will be created to allow the creation, deletion and amendment of records on this table. This will required packages to be created for this object, including (but not limited to):
- EPOD_UDF_CONFIG_INSERT
- EPOD_UDF_CONFIG_SELECT
- EPOD_UDF_CONFIG_UPDATE
The object will allow all standard functions (for examples, see any existing simple DAL object, like EPOD_REASON_CODES). The object must allow exporting of Configuration data as XML.
The existing EPOD_SERVICES table will be modified to add new fields as follows:
- EPL_UDF_INFO - nvarchar(max)
- EPL_UDF_DIAGNOSIS - nvarchar(max)
- EPL_UDF_PREWORK - nvarchar(max)
- EPL_UDF_POSTWORK - nvarchar(max)
Existing packages will be modified to allow the creating, editing and selecting of the new fields, including but not limited to:
- EPOD_SERVICE_INSERT
- EPOD_SERVICE_JOB_SEARCH
- EPOD_SERVICE_JOB_SELECT
- EPOD_SERVICE_SELECT
- EPOD_SERVICE_UPDATE
The existing EPOD_SERVICE/SERVICE_JOB DAL object will be changed to:
- Export the new fields in XML requests
- Read the new fields
Note: It is not necessary to add this flag as a searchable item. However, if allowing this keeps the packages and DAL objects standard in design, then this can also be done, within the DAL and the packages.
The XML Export of services will now look as follows:
<EPOD_SERVICES>
 <EPOD_SERVICE>
  <EPL_SITE_ID></EPL_SITE_ID>
  <EPL_JOB_ID></EPL_JOB_ID>
  <EPL_SERVICE_ID></EPL_SERVICE_ID>
  <EPL_SERVICE_TYPE></EPL_SERVICE_TYPE>
  <EPL_PREWORK_INTERIOR></EPL_PREWORK_INTERIOR>
  <EPL_PREWORK_EXTERIOR></EPL_PREWORK_EXTERIOR>
  <EPL_PREWORK_ELECTRIC></EPL_PREWORK_ELECTRIC>
  <EPL_POSTWORK_INTERIOR></EPL_POSTWORK_INTERIOR>
  <EPL_POSTWORK_EXTERIOR></EPL_POSTWORK_EXTERIOR>
  <EPL_POSTWORK_ELECTRIC></EPL_POSTWORK_ELECTRIC>
  <EPL_UNIT_TYPE></EPL_UNIT_TYPE>
  <EPL_REG_NUMBER></EPL_REG_NUMBER>
  <EPL_VIN_NUMBER></EPL_VIN_NUMBER>
  <EPL_MILEAGE>0</EPL_MILEAGE>
  <EPL_SIM_NUMBER></EPL_SIM_NUMBER>
  <EPL_MC_REF_1></EPL_MC_REF_1>
  <EPL_MC_REF_2></EPL_MC_REF_2>
  <EPL_MC_REF_3></EPL_MC_REF_3>
  <EPL_MC_REF_4></EPL_MC_REF_4>
  <EPL_MC_REF_NARRATIVE></EPL_MC_REF_NARRATIVE>
  <EPL_DIAGNOSIS_NARRATIVE></EPL_DIAGNOSIS_NARRATIVE>
  <EPL_SPEC_REQUIRED></EPL_SPEC_REQUIRED>
  <EPL_FAULT></EPL_FAULT>
  <EPL_CUSTOMER_DAMAGE></EPL_CUSTOMER_DAMAGE>
  <EPL_VNOS></EPL_VNOS>
  <EPL_SERVICE_GROUP></EPL_SERVICE_GROUP>
  <EPL_SYSTEM_TYPE></EPL_SYSTEM_TYPE>
  <EPL_UDF_INFO></EPL_UDF_INFO>
  <EPL_UDF_DIAGNOSIS></EPL_UDF_DIAGNOSIS>
  <EPL_UDF_PREWORK></EPL_UDF_PREWORK>
  <EPL_UDF_POSTWORK></EPL_UDF_POSTWORK>
  <EPL_LAST_CHANGED_DATE>0</EPL_LAST_CHANGED_DATE>
  <EPL_LAST_CHANGED_TIME>0</EPL_LAST_CHANGED_TIME>
 </EPOD_SERVICE>
</EPOD_SERVICES>
Server
The LOGIN_RESPONSE message sent when processing a LOGIN_REQUEST message (through the calidus_epod.asmx web service) will be modified to add a new section, detailing ONLY the EPOD_CONFIG records found that have changed since the last update. An XML Structure sample follows:
<EPOD_CONFIGS>
  <EPOD_CONFIG>
    <EPL_CONFIG_ID></EPL_CONFIG_ID>
    <EPL_DESCRIPTION></EPL_DESCRIPTION>
    <EPL_UDF_FIELDS></EPL_UDF_FIELDS>
    <EPL_KEY_TYPE></EPL_KEY_TYPE>
    <EPL_KEY_VAL></EPL_KEY_VAL>
    <EPL_CONFIG_TYPE></EPL_CONFIG_TYPE>
    <EPL_LAST_CHANGED_DATE></EPL_LAST_CHANGED_DATE>
    <EPL_LAST_CHANGED_TIME></EPL_LAST_CHANGED_TIME>
  </EPOD_CONFIG>
</EPOD_CONFIGS>
This section will be added after all existing sections.
When receiving JOB_UPDATE messages back from the device in the same web service, the new EPL_UDF fields should be saved with the values as sent back from the PDA. Note that the content of these elements will be XML and should not be translated, but stored as text in the fields - see the storage of Terms and Conditions XML within the same update to see how this should be achieved.
Admin
Note: This is a phase 2 deliverable item - for phase 1, all administration of UDF configuration items will be through the database and will be directly administered by OBS support or implementation staff.
A new menu item will be added to the main menu, on sub-menu Administration, labelled as UDF Config.
This screen will allow a user to add, search for and edit UDF configurations in the system. The main title should display as "User-Defined Forms Configuration"
This screen will work in all ways like the rest of the Admin screens in that:
- The screen will start empty.
- A Find and New button will be provided.
- Clicking the Find button will display a search criteria box, allowing the user to:
- Enter search criteria of Description and/or Type.
- A Clear button (to clear search criteria) and a Search button (to execute the search).
- Clicking the New button will display a pop-up window to enter new config details.
- Clicking the Search button will find all matching records, which will be displayed in a grid showing:
- Description
- Key Type
- Key Value
- A Select button.
- Clicking the Select button will display a pop-up window to exit the configuration.
A pop-up window will be created to allow the user to add, edit or delete UDF Configurations.
Note: This screen should be written in such a way that the code can be re-used in other screens i.e. as a reusable object.
The pop-up window will allow the user to enter:
- UDF Config section - all items required entry:
- Description - A required description of the configuration being created.
- Key Type - the level at which this is being created. Currently one of:
- Site (value "S")
- Job Group (value "J")
- Product Group (value "P")
- Key Value - the key item from the key type selected. This will be displayed as a drop-down list and will be populated with values when a Key Value has been chosen.
- Config Type - one of:
- "INFO" - labelled as "Service - Info"
- "PREWORK" - labelled as "Service - Pre-work Checks"
- "POSTWORK" - labelled as "Service - Post-work Checks"
- "DIAGNOSIS" - labelled as "Service - Diagnosis/Completion"
Note: Changing the Key Type should blank the Key Value and require the value to be entered again.
- Form section:
- Name - The title of the form or button that calls the form. Required entry.
- Required - future development.
- Field List:
- Field List - A list of all fields created on the form, in sequence, showing the ID and the Label. At least one field must be entered.
- Top/Up/Down/Bottom Buttons - to change the selected field's sequence.
- Add Field button - to add a new field.
- Field Detail - shown when a field is selected from a list, or a new field is requested through the Add Field button, showing:
- ID - An ID for the field. This is required entry. Up to 30 characters may be entered, using only alphanumeric and the underscore character only. This must be unique.
- Linked? - a check-box to show that this item is linked to the previous item in the list.
- Label - A label displayed against the field when it is being entered on the device. There is no limit to the number of characters, but users should be made aware that excessively long labels will result in less-than-usable data entry on the device. Required entry.
- Sub-Label - A smaller-font label under the main label when this field is being entered on the device.
- Post Text - a 6-character UOM to be displayed under the data being entered, in a small font.
- Required - whether the field must be entered on the device. Should default to Checked.
- Type - a field type, which defines how data can be entered, and what Field Type Content must be defined. Can be:
- Text - a free-text entry field - the default option.
- Numeric - Numeric-only data
- Options - a series of options grouped together, that may be checked or unchecked.
- Check - a single-option check.
- Drop-Down List - a list of options that drop down when it is clicked on - only one may be selected.
- Delete Field button - if clicked, this will delete the field from the list and blank the Field Detail section.
- Buttons section - optional entry - there can be up to 2 buttons defined for a form, one shown on each tab, allowing the user to enter:
- Label - The label of the button displayed - required entry.
- Type - The button type, one of:
- Confirm - saves the data
- Ignore - a back-out option
- Cancel - A Postpone-style option
- Confirmation Dialogue - Optional entry - If this is entered, this will make the device display a confirmation dialogue with this text and Yes/No buttons, when the button is clicked.
- Field Type Content section - This section differs depending on the different Field Type:
- Text/Numeric/Check - this section should not be displayed.
- Options - a table of options (of name only) to be selected will be shown, allowing the user to add or delete options. At least one option must be entered.
- Drop-down List - a table of options (with columns for Text, Value and a Default check box)) to be selected will be shown, allowing the user to add or delete options. At least one option must be entered.
Note: All fields in this pop-up should have hover-help and appropriate validators attached to them. Validators should be applied at the minimum to check maximum length of each of the fields. Also, attempting to exist the screen after making changed but without saving should prompt the user to confirm or save.
If the record already exists and is being edited, the details should be created and pre-populated from the details held in the EPL_UDF_FIELDS object, extracted from the XML following the schema for the XML, as follows:
<xsd:schema attributeFormDefault="unqualified" elementFormDefault="qualified" xmlns:xsd="http://www.w3.org/2001/XMLSchema">
  <xsd:element name="FORM">
    <xsd:complexType>
      <xsd:sequence>
        <xsd:element maxOccurs="unbounded" name="FIELD">
          <xsd:complexType>
            <xsd:sequence>
              <xsd:element name="TEXT" type="xsd:string" minOccurs="0" maxOccurs="1" />
              <xsd:element name="SUBTEXT" type="xsd:string" minOccurs="0" maxOccurs="1"/>
              <xsd:element name="POST" type="xsd:string" minOccurs="0" maxOccurs="1" />
              <xsd:element name="FORMAT" nillable="false">
                <xsd:simpleType>
                  <xsd:restriction base="xsd:string">
                    <xsd:enumeration value="X"/>
                    <xsd:enumeration value="N"/>
                    <xsd:enumeration value="T"/>
                    <xsd:enumeration value="B"/>
                    <xsd:enumeration value="DDL"/>
                  </xsd:restriction>
                </xsd:simpleType>
              </xsd:element>
              <xsd:element name="SKIPABLE" nillable="false">
                <xsd:simpleType>
                  <xsd:restriction base="xsd:string">
                    <xsd:enumeration value="Y"/>
                    <xsd:enumeration value="N"/>
                  </xsd:restriction>
                </xsd:simpleType>
              </xsd:element>
              <xsd:element minOccurs="0" nillable="true" name="VALUE" type="xsd:string" />
              <xsd:element minOccurs="0" name="ITEMS">
                <xsd:complexType>
                  <xsd:sequence>
                   <xsd:element name="ITEM" maxOccurs="unbounded" minOccurs="0">
                     <xsd:complexType>
                       <xsd:simpleContent>
                         <xsd:extension base="xsd:string">
                           <xsd:attribute type="xsd:string" name="CODE" use="optional"/>
                           <xsd:attribute type="xsd:string" name="DEFAULT" use="optional"/>
                         </xsd:extension>
                       </xsd:simpleContent>
                     </xsd:complexType>
                   </xsd:element>
                  </xsd:sequence>
                </xsd:complexType>
              </xsd:element>
            </xsd:sequence>
            <xsd:attribute name="ID" type="xsd:string" use="required" />
            <xsd:attribute name="LINK" type="xsd:string" use="optional" />
          </xsd:complexType>
        </xsd:element>
        <xsd:element maxOccurs="unbounded" name="BUTTON">
          <xsd:complexType>
            <xsd:sequence>
              <xsd:element name="TYPE" nillable="false">
                <xsd:simpleType>
                  <xsd:restriction base="xsd:string">
                    <xsd:enumeration value="C"/>
                    <xsd:enumeration value="I"/>
                    <xsd:enumeration value="X"/>
                  </xsd:restriction>
                </xsd:simpleType>
              </xsd:element>
              <xsd:element name="TEXT" type="xsd:string" />
            </xsd:sequence>
            <xsd:attribute name="CONFIRM" type="xsd:string" use="optional" />
          </xsd:complexType>
        </xsd:element>
      </xsd:sequence>
      <xsd:attribute name="NAME" type="xsd:string" use="optional" />
      <xsd:attribute name="REQUIRED" type="xsd:string" use="optional" />
      <xsd:attribute name="STATUS" type="xsd:string" use="optional" />
    </xsd:complexType>
  </xsd:element>
</xsd:schema>
A sample is provided in Appendix B for reference.
When all details have been edited, the user can press the Save button. This should then generate a XML configuration as per the user's details, saving this to the EPOD_CONFIG record.
The following is a prototype screen-shot of how the pop-up screen would look when editing a configuration similar to that shown in Appendix B:
Note: This prototype may not contain all changes specified above and should be used as a guideline only.
Android Client
The database will be modified to add the new table EPOD_UDF_CONFIG.
The existing EPOD_SERVICE table will be modified to add new fields as follows:
- EPL_UDF_INFO - ntext
- EPL_UDF_DIAGNOSIS - ntext
- EPL_UDF_PREWORK - ntext
- EPL_UDF_POSTWORK - ntext
The existing PDA_SERVICE DAL object will be changed to:
- Export the new fields in XML requests
- Read the new fields
Note: As the database structure is changing with this version, the default values must be carefully set and the database creation script modified to ensure that the standing data is re-downloaded from the server after the changes have been made. This is achieved by setting the "last version changed" variable (lngLastVersionDB) in DBConnection to the latest version number.
The XML Export of EPOD_SERVICE records will now look as follows:
<SERVICE>
  <PREWORK>
    <EPL_PREWORK_INTERIOR></EPL_PREWORK_INTERIOR>
    <EPL_PREWORK_EXTERIOR></EPL_PREWORK_EXTERIOR>
    <EPL_PREWORK_ELECTRIC></EPL_PREWORK_ELECTRIC>
    <EPL_UDF_PREWORK></EPL_UDF_PREWORK>
  </PREWORK>
  <POSTWORK>
    <EPL_POSTWORK_INTERIOR></EPL_POSTWORK_INTERIOR>
    <EPL_POSTWORK_EXTERIOR></EPL_POSTWORK_EXTERIOR>
    <EPL_POSTWORK_ELECTRIC></EPL_POSTWORK_ELECTRIC>
    <EPL_UDF_POSTWORK></EPL_UDF_POSTWORK>
  </POSTWORK>
  <INFO>
    <EPL_UNIT_TYPE></EPL_UNIT_TYPE>
    <EPL_REG_NUMBER></EPL_REG_NUMBER>
    <EPL_VIN_NUMBER></EPL_VIN_NUMBER>
    <EPL_MILEAGE></EPL_MILEAGE>
    <EPL_SIM_NUMBER></EPL_SIM_NUMBER>
    <EPL_SPEC_REQUIRED></EPL_SPEC_REQUIRED>
    <EPL_SERVICE_GROUP></EPL_SERVICE_GROUP>
    <EPL_SYSTEM_TYPE></EPL_SYSTEM_TYPE>
    <EPL_UDF_INFO></EPL_UDF_INFO>
  </INFO>
  <MC_REF>
    <EPL_MC_REF_1></EPL_MC_REF_1>
    <EPL_MC_REF_2></EPL_MC_REF_2>
    <EPL_MC_REF_3><EPL_MC_REF_3>
    <EPL_MC_REF_4></EPL_MC_REF_4>
    <EPL_MC_REF_NARRATIVE></EPL_MC_REF_NARRATIVE>
  </MC_REF>
  <DIAGNOSIS>
    <EPL_DIAGNOSIS_NARRATIVE></EPL_DIAGNOSIS_NARRATIVE>
    <EPL_CUSTOMER_DAMAGE></EPL_CUSTOMER_DAMAGE>
    <EPL_VNOS></EPL_VNOS>
    <EPL_CHECKBOX_1></EPL_CHECKBOX_1>
    <EPL_CHECKBOX_2></EPL_CHECKBOX_2>
    <EPL_CHECKBOX_3></EPL_CHECKBOX_3>
    <EPL_UDF_DIAGNOSIS></EPL_UDF_DIAGNOSIS>
  </DIAGNOSIS>
  <PRODUCT>
    <EPL_PRODUCT_ID></EPL_PRODUCT_ID>
    <EPL_QUANTITY></EPL_QUANTITY>
    <EPL_DIRECTION></EPL_DIRECTION>
    <EPL_RETURN></EPL_RETURN>
  </PRODUCT>
  <ACTIVITY>
    <EPL_SITE_ID></EPL_SITE_ID>
    <EPL_SERVICE_ID></EPL_SERVICE_ID>
    <EPL_ACTIVITY_CODE></EPL_ACTIVITY_CODE>
    <EPL_QUANTITY></EPL_QUANTITY>
  </ACTIVITY>
</SERVICE>
Note: This format includes the changes made under reference 311636.
The Webservices.LOGON_RESPONSE processing function will be modified to add all new EPOD_UDF_CONFIG messages.
Note: The function should be written not to delete all items, but just to add or update items.
A new DAL object will be added, called PDA_UDF_CONFIG. This will include all the options required to maintain the EPOD_UDF_CONFIG table, using:
There will also be global functions to process additions and updates to the table through logon, as follows:
- InsertAllUDFConfigs
- InsertUDFConfig
The format and functions required should be copied from an existing PDA DAL object, for example PDA_REASON_CODES.
The DAL object should include an ability to get the configuration matching certain Job configurations. So, a function is required to return a single EPOD_CONFIG item, when passed in the following parameters:
- EPL_CONFIG_TYPE (required)
- EPL_SITE_ID (required)
- EPL_JOB_GROUP
- EPL_PRODUCT_GROUP
The function should retrieve all records found for the Config Type required, matching against the key elements provided. Note: Any null or blank optional parameters should be ignored when fetching UDF Configurations. All would be sorted so that the hierarchy below is followed:
- Product Group - 1
- Job Group - 2
- Site - 3
The highest available configuration in the hierarchy will be returned as a PDA_UDF_GROUP object. If one is not found, null will be returned.
The suggested name for this function is getUDFConfig.
Example:
If the following parameters are provided:
- EPL_CONFIG_TYPE - "INFO"
- EPL_SITE_ID - "TEST"
- EPL_JOB_GROUP - "JG01"
- EPL_PRODUCT_GROUP - "PG01"
The procedure should fetch all configurations for key elements as follows:
- EPL_CONFIG_TYPE = "INFO" AND EPL_KEY_TYPE = "S" and EPL_KEY_VALUE = "TEST"
- EPL_CONFIG_TYPE = "INFO" AND EPL_KEY_TYPE = "J" and EPL_KEY_VALUE = "JG01"
- EPL_CONFIG_TYPE = "INFO" AND EPL_KEY_TYPE = "P" and EPL_KEY_VALUE = "PG01"
The lowest hierarchical record found will be returned, in this case, the Product Group record, as a DAL object.
A generic UDF object will be used in the project, in Style.js, to allow the creation and validation of UDF fields. This will:
- Create a sizeable, scrollable entry frame
- Display Labels
- Display Post-labels (e.g. UOMs)
- Validate entry (optional or required entry against individual fields)
- Allow entry of different Field Types, such as:
- DDL (Drop-down List)
- Text entry (plus barcode)
- Numeric entry (plus barcode)
- Option entry
- Check Field Group entry
- Pre-populate the value, if already entered
- Produce Results in a pre-defined XML format
Note: An object has already been written to do this, utilising Titanium Tables, and is used in Vehicle Checks. This object should be modified to allow the additional functionality specified above, whilst maintaining compatibility with the Vehicle Checks functionality.
The fields shown in the object itself are subject to a configuration XML string, which will be found in the new UDF_CONFIG table.
The configuration must conform to the schema XSD, as shown in the previous section.
Note: Comparing this to the existing UDF and VEHICLE_CHECK XSD:
- New elements have been added to the FIELD element:
- TEXT is the main label.
- SUBTEXT is a sub-label, that should be under the main label.
- POST is a small 'UOM' label that, if present, should be placed after the text entry item.
- As the current system allows for only one label and one item, this will require a restructure of the layout of the view containing these elements.
- New attribute LINK has been added to the field, to identify the FIELD ID that this field is linked to.
- The new element BUTTON controls what buttons are on the form:
- TEXT - the label on the button
- TYPE - the type of button:
- C - Confirm
- I - Ignore
- X - Cancel
- CONFIRM - if present, a confirmation message to be displayed, requiring the user to confirm that they confirm the action, with a Yes/No prompt.
- NAME attribute - a label for any button calling this form, and for a label on the top of the form.
- REQUIRED attribute - whether the user must confirm to be allowed to continue.
- STATUS attribute - Set to the Status of the Button that was pressed. Note that this attribute should be a property of the new Object that is created, to allow easy checking of the status.
These new attribute items apply to the object that calls the UDF form, whereas the buttons apply to the object itself.
The VALUE tag will now be checked - if this is present on the field, the value of the entry object will be preset to the value in the VALUE tag. For DDL items, this vaue will take precedence over any default item.
Note: See existing test code in Pre- and Post-work checks in Services for information as to how this object works in its original form, and guidance as to how this will change applying the changes in this specification.
Note: The existing DLL code is a prototype of how this is expected to work and has not yet been fully tested. This code must also be modified to check whether a CODE attribute has been provided - if not, the tag value should be used as the code in the DLL.
Note: If a new UDF object is written, it should be written without the use of the Titanium tables, as these are notoriously memory-hungry - instead, use multiple Views in a vertical layout, as can be seen in Signature Container list. This will also minimise risk of change affecting the existing Vehicle Checks code.
The layout of the fields will change with the new labels, as follows:
- The original label field will become height: 66%.
- The original entry items will become height: 66%.
- A new label item will be added at top: 67%, height: 33%, left: 1%, align: right for the Subtext text if it exists.
- A new label item will be added at top: 67%, height: 33%, right: 1%, align: right for the Post text if it exists.
For Check-box fields, the values in SUBTEXT and POST does not apply and should not be added.
Items which have a LINK attribute equal to the ID of the previous FIELD item in the list are considered linked - in this instance, the TEXT field need not be displayed, but SUBTEXT and POST should be.
A sample test XML file is provided in Appendix B.
An example of how this may look for each combination is below:
The Services module (in SM_Services.js) will be modified to create UDF views, if required, in certain sections, as follows:
- Pre-work Checks
- Post-work Checks
- Info
- Diagnosis
The Services function will create a PDA_UDF object for each section, named appropriately, passing in the Site, Job Group and Service Group parameters, and the name of each section. This will result with any UDF configuration retrieved for each section. Naming conventions would be:
- PDA_UDF_INFO
- PDA_UDF_PREWORK
- PDA_UDF_POSTWORK
- PDA_UDF_DIAGNOSIS
In the Diagnosis section, A fixed-size, vertical-layout UDF form will be added to the view under any existing fields. This will be created with the value in the new field EPL_UDF_DIAGNOSIS from the in-progress EPOD_SERVICE record, if this contains a value, or using EPL_FIELDS of the PDA_UDF_DIAGNOSIS object, if this object is not null.
In the Info section, the section will be modified to be contained within a scrolling vertical-layout view. Note: This is similar to how the existing Diagnosis tab is structured now, so this code should be used as source. A fixed-size, vertical-layout UDF form will be added to the view under any existing fields, if the configuration is not null. This will be created with the value in the new field EPL_UDF_INFO from the in-progress EPOD_SERVICE record, if this contains a value, or using EPL_FIELDS of the PDA_UDF_INFO object, if this object is not null.
Note: If the Service Group is being entered on the Info screen, all UDF configuration items should be refreshed, as this could potentially affect the UDF fields configuration. Once refreshed, the old and new configurations should be compared and, if different, the UDF objects affected should be rebuilt. As this may take some time, an Activity Indicator should be displayed.
The Info section should also check the Pre-work UDF configuration. If this is present, the Pre-work button should be created with the label as defined in the configuration. The Pre-work pop-up should be triggered from this, passing the value in the new field EPL_UDF_PREWORK from the in-progress EPOD_SERVICE record, if this contains a value, or using EPL_FIELDS of the PDA_UDF_PREWORK object, if this object is not null.
The Pre-work pop-up screen will be modified to replace the current fields and buttons with a scrolling vertical-layout view, if the flag PDAJOBGROUP.EPL_SERVICE_PREWORK is not "Y" or "N". The view should be 70% height, allowing for up to 2 buttons and a title on the screen. The title should be set to the NAME parameter of the configuration settings. The buttons should be created from the buttons passed in in the configuration settings. The button type will define what actions are to be taken:
- If this is a Confirm button, the changes will be validated and, if OK, will be saved, the confirm attribute will be set to the type and the pop-up will exit.
- If this is an Ignore button, the changes will be saved, the confirm attribute will be set to the type and the pop-up will exit.
- If this is a Cancel button, the changes will not be saved, the confirm attribute will be set to the type and the pop-up will exit.
In all cases, if the Confirm attribute is present on the button, a Yes/No confirmation message will be displayed before the actions, displaying the message configured on the device. If the user chooses Yes, the actions above will be taken. If the user chooses No, they will be returned to the pop-up screen.
When exiting the Pre-work pop-up screen, the value of the Confirm parameter and the returned XML string should be stored, for validating later.
The Diagnosis section should also check the Post-work UDF configuration. If this is present, the Post-work button should be created with the label as defined in the configuration. The Post-work pop-up should be triggered from this, passing the value in the new field EPL_UDF_POSTWORK from the in-progress EPOD_SERVICE record, if this contains a value, or using EPL_FIELDS of the PDA_UDF_POSTWORK object, if this object is not null.
The Post-work pop-up screen will be modified to replace the current fields and buttons with a scrolling vertical-layout view, if the flag PDAJOBGROUP.EPL_SERVICE_POSTWORK is not "Y" or "N". The view should be 70% height, allowing for up to 2 buttons and a title on the screen. The title should be set to the NAME parameter of the configuration settings. The buttons should be created from the buttons passed in in the configuration settings. The button type will define what actions are to be taken:
- If this is a Confirm button, the changes will be validated and, if OK, will be saved, the confirm attribute will be set to the type and the pop-up will exit.
- If this is an Ignore button, the changes will be saved, the confirm attribute will be set to the type and the pop-up will exit.
- If this is a Cancel button, the changes will not be saved, the confirm attribute will be set to the type and the pop-up will exit.
In all cases, if the Confirm attribute is present on the button, a Yes/No confirmation message will be displayed before the actions, displaying the message configured on the device. If the user chooses Yes, the actions above will be taken. If the user chooses No, they will be returned to the pop-up screen.
When exiting the Post-work pop-up screen, the value of the Confirm parameter and the returned XML string should be stored, for validating later.
The validation against the OK button should check whether any of the above configurations are present. If so, the following validation checks should be added to the validateService function:
- If PDA_UDF_PREWORK is not null and the Confirm property of the Pre-work pop-up is I (Ignore) or unset, a message should be displayed requiring the user to enter the Pre-work checks, referred to by the Name element of the Pre-work configuration. The device should return the user to the services screen on clearing this message.
- If PDA_UDF_POSTWORK is not null and the Confirm property of the Pre-work pop-up is I (Ignore) or unset, a message should be displayed requiring the user to enter the Post-work checks, referred to by the Name element of the Post-work configuration. The device should return the user to the services screen on clearing this message.
- If PDA_UDF_INFO is not null, the validation procedure of the Info UDF object should be called. If this does not pass, a message should be displayed requiring the user to enter the Info details, referred to by the Name element of the Info configuration. The device should return the user to the services screen on clearing this message.
- If PDA_UDF_DIAGNOSIS is not null, the validation procedure of the Diagnosis UDF object should be called. If this does not pass, a message should be displayed requiring the user to enter the Diagnosis details, referred to by the Name element of the Diagnosis configuration. The device should return the user to the services screen on clearing this message.
If the user's entry passes this validation, the saveService function should be called. This should be modified as follows:
- If PDA_UDF_PREWORK is not null, save the resulting XML from the Pre-work UDF object into the new Service field EPL_UDF_PREWORK.
- If PDA_UDF_POSTWORK is not null, save the resulting XML from the Post-work UDF object into the new Service field EPL_UDF_POSTWORK.
- If PDA_UDF_INFO is not null, save the resulting XML from the Info UDF object into the new Service field EPL_UDF_INFO.
- If PDA_UDF_DIAGNOSIS is not null, save the resulting XML from the Diagnosis UDF object into the new Service field EPL_UDF_DIAGNOSIS.
Appendix A: TEST PLAN
| Test Script / Scenario Reference | UDF Modifications | Call Number(s): 311636 309371-1 |
| Test Script / Scenario Description | To test the entry and visibility of the additional check box fields in CALIDUS eSERV | PASS / ISSUES / FAIL |
| Menu Access | Services | |
| Pre-requisites | Ensure that any UDF configurations created have a specific test added that identifies the key type and key value, to make it easier to identify which configuration is being used by the device at that time - a sample set-up as is shown in Appendix B | Tested By:
|
| Test Objective | To test that UDF configurations: can be maintained; are sent to the device and stored; are applied when required; are validated correctly and; are updated back in the server when complete. | Date:
|
| Step |
Action |
Result |
Remarks |
P/F |
| 1 |
Admin |
|
|
|
| |
|
|
|
|
| 1.01 |
Enter the new UDF Config screen and click Find then Search to find all data. |
Any data present will be displayed in a grid. If no data is found, the screen will display a line in the grid showing no data found. |
|
|
| 1.02 |
Click New. Enter no details. Click Save |
The system should not allow the new record to be created, displaying the validation failures. |
|
|
| 1.03 |
Click New. Enter all required details. Click Save. |
The system should create the record and show it in the grid. |
|
|
| 1.04 |
Click Select against an existing record. Click Edit. |
The system should allow editing of the record. |
|
|
| 1.05 |
Change by removing required items and click Save. |
The changes should not be saved, the screen showing the validation failures. |
|
|
| 1.06 |
Change and correct and click Save. |
The changes should be saved. |
|
|
| 1.07 |
Ensure there are multiple items on the table. Click Find and choose to filter by all of the items available in turn, by clicking Search. |
The grid displayed should be filtered by the items entered. |
|
|
| 1.08 |
Click Select against an existing record. Click Delete. |
A confirmation should be displayed and, if confirmed, the record should be deleted. |
|
|
| Step |
Action |
Result |
Remarks |
P/F |
| 2 |
Server/PDA - DTO |
|
|
|
| |
Ensure that there are multiple configurations, one for site 1 and one for site 2. |
|
|
|
| 2.01 |
Log on a PDA and check the Server logs. |
All UDF configuration sent to the device. |
|
|
| 2.02 |
Check the device database using SQLite Note: Only on an emulator. |
All UDF configuration is stored in the device database. |
|
|
| Step |
Action |
Result |
Remarks |
P/F |
| 3 |
PDA - Optionality |
|
|
|
| |
Start with no UDF configuration |
|
|
|
| 3.01 |
Add an Info UDF Configuration to the Site. Log on and start a Service job. Check the Info tab. |
All configurable fields required are present on the screen in a scrolling view, the final field showing that this is the correct Key Type and Key Value. |
|
|
| 3.02 |
Add a Pre-work UDF Configuration to the Site. Log on and start a Service job. Check the Info tab. |
A Pre-work check button is present with a label as configured. When pressed, all configurable fields required are present on the pop-up in a scrolling view, the final field showing that this is the correct Key Type and Key Value. All required buttons are present. |
|
|
| 3.03 |
Add a Diagnosis UDF Configuration to the Site. Log on and start a Service job. Check the Info tab. |
All configurable fields required are present on the screen in a scrolling view, the final field showing that this is the correct Key Type and Key Value. |
|
|
| 3.04 |
Add a Post-work UDF Configuration to the Site. Log on and start a Service job. Check the Info tab. |
A Post-work check button is present with a label as configured. When pressed, all configurable fields required are present on the pop-up in a scrolling view, the final field showing that this is the correct Key Type and Key Value. All required buttons are present. |
|
|
| 3.05 |
Repeat the first 4 tests, this time configuring for Job Group. |
The Job Group configurations should be used. |
|
|
| 3.06 |
Ensure the job being started has no Service Group set. Repeat the first 4 tests, this time configuring for Product Group. |
The Job Group UDF configurations should be used, as there is no Service Group present. |
|
|
| 3.07 |
Ensure the job being started has a Service Group set. Repeat the first 4 tests, this time configuring for Product Group. |
The Product Group UDF configurations should be used. |
|
|
| 3.08 |
Ensure the Service configuration allows entry of Product Group. Ensure a UDF configuration for a different product group exists. Change the Service Group to the new Product Group. |
The Post-work UDF configuration should be refreshed to the new Product Group's UDF configuration. |
|
|
| 3.09 |
Ensure UDF configurations exist for different sites and Job Groups. Retest the above using these new configurations. |
The UDF configurations of the expected Site, Job Group or Product Group are used, as expected. |
|
|
| Step |
Action |
Result |
Remarks |
P/F |
| 4 |
PDA - Process |
|
|
|
| |
Ensure a UDF configuration is set up for all areas (Info, Diagnosis, Pre-work, Post-work) for the Job Group of the job being processed. |
|
|
|
| 4.01 |
Click the Info tab |
All fields required to be entered at Info stage should be shown on the screen. A Pre-work button should be shown, labelled correctly. |
|
|
| 4.02 |
Click a Text field. |
A Text keyboard is shown to enter data. |
|
|
| 4.03 |
Enter data |
The data entered should be shown in the field. |
|
|
| 4.04 |
Click the Barcode button (requires a device). |
The Barcode Scan screen should be shown. |
|
|
| 4.05 |
Scan a barcode |
The data scanned should be shown in the field. |
|
|
| 4.06 |
Click a Numeric field |
A Number keyboard is shown to enter data. |
|
|
| 4.07 |
Enter data |
The data entered should be shown in the field. |
|
|
| 4.08 |
Check and Uncheck Options and Check Box elements |
The data should be entered as expected. |
|
|
| 4.09 |
Check a Drop-Down List (DDL) field. |
The default value should be selected. |
|
|
| 4.10 |
Click the DDL field. |
All options should be displayed for entry. |
|
|
| 4.11 |
Select a different one. |
The selected data should be shown in the field. |
|
|
| 4.12 |
Click the Pre-work button. |
A pop-up window should be displayed, showing the required fields in a scrolling view. The Save and Pre-completed buttons should be displayed. |
|
|
| 4.13 |
Do not enter any required data - click the Save button. |
A validation failure message should be displayed. The offending field should be highlighted in the screen. |
|
|
| 4.14 |
Click Pre-completed |
A confirmation pop-up should appear ("Please confirm that Risk Assessments have been pre-completed.), allowing Yes or No entry. |
|
|
| 4.15 |
Click No |
The Pop-up screen should stay - no action taken. |
|
|
| 4.16 |
Click Pre-completed and Yes. |
The Info tab should be re-displayed, as the Pre-work checks have been cancelled. |
|
|
| 4.17 |
Click the Pre-work button and enter all information. Click the Confirm button. |
The Info tab should be re-displayed, as the Pre-work checks have been saved. |
|
|
| 4.18 |
Click the Diagnosis tab |
All fields required to be entered at Diagnosis stage should be shown on the screen. A Post-work button should be shown, labelled correctly. |
|
|
| 4.19 |
Check entering data. |
As expected. |
|
|
| 4.20 |
Click the Post-work button. |
A pop-up window should be displayed, showing the required fields in a scrolling view. The Save and Pre-completed buttons should be displayed. |
|
|
| 4.21 |
Do not enter any required data - click the Save button. |
A validation failure message should be displayed. The offending field should be highlighted in the screen. |
|
|
| 4.22 |
Click Pre-completed |
A confirmation pop-up should appear ("Please confirm that Risk Assessments have been pre-completed.), allowing Yes or No entry. |
|
|
| 4.23 |
Click No |
The Pop-up screen should stay - no action taken. |
|
|
| 4.24 |
Click Pre-completed and Yes. |
The Info tab should be re-displayed, as the Post-work checks have been cancelled. |
|
|
| 4.25 |
Click the Post-work button and enter all information. Click the Save button. |
The Info tab should be re-displayed, as the Post-work checks have been saved. |
|
|
| 4.26 |
Before Pre-work and Post-work validations have been completed, click Done. |
Validation messages should be displayed, showing the errors. |
|
|
| 4.27 |
Before all required data on Info and Diagnosis tabs is entered, click Done |
Validation messages should be displayed, showing the errors. The first offending field should be highlighted on the tab. |
|
|
| 4.28 |
When all complete, click Done |
All data is saved and the job moves on to Completion (Signature Entry). |
|
|
| 4.29 |
Complete the Job. |
The job is sent back to the server (check the Server web-service logs). The job is saved, with all UDF data saved into the correct new fields (check the database). |
|
|
Appendix B: TEST UDF FILE
<FORM NAME="EPL_CONFIG_TYPE TEST" REQUIRED="Y">
   <FIELD ID="0001">
       <TEXT>Please enter any comments.</TEXT>
       <FORMAT>T</FORMAT>
       <SKIPABLE>Y</SKIPABLE>
   </FIELD>
   <FIELD ID="0002">
       <TEXT>Please enter Mileage</TEXT>
       <SUBTEXT>Not distance</SUBTEXT>
       <FORMAT>N</FORMAT>
       <SKIPABLE>Y</SKIPABLE>
   </FIELD>
   <FIELD ID="0003">
       <TEXT>Please enter pressure</TEXT>
       <SUBTEXT>Read from gauge</SUBTEXT>
       <POST>mBar</POST>
       <FORMAT>DDL</FORMAT>
       <SKIPABLE>N</SKIPABLE>
       <ITEMS>
           <ITEM CODE="1" DEFAULT="Y">1</ITEM>
           <ITEM CODE="2">2</ITEM>
           <ITEM CODE="3">3</ITEM>
           <ITEM CODE="4">4</ITEM>
           <ITEM CODE="5">5</ITEM>
       </ITEMS>
   </FIELD>
   <FIELD ID="0004">
       <TEXT>Have you checked?</TEXT>
       <SUBTEXT>Really?</SUBTEXT>
       <POST>:-)</POST>
       <FORMAT>B</FORMAT>
       <SKIPABLE>N</SKIPABLE>
   </FIELD>
   <FIELD ID="0005">
       <TEXT>Please check the following items.</TEXT>
       <SUBTEXT>Check them all to continue</SUBTEXT>
       <POST>OK</POST>
       <FORMAT>X</FORMAT>
       <SKIPABLE>N</SKIPABLE>
       <ITEMS>
           <ITEM>Oil Level</ITEM>
           <ITEM>Water</ITEM>
       </ITEMS>
   </FIELD>
   <FIELD ID="0006">
       <TEXT>Process Temperature</TEXT>
       <SUBTEXT>(All Systems) deg C</SUBTEXT>
       <POST>Min</POST>
       <FORMAT>N</FORMAT>
       <SKIPABLE>Y</SKIPABLE>
   </FIELD>
   <FIELD ID="0007" LINK="0006">
       <TEXT>Process Temperature</TEXT>
       <SUBTEXT>(All Systems) deg C</SUBTEXT>
       <POST>Max</POST>
       <FORMAT>N</FORMAT>
       <SKIPABLE>Y</SKIPABLE>
   </FIELD>
   <FIELD ID="0008">
       <TEXT>EPL_KEY_TYPE=EPL_KEY_VALUE</TEXT>
       <FORMAT>B</FORMAT>
       <SKIPABLE>N</SKIPABLE>
   </FIELD>
   <BUTTON>
       <TYPE>C</TYPE>
       <TEXT>Confirm</TEXT>
   </BUTTON>
   <BUTTON CONFIRM="Please confirm that Risk Assessments have been pre-completed.">
       <TYPE>X</TYPE>
       <TEXT>Pre-completed</TEXT>
   </BUTTON>
</FORM>
Appendix B: Quote & Document References
| Cost Details |
| Activity |
No. of Days |
Rate per Day (£) |
Cost (£ Exc. VAT) |
| Requirements |
0.00 |
0 |
£0.00 |
| Change Request Evaluation |
0.00 |
0 |
£0.00 |
| Functional Specification |
2.50 |
0 |
£0.00 |
| Technical Specification |
0.00 |
0 |
£0.00 |
| Development |
13.75 |
0 |
£0.00 |
| Testing and Release |
2.00 |
0 |
£0.00 |
| Implementation |
0.00 |
0 |
£0.00 |
| Project Management |
First argument to "number_format" must be a number. |
0 |
£First argument to "number_format" must be a number. |
| |
| TOTAL |
First argument to "number_format" must be a number. |
|
£First argument to "number_format" must be a number. |
| Estimate excludes training, release to live and go live support. |
B.1 References
| Ref No | Document Title & ID | Version | Date |
| 1 | UG 291094 EPOD Admin User Guide | 2.0 | 4/4/2012 |
| 2 | UG 291097 EPOD Client User Guide | 3.0 | 23/4/2013 |
| 3 | REQ 309371 Lanemark eSERV Requirements | 0.4 | 29/08/2013 |
B.2 Glossary
| Term |
Definition
|
| EPOD |
Electronic Proof of Delivery. The OBS EPOD system is CALIDUS ePOD.
|
| CALIDUS eSERV |
The OBS mobile system to complete Service functionality in the field. This is part of the CALIDUS ePOD system.
|
| PDA |
The mobile device on which the C-ePOD system will run in the field. This can be a Phone, EDA or industrial PDA, running Android.
|
| DAL |
Data Access Layer. A mechanism for accessing data by the system that is removed from the application, allowing for simplified access and providing protection to the data, as only approved DAL methods can be used to modify it.
|
| GPS |
Global Positioning System. A mechanism of retrieving accurate positioning information in the form of Latitude and Longitude (Lat-Long) co-ordinates from a device.
|
| GPRS, 3G, HSDPA, Data Service |
All terms referring to mobile device network connectivity, and the speed at which the device connects to the internet.
|
B.3 Authorised By
Julie Taylor |
OBS Project Manager | _____________________________ |
Jeff Foster |
Client Representative | _____________________________ |
Alan Thompson |
Client Representative | _____________________________ |

