REQ 354306 CFC v2 Requirements: Difference between revisions
(v0.6 - Minor correction to v1 system components.) |
|||
| Line 4: | Line 4: | ||
{{#vardefine:System|''CALIDUS'' ePOD}} | {{#vardefine:System|''CALIDUS'' ePOD}} | ||
{{#vardefine:Doc_Title|CFC v2 Requirements}} | {{#vardefine:Doc_Title|CFC v2 Requirements}} | ||
{{#vardefine:Version|0. | {{#vardefine:Version|0.6}} | ||
{{#vardefine:Date| | {{#vardefine:Date|19th March 2019}} | ||
{{#vardefine:Reference|354306}} | {{#vardefine:Reference|354306}} | ||
{{#vardefine:Year|2019}} | {{#vardefine:Year|2019}} | ||
| Line 35: | Line 35: | ||
== Overview == | == Overview == | ||
The systems have been created for implementation as follows: | The systems have been created for implementation as follows: | ||
* v1 - VEhub | * v1 - VEhub | ||
* v2 - CTL-TMS + C-ePOD + TTM | * v2 - CTL-TMS + C-ePOD + TTM | ||
Latest revision as of 10:09, 19 March 2019
![]()
Charity Fleet Care
CFC v2 Requirements
CALIDUS ePOD
19th March 2019 - 0.6
Reference: REQ 354306
Contents
- 1 Introduction
- 2 Client Requirements
- 3 Appendix A: Table of SCRs and Ballpark Estimates
- 4 Appendix B: Document References
Introduction
This document is the CFC v2 Requirements.
Objective
The primary purpose of this document is to document the requirements gathered from Matt Turner for new Charity Fleet Care implementations.
Scope and Limitations
Client Requirements
Overview
The systems have been created for implementation as follows:
- v1 - VEhub
- v2 - CTL-TMS + C-ePOD + TTM
The full v2 process is:
- Plan a load per vehicle per day.
- Create planned collection jobs for the load.
- Create linked delivery jobs to charity store (optional).
- Gather Gift Aid information and signature at arrival.
- Ad Hoc Items at collection.
- Generate Ad Hoc items automatically on device.
- Print labels (optional).
- Produce POC and Gift Aid form combined.
- Email or store PDF automatically (optional).
The process needs the following hardware:
- An Android device
- A Mobile Bluetooth label printer (optional) supporting ZPLII language (optional)
![]() Note:
Note:
- The process can still be followed without mobile label printers.
- The only label format currently being developed is in ZPLII printer language. If the printer supports standard Bluetooth connections and the printer language is compatible with the way that the application sends data (for example, EPL and CPCL would also work), then a different label format could be created. Note that this is dependent on a fully-configurable label format in C-ePOD.
The devices expected for customers implementing this system are as follows:
- Brother RJ-4030 mobile printer.
- TomTom PRO mobile devices.
Data
CALIDUS ePOD will receive loads consisting of jobs sent from TMS. These loads will be assigned to drivers and/or vehicles. The jobs on the load will be sequenced for collection.
Each loads will be assigned to a site, expected to be the charity shop.
Configuration in CALIDUS ePOD will control the process of collecting the goods from the donor.
It is expected that this configuration will be as follows:
- Customer signature required at the end of a collection.
- Ad Hoc item collection.
- Print Item Labels (controlled by the label format).
- Collection Note and Gift Aid Registration format.
- A defined container (item) abel format.
- Printing from EPOD devices.
- Unmanned location.
Vehicles and users will be created when loads are received from CTL-TMS. They may also be maintained within the CALIDUS ePOD Admin Users and Vehicles maintenance screens.
![]() Note: If using TomTom PRO devices with a WEBFLEET user, the CALIDUS ePOD user name should be created to match the WEBFLEET driver name, and the WEBFLEET vehicle ID entered against the vehicle. If this is not maintained, the application will not automatically log in using WEBFLEET login information.
Note: If using TomTom PRO devices with a WEBFLEET user, the CALIDUS ePOD user name should be created to match the WEBFLEET driver name, and the WEBFLEET vehicle ID entered against the vehicle. If this is not maintained, the application will not automatically log in using WEBFLEET login information.
DU (item) types (for example, BOX, BAG, etc) will be created and maintained within the CALIDUS ePOD Admin Codes maintenance screen.
The expected configuration of Arrival Terms and Conditions will be:
- Enter Gift Aid ID
- A button to Register for Gift Aid running the Gift Aid Registration sub-form.
The expected configuration of the Gift Aid Registration sub-form is expected to contain:
- Several text labels describing the Gift Aid process:
- A check-box to confirm Gift Aid, which must be checked.
- The charity name, defaulted from the job, required to be entered.
- Name, defaulted from the contact name on the job, required to be entered.
- 4 lines of address, defaulted from the job address, 1 line required to be entered.
- Post Code, defaulted from the job address, required to be entered, validated as a UK post code.
- Date, defaulted to the current date, required to be entered.
- A Confirm button to save the Gift Aid Registration details.
- A Cancel button to discard the Gift Aid Registration details.
![]() Note: It is expected that a single set of T&Cs for a single job group or for the site will be required. However, the application will allow for different T&Cs (and Gift Aid Registration forms) to be configured for each customer (Job Group in C-ePOD). The POC note format will display all of these checks on a Gift Aid Registration page. Note however that formatting changes cannot be made to this page without further development.
Note: It is expected that a single set of T&Cs for a single job group or for the site will be required. However, the application will allow for different T&Cs (and Gift Aid Registration forms) to be configured for each customer (Job Group in C-ePOD). The POC note format will display all of these checks on a Gift Aid Registration page. Note however that formatting changes cannot be made to this page without further development.
PDA Login
The application will have a customised which will display the site logo on the login page.
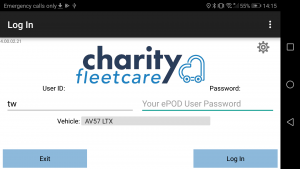
Log In

The drivers will be provided a user-name and password, and the loads will be allocated to specific vehicles, ensuring that they can complete only the loads required. The users and their passwords must be configured within CALIDUS ePOD. ![]() Note: User IDs that are created automatically as part of the Standing Data creation at Load Import will be available for use, but will have a default password created. This password should be modified before use as a security precaution.
Note: User IDs that are created automatically as part of the Standing Data creation at Load Import will be available for use, but will have a default password created. This password should be modified before use as a security precaution.
![]() Note: It is expected that the CALIDUS ePOD user name and password will be configured to be the TomTom WEBFLEET user name and password.
Note: It is expected that the CALIDUS ePOD user name and password will be configured to be the TomTom WEBFLEET user name and password.
A driver will log on to a device using the provided user name, password and vehicle. The device will remember the last used User name and Vehicle, but will always require that the password is entered.
When logged in to WEBFLEET, the device will automatically detect the user and vehicle and automatically log the user on to the application using these credentials if possible.
![]() Note: Vehicle checks will be completed through the CALIDUS VEhub application and are not integrated into CALIDUS ePOD. CALIDUS VEhub is not within the scope of this document. There will be no vehicle checks implemented within CALIDUS ePOD.
Note: Vehicle checks will be completed through the CALIDUS VEhub application and are not integrated into CALIDUS ePOD. CALIDUS VEhub is not within the scope of this document. There will be no vehicle checks implemented within CALIDUS ePOD.
Printer Selection
If the site is set up for printing (as it is expected to be), the device starts the Printer Selection process after log-on:
- The device prompts for a printer, showing all Bluetooth printers paired with the device, and an option to choose "No Printer".
- The driver selects one.
Once selected, the load and job list is shown.
Obtain Workload/Job List
When log on is complete, the assigned work-list will be downloaded onto the device, showing all the jobs in sequence on a Job List screen. If no workload has been assigned to the Driver (or vehicle), the device will tell the user that there is no work available. The driver can exit, or try to download again.
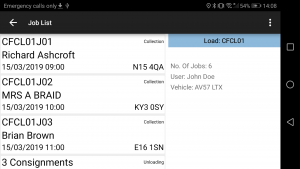
Job List

The Job list on the mobile device is expected to be styled so that only the following items are displayed:
- The planned date and time
- The job number (the job code)
- The location (address name)
The screen will display the status of the jobs on the load through a coloured outline, as follows:
- Red - Cancelled
- Green - Completed
- Blue - Completed (with amendments)
- Yellow - In Progress
- None - Pending/Incomplete
Note that this status is also displayed prominently in the Job Details screen (following).
The jobs are displayed in the sequence in which they should be completed.
However, the jobs can be viewed in any sequence by clicking the line of the job - the device will display the Job Details page.
The Menu button can be used here to allow the following options:
- Show All / Outstanding Jobs - Toggle between showing all or only incomplete jobs.
- Refresh - Refresh the Load/Worklist
- Settings - Show the Settings screen
The system can be configured to control allowing the drivers' ability to complete jobs out of sequence, as follows:
- No re-sequencing of jobs - this is not allowed by the driver - the jobs must be completed in the order planned, or cancelled if they cannot be completed (see the following for details on cancellation for the business units).
- Confirm re-sequencing allowed - this requests the user to confirm first.
- Always allowed - no confirmation.
It is expected that re-sequencing of timed jobs will not be allowed at any time. Jobs with the same sequence (i.e. non-timed jobs) may be completed in any order, although not before any timed jobs i.e. jobs that are lower in sequence.
If any jobs have been added to a Load while the load is in progress, the Refresh option (which also is timed to happen on a regular interval) will get the details of the new job and add it to the job list, showing the user a summary of the job(s) added. This functionality will also pick up any amendments to the jobs. It is noted that this should not occur.
The driver has an option to change the label printer from the hamburger menu here, which re-starts the Printer Selection process described above.
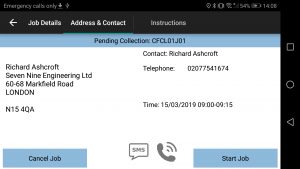
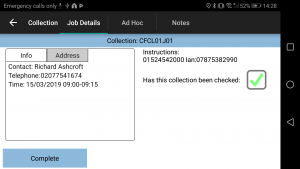
Job Details
Selecting a job from the Job List will show the user the job report and customer contact details, on the Job Details screen. The user can back out of the selected Job and view any Job on the list.
Job Details
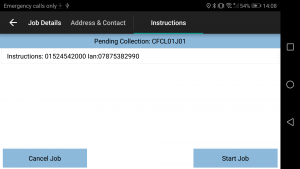
Instructions


The screen has several sections and tabs, showing:
- The Job Type (Collection, Delivery, Service).
- The customer details (Customer Code, Name, Address and Postcode).
- The contact information (Contact name and number).
- The Instructions for the job.
Clicking on the tabs will display the information.
The Instructions tab will show instructions for the job, as well as any additional information passed through for the job.
![]() Note: The screen does not allow the user to contact the customer (through either text or phone) when using TomTom PRO or BRIDGE devices, as they do not allow telephony. Other devices will allow this and, in this case, the application will display appropriate icons to allow the drivers to accomplish this.
Note: The screen does not allow the user to contact the customer (through either text or phone) when using TomTom PRO or BRIDGE devices, as they do not allow telephony. Other devices will allow this and, in this case, the application will display appropriate icons to allow the drivers to accomplish this.
Cancelling a Job
The driver can cancel jobs by clicking the Cancel Job button on the job detail screen.
This will call the cancellation screen where the user will be prompted to enter a reason why this job is being cancelled. The cancellation screen also allows the user to take a picture.
![]() Note: Whether or not a picture is required for a job cancellation is controlled by the 'Image Required for Cancellations' setting against the job group for the job. If this is set to 'All' or 'Job Only' then a picture must be taken to cancel a job, otherwise the picture is optional. If Job Cancellation is enabled, it is expected that the application will not be configured to require a photo, although one can still be taken if required.
Note: Whether or not a picture is required for a job cancellation is controlled by the 'Image Required for Cancellations' setting against the job group for the job. If this is set to 'All' or 'Job Only' then a picture must be taken to cancel a job, otherwise the picture is optional. If Job Cancellation is enabled, it is expected that the application will not be configured to require a photo, although one can still be taken if required.
If a job is confirmed cancelled, the device will show the Job List again with the cancelled job removed from the list.
Navigation and Arriving
The screen will show a Navigation icon, which can be clicked to start navigation through the installed navigation app. For TomTom devices, this will be the TomTom NavApp, which can be linked to WEBFLEET.
The TomTom NavApp will be sent the address by the C-ePOD app, and will commence immediate navigation to the address.
The driver will select Start Job from the Job Details screen.
![]() Note: If there have been instructions provided on the Job and the driver has not already switched to this tab to view the instructions, the device will switch to the Instructions tab, to force the user to see the instructions before starting.
Note: If there have been instructions provided on the Job and the driver has not already switched to this tab to view the instructions, the device will switch to the Instructions tab, to force the user to see the instructions before starting.
![]() Note: It is expected that re-sequencing of jobs will not be allowed for jobs. If a job is attempted to be started, arrived or delivered out of sequence, the user will be told this at this point and will not be allowed to continue. Note that the application can if desired be configured to only issue a warning in this case, rather than prevent it outright.
Note: It is expected that re-sequencing of jobs will not be allowed for jobs. If a job is attempted to be started, arrived or delivered out of sequence, the user will be told this at this point and will not be allowed to continue. Note that the application can if desired be configured to only issue a warning in this case, rather than prevent it outright.
Once started, the device will display a navigation button. Clicking this will commence immediate navigation to the address - the TomTom NavApp will be shown, which will immediately calculate a route to the destination address.
The Lat/Longs on the job (if present) will be used for navigation, otherwise the address will be evaluated at that time and used for navigation.
Once arrived at the destination, the driver will switch to the CALIDUS ePOD mobile application. This can be through the 'All apps' icon on the home screen or (expected to be) through a configured short-cut on the task bar.
The driver will then indicate arrival and start processing the Job by clicking the Arrive Job button.
When clicking the button to start, arrive at or deliver the job, the application performs a check whether the job has been changed since it was loaded on the device, to ensure that the latest data is on the device for the job. If there are changes, the driver will be informed and the screen will refresh.
The device will move on to the Arrival process.
Arrival Process
The driver process when arriving at a collection point is:
- Arrive at site, capturing arrival time automatically.
- Capture Gift Aid information and signature.
The driver will press the Arrive Job button to show arrival at the location.
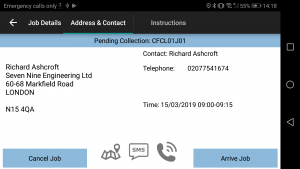
Arrive Job

On arrival to the location, the terms and conditions will show:
- A facility to enter an existing Gift Aid ID for the charity.
- A button to Register for Gift Aid.
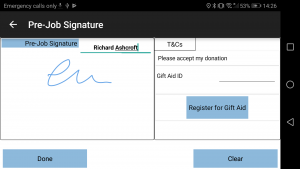
Arrival Signature and T&Cs

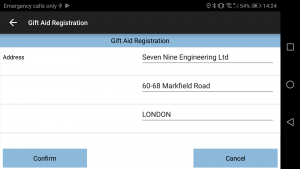
Pressing the Register for Gift Aid button will open a form to enter the Gift Aid Registration details.
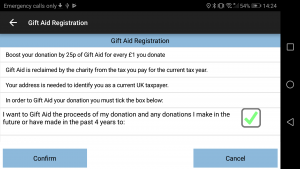
Gift Aid Registration
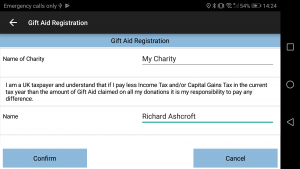
Gift Aid Registration
Gift Aid Registration
Gift Aid Registration


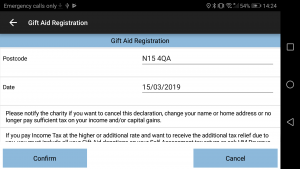
The Gift Aid Registration form will show the following:
- Several text labels describing the Gift Aid process:
- A check-box to confirm Gift Aid, which must be checked.
- The charity name, defaulted from the job, required to be entered.
- Name, defaulted from the contact name on the job, required to be entered.
- 4 lines of address, defaulted from the job address, 1 line required to be entered.
- Post Code, defaulted from the job address, required to be entered, validated as a UK post code.
- Date, defaulted to the current date, required to be entered.
- A Confirm button to save the Gift Aid Registration details.
- A Cancel button to discard the Gift Aid Registration details.
Any fields with a default value will be shown with the value of the data from the job.
![]() Note: This form will not be required to be completed, and the provided Cancel button bay be used to return to the Arrival Signature.
Note: This form will not be required to be completed, and the provided Cancel button bay be used to return to the Arrival Signature.
Once complete and saved, the customer will sign for the collection.
The information on the device will be passed back to CALIDUS TMS. The signature and T&Cs (along with any completed Gift Aid declaration or existing Gift Aid ID) will be stored against additional order information when the collection has been confirmed as complete.
![]() Note: The arrival signature process itself will be configured so that the driver can skip this process entirely if the customer is not a registered gift aider, nor desires to register.
Note: The arrival signature process itself will be configured so that the driver can skip this process entirely if the customer is not a registered gift aider, nor desires to register.
The device will move on to the Collection process.
Collection Process
The driver process at a collection point is:
- Confirm items collected.
- Complete collection and capture customer signature.
Collections will initially consist of no items to be collected.
The following are the standard tabs that are expected to be displayed:
Job Details Tab
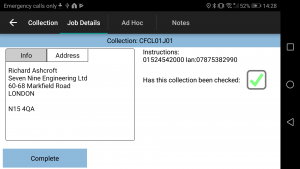
Job Details Tab - Addresses
Ad Hoc Tab
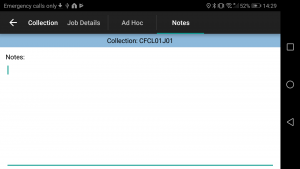
Notes Tab


The Job Details tab has multiple sections:
- Contact information
- Address information - if supplied, both current address and origin address are shown.
- Job Instructions
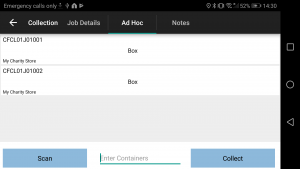
The driver clicks the New Item button which shows a pop-up:
- The driver selects the DU from list, for example, BAG, BOX, LARGE ITEM, etc.
- The driver selects the job destination (if consolidated).
- If multiple labels are configured to be allowed to be created, the driver can also select the number of items to create/labels to print i.e. create 4 "BAG" items for destination "My Charity Store".
The label (or labels) will then be printed. A confirmation dialogue will be displayed, allowing the driver to:
- Confirm printing OK.
- Reprint the label (or labels).
- Change the printer (through the Printer Selection process above).
The items created will be added to the list of items automatically.
| SCR-354306-1: | Ad Hoc Item Generation and Label Printing |
The driver can reprint any single label by long-pressing on the added item and select "Print Label" from the pop-up options.
If a label is damaged or not required, the driver can remove an item by long-pressing on the added item.
A single generic label format will be designed and delivered with the software. The label format has been prototyped and is shown below:

| SCR-354306-2: | Label Format |
The label format is expected to contain:
- The charity store (the site name).
- The item barcode.
- The charity name (the owner name).
- The donor name and address.
![]() Note: Any additional label formats required by individual charities will accrue additional cost.
Note: Any additional label formats required by individual charities will accrue additional cost.
When all items have been confirmed as collected, the user will return to the Job Details tab, where a Complete button will be displayed, to complete the job.
When the driver has confirmed that everything is complete and clicked the Complete button, this screen will close and the user will be directed to the Job Completion process.
Job Completion
All jobs will be sent to the CALIDUS ePOD system with a configuration element known as Job Group - this will define the process to be followed against each job, configuring the following items:
- The Terms and Conditions displayed
- Customer Signature required
- Driver Signature required
- Completion document format
All of these processes are controlled during Job Completion.
![]() Note: At this time, the expectation is that the configuration will require only the Customer to sign for collection of goods. It is an optional configuration for CALIDUS ePOD, where customer and driver signatures can be enabled or disabled for collections, and whether the device will prompt for Job Photos after signature.
Note: At this time, the expectation is that the configuration will require only the Customer to sign for collection of goods. It is an optional configuration for CALIDUS ePOD, where customer and driver signatures can be enabled or disabled for collections, and whether the device will prompt for Job Photos after signature.
The device will prompt for Customer Signature.
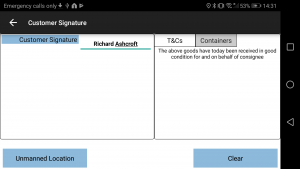
Customer Signature and T&Cs
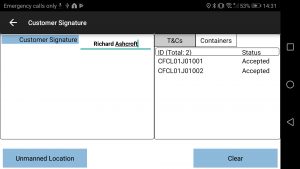
Customer Signature and Items (Containers)


The signatory will by configuration be set to be blank and always required entry. The driver will be forced to enter one.
The screen displays several tabs, allowing the user to see:
- Terms and Conditions, plus any data entry the user is required to confirm.
- The items being collected.
The Terms and Conditions are configurable, but will appear in the same place on the screen (under or to the right of the signature). Unlimited T&Cs text can be configured, along with check-boxes and data entry. This may be configured at any time and is expected to be finalised during implementation.
The device can be configured to handle unmanned collections. On the device, if configured, the device will have a button on the screen, labelled as Unmanned Location.
If a signature is entered in the customer signature screen, the screen will change this button to "Done", so that the driver can accept the customer signature.
If a customer is not available, the driver can click the Unmanned Location button. The device will prompt for confirmation from the driver that no customer is available to sign for the job.
If confirmed, the device will prompt for the Driver signature, then prompt for a Job Photo, where at least one photo must be taken by the driver.
If driver signature is required, this displays very similarly to the customer signature above, with some differences:
- Only T&Cs if configured will be shown on the tabs.
- The driver name will be pre-set from the logged-on driver and cannot be changed.
If driver signature is prompted for, it must be entered and cannot be skipped.
The process can be configured to prompt for photos after completion of the signatures for collections.
It is expected that this will either be optional or not configured at all.
As each job (or group of jobs) is completed, the information is updated back to the system, with all information captured on the device (actual times, quantities, signatures, images, etc) updated. The updates are sent whenever the driver has an internet connection, and may be delayed until that time.
The user will be returned to the Job List screen and the completed Job will be removed from the list. Any completed jobs can be optionally viewed again, by pressing the Menu button and choosing Show All Jobs. The list can be made to show only outstanding jobs again by pressing the Menu button and choosing Show Outstanding Jobs.
Post-Load
Once all Jobs have been completed, the Load will be marked as completed when the user returns to the Job List screen.
The device will attempt to download a new load for the user and/or vehicle. If one has not been provided, the device will confirm this and allow the user to check again or log off the system.
POC/POD Documents
Once jobs are completed, then will be confirmed with the C-ePOD server. After this confirmation, a POD/POC report may be produced.
All photos taken by the driver during the execution of the job (i.e. at cancellation of job, job photos) will be displayed in the C-ePOD Admin system for the administrative users to view.
![]() Note: CALIDUS ePOD will be modified to create a single generic Charity Fleetcare POD/POC format, containing:
Note: CALIDUS ePOD will be modified to create a single generic Charity Fleetcare POD/POC format, containing:
- A front page detailing the charity, collection information, items collected and signature, signatory, date and time. Any existing
- A second page showing the Gift Aid Registration form, if captured against that job.
| SCR-354306-3: | Charity Fleetcare POC Format |
The format of the POD note has been prototyped to show capability. The format has been provided and the prototype is shown below:

Prototype Charity Fleetcare POC Format

Prototype Charity Fleetcare POC Format
![]() Note: It is expected that a single set of T&Cs for a single job group or for the site will be required. However, the application will allow for different T&Cs (and Gift Aid Registration forms) to be configured for each customer (Job Group in C-ePOD). The POC note format will display all of these checks on a Gift Aid Registration page. Note however that formatting changes cannot be made to this page without further development.
Note: It is expected that a single set of T&Cs for a single job group or for the site will be required. However, the application will allow for different T&Cs (and Gift Aid Registration forms) to be configured for each customer (Job Group in C-ePOD). The POC note format will display all of these checks on a Gift Aid Registration page. Note however that formatting changes cannot be made to this page without further development.
The front page contains the POC (Proof of Collection) information as follows:
- Site Logo.
- Title "COLLECTION NOTE".
- Collection Number.
- Site Address/contact information.
- Collection Address
- Order Information.
- Items collected, with barcode and type.
- T&Cs displayed when the user signs for the collection. Also includes the Gift Aid ID.
- The Signature, Name and Date.
The back page contains the Gift Aid Declaration (if present), as follows:
- Site Logo
- Title "GIFT AID DECLARATION"
- The Gift Aid Form entered on arrival to the collection.
- The Signature, Name, Date and Time.
Data Export
When jobs have been completed all the job is updated in the CALIDUS ePOD server, these jobs are then available for exporting to external systems or users. This is also true of cancelled jobs
Completed jobs with an email specified on the address will be picked up by a timed process and the POC may be configured to be automatically sent to that email address. The POD will be in PDF format. The email address will be that provided to C-ePOD from the customer record.
![]() Note: This feature requires access to a mail server for the use of the customer.
Note: This feature requires access to a mail server for the use of the customer.
Automatic emails may also be sent to a central email address if required. This may be configured at any time.
Email subject and content may be configured:
- Customer Name.
- A/C Number.
- Order Reference, one of:
- Job ID - ePOD internal unique job reference.
- Job Code.
- Cust Ref.
- SO Ref.
- Ext Ref.
- Date.
- Job Type (Collection).
It is also possible to configure the system to send a copy of the POD/POC note at completion of the jobs, for the purposes of updating a Document Management System (DMS). The POD/POC can be sent in image or PDF format, to multiple destinations, by flat file transfer. The POD/POC file can be named with several items to aid identification of which order/job the POD/POC belongs.
Further Reporting and Queries
The CALIDUS ePOD Admin system allows admin users (i.e. non-PDA users) the ability to access loads, jobs and item (container) details, as mentioned previously.

Loads
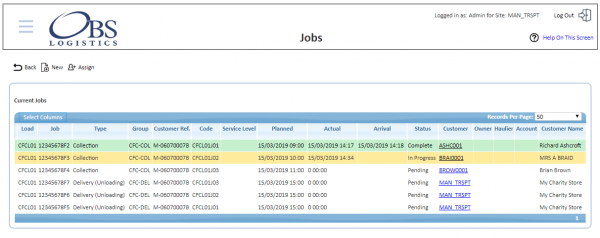
Jobs
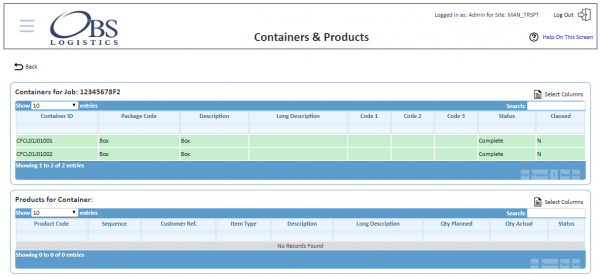
Items (Containers)


When jobs are being processed, the status of the jobs and loads changes to show progress:
- Pending - not yet assigned to a driver.
- Assigned - Assigned to a driver, but not yet started. This is highlighted grey.
- In Progress - Started by the driver. This is highlighted yellow.
- Complete - Complete by the driver - This is highlighted green.
- Cancelled - Job cancelled by the driver. This is highlighted red.
- Complete (With Amendments) - job completed, but not exactly as planned. This is also highlighted blue.
POD/POC reports and full collection details can be accessed from this screen.
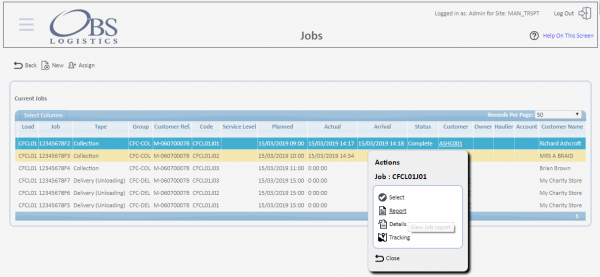
Jobs

Additionally, this information may be taken from the CALIDUS Portal system.
User activity may also be accessed, to show auditing of messages from the user, for example:
- Log on
- Load picked up
- Job started
- Job arrived
- Job completed
- Load completed
- Log off
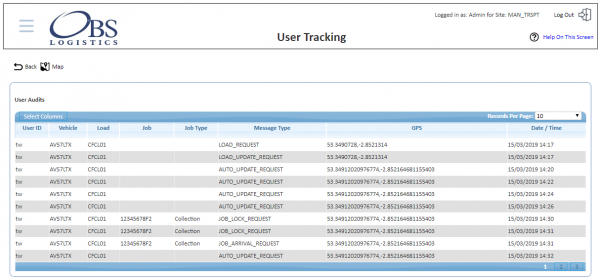
User Tracking - Activities
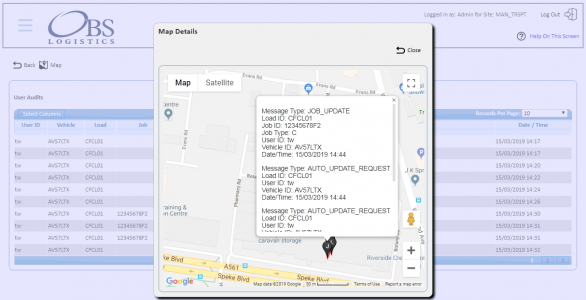
User Tracking - Location
Appendix A: Table of SCRs and Ballpark Estimates
| SCR# | System | Area | Description | Estimate (Days) | Notes |
| 1 | EPOD | Mobile Printing | Ad Hoc Item Generation and Label Printing | 22.00 | |
| 2 | EPOD | Mobile Printing | Label Format | 2.50 | |
| 3 | EPOD | Reports | Charity Fleetcare POC Format | 3.50 |
Notes:
- Any high level ballpark estimates for development are based on the basic information provided and are subject to detailed design and creation of an SCR.
Appendix B: Document References
B.1 References
| Ref No | Document Title & ID | Version | Date |
| 1 |
B.2 Glossary
| Term or Acronym | Meaning |
|---|---|
| General Definitions | |
| EPOD | Electronic Proof of Delivery. The OBSL EPOD system is CALIDUS ePOD. This also comprises the basis of the Service Completion system CALIDUS eServ. |
| Server | The portion of the CALIDUS ePOD/eServ systems that controls all the data and sends information to and receives updates from the mobile device. |
| Mobile Device; PDA | The device used by the driver to perform the jobs. Typically an Android mobile device or tablet. |
| Site | The site usually defines the depot, business or the transport group (carrier). It can be set to any value required by the customer. All transactions data (for example, loads and jobs) and standing data (for example, vehicles and uses) belong to a site. An EPOD user, on a device or in the Admin screen, can only see data for one site at a time. |
| Load | A single journey for the driver with a set of work attached. A load is identified by a unique load ID. This may also be referred to as a worklist or workload. |
| Job | Also Consignment. A single task for the driver as a specific location. This could be the collection of goods or the delivery of goods. Jobs may also be Services (for example, servicing, installing or de-installing a boiler). A job is identified by a unique job ID but can also have other references held against the job (e.g. job code, SO number, customer reference and external reference). |
| Job Group | Jobs must be tagged with a Job Group. All jobs tagged with a single job group are processed in the same way. The job group has configuration associated to it to control such items as: POD/POC Report settings; Pre-Job actions (such as signing at a gatehouse); Post-Job actions (such as who signs for the item, are photos required); configurable fields required for entry for the jobs; Terms and Conditions displayed and; driver/user process (such as photos required for cancellation, comments/notes allowed). The job group can be used for any or all Sites, and the configuration against the job group can be different in each site. Job Groups can also be restricted from Admin and Remote users, so that certain users only see jobs for certain groups. |
| Container | A generic term for any object that contains the items being collected or delivered. Examples of containers are: Pallet; Package; Carton; Item; Cage. A special container "Loose Products" - see Product below. A container is identified by a container ID which is unique to this physical container. |
| Product | A product is any goods that are being collected or delivered where the product has a 'Product Code' which identifies what the product is but which does not uniquely identify each individual item. A product will also have a quantity associated with it to indicate how many items of this 'Product Code' are being collected or delivered. Products can either be processed within a 'Container' or as 'Loose Products' without a 'Container'. |
| Owner | The owner of the order that created the job. Typically this is the sales team that took the order and will be responsible for dealing with queries from the customer regarding the status. |
| Operator; Executor | The Site (depot or carrier) that is executing the load or loads that are involved in the delivery of the items. |
| Item Related Definitions | |
| Job Code | A reference associated with a job or job(s). This reference is common to connected jobs, for example this would be the same on both the collection of goods and the associated delivery of the same goods. Typically this would be the transport unique reference. |
| SO Number | A reference associated with a job which indicates the "Sales Order Number" this job is associated with. |
| Customer Reference | A reference associated with a job which has been provided by and will be recognised by the customer. |
| External Reference | A reference associated with a job which does not match any of the existing references, usually because it has been provided by an external system. |
| Pallet | An alternative for 'Container'. The term pallet is used when the operation only uses portable platforms as the container for goods. |
| Package | An alternative for 'Container'. The term package is used when the operation only uses boxes or wrapping as containers for goods. |
| Package Code | A code representing the type of 'Container'. |
| Package Desc | A description of the type of 'Container'. |
| Product Code | A code which identifies what a product is. |
| Item | A generic term for any individual item that can be collected or delivered. An item can represent a 'Container' or a 'Product'. This can also be used as an alternative for 'Container' when the operation only treats the goods as individual items, i.e. not as identifiable products. |
| Service Item | An item which will be serviced by a service job. See action 'Service'. |
| Issue Life | The time after which an item is no longer fit for purpose. |
| Pack Size; Case Quantity | A product may consist of a full quantity of items, inside a pack. The Pack Size (or Case Quantity) defines the amount of this product contained in a single pack. For example, if there are 85 items to deliver, with a pack size of 24, the number of full packs is determined to be 3 (24 * 3, or 72), with the remaining (13) being 'loose' quantity. This is displayed as "3/13" on the mobile application. |
| UOM; Item Type | Unit of Measure; The major (case) UOM. This can optionally be displayed on the mobile device when changing product quantities. |
| Product Type | A classification of the product being delivered. For example, a company may deliver 7 different mortar products and 80 different concrete slab products. The Product Types may be set to "MORTAR" and "SLABS". This may be used to attach additional configuration, changing the data required when collecting or delivering these product types. |
| Status Definitions | |
| Status | An indicator of how far through the processing a 'Job', 'Container' or 'Product' has progressed. |
| Pending | A status indicating that the processing has not yet started, but is required to be completed. |
| In Progress | A status indicating that processing has started but not yet finished. |
| Complete | A status indicating that the 'Job', 'Container' or 'Product' has been collected or delivered. |
| Complete (Amended) | A status indicating that the 'Job', 'Container' or 'Product' has been collected or delivered but that some changes or amendments have been made. This means that not everything that was planned to be collected or delivered was collected or delivered, some items may have been cancelled or some products may only have had some of the planned quantities collected or delivered. |
| Complete (Claused) | A status indicating that the processing has been finished but that a 'Clause' condition has been recorded for this item. |
| Claused | See 'Complete (Claused)' and action 'Clause'. |
| Cancelled | A status indicating that the processing of this item or job is no longer required. |
| Cancelled at Collection | A status indicating that the delivery of a container or product is no longer required because the associated collection of this container or product was cancelled. |
| Submitted | An optional status that applies only to a 'Job' and which occurs after the 'Job' has been completed. This indicates that any time and expenses information recorded for the 'Job' has been submitted back to the server and can no longer be altered. |
| Action Definitions | |
| Start | An action associated with a 'Job' meaning the driver is about to start the processing of this job or jobs. This action will mark the job(s) with a status of 'In Progress'. |
| Arrive | A conditional action associated with a 'Job' meaning the driver has arrived at the location the goods should be collected from or delivered to. |
| Continue | An action associated with a 'Job' meaning the driver has previously performed the 'Start' and/or 'Arrive' action and has exited the processing screen but is now going to continue the processing. |
| Collect | An action associated with a specific 'Container' or a 'Product' meaning the driver has collected the 'Container' or 'Product'. This action will mark the 'Container' or 'Product' with a status of 'Complete' or 'Complete (Amended)'. |
| Collect Claused | An action associated with a specific 'Container' or a 'Product' meaning the driver has collected the 'Container' or 'Product' but with a condition under which the collection was accepted. This action will accept the clause condition and then mark the 'Container' or 'Product' with a status of 'Complete (Claused)'. |
| Deliver | An action associated with a specific 'Container' or a 'Product' meaning the driver has delivered the 'Container' or 'Product'. This action will mark the 'Container' or 'Product' with a status of 'Complete' or 'Complete (Amended)'. |
| Deliver Claused | An action associated with a specific 'Container' or a 'Product' meaning the driver has delivered the 'Container' or 'Product' but with a condition under which the delivery was accepted. This action will accept the clause condition and then mark the 'Container' or 'Product' with a status of 'Complete (Claused)'. |
| Clause | An action associated with a specific 'Container' or a 'Product' that has already been collected or delivered meaning the collection or delivery has been accepted with a condition. This action will accept the clause condition and then mark the 'Container' or 'Product' with a status of 'Complete (Claused)'. |
| Cancel | An action associated with a 'Job', 'Container' or 'Product' meaning the collection or delivery will not be performed for this 'Job', 'Container' or 'Product'. |
| Submit | An optional action which can conditionally be carried out after a 'Job' has been collection or delivered meaning that any/all required expense or time recording for this 'Job' has been completed and can be submitted back to the server. |
| Service | A service of a service item or items. Typically, Installation, Deinstallation or Service. The process of a service usually encompasses Pre- and Port-work checks, information gathering and diagnosis and resolution notes. Additional references (MC Refs) may also be captured. |
| Actioned | A general term describing completing a job. So, 'Actioned' may be used instead of 'Collected', 'Serviced', 'Delivered'. |
| Consolidate | The action of taking several jobs and linking them together, so they are actioned at the same time with one start, arrive and signature. |
| Deconsolidate | The action of taking a consolidation of jobs and breaking them down into the component jobs again. |
| Job Swap | The action of selecting an existing load not assigned to the user, and picking jobs to transfer onto the user's load. |
| Signature Capture | Usually the final action of a job, where the customer's name and signature are entered. |
| Other Definitions | |
| Reason Code | A code which represents the reason that a job was cancelled or an item was cancelled or claused. |
| Vehicle | The vehicle used for transporting the goods. |
| Vehicle Checks | Also Defect Checks. A series of questions representing the results of checks intended to ensure the vehicle is in an acceptable condition. |
| Metrics Entry | A series of questions to capture information either at the start or end of a 'Load'. |
| Driver | The person performing the collections or deliveries; the user of the device/application. |
| Engineer | The person performing the services; the user of the device/application. |
| Customer | The person/company the goods are being collected from or delivered to. |
| Signatory | The name of the person providing a signature. |
| T&Cs | Terms and Conditions. The T&Cs are shown when signatures are prompted for. The text of the T&Cs are defined in the system itself. |
| Transfer Load | A load select from which to swap jobs to the user's load. |
| Base | E.g. 'Return to Base'. Typically the depot from which the driver departed. |
| Unplanned Ad Hoc Collection | A collection job that is created by the driver, usually after delivering to a customer. |
| Ad Hoc Container Entry/Scanning | The process of adding containers (items) to a job that have not been pre-advised on the job. |
| Completion Report | POD, POC, Service/Work Report. |
| Load Assignment | The action of assigning a vehicle and/or a driver to a load. |
| Job Assignment | The action of putting jobs onto a load. |
| Collection/Delivery Windows; Access Windows | Periods of time between which it is acceptable to deliver or collect from that customer. This has limited use in the system, mostly for reporting purposes. |
| Location/Map Terms | |
| Lat-Longs; GPS Co-ordinates, GPS Position | Latitude and Longitude co-ordinates, specified together as a single entity, identifying the exact position of a location. There are multiple formats - CALIDUS ePOD uses decimal notation, for example "53.3490818,-2.8521498" identifies the OBS Logistics office building in Liverpool. |
| GPS | Global Positioning System; the satellite system used to obtain a GPS position, for use with navigation and location positioning. |
| Geocode; Reverse Geocode | Geocoding is the process of obtaining lat-longs from an address. Reverse Geocoding is the process obtaining an address from lat-longs. |
| Geofence; Geofence Break | A Geofence is a perimeter around a location. A Geofence Break occurs when a device passes through this perimeter on entry or exit from the location. |
B.3 Authorised By
Murray Middleton | OBS Project Manager | _____________________________ |
Matt Turner | OBS Product Manager | _____________________________ |