FS 313754 AUNZ-018 LFS Job Consolidation
![]()
LFS
LFS Job Consolidation
CALIDUS ePOD
28th January 2014 - 0.1
Reference: FS 313754/AUNZ-018
Contents
Functional Overview
Client Requirement
- 313754 and 313755 - Job Consolidation at Loading/Collection
- 312818 and 313630 - Job Consolidation at Deliveries
- 312490 - Trip Creation Control
The changes specified here cover the following:
- Consolidation from/to the same location
- Consolidation from linked locations
- Consolidation from/to depots
- Manual Consolidation through the Job List
The included functionality to be specified is shown below:
- From 313754/AUNZ-018
- LFS can arrive at a collection point at an RDC and pick up multiple collection pallets these pallets will contain multiple jobs. When the driver arrives back at the depot the pallets will be broken down and then distributed to individual loads. A change will be made to allow the jobs to be consolidated on the PDA based on a new customer setting and a new location setting. If both of these settings are set to allow bulk collections then the data will be transferred through from the CTMS system with a flag to say these jobs should be consolidated. The driver will then see a consolidated order on the Job List screen. They will click this job which will take them to the Job details screen where they can start the job. Each pallet will then be scanned without the need to complete multiple jobs.
- Bulk pick-up work for several orders collected/loaded at the same location – these should show as one job on ePOD. The same applies for pick/pack orders outbound from LFS depot – show one location with many packages to scan on – not segregated into lots of jobs for each order at same loading location.
- Similar ability to consolidate to delivery addresses where the same address (and orders not already part of a shipment).
- These should be configurable at customer level to control how the data is presented to ePOD.
- From 313630/AUNZ-030
- A new Link ID will be added to the Customer addresses table. If multiple jobs are sent to the PDA device from the CTMS which have the same link ID these Jobs will be consolidated on the PDA as one job.
- A new link ID will be added to the location table of the CTMS. This link will determine which locations are for the same delivery point. A change will be made to the location entry screen and the location upload process.
- The inbound and outbound flow to and from EPOD will be modified to accept a Link ID.
- There is also a need for when a new location is entered the CTMS will check all Latitude and Longitude records to see if there are any locations sharing the same latitude and longitude. If this is the case the locations will be automatically linked by the CTMS"
- A requirement was identified whereby when a manual consolidation has occurred on the device a record will be stored of this in a link ID field this will be sent back to the CTMS and the addresses will now be linked so they will not need to be manually consolidated by the driver again.
- This must be configurable so the option to consolidate can be deactivated.
Solution Overview
CALIDUS TMS will consolidate jobs through to CALIDUS ePOD under the following conditions:
- Collections from depot (loading tasks for inter-warehouse transfers and cross-dock trips)
- Deliveries to depot (unloading tasks for inter-warehouse transfers and cross-dock trips)
- Linked locations (remembered from drivers' manual consolidations in the past)
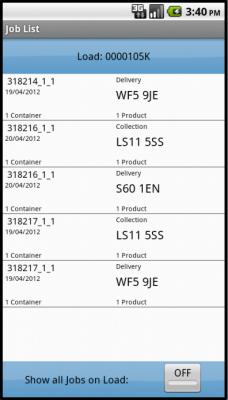
Jobs that have been pre-consolidated in this way will be displayed as a single line on the Job List screen on the Android device. The layout of these rows will be modified slightly to make it clear that this row represents a consolidated group of jobs, and the number of jobs in that group.
The user will also be able to create a consolidated group of jobs manually, by long holding on a row, starting a 'Consolidation Mode', and selecting the jobs (or existing groups of jobs) to merge together. There will be some criteria that will be checked when selecting jobs, to ensure that only jobs that can be consolidated together are selected. When complete, these selected rows will be merged into one on the device, displaying just like a pre-consolidated group of jobs. It will also be possible to break these groups back down, in case of any mistakes.
This manual consolidation of jobs can be completed before leaving the depot, on all jobs that need it, or as the deliveries are being made, on demand. In either case, the device will remember any consolidations made, as long as the load is not taken away from the user, or reloaded onto the device from scratch.
Completing consolidated groups of jobs will be very similar to completing a single job. For example, the user will still be able to:
- Select the group to see the details
- Start and Arrive to the group of jobs
- Scan, enter or select the containers (parcels) to be delivered or collected on that group of jobs
- Obtain a customer signature for the group of jobs, showing the containers and any terms and conditions.
The differences is processing are to allow the user to see details of each of the jobs in the group. For example:
- When the group is selected, the Job Detail screen will allow the user to scroll through all the jobs in the group, so that they can see the details of all the individual jobs in the group, including:
- Contact details (Name, telephone)
- Job Address details
- Any special instructions for the group of jobs, all collected onto one scrollable page, for ease of use.
- When arrived at jobs and starting to complete the group of collections or deliveries, the user will also be able to scroll through these job details again, to help find the right contacts for the jobs.
- The list of parcels to be delivered will show all the packages for all the grouped jobs together. The list will be grouped by the sequence CALIDUS TMS requires them to be loaded. The list of packages will also show a little more information, allowing the user to see the Job that the item came from, to help in visually identifying items together.
- The user can break all the items from a job out of a consolidation from the list of all the packages in one long-press from the list of packages.
When all packages have been collected or delivered, the device will move on to job confirmation. This will work as it does for single jobs, in that it will request only one customer signature. This screen will show all the collected or delivered items here, as well as the chosen terms and conditions from the first job.
When complete, all the jobs will updated to CALIDUS TMS with the same signature information.
CALIDUS TMS will remember the locations linked together (consolidated) by the device users, and will ensure that those locations are automatically consolidated together again when the next loads are produced. ![]() Note: CALIDUS TMS will not attempt to reflect when a location has been split from a group - this can be reflected manually within CALIDUS TMS screens if required.
Note: CALIDUS TMS will not attempt to reflect when a location has been split from a group - this can be reflected manually within CALIDUS TMS screens if required.
Scope
Set-up
Pre-requisites
- A working CALIDUS ePOD system.
- A working CALIDUS TMS system, accessible to the CALIDUS ePOD system.
- Although specified elsewhere, it should be noted that the following data is required to be sent from CALIDUS TMS, in additions to the normal data, for the described functionality to work:
- EPOD_JOB:
- EPL_LINKED_ID - if this job is required to be consolidated
- EPL_SEQUENCE - from the stop-level information.
- EPOD_JOB:
Menu Structure
None
Data
No additional configuration due to these changes is expected.
Functional Description
Database/DAL
Table EPOD_JOB requires the following modification:
- EPL_LINKED_ID - nvarchar(40)
Existing packages will be modified to allow the creating, editing and selecting of the new field, including but not limited to:
- EPOD_JOB_INSERT
- EPOD_JOB_SEARCH
- EPOD_JOB_SELECT
- EPOD_JOB_SELECT_DATE_RANGE
- EPOD_JOB_UPDATE
The existing EPOD_JOB DAL object will be changed to:
- Export the new field in XML requests
- Read the new field
![]() Note: It is not necessary to add this field as a searchable item. However, if allowing this keeps the packages and DAL objects standard in design, then this can also be done, within the DAL and the packages.
Note: It is not necessary to add this field as a searchable item. However, if allowing this keeps the packages and DAL objects standard in design, then this can also be done, within the DAL and the packages.
Example: The XML Export of EPOD_JOB records will now look as follows:
   <EPOD_JOB>
     <EPL_SITE_ID></EPL_SITE_ID>
     <EPL_JOB_ID></EPL_JOB_ID>
     <EPL_LOAD_ID></EPL_LOAD_ID>
     <EPL_JOB_TYPE></EPL_JOB_TYPE>
     <EPL_JOB_GROUP></EPL_JOB_GROUP>
     <EPL_JOB_INSTRUCTION></EPL_JOB_INSTRUCTION>
     <EPL_JOB_SIGNATURE></EPL_JOB_SIGNATURE>
     <EPL_REASON_CODE></EPL_REASON_CODE>
     <EPL_LINKED_REASON></EPL_LINKED_REASON>
     <EPL_STATUS></EPL_STATUS>
     <EPL_CUSTOMER_CODE></EPL_CUSTOMER_CODE>
     <EPL_PHOTO_ID></EPL_PHOTO_ID>
     <EPL_PHOTO></EPL_PHOTO>
     <EPL_ENG_SIGNATURE></EPL_ENG_SIGNATURE>
     <EPL_SEQUENCE></EPL_SEQUENCE>
     <EPL_START_PLANNED_DATE></EPL_START_PLANNED_DATE>
     <EPL_START_PLANNED_TIME></EPL_START_PLANNED_TIME>
     <EPL_END_PLANNED_DATE></EPL_END_PLANNED_DATE>
     <EPL_END_PLANNED_TIME></EPL_END_PLANNED_TIME>
     <EPL_START_ACTUAL_DATE></EPL_START_ACTUAL_DATE>
     <EPL_START_ACTUAL_TIME></EPL_START_ACTUAL_TIME>
     <EPL_END_ACTUAL_DATE></EPL_END_ACTUAL_DATE>
     <EPL_END_ACTUAL_TIME></EPL_END_ACTUAL_TIME>
     <EPL_DISTANCE_PLANNED></EPL_DISTANCE_PLANNED>
     <EPL_DISTANCE_ACTUAL></EPL_DISTANCE_ACTUAL>
     <EPL_DRIVING_TIME></EPL_DRIVING_TIME>
     <EPL_CUSTOMER_NAME></EPL_CUSTOMER_NAME>
     <EPL_INVOICED></EPL_INVOICED>
     <EPL_CUST_SIGNATORY></EPL_CUST_SIGNATORY>
     <EPL_JOB_CODE></EPL_JOB_CODE>
     <EPL_CUST_REF></EPL_CUST_REF>
     <EPL_OFFICE_INSTRUCTION></EPL_OFFICE_INSTRUCTION>
     <EPL_SIGNED_UNCHECKED></EPL_SIGNED_UNCHECKED>
     <EPL_SO_NUMBER></EPL_SO_NUMBER>
     <EPL_TNCS></EPL_TNCS>
     <EPL_ORDER_DATE></EPL_ORDER_DATE>
     <EPL_ORDER_TIME></EPL_ORDER_TIME>
     <EPL_SALES_CONTACT></EPL_SALES_CONTACT>
     <EPL_USER_NOTES></EPL_USER_NOTES>
     <EPL_OWNER_NAME></EPL_OWNER_NAME>
     <EPL_SERVICE_LEVEL></EPL_SERVICE_LEVEL>
     <EPL_LAST_CHANGED_DATE></EPL_LAST_CHANGED_DATE>
     <EPL_LAST_CHANGED_TIME></EPL_LAST_CHANGED_TIME>
     <EPL_ARRIVAL_DATE></EPL_ARRIVAL_DATE>
     <EPL_ARRIVAL_TIME></EPL_ARRIVAL_TIME>
     <EPL_XF_VALUES></EPL_XF_VALUES>
     <EPL_EXT_REF></EPL_EXT_REF>
     <EPL_TRAILER_ID></EPL_TRAILER_ID>
     <EPL_PF_DEPOT></EPL_PF_DEPOT>
     <EPL_PF_TRACKING_NO></EPL_PF_TRACKING_NO>
     <EPL_JOB_STATUS></EPL_JOB_STATUS>
     <EPL_UDF_JOBDETS></EPL_UDF_JOBDETS>
     <EPL_LINKED_ID></EPL_LINKED_ID>
     <EPOD_CONTAINERS></EPOD_CONTAINERS>
     <EPOD_SERVICES></EPOD_SERVICES>
   </EPOD_JOB>
Import/Export Message
Both the dataservice and PDA web request servers (ePOD_DataService.asmx, ePOD_DataService2.asmx and Calidus_ePOD.asmx) and the AutoExport and AutoImport applications will need to import and export the new field EPOD_JOB.EPL_LINKED_ID in their XML requests. This should be handled by the DAL changes above. The responses affected are:
- AutoExport:
- EPOD_EXPORT_LOAD
- EPOD_EXPORT_JOB
- ePOD_DataService:
- EPOD_EXPORT_LOAD_RESPONSE
- EPOD_EXPORT_JOB_RESPONSE
- AutoImport and ePOD_DataService:
- EPOD_XML_IMPORT
- Calidus_ePOD:
- JOB_LOCK_RESPONSE
- LOAD_RESPONSE
- AUTO_UPDATE_RESPONSE
The processing of Job Update messages from the PDA (in Calidus_ePOD.asmx, JOB_UPDATE_REQUEST) must be modified to update this new field. The EPOD_JOB tag contents will now look like this:
   <EPL_SITE_ID></EPL_SITE_ID>
   <EPL_LOAD_ID></EPL_LOAD_ID>
   <EPL_JOB_ID></EPL_JOB_ID>
   <EPL_USER_ID></EPL_USER_ID>
   <EPL_VEHICLE_ID></EPL_VEHICLE_ID>
   <EPL_START_DATE_TIME></EPL_START_DATE_TIME>
   <EPL_ARRIVAL_DATE_TIME></EPL_ARRIVAL_DATE_TIME>
   <EPL_END_DATE_TIME></EPL_END_DATE_TIME>
   <EPL_STATUS></EPL_STATUS>
   <EPL_CONTACT></EPL_CONTACT>
   <EPL_INVOICED></EPL_INVOICED>
   <EPL_SIGNED_UNCHECKED></EPL_SIGNED_UNCHECKED>
   <EPL_USER_NOTES></EPL_USER_NOTES>
   <EPL_TNCS></EPL_TNCS>
   <EPL_AMENDED_FLAG></EPL_AMENDED_FLAG>
   <EPL_JOB_STATUS></EPL_JOB_STATUS>
   <EPL_UDF_JOBDETS></EPL_UDF_JOBDETS>
   <EPL_LINKED_ID></EPL_LINKED_ID>
   <CONFIRMATION>
       <EPL_ENG_SIGNATURE></EPL_ENG_SIGNATURE>
       <EPL_JOB_SIGNATURE></EPL_JOB_SIGNATURE>
   </CONFIRMATION>
   <EXCEPTION type="job">
       <EPL_REASON_CODE></EPL_REASON_CODE>
   </EXCEPTION>
   <SERVICES>
   ...
   </SERVICES>
   <CONTAINERS>
   ...
   </CONTAINERS>
The processing of import jobs (in AutoImport and ePOD_Dataservice) must be modified to update this new field. The EPOD_JOB tag contents will now look like this:
   <EPOD_JOB>
     <EPL_SITE_ID></EPL_SITE_ID>
     <EPL_LOAD_ID></EPL_LOAD_ID>
     <EPL_JOB_ID></EPL_JOB_ID>
     <EPL_JOB_CODE></EPL_JOB_CODE>
     <EPL_JOB_TYPE></EPL_JOB_TYPE>
     <EPL_JOB_GROUP></EPL_JOB_GROUP>
     <EPL_CUST_REF></EPL_CUST_REF>
     <EPL_JOB_INSTRUCTION></EPL_JOB_INSTRUCTION>
     <EPL_OFFICE_INSTRUCTION></EPL_OFFICE_INSTRUCTION>
     <EPL_START_PLANNED_DATE></EPL_START_PLANNED_DATE>
     <EPL_START_PLANNED_TIME></EPL_START_PLANNED_TIME>
     <EPL_END_PLANNED_DATE></EPL_END_PLANNED_DATE>
     <EPL_END_PLANNED_TIME></EPL_END_PLANNED_TIME>
     <EPL_DISTANCE_PLANNED></EPL_DISTANCE_PLANNED>
     <EPOD_CUSTOMER></EPOD_CUSTOMER>
     <EPL_CUSTOMER_CODE></EPL_CUSTOMER_CODE>
     <EPL_CUSTOMER_NAME></EPL_CUSTOMER_NAME>
     <EPL_ADDRESS_1></EPL_ADDRESS_1>
     <EPL_ADDRESS_2></EPL_ADDRESS_2>
     <EPL_ADDRESS_3></EPL_ADDRESS_3>
     <EPL_ADDRESS_4></EPL_ADDRESS_4>
     <EPL_ADDRESS_5></EPL_ADDRESS_5>
     <EPL_POSTCODE></EPL_POSTCODE>
     <EPL_CONTACT></EPL_CONTACT>
     <EPL_TELEPHONE></EPL_TELEPHONE>
     <EPL_EMAIL></EPL_EMAIL>
     <EPL_OWNER_NAME></EPL_OWNER_NAME>
     <EPL_SO_NUMBER></EPL_SO_NUMBER>
     <EPL_ORDER_DATE></EPL_ORDER_DATE>
     <EPL_ORDER_TIME></EPL_ORDER_TIME>
     <EPL_SALES_CONTACT></EPL_SALES_CONTACT>
     <EPL_SERVICE_LEVEL></EPL_SERVICE_LEVEL>
     <EPL_TRAILER_ID></EPL_TRAILER_ID>
     <EPL_JOB_STATUS></EPL_JOB_STATUS>
     <EPL_USER_ID></EPL_USER_ID>
     <EPL_EXT_REF></EPL_EXT_REF>
     <EPL_COL_DATE></EPL_COL_DATE>
     <EPL_SEQUENCE></EPL_SEQUENCE>
     <EPL_LINKED_ID></EPL_LINKED_ID>
     <EPOD_CONTAINERS></EPOD_CONTAINERS>
     <EPOD_PRODUCTS></EPOD_PRODUCTS>
     <EPOD_SERVICES></EPOD_SERVICES>
   </EPOD_JOB>
![]() Note: All XSDs should be modified to include the new field, along with standard documentation. This includes but is not limited to:
Note: All XSDs should be modified to include the new field, along with standard documentation. This includes but is not limited to:
- EPOD_EXPORT_LOAD_RESPONSE.xsd
- XMLUpload.xsd
- EPOD_EXPORT_JOB.xsd
- EPOD_EXPORT_JOB_RESPONSE.xsd
- ePOD_ImportResponce.xsd
The element should be added to the XSDs, in all places where EPOD_JOB is specified, as follows:
   <xsd:element name="EPL_LINKED_ID" nillable="true" minOccurs="0">
     <xsd:annotation>
       <xsd:documentation>
         An identifier that informs the system that this job should be linked (consolidated) with other jobs.
         The format is irrelevant - if multiple jobs on the same load have the same link ID, they will be consolidated.
       </xsd:documentation>
     </xsd:annotation>
     <xsd:simpleType>
       <xsd:restriction base="xsd:string">
         <xsd:maxLength value="40" />
       </xsd:restriction>
     </xsd:simpleType>
   </xsd:element>
PDA Changes
General PDA Changes
A custom LFS style will be created, changing the displays as follows:
- The LFS logo will be displayed on the login screen.
- All occurrences of the word "Container" or "Containers" will be exchanged for the words "Package" or "Packages".
PDA DAL/Database Changes
The existing EPOD_JOB table will be modified to add the new fields as follows:
- EPL_LINKED_ID - nvarchar(40) default
- EPL_LINK_ID - nvarchar(40) default
- EPL_LINKED_JOB_ID - nvarchar(10) default null
- EPL_LINKED_SEQUENCE - nvarchar(4) default
These new fields should be added to every procedure as part of the PDA_JOB DAL object.
The method ToUpdateXML of the EPOD_PRODUCT DAL should be modified to add the new EPL_LINKED_ID field to the message, as follows:
   <EPL_SITE_ID></EPL_SITE_ID>
   <EPL_LOAD_ID></EPL_LOAD_ID>
   <EPL_JOB_ID></EPL_JOB_ID>
   <EPL_USER_ID></EPL_USER_ID>
   <EPL_VEHICLE_ID></EPL_VEHICLE_ID>
   <EPL_START_DATE_TIME></EPL_START_DATE_TIME>
   <EPL_ARRIVAL_DATE_TIME></EPL_ARRIVAL_DATE_TIME>
   <EPL_END_DATE_TIME></EPL_END_DATE_TIME>
   <EPL_STATUS></EPL_STATUS>
   <EPL_CONTACT></EPL_CONTACT>
   <EPL_INVOICED></EPL_INVOICED>
   <EPL_SIGNED_UNCHECKED></EPL_SIGNED_UNCHECKED>
   <EPL_USER_NOTES></EPL_USER_NOTES>
   <EPL_TNCS></EPL_TNCS>
   <EPL_AMENDED_FLAG></EPL_AMENDED_FLAG>
   <EPL_JOB_STATUS></EPL_JOB_STATUS>
   <EPL_UDF_JOBDETS></EPL_UDF_JOBDETS>
   <EPL_LINKED_ID></EPL_LINKED_ID>
   <CONFIRMATION>
       <EPL_ENG_SIGNATURE></EPL_ENG_SIGNATURE>
       <EPL_JOB_SIGNATURE></EPL_JOB_SIGNATURE>
   </CONFIRMATION>
   <EXCEPTION type="job">
       <EPL_REASON_CODE></EPL_REASON_CODE>
   </EXCEPTION>
   <SERVICES>
   ...
   </SERVICES>
   <CONTAINERS>
   ...
   </CONTAINERS>
![]() Note: None of the other new fields above are to be added.
Note: None of the other new fields above are to be added.
A new column will be added to the EPOD_SITE table:
- EPL_CONSOLIDATION – This will be a one character field with of Values 'Y' and 'N'. The default value is 'N'.
This new field should be added to every procedure as part of the PDA_SITE DAL object.
A new column will be added to the EPOD_JOB_GROUPS table:
- EPL_CONSOLIDATION – This will be a one character field with of Values 'Y' and 'N'. The default value is 'N'.
This new field should be added to every procedure as part of the PDA_JOB_GROUP DAL object.
The PDA_CONTAINER DAL object will be modified to allow retrieval of some job-level information with the container. This will be achieved with a new boolean flag against the creation of the PDA_CONTAINER object. If set, this will get the container information linking to its job record to also retrieve:
- EPL_CUSTOMER_NAME
- EPL_JOB_DISP_ID (a combination of many fields - see PDA_JOB for details).
- EPL_LINKED_SEQUENCE
If the boolean flag is not set, these new fields will be left blank.
The PDA_JOB DAL object will be modified to find and store any jobs linked to in in a new field EPL_LINKED_JOB_ID. This will make retrieval of any linked job easier and faster. This will be done when creating a job on the database, by getting any job on the device with the same EPL_JOB_CODE, EPL_SITE_ID and EPL_LOAD_ID but different EPL_JOB_ID. If one is not found, this new field should be left as null. Modify the existing getLinkedJob methods to use this field instead.
Additionally, this object will also be modified to retrieve the value of EPL_SEQUENCE of any linked job into a new field. Again, at the time of creating a job on the database, store the EPL_SEQUENCE value from the linked job into EPL_LINKED_SEQUENCE. If this is not found, the sequence from the existing job should be stored here.
Job List
Job List screen

The Job List screen will allow users to enter 'Consolidation Mode' through a long-press on a job's row, if configured to do so, through the EPOD_SITE EPL_CONSOLIDATION flag. This will display a pop-up action, allowing the option 'Group Jobs Together'. ![]() Note: This mode may be used to consolidate jobs together whilst 'on-the-road' or before leaving for the first job.
Note: This mode may be used to consolidate jobs together whilst 'on-the-road' or before leaving for the first job.
When in Consolidation Mode, selecting Jobs from the Job list will highlight them as selected. Selecting an already-highlighted job will deselect it.
![]() Note: There is no criteria used to identify whether jobs in the collection may be consolidated with other jobs (e.g. Post Code, etc), other than that different Job Types may not be consolidated together (i.e. a delivery with a collection).
Note: There is no criteria used to identify whether jobs in the collection may be consolidated with other jobs (e.g. Post Code, etc), other than that different Job Types may not be consolidated together (i.e. a delivery with a collection).
A Consolidate button will be shown on the bottom of the screen. When clicked, all jobs selected will be consolidated together (by setting EPL_LINK_ID against each job selected to be a unique counting integer for that group on that load) and the Job Details screen will be shown. The jobs that have been consolidated together will be passed to this screen as a collection. Additionally, these jobs grouped together in this way will be consolidated onto a single row in the Job List, displaying identically to pre-consolidated jobs - see below for details.
The Back button on the device will exit Consolidation Mode and will not save any changes.
Any jobs that are marked as pre-consolidated (i.e. have a value of EPL_LINKED_ID not blank) and jobs that have been manually consolidated together (i.e. have a value of EPL_LINK_ID not blank) will be consolidated together, as long as other jobs exist for those linking id's. This will require the screen to take all jobs in the list with an identical value in this field and group them together into an EPOD_JOBS collection, and create a single entry on the Job List for this consolidation. If no other jobs exist for that linking ID, the linking ID should be blanked.
The fields displayed in Job List rows are:
- Job Identifier - One of: Job ID, Job Code. This is be configured at Site level in CALIDUS ePOD and is subject to a change being specified elsewhere to allow other values (e.g. Cust Ref, SO Ref, External Ref). For rows showing a group of consolidated jobs, this will display "X Consignments" instead, where X is the number of jobs grouped together.
- Job Type - "Collection" or "Delivery"
- Customer Name - The customer's names
- Start Planned Date/Time - The planned date and time for the delivery.
- Post Code - The Collection/delivery address's post code.
- Container Count - The number of containers (packages) on the Job. For rows showing a group of consolidated jobs, this will show the total number of containers in all the grouped jobs.
- Product Count - Not displayed, as not applicable.
![]() Note: Customer Name and Post Code will take the majority of space on this row, across the center. Other elements will be distributed around these elements in a smaller font.
Note: Customer Name and Post Code will take the majority of space on this row, across the center. Other elements will be distributed around these elements in a smaller font.
Clicking on one of these consolidated jobs on the screen will display the Job Details screen. The jobs that have been consolidated together will be passed to this screen as a collection.
It will be possible to consolidate a pre-consolidated group of jobs with another or other single jobs. In this case, all of the jobs, including the pre-consolidated ones, will be linked together by a common value in EPL_LINKED_ID, in preference to anything passed in to CALIDUS ePOD.
It will be possible to break a consolidated group of jobs into single jobs again, by long-holding on a consolidated group's row and choose Break Group. This will refresh the Job List and put all the group's constituent jobs back into the list on their own lines. ![]() Note: Any jobs that were originally pre-consolidated by TMS will be displayed back into their original consolidation group.
Note: Any jobs that were originally pre-consolidated by TMS will be displayed back into their original consolidation group.
The option Cancel Job on the pop-up menu will display as Cancel Group when showing this menu when long-pressing on a consolidated group row. This will call the standard Cancellation screen once only, allowing the user to identify the reason for the cancellation and potentially also an image. Once confirmed, a cancellation message should be sent for all jobs with the same reason. ![]() Note: If an image is taken, that image will be attached to the first job ONLY. Regardless of how this cancellation was run, the user will be returned to the Job List screen, redisplaying the job list again.
Note: If an image is taken, that image will be attached to the first job ONLY. Regardless of how this cancellation was run, the user will be returned to the Job List screen, redisplaying the job list again.
Job Details
Job Details - Main Tab
Job Details - Instructions Tab


The Job Details screen will show be modified to recognise whether it has been called with a collection of consolidated jobs, or a single job, as now.
If the screen is called with a single job, this screen will act as it does now.
If the screen is called with a collection of jobs, several changes will be made:
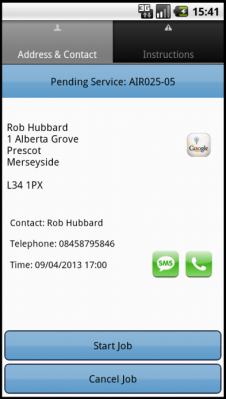
- < and > (Previous and Next) buttons will be added to the title of the Address & Contact tab.
- The Title text on this tab will be modified to display the number the job is in the collection of consolidated jobs (e.g. "1 of 5").
- The Start Job button will have its label changed to indicate this affects all jobs, for all labels of this button, i.e. Start Jobs, Arrive Jobs and Continue Jobs on both existing tabs.
When the Prev and Next buttons are pressed, this will navigate to the next or previous job in the consolidated group. If the Prev button is hit on the first job, this will move to the last job. If the Next button is hit on the last job, this will move to the first. When a new job is moved to, the Address & Contact tab will refresh, changing the data displayed to show the information for the job now selected. This will allow the user to see all detailed information for all jobs before choosing to start the jobs.
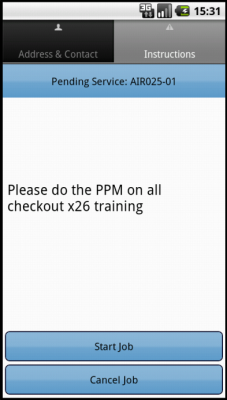
The Job Instructions tab will be modified to show all Job Instructions from all jobs on one scrollable screen. For each job that has instructions, a line will be shown, saying "Instructions for job EPL_JOB_DISP_ID:\nEPL_JOB_INSTRUCTIONS\n".
When ready to travel to a group of jobs, the user will press the Start Jobs button. This will mark all of the jobs as In Progress, with the Actual Start Date and Time. When pressed, the label will change to Arrive Jobs.
![]() Note: The functionality in the Android application for Job Lock updates will still be in force, whereby all job lock messages could potentially update the jobs at this point. The functionality in the existing Windows Mobile application should be copied where appropiate to ensure that this updating works as expected when processing a consolidated group.
Note: The functionality in the Android application for Job Lock updates will still be in force, whereby all job lock messages could potentially update the jobs at this point. The functionality in the existing Windows Mobile application should be copied where appropiate to ensure that this updating works as expected when processing a consolidated group.
When the user arrives at the destination, they will press the Arrive Jobs button. This will mark all of the jobs as Arrived, with the Arrival Date and Time. The label will change to Continue Jobs and the Collection or Delivery screen will be displayed. These will be called passing a collection of Jobs rather than a single job.
When processing a consolidated group of jobs, the Cancel Job button's label will be modified to Cancel Jobs. When pressed, the screen should offer a choice to the user as follows:
- Cancel Job EPL_JOB_DISP_ID only?
- Cancel all jobs in this group?
- Do nothing.
Regardless of the which of the first two choices are made, the existing cancellation screen should be called once only, allowing the user to identify the reason for the cancellation and potentially also an image. Once confirmed, if this was a single job being cancelled, the screen should run as now, cancelling only that job. If the user chose to cancel all jobs, a cancellation message should be sent for all jobs with the same reason. ![]() Note: If an image is taken, that image will be attached to the first job ONLY. Regardless of how this cancellation was run, the user will be returned to the Job List screen, redisplaying the job list again.
Note: If an image is taken, that image will be attached to the first job ONLY. Regardless of how this cancellation was run, the user will be returned to the Job List screen, redisplaying the job list again.
Collection / Delivery
![]() Note: The processes are identical within CALIDUS ePOD and are shown below. For convenience, these will be referred to as Deliveries below. For Collections, all labels will display as "Collect", "Collection", etc.
Note: The processes are identical within CALIDUS ePOD and are shown below. For convenience, these will be referred to as Deliveries below. For Collections, all labels will display as "Collect", "Collection", etc.
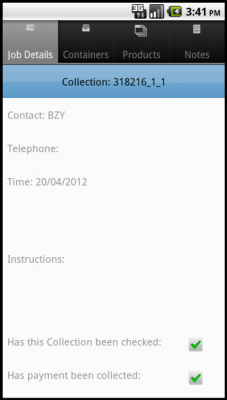
Collection/Delivery - Job Details Tab
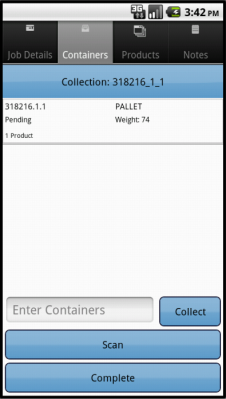
Collection/Delivery - Containers Tab


![]() Note: For the purposes of deciding upon which settings are used to control how the consolidated jobs are processed, the Job Group of the first job will be used.
Note: For the purposes of deciding upon which settings are used to control how the consolidated jobs are processed, the Job Group of the first job will be used.
The Delivery screen will show be modified to recognise whether it has been called with a collection of consolidated jobs, or a single job, as now.
If the screen is called with a single job, this screen will act as it does now.
If the screen is called with a collection of jobs, several changes will be made:
- < and > (Previous and Next) buttons will be added to the title of the Job Details tab on this screen.
- The Title text on this tab will be modified to display the number the job is in the collection of consolidated jobs (e.g. "1 of 5").
- The Container and Products tabs' titles will be changed to show the text "X Consignments", where X is the number of jobs in the consolidated group.
 Note: The style should have changed the title and tab content of the Containers tab to "Packages".
When the Prev and Next buttons are pressed, this will navigate to the next or previous job in the consolidated group. If the Prev button is hit on the first job, this will move to the last job. If the Next button is hit on the last job, this will move to the first. When a new job is moved to, the Job Details tab will refresh, changing the data displayed to show the information for the job now selected. This will allow the user to see all detailed information for all jobs individually.
The existing area used to display the contact, telephone and planned times will be modified into a custom tab object, an example of which can be found on the Signature screen. This will be populated as follows:
- Tab 1 - Info
- Contact
- Telephone
- Planned Start Date Time
- Tab 2 - Job Address
Other tabs can then be used for further extended information, for example to display original collection/ultimate delivery address, a potential future change.
The Job Details tab on this screen already displays (and will continue to display):
- Any special instructions Note: This is just for the job being displayed at this time, unlike the Job Details screen above.
- Any additional check flags
- Any additional entry fields
This section of the screen is scrollable by the user.
The Container and Products tabs will also be modified if the screen has been passed a group of jobs.
The Container list will be modified from its current contents:
For standard jobs:
- Container ID
- Description - The Distribution Unit passed in (e.g. PACKAGE, PALLET).
- Weight - As received
- Product Count - This will not be displayed as there are no products.
- Status - this will be left at this time, as a further future change may require this to be visible.
For consolidations:
- Job Identifier - EPL_JOB_DISP_ID
- Customer Name - from the Job.
Additionally, the list will be shown in reverse Job sequence, as provided by the CALIDUS TMS system against the Delivery jobs.
![]() Note: To achieve this, the EPOD_CONTAINER DAL object will need to be called requesting this extra Job-level information - this is specified above.
Note: To achieve this, the EPOD_CONTAINER DAL object will need to be called requesting this extra Job-level information - this is specified above.
Long-pressing on a container and choosing Info will show more information about this container in a pop-up screen. This will be modified to add the following fields, if this is part of a consolidated group of jobs:
- Job Identifier - EPL_JOB_DISP_ID
- Customer Name - from the Job.
If a job needs to be deconsolidated from the list the driver can long hold the container for the job, this will open up the further options menu where a 'Deconsolidate Job' menu item will be added. If the driver selects the 'Deconsolidate Job' menu item the job and all containers associated to this job will be removed from the list (blanking its EPL_LINK_ID and EPL_LINKED_ID values) and the container list redisplayed. If all jobs have been completed at this time, this should automatically move on to job completion.
![]() Note: The deconsolidated job will be placed back onto the Job List screen to be processed as a normal stand-alone job, the next time the user returns to this screen.
Note: The deconsolidated job will be placed back onto the Job List screen to be processed as a normal stand-alone job, the next time the user returns to this screen.
Once all containers (for all jobs if consolidated) have been marked as either delivered, deconsolidated or cancelled, the user will be taken to Job Completion stage automatically. If this is a consolidated group, this should pass the job collection to the screen.
Job Completion
The existing Signature screen needs some modifications if the jobs being completed are consolidated.
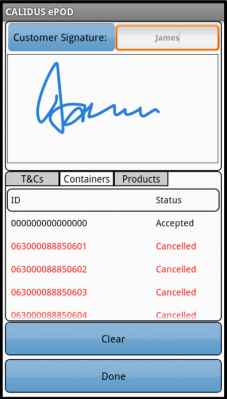
Signature screen

![]() Note: For the purposes of deciding upon which settings are used to control how the consolidated jobs are processed, the Job Group of the first job will be used.
Note: For the purposes of deciding upon which settings are used to control how the consolidated jobs are processed, the Job Group of the first job will be used.
The general functionality of this screen when signing for a consolidated group of jobs is as follows:
- One signature is required for all jobs
- One set of T&Cs will be displayed (from the first job) and used against all jobs.
- The Containers tab will show a consolidated views of all containers for all jobs.
- The Products tab will show a consolidated views of all Products for all jobs.
Clicking on a container in the Containers tab will show more information about this container in a pop-up screen, allowing the customer to enter notes against a pallet. This pop-up screen will be modified to add the following fields, if this is part of a consolidated group of jobs:
- Job Identifier - EPL_JOB_DISP_ID
- Customer Name - from the Job.
When the signature has been recorded, the device will move onto the next stage. Generically, this could be a driver signature or job photograph. However, it is expected in this configuration to update the job or jobs.
![]() Note: If Job Photo is used, this photo will be stored against the first job in the consolidation only.
Note: If Job Photo is used, this photo will be stored against the first job in the consolidation only.
For a consolidated group of jobs, all jobs will be marked with the T&Cs and signature from the signature screen and all jobs will be updated back to the server through the existing web services. This job update message will be modified to include the new EPL_LINKED_ID field (as specced above). This will be set to (in order of precedence):
- EPL_CUSTOMER_CODE (the location) of the first job in any group linked by EPL_LINK_ID)
- EPL_LINKED_ID received (if not removed from a pre-consolidated group)
- Blank (if not consolidated or deconsolidated)
This will be saved in the server through the Job Update message on the Calidus_EPOD.asmx webservice.
Completed and Cancelled jobs will be automatically exported to CALIDUS TMS through the standard interface. This will include the new field values.
Appendix A: Quote & Document References
| Cost Details | ||||
| Activity | Estimate No. of Days |
No. of Days | Rate per Day (£) | Cost (£ Exc. VAT) |
| Requirements | 0.00 | 0.00 | 0 | £0.00 |
| Change Request Evaluation | 0.00 | 0.00 | 0 | £0.00 |
| Functional Specification | 0.00 | 2.00 | 0 | £0.00 |
| Technical Specification | 0.00 | 0.00 | 0 | £0.00 |
| Development | 0.00 | 20.00 | 0 | £0.00 |
| Testing and Release | 0.00 | 3.00 | 0 | £0.00 |
| Implementation | 0.00 | 0.25 | 0 | £0.00 |
| Project Management | First argument to "number_format" must be a number. | First argument to "number_format" must be a number. | 0 | £First argument to "number_format" must be a number. |
| TOTAL | First argument to "number_format" must be a number. | First argument to "number_format" must be a number. | £First argument to "number_format" must be a number. | |
| Estimate excludes training, release to live and go live support. |
A.1 References
| Ref No | Document Title & ID | Version | Date |
| 1 | FS-308745 - ID5 - Job Consolidation | 1.4 | 03/07/2013 |
A.2 Glossary
| Term | Definition |
|---|---|
| EPOD | Electronic Proof of Delivery. The OBS EPOD system is CALIDUS ePOD. |
| CALIDUS eSERV | The OBS mobile system to complete Service functionality in the field. This is part of the CALIDUS ePOD system. |
| PDA | The mobile device on which the C-ePOD system will run in the field. This can be a Phone, EDA or industrial PDA, running Android. |
| DAL | Data Access Layer. A mechanism for accessing data by the system that is removed from the application, allowing for simplified access and providing protection to the data, as only approved DAL methods can be used to modify it. |
| GPS | Global Positioning System. A mechanism of retrieving accurate positioning information in the form of Latitude and Longitude (Lat-Long) co-ordinates from a device. |
| GPRS, 3G, HSDPA, Data Service | All terms referring to mobile device network connectivity, and the speed at which the device connects to the internet. |
A.3 Authorised By
Matt Tipping | Project Manager | _____________________________ |
____________________(PRINT) | Client Representative | _____________________________ |