FS 317761 SCR15 NHSBT C-EPOD Collection Changes
![]()
NHSBT
C-EPOD Collection Changes
CALIDUS ePOD
4th June 2014 - 0.4
Reference: FS 317761 SCR15
Contents
Functional Overview
Client Requirement
The following changes from the Solution Design document are included in this specification:
- SCR-316403-68 - Round Robin/BMV
- Ad Hoc Collection: The EPOD device will need to recognise that this is a consolidated collection at a depot with multiple destinations, and prompt the user to enter the destination location (selected from a drop-down list).
- SCR-316403-69 - Single Trip Asset:
- Prompt for Asset Type; Store DU on database
- SCR-316403-74 - Ad Hoc Collection:
- Ad Hoc Collection tab on Collection jobs; configuration (by Container or Stock); Ad Hoc Collection Process
- SCR-316403-77 - Collection / Delivery:
- Completion of a job for a location should move on to the next job at that location immediately.
- SCR-316403-86 - Return Cancels to Depot:
- Any cancelled items or entire cancelled deliveries must be returned to the depot and scanned off the vehicle.
- Ad Hoc Collections of items should be added to scanned items to be returned
- SCR-316403-88 - Scanning:
- EPOD scanning of preadvised items will be seamless (stay in scanning)
- SCR-316403-79 - Unloading:
- EPOD will generate the items to be unloaded back at the depot on the device. This will include cancelled items and ad hoc collected items
- SCR-316403-80 - Validation Rules:
- The EPOD handheld device application will be modified to provide validation whether the wrong box has been used/where issue life is exceeded.
- SCR-316403-83 - Scanning:
- EPOD Application will be changed to recognise the different potential scan-able items, to distinguish between Permanent and Single Trip Asset tags, and to disregard any other barcodes scanned as invalid.
- SCR-316403-84 - Auto-Login:
- Disable Auto-Login
- SCR-316403-95 - Ad Hoc Collection:
- Ad Hoc Collection prompted for through Job Detail (automatically when other jobs at that location completed) or Job list (through menu)
- SCR-316403-96 - Consolidation:
- Use same location consolidation and possibly linked locations, EPOD config, signature controls, carrier controls
- SCR-316403-98 - Resource Availability:
- EPOD - store Logon/off message
- SCR-316403-30 - Asset Tracking:
- Single Trip Assets are not currently part of the Asset Management within EPOD. This will require a change to allow temporary asset tags to be scanned.
Additionally, this change will encompass ensuring that the terms used in the application are appropriate, for example (but not limited to):
- Use the word "Item" rather than "Container" when collecting and delivering.
- Lay out the Job List and Container rows as required for the operation.
Solution Overview
Scanning
The processes being used by the operation will extensively use scanning to validate the items and to help track assets throughout the network. To aid in this, the application allows scanning, both through a 'keyboard wedge' (where an external hardware device may be connected to the mobile device, typically through Bluetooth local wireless connectivity) or through an integrated scanning module (utilising the inbuilt camera on the mobile device).
The C-EPOD application will be modified for the scanning of items as follows:
- Continuous scanning will be implemented within the C-EPOD application, to ensure that scanning speed is kept at a maximum.
- The overlay/scanning window size should be maximised for the device, to ensure that larger barcodes may be scanned more easily.
- Items scanned successfully should be immediately marked as delivered (no pop-up dialogue).
- Unknown items will be identified with a message, but scanning will be allowed to continue without interruption.
(SCR-316403-88)
This applies when scanning preadvised items for collection and delivery, but not for Ad Hoc Collection.
The project team also allows the possibility of using external scanning modules connected via Bluetooth to help speed up this process, if it proves to be too slow to be practical.
The different barcodes used by the operation are expected to be as follows:
Permanent Asset Tag Format:
- 8004: 4-digit AI
- 00000000: 8-digit company prefix
- XXX00000: 8-AN Asset ID.
- GS1-standard (EAN-128)
Single Trip Asset Tag Format:
- 00: 2-digit AI (SSCC-ID)
- 00000000: 8-digit company prefix
- 0000000000: 10-digit Asset ID.
- GS1-standard (EAN-128)
The C-EPOD Application will be changed to recognise the different potential items' barcode formats, for validation and data extraction purposes. The purpose of this is to distinguish between Permanent and Single Trip Asset tags, and to disregard any other barcodes scanned as invalid. (SCR-316403-83)
![]() Note: The systems already support barcode scanning, and Asset registers. However, the specific mix of externally generated asset labels, as well as a concept of single-trip assets, results in changes being required both within C-TMS and C-EPOD, to handle that mix. (SCR-316403-30 and SCR-316403-75)
Note: The systems already support barcode scanning, and Asset registers. However, the specific mix of externally generated asset labels, as well as a concept of single-trip assets, results in changes being required both within C-TMS and C-EPOD, to handle that mix. (SCR-316403-30 and SCR-316403-75)
Login
The application will be pre-installed on the units, but can also be downloaded from stores or manually installed.
Once the application has been installed, it will be present on the application list of your device. Once clicked, the application will load.

Application Start Screen

On starting the application, the driver will be requested to Log In.
The device requests entry of the User ID, Vehicle and Password that the driver has been provided with. If there is any error regarding the values entered, the application will inform them of the error. A pop-up keyboard will be displayed for entry of the details. The device will be pre-configured with the site (depot) from which they are being allocated work.
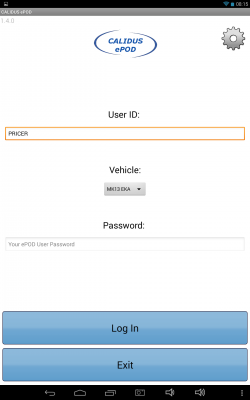
Login Screen

If the device has not been configured for first use, the device will prompt the driver upon initial log on. This can be easily configured through the scan of a single barcode, which can be provided to the drivers, if this is required.
When successfully logged in and with a data connection, the application will download all of the latest configuration data from the server, and a load to be completed.
If the vehicle checks have not been completed recently, the application will direct the driver to complete the Vehicle Checks.
Vehicle Checks should be configured so that they are prompted for whenever a driver first uses a vehicle that day.
If no load has been assigned to that driver, the unit will display a message and ask if them to recheck.
If a Load has been assigned to the driver, they will be directed to the Job List screen to action it.
![]() Note: Functionality exists within C-EPOD to automatically log a driver back in to the point where they left the application, after an unplanned closure of the application. It was noted that the NHSBT team do not want this functionality and that it should be capable of being disabled. This will require a modification to the standard functionality of the application. (SCR-316403-84)
Note: Functionality exists within C-EPOD to automatically log a driver back in to the point where they left the application, after an unplanned closure of the application. It was noted that the NHSBT team do not want this functionality and that it should be capable of being disabled. This will require a modification to the standard functionality of the application. (SCR-316403-84)
The device and the Admin system will be modified to capture the login time from the user, so that it may be enquired on in the Admin system (SCR-316403-98).
Job List
This screen shows all the jobs on the Load (work-list) that has been assigned to the driver.
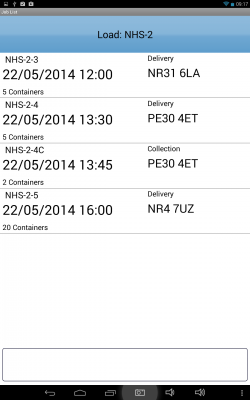
Job List Screen

The screen displays a grid containing:
- Job Status through background or border colour
- Job ID or Code
- Job Type, one of:
- S - Service
- C - Collection
- D - Delivery
- Planned Date/Time
- Customer Name
- Postcode
- Job SO Number
- Customer Reference Number
- Container and Product Counts (for Collections/Deliveries)
- Priority
The layout of this grid can be controlled through the style chosen in the PDA client configuration screen - this is expected to be configured for NHSBT requirements, within the existing capabilities of the system.
Where there are multiple jobs being actioned at the same location or depot (for example, loading or unloading at a depot, or delivering or collecting from the same hospital), the job list will show a single consolidated entry against the location, showing the number of consignments planned. If there are deliveries and collections to/from the same point, the Job List will show one consolidated entry for the deliveries, and one for the collections. It was noted that consolidated collections may have an exception where certain items are picked up and loaded from a different area. It was noted that these should be defined as coming from a different location, although this must be confirmed by the NHSBT team.
Depending on the application style chosen, the screen may display the status of the jobs on the load through a coloured outline, as follows:
- Red - Cancelled
- Green - Completed
- Blue - Completed (with amendments)
- Yellow - In Progress
- None - Pending/Incomplete
This status is also displayed prominently in the Job Details screen.
The identifying field for the job (Job ID, Code or many other references) can be selected through configuration in Admin against the Site.
The jobs are displayed in the sequence in which they should be completed, with the first job selected. The device will be configured to require that the top-most job is completed first. However, the jobs can be viewed in any sequence by clicking the line of the job the driver wants to see - they will then be taken to the Job Details page.
The driver can also long-press against the line for some options from a pop-up menu:
- Details - show the Job Details screen.
- Cancel - Cancel the job - this job will be cancelled. The unit will take to the driver to an Exception screen and prompt to enter a reason code explaining why this job was cancelled. This may be used to report Accidents, when the job has been affected to the degree that it can no longer be delivered.
Clicking the Back button here will confirm whether the driver wants to log off from the CALIDUS ePOD application.
The device and the Admin system will be modified to capture the logout time from the user, so that it may be enquired on in the Admin system. (SCR-316403-98) The Menu button can be used here to allow the following options:
- Show All / Outstanding Jobs - Toggle between showing all or only incomplete jobs.
- Refresh - Refresh the Load/Work-list
- Settings - Show the Settings screen
There are also some bug-reporting options available on this pop-up menu.
This menu will be added to allow a user to elect to do an ad hoc collection for the last completed delivery point, to pick up any samples or returned assets for that location. (SCR-316403-95). This menu will also be modified to add Change Vehicle and Relogon options – some slight restructuring of the menu will be required.
Should the trip that is allocated to this user be modified by C-TMS or DPS, in response to planning and order demand, the C-EPOD device will indicate this to the driver, by way of a pop-up dialogue and audible alert.
Job Details
This screen displays full details of the job being undertaken.
This screen will be displayed regardless of job type. The translated job type will be displayed on the top of the screen (i.e. COLLECTION, DELIVERY), along with the Job ID (or other descriptive text, as configured for the system). The status of the job will also be displayed.
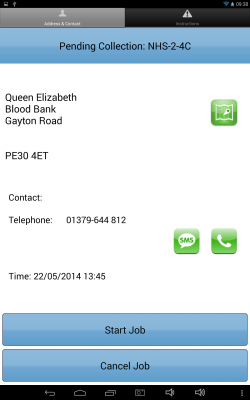
Job Details

Job Instructions


The screen has several Tabs, each showing:
- The Job Type (Collection, Delivery, Service)
- The customer details (Customer Code, Name, Address and Postcode)
- The contact information (Contact name and number)
- The Instructions for the job (The driver will be forced to view any C-TMS-provided order instructions before starting the Job.)
Where there are multiple jobs being actioned at the same location or depot, this screen will allow you to move between the information of each job.
From these tabs, the driver can:
- Call the customer by clicking on the Call button, if a phone number has been provided. The device will display the dialler with the Phone number already entered.
- Navigate to the customer's address by clicking on the Navigate button. The device will use whatever navigation software is installed on the device, or route through a browser search.
- SMS message the customer. The device will display the SMS message, with the phone number and job details already entered.
The driver can start the job using the Start Job button.
![]() Note: The requirement for Location Check Digit has been superseded by a GPS Location Point that should be stamped against pressing this button here, which will be audited in the C-EPOD Admin system. This may be enquired upon using the C-EPOD Admin system (see the Admin section for details of how this can be seen). This will not be passed back to C-TMS to be viewed there.
Note: The requirement for Location Check Digit has been superseded by a GPS Location Point that should be stamped against pressing this button here, which will be audited in the C-EPOD Admin system. This may be enquired upon using the C-EPOD Admin system (see the Admin section for details of how this can be seen). This will not be passed back to C-TMS to be viewed there.
The user will then be taken to the following process, based on job type:
- Collection
- Delivery
There are many acknowledged reasons for a delivery to be cancelled during execution:
- Misdirected
- Cancelled after starting
- Patient no longer requires product
If the driver presses Cancel Job, this job will be cancelled. The unit will take them to an Exception screen and prompt to enter a reason code explaining why this job was cancelled. This may be used to report Accidents, when the job has been affected to the degree that it can no longer be delivered.
![]() Note: In the instance that a driver is early, this is not a reason for cancellation of the order - the driver has instructions to wait until someone is available to accept the product, and will call hospital services or staff to facilitate that.
Note: In the instance that a driver is early, this is not a reason for cancellation of the order - the driver has instructions to wait until someone is available to accept the product, and will call hospital services or staff to facilitate that.
![]() Note: Cancelled items or entire cancelled deliveries must be returned to the depot and scanned off the vehicle. (SCR-316403-79 and SCR-316403-86)
Note: Cancelled items or entire cancelled deliveries must be returned to the depot and scanned off the vehicle. (SCR-316403-79 and SCR-316403-86)
Collection
This process will be followed for any collection of any type at any location.
Collection jobs from a hospital may be planned or unplanned. Planned collections can be preadvised with items (i.e. the specific assets to be collected) or Ad Hoc (a number of items are to be collected, without knowing the specific IDs). Planned Ad Hoc collections will typically be collections of a number of specific samples. Unplanned collections are intended to allow the driver to pick up any items (i.e. assets, pick up samples, post, etc.) - these will be generated by the driver, when requested by the device, after all planned jobs at this location have been completed. The following process covers all aspects of collection.
If the job is a Collection, the driver will be shown this screen. They will be initially presented with a summary screen.
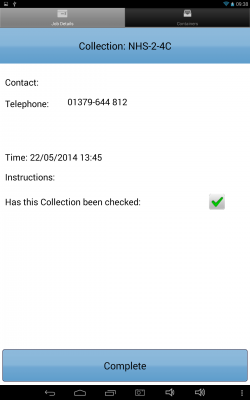
Job Details Tab
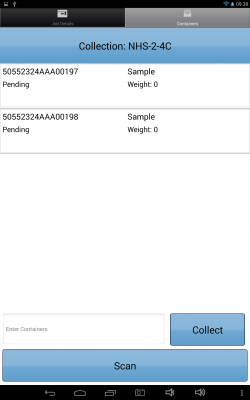
Containers Tab


There are multiple possible tabs on this screen:
- Job Details - address and instructions (where any have been provided by C-TMS against the order)
- Items (Containers) - where assets are marked as collected/loaded.
Where there are multiple collection jobs being actioned at the same location or depot, this screen will allow the user to move between the information of each job. All of the items to be collected will be consolidated together, however.
If any items have been preadvised to be collected specifically (as when loading at the depot, for example), these will be shown on the Item (Container) list, for collection.
The system will be configured to not allow the user the option to deliver/collect an item directly from the grid row itself. This will force scanning of asset barcodes.
From the Containers tab, the driver can enter the Container in the text box and click the Collected button, which will mark the item as collected. The process also supports scanning of the barcode of the items preadvised to be collected, either through an attached external barcode scanner (through additional software and hardware purchases) or an internal laser scanner – entered through the Enter Container text box provided, or using the device's camera to scan within the application, using the Scan button provided.
If a container is scanned that is not expected, the device will display a temporary error on the screen, to inform the driver that the item is not expected. ![]() Note: Incorrect scans are not audited within C-EPOD or C-TMS.
Note: Incorrect scans are not audited within C-EPOD or C-TMS.
As each item is successfully scanned (or otherwise confirmed as collected), it will be removed from the list.
When collecting Assets at the centre, if the driver finds that any items are missing, the driver should alert this immediately to Hospital Services. The driver will wait until the issue is resolved, rather than cancelling the pickup of the specific missing item.
In the case where these exceptions cannot be resolved, the driver will have the facility to remove certain items from the job. This will be through the Container Cancellation feature on the C-EPOD application (from long-pressing against the missing item in the list and choosing Cancel from the pop-up menu).
The driver is able to long-press any container in the grid. This will provide a pop-up menu, allowing visibility of details of the selected container, showing:
- ID (note that this may not be removed or hidden at this time, nor may the option to show this screen be configured to be hidden).
- Package Code and Description
- Weight
- Code 1/2/3 (Multi-use fields)
The pop-up menu also allows cancellation or collection, as above.
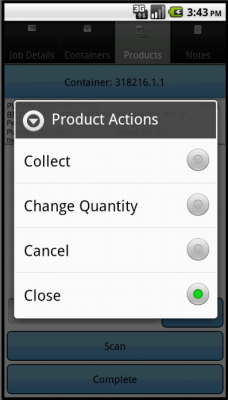
Pop-up Menu

The Collection process can also be configured with an Ad Hoc Collection facility. (SCR-316403-74)
The Ad Hoc Collection process allows the driver to specify the items collected, at the point of collection, without the specific items for those collections being planned in advance. This appears as a separate tab on the PDA within the Collections process, labelled as "Ad Hoc".
When this feature is enabled, the user is able to scan the preadvised items for collection on the "Containers" tab, as well as any additional ones on this new tab. The application will not automatically complete a job when all preadvised items have been scanned - the driver will always have an opportunity to enter more and then complete the job manually.
The tab will allow the user to scan or enter Asset IDs - this works similarly as to the standard Container scanning, but will only allow scanning one item at a time.
The application will only allow asset formats to be scanned in the formats detailed in the Scanning section. The different types of Asset will be dealt with separately:
- Fixed (Permanent) Assets IDs will always be associated with a particular Asset Type in C-TMS, so the application will not require the driver to confirm the Asset Type for a Fixed Asset.
- Temporary Assets must have an asset type entered. (SCR-316403-69).
Additionally, the application will check to see if this collection is part of a consolidation (multiple collection jobs) with multiple destinations, which can happen in the following instances:
- For processed blood deliveries from a manufacturing centre to SHU, the cages could be being delivered to different destinations, for example one cage on one order to the first SHU, with the other 2 cages to go to a second SHU on a different order. The cages will be labelled with their destination.
- For Round Robin movements, the loading of the items at the depots can include single-trip assets (i.e. for other transport). The items that are being loaded may be for multiple orders and therefore multiple destinations.
The application will deal with these requirements by recognising this and popping up a dialogue box when scanning, if required. It will request the user to select the Asset Type and/or destination for the scanned Asset. (SCR-316403-68 and SCR-316403-69)
Note that this process applies only for unplanned collections of assets scanned in this tab.
The Asset Type will be selected through the use of a drop-down list (DDL). The types (amongst many) are:
- "Sample", "Post", "Waste", "Other", "Cage", "BAM", "Clinomed", "Va-Q-Tec", "Blue".
The list of Asset Types will be maintained as standing data within C-TMS and used within C-EPOD, to allow the asset types used by the drivers to be maintained centrally by the operation. (SCR-316403-69)
The Asset Types prompted for will be all available Asset Types within the system, as a single trip asset ID may be used when an Asset loses its label, as well as identifying real single trip items.
It was noted that the status of permanent Assets need not be checked when scanning assets in C-EPOD - this should already have been checked in the Tag to Asset Scanning process.
When entered, the Asset will be added to a scrolling list on this tab - each item scanned this way will be added to this list.
Any items collected in this manner must be added to the items to be unloaded back in the depot. The application will be modified to add these to the unloading jobs back at the depot. This also applies to any items that were cancelled for delivery (SCR-316403-79 and SCR-316403-86)
Once all containers have been collected, the Complete button may be clicked to finish the job. During collections of any type, the driver will not be required to capture a signature from the person handing them the items, the driver is accepting them - the physical scan of the items is enough to confirm that they are now in the driver's possession. The system will be configured to immediately complete the job. Therefore, once completed, the driver will be returned to the Job Menu to pick up the next task or Load/Work-list. The completed job will be transferred back to the main system with all the details, signatures and photos.
Delivery
This process will be followed for any delivery of any type at any location.
If the job is a Delivery, the driver will be shown this screen. They will be initially presented with a summary screen.
Note that the general layout of these screens is almost identical to the collection screens, albeit using the word 'Deliver' rather than 'Collect'. There is no Ad Hoc tab, however.
There are multiple possible tabs on this screen:
- Job Details - address and instructions (where any have been provided by C-TMS against the order)
- Items (Containers) - where assets are marked as delivered/unloaded.
Where there are multiple delivery jobs being actioned at the same location or depot, this screen will allow the user to move between the information of each job. All of the items to be delivered will be consolidated together, however.
If any items have been advised to be collected specifically (as when loading at the depot, for example), these will be shown on the Container list, for collection.
As with collections, the project team requested the ability to display only a small part of the Item ID on the device. (SCR-316403-85) The options available are covered in that process. From here the driver can scan or enter the Container in the text box and clicking Delivered, which will mark the item as delivered. Options regarding quick entry through clicking on the item in the list will be disabled in this configuration, to force scanning of Asset barcodes. The driver is able to long-press any container in the grid. This will provide a pop-up menu, displaying the details of the selected container, showing the same details as in the Collection screens.
As each item is scanned (or otherwise confirmed as delivered), it will be removed from the outstanding list. When delivering items at a Hospital these items may be refused (or be incapable of being delivered). In this case, these items will be cancelled through the Container Cancellation feature on the C-EPOD application (from long-pressing against the missing item in the list and choosing Cancel from the pop-up menu) and be managed by C-EPOD and C-TMS back into the centre. (SCR-316403-79 and SCR-316403-86)
Once all containers have been delivered, the driver is required to click the Complete button. During deliveries of any type, the driver will always be required to capture a signature from the person they are handing the items to, to confirm that they are now in their possession. This button press will take the driver to the Job Confirmation screen.
Job Confirmation
This screen controls the confirmation that the job has been completed satisfactorily. The process can be configured for:
- Customer Signature
- Driver or Engineer Signature
- Job Photo Capture (also referred to as Document Photo Capture).
For Collections, nothing will be prompted. For Deliveries, a customer signature will be required.
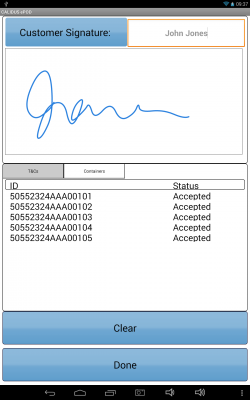
Signature

The Signatory box defaults to the customer contact name (if present on the job) and also allows free text entry, which will be sent back to the main system if the customer contact is not the person planned for the job.
To clear the signature, the driver may click Clear.
Depending on Job Type and the data, several other tabs may appear in this section:
- T&Cs - Terms and Conditions, along with up to 3 optional check boxes for entry. This is configurable within the Admin system.
- Items (Containers) - All containers delivered or collected.
The Containers tab can also be used by the person signing for the goods to comment against delivery jobs (accept the delivery with a clause).
- If containers are accepted but the customer wishes to note that the delivery may be queried later, they can enter clause text against specific containers.
- Click the container in the grid, and a pop-up will be displayed, allowing the user to enter clause information.
- When saved, the Container tab will be redisplayed, showing in the status that the container is claused.
The C-EPOD device application will be modified here to provide validation as to whether the product in the box is still valid (i.e. it has been out of cold storage for longer than it is validated to be). (SCR-316403-80) This will be based on an issue life passed to the C-EPOD application per item, based on the pack time, the product and the box type. The device will display a pop-up warning to the user when the signature screen is displayed, expected to be "Issue life exceeded on some items. Please see the detail of the items affected below".
Additionally, the screen will be modified to pre-identify items that are out of issue life as status "Claused" on the Containers tab here. Clicking on a claused item will display the reason, expected to be "Issue life exceeded - product must be checked".
Signature entry (and therefore job completion) is confirmed by clicking Done. The driver will be prompted for a final confirmation before continuing. Once completed, they will be returned to the Job List to pick up the next task or Load/Work-list. The completed job will be transferred back to the main system with all the details, signatures and photos.
Deliveries to a hospital (i.e. not unloading tasks at a depot) will always be followed by a collection, planned or unplanned:
- If the Hospital staff have arranged a planned collection of specific items (such as Assets or Samples) at the same time as the delivery, the application will immediately start the collection job for the user. In this case, the user will not be prompted if they want to do an ad-hoc collection, as this can be done with the standard collection (SCR-316403-77).
- If there is no planned collection, in order to allow the driver to pick up any returned assets or samples, the driver will be prompted as to whether they wish to do an ad hoc collection at this stage (SCR-316403-95). If so, the device will create a job for this location and prompt the user as per any normal collection process.
Scope
Set-up
Pre-requisites
- A working CALIDUS ePOD system.
- A working CALIDUS TMS system, accessible to the CALIDUS ePOD system.
CALIDUS TMS Interface Changes
The interface of jobs through to C-EPOD will include the following details and changes:
- EPL_UDF_JOBDETS to be populated with PACKAGING, GEL and DRY ICE counts, in UDF format, on collections. Format example:
<FORM NAME="Job Details" REQUIRED="Y">
  <FIELD ID="DU1_COUNT">
     <TEXT>No. of DU1: X</TEXT>
     <FORMAT>L</FORMAT>
  </FIELD>
  <FIELD ID="DU2_COUNT">
     <TEXT>No. of DU2: X</TEXT>
     <FORMAT>L</FORMAT>
  </FIELD>
</FORM>
- EPL_LINKED_ID will be passed through against each EPOD_JOB record to identify consolidated collections and deliveries
- New fields EPL_VALID_DATE and EPL_VALID_TIME will be passed through for box-level validation, against each EPOD_CONTAINER record.
- New field EPL_LOADING_TYPE will be passed through against each EPOD_JOB record to indicate whether this is the loading or unloading job.
- New Asset Type information will be passed though on the EPOD_REASON_CODES stream, with EPL_REASON_TYPE = "DU".
- It is expected that customer contact numbers will not be passed through to C-EPOD.
- It is expected that any additional information regarding Items (containers) to be delivered not covered above will be sent through in item EPL_CODE_1.
The interface of jobs back into C-TMS from C-EPOD will include the following changes:
- Create jobs for unplanned Ad Hoc Collections and their return to depot.
- Ignore any other additional depot return jobs that are included
- Create empty assets on orders for Ad Hoc collect items against planned collections.
All changes regarding the EPOD interface will be completed under reference 317907/SCR01.
Menu Structure
None
Data
- Device configured to NHSBT style
- Asset Types configured within C-TMS and C-EPOD.
- Job Groups set up with the following PDA options:
- Ad Hoc Collection enabled
- Job Consolidation enabled
- Driver Sign Delivery enabled
 Note: All other options are expected to be disabled.
- Sites set up for each depot (carrier), with the following PDA options:
- "Audit Login" enabled
- "Seamless Scanning" enabled
- "Driver Sign Delivery" enabled
- "Next Job Automatic" enabled
- "Generate Ad Hoc Config" enabled
- "Ad Hoc Collection" enabled
- "Generate Depot Returns" enabled
- "Auto-Login" disabled
- "Job Consolidation" enabled
- "Forced Container and Product Entry" enabled
- "Capture Arrival Times" disabled
- "Link C & D on Job Code" enabled
- "Display Job Code on PDA" enabled ( Note: Depending on other changes, this flag may now be a drop-down list labelled as "Display Job As" - if so, select value "Job Code/Order No", or any required value other than "Job ID").
- "Scan Errors Intrusive" disabled
- "Clause Delivery" enabled ( Note: Depending on other changes, this flag may now be a drop-down list, allowing the choice of functionality - if so, this should be set to any option that requires "Claused Delivery Description", preferably option "1").
- "Resequencing Options" disabled.
- Note: All other options are expected to be disabled, but may be set as desired.
Functional Description
Database/DAL
Table EPOD_SITE requires the following modifications:
- EPL_NEXT_JOB_FLAG - nvarchar(1), NOT NULL DEFAULT 'N', values 'Y' or 'N'.
- EPL_RETURNS_DEPOT_FLAG - nvarchar(1), NOT NULL DEFAULT 'N', values 'Y' or 'N'.
- EPL_SCANNING_FLAG - nvarchar(1), NOT NULL DEFAULT 'N', values 'Y' or 'N'.
- EPL_AUTOLOGIN_FLAG - nvarchar(1), NOT NULL DEFAULT 'Y', values 'Y' or 'N'.
- EPL_ADHOC_ANYTIME_CONFIG - nvarchar(20), DEFAULT ' '.
- EPL_AUDIT_LOGIN_FLAG - nvarchar(1), NOT NULL DEFAULT 'N', values 'Y' or 'N'.
Existing packages will be modified to allow the creating, editing and selecting of the new flag, including but not limited to:
- EPOD_SITE_INSERT
- EPOD_SITE_SELECT
- EPOD_SITE_SELECT_UPDATED_DATA
- EPOD_SITE_UPDATE
The existing EPOD_SITE DAL object will be changed to:
- Read the new flag
![]() Note: It is not necessary to add this flag as a search-able item. However, if allowing this keeps the packages and DAL objects standard in design, then this can also be done, within the DAL and the packages.
Note: It is not necessary to add this flag as a search-able item. However, if allowing this keeps the packages and DAL objects standard in design, then this can also be done, within the DAL and the packages.
The XML Export of EPOD_SITE records will look as follows:
 <EPOD_SITE>
   <EPL_SITE_ID></EPL_SITE_ID>
   <EPL_DESCRIPTION></EPL_DESCRIPTION>
   <EPL_SERVICE_POD_FORMAT></EPL_SERVICE_POD_FORMAT>
   <EPL_DELIVERY_POD_FORMAT></EPL_DELIVERY_POD_FORMAT>
   <EPL_COLLECTION_POD_FORMAT></EPL_COLLECTION_POD_FORMAT>
   <EPL_SERVICE_ACTIVITIES></EPL_SERVICE_ACTIVITIES>
   <EPL_SERVICE_PREWORK></EPL_SERVICE_PREWORK>
   <EPL_SERVICE_INFO></EPL_SERVICE_INFO>
   <EPL_SERVICE_PRODUCTS></EPL_SERVICE_PRODUCTS>
   <EPL_SERVICE_MC_REF></EPL_SERVICE_MC_REF>
   <EPL_SERVICE_DIAGNOSIS></EPL_SERVICE_DIAGNOSIS>
   <EPL_SERVICE_POSTWORK></EPL_SERVICE_POSTWORK>
   <EPL_AUTO_COMPLETE_EMAIL></EPL_AUTO_COMPLETE_EMAIL>
   <EPL_AD_HOC_COLLECTION></EPL_AD_HOC_COLLECTION>
   <EPL_DEL_DRIVER_SIGN></EPL_DEL_DRIVER_SIGN>
   <EPL_COL_DRIVER_SIGN></EPL_COL_DRIVER_SIGN>
   <EPL_DELIVERY_PAYMENT></EPL_DELIVERY_PAYMENT>
   <EPL_DOCUMENT_PHOTO></EPL_DOCUMENT_PHOTO>
   <EPL_CONTAINER_ONLY></EPL_CONTAINER_ONLY>
   <EPL_PDA_DIS_JOB_CODE></EPL_PDA_DIS_JOB_CODE>
   <EPL_LINKED_C_D></EPL_LINKED_C_D>
   <EPL_METRICS_ENTRY></EPL_METRICS_ENTRY>
   <EPL_NOTES></EPL_NOTES>
   <EPL_FORCED_ENTRY></EPL_FORCED_ENTRY>
   <EPL_SYSTEM_TYPE></EPL_SYSTEM_TYPE>
   <EPL_UPDATE_FUNCTIONS></EPL_UPDATE_FUNCTIONS>
   <EPL_VEHICLE_CHECK_CONFIG></EPL_VEHICLE_CHECK_CONFIG>
   <EPL_JOB_LIST_CFG></EPL_JOB_LIST_CFG>
   <EPL_ARRIVAL_FLAG></EPL_ARRIVAL_FLAG>
   <EPL_SCAN_ERROR_FLAG></EPL_SCAN_ERROR_FLAG>
   <EPL_LAST_CHANGED_DATE></EPL_LAST_CHANGED_DATE>
   <EPL_LAST_CHANGED_TIME></EPL_LAST_CHANGED_TIME>
   <EPL_RESEQUENCE></EPL_RESEQUENCE>
   <EPL_CLAUSE_DELIVERY></EPL_CLAUSE_DELIVERY>
   <EPL_JOB_STATUS></EPL_JOB_STATUS>
   <EPL_CONSOLIDATION></EPL_CONSOLIDATION>
   <EPL_VEHICLE_STOCK_FLAG></EPL_VEHICLE_STOCK_FLAG>
   <EPL_SCAN_AT_VEHICLE></EPL_SCAN_AT_VEHICLE>
   <EPL_PDA_FULL_ADDRESSES></EPL_PDA_FULL_ADDRESSES>
   <EPL_JOB_TRANSFER></EPL_JOB_TRANSFER>
   <EPL_NEXT_JOB_FLAG></EPL_NEXT_JOB_FLAG>
   <EPL_RETURNS_DEPOT_FLAG></EPL_RETURNS_DEPOT_FLAG>
   <EPL_SCANNING_FLAG></EPL_SCANNING_FLAG>
   <EPL_AUTOLOGIN_FLAG></EPL_AUTOLOGIN_FLAG>
   <EPL_ADHOC_ANYTIME_CONFIG></EPL_ADHOC_ANYTIME_CONFIG>
   <EPL_AUDIT_LOGIN_FLAG></EPL_AUDIT_LOGIN_FLAG>
 </EPOD_SITE>
The existing database package EPOD_SETUP will be modified to ensure that the new flags are defaulted appropriately
Table EPOD_JOB requires the following modification:
- EPL_LOADING_TYPE - nvarchar(2), NOT NULL DEFAULT ' ', values ' ', 'Y' or 'N'.
- EPL_GENERATED - nvarchar(1), NOT NULL DEFAULT ' ', values ' ', 'Y' or 'N'.
Existing packages will be modified to allow the creating, editing and selecting of the new fields, including but not limited to:
- EPOD_JOB_INSERT
- EPOD_JOB_SEARCH
- EPOD_JOB_SELECT
- EPOD_JOB_SELECT_DATE_RANGE
- EPOD_JOB_UPDATE
The existing EPOD_JOB DAL object will be changed to:
- Export the new fields in XML requests
- Read the new fields
![]() Note: It is not necessary to add these fields as a search-able item. However, if allowing this keeps the packages and DAL objects standard in design, then this can also be done, within the DAL and the packages.
Note: It is not necessary to add these fields as a search-able item. However, if allowing this keeps the packages and DAL objects standard in design, then this can also be done, within the DAL and the packages.
The XML Export of EPOD_JOB records will now look as follows:
   <EPOD_JOB>
     <EPL_SITE_ID></EPL_SITE_ID>
     <EPL_JOB_ID></EPL_JOB_ID>
     <EPL_LOAD_ID></EPL_LOAD_ID>
     <EPL_JOB_TYPE></EPL_JOB_TYPE>
     <EPL_JOB_GROUP></EPL_JOB_GROUP>
     <EPL_JOB_INSTRUCTION></EPL_JOB_INSTRUCTION>
     <EPL_JOB_SIGNATURE></EPL_JOB_SIGNATURE>
     <EPL_REASON_CODE></EPL_REASON_CODE>
     <EPL_LINKED_REASON></EPL_LINKED_REASON>
     <EPL_STATUS></EPL_STATUS>
     <EPL_CUSTOMER_CODE></EPL_CUSTOMER_CODE>
     <EPL_PHOTO_ID></EPL_PHOTO_ID>
     <EPL_PHOTO></EPL_PHOTO>
     <EPL_ENG_SIGNATURE></EPL_ENG_SIGNATURE>
     <EPL_SEQUENCE></EPL_SEQUENCE>
     <EPL_START_PLANNED_DATE></EPL_START_PLANNED_DATE>
     <EPL_START_PLANNED_TIME></EPL_START_PLANNED_TIME>
     <EPL_END_PLANNED_DATE></EPL_END_PLANNED_DATE>
     <EPL_END_PLANNED_TIME></EPL_END_PLANNED_TIME>
     <EPL_START_ACTUAL_DATE></EPL_START_ACTUAL_DATE>
     <EPL_START_ACTUAL_TIME></EPL_START_ACTUAL_TIME>
     <EPL_END_ACTUAL_DATE></EPL_END_ACTUAL_DATE>
     <EPL_END_ACTUAL_TIME></EPL_END_ACTUAL_TIME>
     <EPL_DISTANCE_PLANNED></EPL_DISTANCE_PLANNED>
     <EPL_DISTANCE_ACTUAL></EPL_DISTANCE_ACTUAL>
     <EPL_DRIVING_TIME></EPL_DRIVING_TIME>
     <EPL_CUSTOMER_NAME></EPL_CUSTOMER_NAME>
     <EPL_INVOICED></EPL_INVOICED>
     <EPL_CUST_SIGNATORY></EPL_CUST_SIGNATORY>
     <EPL_JOB_CODE></EPL_JOB_CODE>
     <EPL_CUST_REF></EPL_CUST_REF>
     <EPL_OFFICE_INSTRUCTION></EPL_OFFICE_INSTRUCTION>
     <EPL_SIGNED_UNCHECKED></EPL_SIGNED_UNCHECKED>
     <EPL_SO_NUMBER></EPL_SO_NUMBER>
     <EPL_TNCS></EPL_TNCS>
     <EPL_ORDER_DATE></EPL_ORDER_DATE>
     <EPL_ORDER_TIME></EPL_ORDER_TIME>
     <EPL_SALES_CONTACT></EPL_SALES_CONTACT>
     <EPL_USER_NOTES></EPL_USER_NOTES>
     <EPL_OWNER_NAME></EPL_OWNER_NAME>
     <EPL_SERVICE_LEVEL></EPL_SERVICE_LEVEL>
     <EPL_LAST_CHANGED_DATE></EPL_LAST_CHANGED_DATE>
     <EPL_LAST_CHANGED_TIME></EPL_LAST_CHANGED_TIME>
     <EPL_ARRIVAL_DATE></EPL_ARRIVAL_DATE>
     <EPL_ARRIVAL_TIME></EPL_ARRIVAL_TIME>
     <EPL_XF_VALUES></EPL_XF_VALUES>
     <EPL_EXT_REF></EPL_EXT_REF>
     <EPL_TRAILER_ID></EPL_TRAILER_ID>
     <EPL_PF_DEPOT></EPL_PF_DEPOT>
     <EPL_PF_TRACKING_NO></EPL_PF_TRACKING_NO>
     <EPL_JOB_STATUS></EPL_JOB_STATUS>
     <EPL_UDF_JOBDETS></EPL_UDF_JOBDETS>
     <EPL_LINKED_ID></EPL_LINKED_ID>
     <EPL_ACCOUNT></EPL_ACCOUNT>
     <EPL_LOADING_TYPE></EPL_LOADING_TYPE>
     <EPL_GENERATED></EPL_GENERATED>
     <EPOD_CONTAINERS></EPOD_CONTAINERS>
     <EPOD_SERVICES></EPOD_SERVICES>
   </EPOD_JOB>
Table EPOD_CONTAINER requires the following modification:
- EPL_VALID_DATE - integer(8), NOT NULL DEFAULT 0.
- EPL_VALID_TIME - integer(8), NOT NULL DEFAULT 0.
- EPL_TYPE - nvarchar(2), NOT NULL DEFAULT ' '.
Existing packages will be modified to allow the creating, editing and selecting of the new fields, including but not limited to:
- EPOD_CONTAINER_INSERT
- EPOD_CONTAINER_SELECT
- EPOD_CONTAINER_UPDATE
The existing EPOD_CONTAINER DAL object will be changed to:
- Export the new fields in XML requests
- Read the new fields
![]() Note: It is not necessary to add these fields as search-able items. However, if allowing this keeps the packages and DAL objects standard in design, then this can also be done, within the DAL and the packages.
Note: It is not necessary to add these fields as search-able items. However, if allowing this keeps the packages and DAL objects standard in design, then this can also be done, within the DAL and the packages.
The XML Export of EPOD_CONTAINER records will now look as follows:
   <EPOD_CONTAINER>
     <EPL_SITE_ID></EPL_SITE_ID>
     <EPL_JOB_ID></EPL_JOB_ID>
     <EPL_CONTAINER_ID></EPL_CONTAINER_ID>
     <EPL_SEQUENCE></EPL_SEQUENCE>
     <EPL_CONTAINER_PACKAGE_CODE></EPL_CONTAINER_PACKAGE_CODE>
     <EPL_CONTAINER_PACKAGE_DESC></EPL_CONTAINER_PACKAGE_DESC>
     <EPL_REASON_CODE></EPL_REASON_CODE>
     <EPL_LINKED_REASON></EPL_LINKED_REASON>
     <EPL_STATUS></EPL_STATUS>
     <EPL_PHOTO_ID></EPL_PHOTO_ID>
     <EPL_GROSS_WEIGHT></EPL_GROSS_WEIGHT>
     <EPL_DESCRIPTION_LONG></EPL_DESCRIPTION_LONG>
     <EPL_CODE_1></EPL_CODE_1>
     <EPL_CODE_2></EPL_CODE_2>
     <EPL_CODE_3></EPL_CODE_3>
     <EPL_LAST_CHANGED_DATE></EPL_LAST_CHANGED_DATE>
     <EPL_LAST_CHANGED_TIME></EPL_LAST_CHANGED_TIME>
     <EPL_CUST_COMMENTS></EPL_CUST_COMMENTS>
     <EPL_VALID_DATE></EPL_VALID_DATE>
     <EPL_VALID_TIME></EPL_VALID_TIME>
     <EPL_TYPE></EPL_TYPE>
     <EPOD_PRODUCTS></EPOD_PRODUCTS>
   </EPOD_CONTAINER>
Import/Export Messages
Both the dataservice and PDA web request servers (ePOD_DataService.asmx, ePOD_DataService2.asmx and Calidus_ePOD.asmx) and the AutoExport and AutoImport applications will need to import and export the new EPOD_JOB and EPOD_CONTAINER fields. The messages affected are:
- AutoImport and ePOD_DataService:
- EPOD_XML_IMPORT
- AutoExport:
- EPOD_EXPORT_LOAD
- EPOD_EXPORT_JOB
- ePOD_DataService
- EPOD_EXPORT_LOAD_RESPONSE
- EPOD_EXPORT_JOB_RESPONSE
- Calidus_ePOD (predominantly handled by the DAL changes above):
- JOB_LOCK_RESPONSE
- LOAD_RESPONSE
- AUTO_UPDATE_RESPONSE
![]() Note: EPOD_CONTAINER.EPL_TYPE does not need to be imported - this may only be set by drivers, and therefore needs to be added only to the export function.
Note: EPOD_CONTAINER.EPL_TYPE does not need to be imported - this may only be set by drivers, and therefore needs to be added only to the export function.
![]() Note: All XSDs should be modified to include the new field, along with the standard documentation. This includes but is not limited to:
Note: All XSDs should be modified to include the new field, along with the standard documentation. This includes but is not limited to:
- EPOD_EXPORT_LOAD_RESPONSE.xsd
- XMLUpload.xsd
- EPOD_EXPORT_JOB.xsd
- EPOD_EXPORT_JOB_RESPONSE.xsd
- ePOD_ImportResponce.xsd
The field definitions should be added to the XSDs in the appropriate position as follows:
   <xsd:element name="EPL_LOADING_FLAG" nillable="true" minOccurs="0" maxOccurs="1">
     <xsd:annotation>
       <xsd:documentation>
         Controls whether this job is seen to be a Loading task at a depot (Job Type = "C")
         or unloading at a depot (Job Type = "D"). Values can be "Y" or "N" or "" -
         only "Y" indicates whether the job is a loading/unloading task.
       </xsd:documentation>
     </xsd:annotation>
     <xsd:simpleType>
       <xsd:restriction base="xsd:string">
         <xsd:maxLength value="2" />
       </xsd:restriction>
     </xsd:simpleType>
   </xsd:element>
   <xsd:element name="EPL_GENERATED" nillable="true" minOccurs="0" maxOccurs="1">
     <xsd:annotation>
       <xsd:documentation>
         Indicates whether the job is generated within C-EPOD.
       </xsd:documentation>
     </xsd:annotation>
     <xsd:simpleType>
       <xsd:restriction base="xsd:string">
         <xsd:maxLength value="1" />
       </xsd:restriction>
     </xsd:simpleType>
   </xsd:element>
   <xsd:element name="EPL_VALID_DATE" type="xsd:int" nillable="false" minOccurs="0" maxOccurs="1">
     <xsd:annotation>
       <xsd:documentation>
         The date up until the contents of the package are valid - controls warnings at delivery.
       </xsd:documentation>
     </xsd:annotation>
   </xsd:element>
   <xsd:element name="EPL_VALID_TIME" type="xsd:int" nillable="false" minOccurs="0" maxOccurs="1">
     <xsd:annotation>
       <xsd:documentation>
         The time up until the contents of the package are valid - controls warnings at delivery.
       </xsd:documentation>
     </xsd:annotation>
   </xsd:element>
   <xsd:element name="EPL_TYPE" nillable="true" minOccurs="0" maxOccurs="1">
     <xsd:annotation>
       <xsd:documentation>
         Shows whether this container was Ad Hoc Scanned ("A") or was pre-planned (blank)
       </xsd:documentation>
     </xsd:annotation>
     <xsd:simpleType>
       <xsd:restriction base="xsd:string">
         <xsd:maxLength value="1" />
       </xsd:restriction>
     </xsd:simpleType>
   </xsd:element>
The elements will be added at the following positions:
- In EPOD_JOB as the last elements before EPOD_CONTAINERS.
- In EPOD_CONTAINER as the last elements before EPOD_PRODUCTS.
The PDA web request server (Calidus_ePOD.asmx) will be modified for the handling of:
- Additional containers
- Additional Unplanned Ad Hoc Collections
- Additional depot returns
If any container records are returned from the Client application on a Job Update message that are not found on the database, these messages will be added from the returned detail - no further information can be obtained about them. Note that they will be added with the new field EPL_TYPE set to "A".
When a job is returned from the Client application for a job that does not exist, the jobs will be created. In this case, the new tag EPL_GENERATED will be returned and must also be stored. The message will also include an <ADDITIONAL> tag, containing more information on the job to be created - see the "PDA DAL/Database Changes" section for more information on the fields returned and the format of the EPOD_JOB tag. ![]() Note: The fields shown are the expected fields required to create an unplanned job successfully within the C-EPOD server. However, if more are required, these should be added to this section. In general, fields not sent may be left blank or at their default values.
Note: The fields shown are the expected fields required to create an unplanned job successfully within the C-EPOD server. However, if more are required, these should be added to this section. In general, fields not sent may be left blank or at their default values.
Depot Return jobs will be indicated by the EPL_LOADING_TYPE field being returned with value "U". These jobs should not be created within C-EPOD server.
The PDA web request server (Calidus_ePOD.asmx, both the XML and JSON versions) will be modified to allow for Logon and Logoff messages to be stored on the server.
The LOGON_REQUEST message will be modified to add a new tag UPDATE_REQUIRED, as follows:
<LOGON_REQUEST ID="" ...>
 <EPL_SITE_ID>XXXXXXXXXX</EPL_SITE_ID>
 <EPL_USER_ID>XXXXXXXXXX</EPL_USER_ID>
 <EPL_VEHICLE_ID>XXXXXXXXXX</EPL_VEHICLE_ID>
 <EPL_LAST_UPDATE_DATE_TIME>2011-01-01T09:09:09</EPL_LAST_UPDATE_DATE_TIME>
 <PDA_VERSIONS>
     <EPOD_CLIENT version="" debug="" />
     <EPOD_UPDATER version="" />
 </PDA_VERSIONS>
 <JSONIF>Y</JSONIF>
 <UPDATE_REQUIRED></UPDATE_REQUIRED>
</LOGON_REQUEST>
If the UPDATE_REQUIRED tag is set to "N", the processor should only validate the message for Username, site and password and respond with a standard a LOGON_RESPONSE message but without any standing data details. The message will be logged as normal to the audit table. The user will be marked as using the vehicle indicated on the message. Note that this affects both the XML and JSON LOGON_RESPONSE messages.
A new message handler for VEHICLE_CHANGE_REQUEST messages will be added to the Calidus_ePOD.asmx web service. The message will be received in the following format:
<VEHICLE_CHANGE_REQUEST ID="" ...>
 <EPL_SITE_ID>XXXXXXXXXX</EPL_SITE_ID>
 <EPL_USER_ID>XXXXXXXXXX</EPL_USER_ID>
 <EPL_VEHICLE_ID>XXXXXXXXXX</EPL_VEHICLE_ID>
 <EPL_LAST_UPDATE_DATE_TIME>2011-01-01T09:09:09</EPL_LAST_UPDATE_DATE_TIME>
 <UPDATE_REQUIRED></UPDATE_REQUIRED>
</VEHICLE_CHANGE_REQUEST>
The handler will validate the message for Username, site and password.
The user will be marked as using the vehicle indicated on the message and respond with a VEHICLE_CHANGE_RESPONSE message with a generic format:
<VEHICLE_CHANGE_RESPONSE ID="" ...>
 <RESULT></RESULT>
 <UPDATE_REQUIRED></UPDATE_REQUIRED>
</VEHICLE_CHANGE_RESPONSE>
Note that the UPDATE_REQUIRED tag from the incoming message will be returned.
If any errors are encountered, the message will have a "NAK" RESPONSE and populated ERROR tags. If no error is found, the message should respond with an "ACK" RESPONSE tag only. The message will be logged to the audit table.
A new message handler for LOGOFF_REQUEST messages will be added to the Calidus_ePOD.asmx web service. The message will be received in the following format:
<LOGOFF_REQUEST ID="" ...>
 <EPL_SITE_ID>XXXXXXXXXX</EPL_SITE_ID>
 <EPL_USER_ID>XXXXXXXXXX</EPL_USER_ID>
 <EPL_VEHICLE_ID>XXXXXXXXXX</EPL_VEHICLE_ID>
</LOGOFF_REQUEST>
The handler will validate the message for Username, site and password and respond with a LOGOFF_RESPONSE message in a generic format:
<LOGOFF_RESPONSE ID="" ...>
 <RESULT></RESULT>
</LOGOFF_RESPONSE>
The message will be logged to the audit table.
Admin Changes
The Site maintenance screen (site_header.aspx) will be modified to allow the system to be configured for:
- EPL_NEXT_JOB_FLAG, a checkbox, labelled as "Next Job Automatic", defaulting to 'N' (Disabled).
- EPL_RETURNS_DEPOT_FLAG, a checkbox, labelled as "Generate Depot Returns", defaulting to 'N' (Disabled).
- EPL_SCANNING_FLAG, a checkbox, labelled as "Seamless Scanning", defaulting to 'N' (Disabled).
- EPL_AUTOLOGIN_FLAG, a checkbox, labelled as "Auto-Login", defaulting to 'Y' (Enabled).
- EPL_ADHOC_ANYTIME_CONFIG, a drop-down list, labelled as "Generate Ad Hoc Collection/Config", defaulting to '' (Disabled). This list will be populated from all Job Groups configured for the site, plus a default value "Disabled".
- EPL_AUDIT_LOGIN_FLAG, a checkbox, labelled as "Audit Login", defaulting to 'N' (Disabled).
These configuration fields will be added to the PDA tab of this maintenance screen.
![]() Note: Ensure that the new check-boxes line up with the existing fields.
Note: Ensure that the new check-boxes line up with the existing fields.
The main menu will rename the Reason Codes maintenance screen as 'Codes' on the Maintenance menu.
The Reason Codes maintenance screen (Reason_Code.aspx) will be modified as follows:
- The screen title will be renamed 'Codes'
- When finding and filtering through Type, a new Type will be added to the drop-down list - code 'DU', description 'DU'.
- When adding or editing codes, the Type drop-down list in the pop-up screen will be modified to add the same value as above.
- The grid will be modified to show the new DU type correctly.
- Any labels or informational messages on the screen that say 'Reason Code' will be modified to say only 'Code' instead.
![]() Note: If these drop-down lists have not been modified to use the database-generated values rather than hard-coding them in the screen, then this should be modified for this now.
Note: If these drop-down lists have not been modified to use the database-generated values rather than hard-coding them in the screen, then this should be modified for this now.
The Job screens (Job_Details.aspx) will be modified to recognise that a job is a Loading or Unloading type (i.e. EPL_LOADING_TYPE is "U" or "L"). If this is the case, the Job Type displayed in the grid should be seen as "Collection (Loading)" or "Delivery (Unloading)" as appropriate. This change will not affect the filter when searching, however - the jobs will still be selected as if they are normal collection or delivery jobs. Furthermore, as job may not be created as a Loading or Unloading job within these screens - this type of job may only be generated by the server or client, or sent to C-EPOD from another system (for example, C-TMS in this configuration).
PDA Changes
PDA DAL/Database Changes
Table EPOD_SITE requires the following modifications:
- EPL_NEXT_JOB_FLAG - nvarchar(1), default 'N'.
- EPL_RETURNS_DEPOT_FLAG - nvarchar(1), default 'N'.
- EPL_SCANNING_FLAG - nvarchar(1), default 'N'.
- EPL_AUTOLOGIN_FLAG - nvarchar(1), default 'Y'.
- EPL_ADHOC_ANYTIME_CONFIG - nvarchar(20), default .
- EPL_AUDIT_LOGIN_FLAG - nvarchar(1), default 'N'.
Table EPOD_JOB requires the following modification:
- EPL_LOADING_TYPE - nvarchar(2), DEFAULT ' '.
- EPL_GENERATED - nvarchar(1), DEFAULT ' '.
Table EPOD_CONTAINER requires the following modification:
- EPL_VALID_DATE - integer(8).
- EPL_VALID_TIME - integer(8).
- EPL_TYPE - nvarchar(1), default .
The DAL objects for the tables above must be modified as follows:
- Add these items as parameters to every method definition and SQL parameter that uses the tables, along with all other functions within the DAL js files, dealing with the tables.
- The functions for populating the tables will be modified to ensure that the default values are correctly set for the fields.
The PDA objects affected are:
- PDA_SITE
- PDA_JOB
- PDA_CONTAINER
The XML Export of EPOD_JOB will change to add the new fields EPL_LOADING_TYPE and EPL_GENERATED and the new tag ADDITIONAL. This will be changed in the PDA_JOB DAL object method ToUpdateXElement. The new format will be as follows:
<EPOD_JOB>
  <EPL_SITE_ID></EPL_SITE_ID>
  <EPL_LOAD_ID></EPL_LOAD_ID>
  <EPL_JOB_ID></EPL_JOB_ID>
  <EPL_USER_ID></EPL_USER_ID>
  <EPL_VEHICLE_ID></EPL_VEHICLE_ID>
  <EPL_START_DATE_TIME></EPL_START_DATE_TIME>
  <EPL_ARRIVAL_DATE_TIME></EPL_ARRIVAL_DATE_TIME>
  <EPL_END_DATE_TIME></EPL_END_DATE_TIME>
  <EPL_STATUS></EPL_STATUS>
  <EPL_CONTACT></EPL_CONTACT>
  <EPL_INVOICED></EPL_INVOICED>
  <EPL_SIGNED_UNCHECKED></EPL_SIGNED_UNCHECKED>
  <EPL_USER_NOTES></EPL_USER_NOTES>
  <EPL_TNCS></EPL_TNCS>
  <EPL_AMENDED_FLAG></EPL_AMENDED_FLAG>
  <EPL_JOB_STATUS></EPL_JOB_STATUS>
  <EPL_UDF_JOBDETS></EPL_UDF_JOBDETS>
  <EPL_LINKED_ID></EPL_LINKED_ID>
  <EPL_GENERATED></EPL_GENERATED>
  <CONFIRMATION>
      <EPL_ENG_SIGNATURE></EPL_ENG_SIGNATURE>
      <EPL_JOB_SIGNATURE></EPL_JOB_SIGNATURE>
  </CONFIRMATION>
  <EXCEPTION type="job">
      <EPL_REASON_CODE></EPL_REASON_CODE>
  </EXCEPTION>
  <ADDITIONAL>
      <EPL_JOB_TYPE></EPL_JOB_TYPE>
      <EPL_JOB_GROUP></EPL_JOB_GROUP>
      <EPL_JOB_CODE></EPL_JOB_CODE>
      <EPL_SO_NUMBER</EPL_SO_NUMBER>
      <EPL_CUST_REF></EPL_CUST_REF>
      <EPL_EXT_REF></EPL_EXT_REF>
      <EPL_CUSTOMER_CODE></EPL_CUSTOMER_CODE>
      <EPL_SEQUENCE></EPL_SEQUENCE>
      <EPL_CUSTOMER_NAME></EPL_CUSTOMER_NAME>
      <EPL_ADDRESS_1></EPL_ADDRESS_1>
      <EPL_ADDRESS_2></EPL_ADDRESS_2>
      <EPL_ADDRESS_3></EPL_ADDRESS_3>
      <EPL_ADDRESS_4></EPL_ADDRESS_4>
      <EPL_ADDRESS_5></EPL_ADDRESS_5>
      <EPL_POSTCODE></EPL_POSTCODE>
      <EPL_LOADING_TYPE></EPL_LOADING_TYPE>
  </ADDITIONAL>
  <SERVICES>...</SERVICES>
  <CONTAINERS>...</CONTAINERS>
</EPOD_JOB>
- EPL_GENERATED need not be sent if it is blank.
- The ADDITIONAL tag will not be returned unless the job has been system-generated.
- The fields shown are the expected fields required to create an unplanned job successfully within the C-EPOD server. However, if more are required, these should be added to this section.
The XML Export of EPOD_CONTAINER will change to add the new field EPL_TYPE. This will be changed in the PDA_CONTAINER DAL object method ToUpdateXElement. The new format will be as follows:
<CONTAINER>
  <EPL_CONTAINER_ID></EPL_CONTAINER_ID>
  <EPL_SEQUENCE></EPL_SEQUENCE>
  <EPL_STATUS></EPL_STATUS>
  <EPL_REASON_CODE></EPL_REASON_CODE>
  <EPL_CONTAINER_PACKAGE_CODE></EPL_CONTAINER_PACKAGE_CODE>
  <EPL_CONTAINER_PACKAGE_DESC></EPL_CONTAINER_PACKAGE_DESC>
  <EPL_GROSS_WEIGHT></EPL_GROSS_WEIGHT>
  <EPL_CODE_1></EPL_CODE_1>
  <EPL_CODE_2></EPL_CODE_2>
  <EPL_CODE_3></EPL_CODE_3>
  <EPL_AMENDED_FLAG></EPL_AMENDED_FLAG>
  <EPL_CUST_COMMENTS></EPL_CUST_COMMENTS>
  <EPL_TYPE></EPL_TYPE>
  <PRODUCTS>...</PRODUCTS>
</CONTAINER>
![]() Note: EPL_REASON_CODE and EPL_TYPE need not be sent if they are blank.
Note: EPL_REASON_CODE and EPL_TYPE need not be sent if they are blank.
The existing PDA_CONTAINER DAL function SelectAllContainersForJob will be modified to allow a new parameter, p_blnAdHoc. If not set when the function is called, the function will assume this parameter is false. When selecting data, if this parameter is false, the SQL will select only EPOD_CONTAINER records where EPL_TYPE is not "A". If the parameter is true, the SQL will select only EPOD_CONTAINER records where EPL_TYPE is "A", ordered in descending EPL_SEQUENCE.
General
A specific 'NHSBT' style preference will be added to the application, which will control the following:
- A conversion of all mentions of the work "Container" to "Item". This will affect:
- All messages
- All tab titles
- All labels
- The Job List row layout.
- The Container List row layout.
The details of how this will affect each screen will be laid out in the following sections.
The generic function to translate the job type (i.e. Job Type "C" becomes "Collection", "D" becomes "Delivery") will be modified to allow the Loading Types to be passed to it, so that the function can return the translation "Loading" for Collections jobs with Loading Type "L", and "Unloading" for Delivery jobs with Loading Type "U". The function should ensure that, if it is called without the Loading Type as a parameter, it works as it does now.
The following screens should be modified to call the function with the new parameter:
- Job List
- Job Details
- Collection/Delivery
All other screens can keep the original "Collection/Delivery" labels.
Login
Functionality exists within C-EPOD to automatically log a driver back in to the point where they left the application, after an unplanned closure of the application. It was noted that the NHSBT team do not want this functionality and that it should be capable of being disabled. This will require a modification to the standard functionality of the application. Specifically, the first time the application opens the login screen, the auto-login feature will only be checked if the device improperly logged out (as now) and that the new Site-level configuration flag EPL_AUTOLOGIN_FLAG is enabled. If this flag is not enabled, the autologin feature will not be activated, meaning that no further changes need to be made to the other screens that access this feature.
NHSBT require that both the login and logout messages be stored on the server, for enquiry later. In order to achieve this, the messaging to the server will be modified.
The LOGON_REQUEST message will be modified to add a new UPDATE_REQUIRED tag to the message, in the format shown below:
<LOGON_REQUEST ID="" ...>
 <EPL_SITE_ID>XXXXXXXXXX</EPL_SITE_ID>
 <EPL_USER_ID>XXXXXXXXXX</EPL_USER_ID>
 <EPL_VEHICLE_ID>XXXXXXXXXX</EPL_VEHICLE_ID>
 <EPL_LAST_UPDATE_DATE_TIME>2011-01-01T09:09:09</EPL_LAST_UPDATE_DATE_TIME>
 <PDA_VERSIONS>
     <EPOD_CLIENT version="" debug="" />
     <EPOD_UPDATER version="" />
 </PDA_VERSIONS>
 <JSONIF>Y</JSONIF>
 <UPDATE_REQUIRED></UPDATE_REQUIRED>
</LOGON_REQUEST>
This tag controls whether the server will respond with standing data updates. When logging on, and no internet connection is established, the LOGON_REQUEST message should be written to the message queue for processing. In this case, the UPDATE_REQUIRED tag should be set to "N", informing the server that no standing data updates are necessary. The server will respond with a LOGON_RESPONSE message but without any standing data details. The response handler for this message (ProcessLogonResponse) will check that there are details before attempting to handle them. Note that this affects both the XML and JSON LOGON_RESPONSE messages.
If the message is sent normally as now, the UPDATE_REQUIRED tag may be omitted, or set to "Y", whichever is simpler. In this case, the server will respond with a standard LOGON_RESPONSE message, with all changed standing data.
Whenever the user logs out of the application (for example, here, vehicle checks or the job list screen, by backing out or pressing a dedicated Exit button), the application will now attempt to send a new Logoff message to the server, in the following format:
<LOGOFF_REQUEST ID="" ...>
 <EPL_SITE_ID>XXXXXXXXXX</EPL_SITE_ID>
 <EPL_USER_ID>XXXXXXXXXX</EPL_USER_ID>
 <EPL_VEHICLE_ID>XXXXXXXXXX</EPL_VEHICLE_ID>
</LOGOFF_REQUEST>
Note that the Login screen will only attempt to send a Logoff message if the user has previously logged on - if the device has not stored a current user and vehicle, then this message need not be written.
This will attempt to be sent immediately, waiting for a response. If this fails, or there is no internet connectivity, this should be added to the message queue, and the standard exit functionality called. This will inform the driver that there are messages pending, and can wait until these messages are successfully sent, ensuring the messages are received on the server, for enquiry.
To achieve the above, a new message sender and response processor will be written (LogoffRequest and ProcessLogoffResponse in WebServices) and a new Logoff function in system utilities, to call the existing ExitApp function after the message has been enqueued. This same process will be followed wherever the existing ExitApp function is called.
The Job List screen will be changed to allow the user to request re-login or change vehicle, which will return the user to the login screen.
For re-login, this should act as per the normal login procedure.
For Vehicle Change, the user and password should be disabled for entry, and only the vehicle checked. In this case, an new VEHICLE_CHANGE_REQUEST message will be sent to the server (created in WebServices.js as a new function VehicleChangeRequest) in the following format:
<VEHICLE_CHANGE_REQUEST ID="" ...>
 <EPL_SITE_ID>XXXXXXXXXX</EPL_SITE_ID>
 <EPL_USER_ID>XXXXXXXXXX</EPL_USER_ID>
 <EPL_VEHICLE_ID>XXXXXXXXXX</EPL_VEHICLE_ID>
 <EPL_LAST_UPDATE_DATE_TIME>2011-01-01T09:09:09</EPL_LAST_UPDATE_DATE_TIME>
 <UPDATE_REQUIRED></UPDATE_REQUIRED>
</VEHICLE_CHANGE_REQUEST>
If there is no data connectivity, this message may be queued and be identified that the message requires no update response, just validation of the vehicle passed in and marking the vehicle as in use by that user. To achieve that, the message can have the UPDATE_REQUIRED tag set to "N".
Any errors from this message should be handled (in WebServices.js, adding a call to the generic ProcessUpdateResponse from the ProcessResponse function, for message type "VEHICLE_CHANGE_RESPONSE") - if any are received and the UPDATE_REQUIRED flag is not present or has a value "Y", a generic error "Change Vehicle"/"Error changing vehicle on the server - please check" will be displayed, and an error value returned to the process to stay in the Login screen. If the UPDATE_REQUIRED flag has a value "N", no message need be produced.
In both of these instances (Re-login and Vehicle Change), because the vehicle and user has changed, the device should force a refresh of the load on the device - it does not need to ask the driver whether the active load should be refreshed.
![]() Note: As with the existing logging in process, as the vehicle has changed, the server may return a different load to process that the one that may have been in progress previously. The driver must ensure that they choose the correct vehicle, as this is normal behaviour.
Note: As with the existing logging in process, as the vehicle has changed, the server may return a different load to process that the one that may have been in progress previously. The driver must ensure that they choose the correct vehicle, as this is normal behaviour.
Vehicle Checks
If the driver chooses to exit the system from vehicle checks, the application will send a logout message to the server, as specified earlier.
Job List
Pressing the android device's Menu button will show the existing menu for the application. This will be modified as follows (new items in italics):
- Refresh Load
- Show All/Outstanding Jobs
- Re-logon
- Change Vehicle
- Unplanned Ad Hoc Collection - this should not be added as an option if the site is not configured for unplanned Ad Hoc Collections (i.e. EPL_ADHOC_ANYTIME_CONFIG is blank).
- Audit Activity
- Email Pending Messages
Additionally, all icons on this menu will be removed, as they do not display effectively on ultra-high and low-resolution devices, and some versions of Android.
When Re-logon or Change Vehicle are chosen, the job list screen will exit, to show the existing Login screen. In the case of Change Vehicle, the user and password should be locked. See the Login section for details on how this will react.
The option Unplanned Ad Hoc Collection should perform some validations:
- The last location visited should be checked (by finding the last job completed on this load):
- If a location has not been visited, no ad hoc collection may be completed - the application should issue an error "Ad Hoc Collection"/"No location - no collection can be made".
- If the last visited location was a loading or unloading location, the application should issue an error "Ad Hoc Collection"/"No ad hoc collection at a depot".
- If fine, a new job should be created for this last location visited, copying the details from the last completed job, as follows:
- Copy address and contact details of the last location visited.
- The Job ID and Job Code should be set to the text "AHC", plus the Load ID, plus a unique counter for each Unplanned Ad Hoc Collection created on this load. So, if this was the 5th unplanned collection on Load 1234567890, the Job ID and Job Code should be set to "AHC_1234567890_5".
- All other references should be blank.
- Planned Start and End date and time and Actual Start date and time should be immediately set to now.
- Sequence should be copied.
- The Job Group should be set from the configured job group setting (in the new field EPL_ADHOC_ANYTIME_CONFIG)
- The job should be marked as system generated (through the new flag EPL_GENERATED set to "Y").
This created Ad Hoc Collection job should be immediately started. ![]() Note: Once created, this job will act as all other jobs, in that it will require the job to be completed normally through the collection process, or cancelled if not required.
Note: Once created, this job will act as all other jobs, in that it will require the job to be completed normally through the collection process, or cancelled if not required.
The automatic update and refresh of loads through a timed AutoUpdate process should not delete or remove any of these unplanned Ad Hoc Collection jobs - they should be left on the load, as the server is at this time unaware that these jobs exist.
The applications (C-TMS and C-EPOD) will be configured to consolidate jobs together when they have been planned on the same stop for the same location. In this case, the jobs themselves will be consolidated into a single row on the job list screen:
- Job List
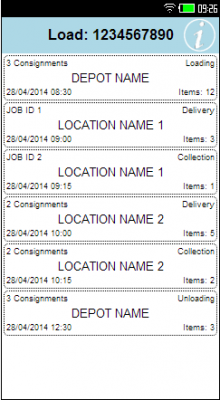
Proposed layout

Current layout


![]() Note: The Job List should be consolidating based on location and Job Type (i.e. collection or delivery), ensuring there is 1 row for any deliveries at the location, and one row for any collections. Furthermore, the jobs on the job list should be sorted by sequence, planned time and then by the job type, as follows:
Note: The Job List should be consolidating based on location and Job Type (i.e. collection or delivery), ensuring there is 1 row for any deliveries at the location, and one row for any collections. Furthermore, the jobs on the job list should be sorted by sequence, planned time and then by the job type, as follows:
- Delivery
- Service
- Collection
Although it is unlikely that the situation would occur that the current sorting of the rows would cause an issue with the NHSBT operation, this sorting mechanism will ensure that this will not be an issue in the future.
When a job is completed, the Job List is returned to by the signature screen or Job Completion process calling back to it. This call-back function must be modified to find the next job in the Job List. If the new EPL_NEXT_JOB_FLAG is enabled, and there is a job (or job consolidation) for the same location, then this job should be started automatically, displaying the Job Details screen for this next series of jobs immediately.
If there is no other job for this location, and the new EPL_ADHOC_ANYTIME_CONFIG is not blank, and the job last completed was a delivery job, and that delivery job was not marked as a loading or unloading job, then the application should immediately display a choice to the driver - "Unplanned Collection"/"Is an unplanned collection required at this location?" with options "Yes" and "No". If "No" is selected, the application will simply display the Job List again. If "Yes" is selected, the application will follow the process as if the Unplanned Ad Hoc Collection menu option was selected.
If the driver chooses to exit the system from the job list screen (using the Android Back button), the application will send a logout message to the server, as specified earlier.
Job Detail
![]() Note: As per standard functionality, the application will display Phone and SMS buttons if the customer contact on the job has a telephone number. If these buttons are not required, then the contact should not be sent through from C-TMS (i.e. not set up against the customer within C-TMS). No changes are necessary to this functionality within the application.
Note: As per standard functionality, the application will display Phone and SMS buttons if the customer contact on the job has a telephone number. If these buttons are not required, then the contact should not be sent through from C-TMS (i.e. not set up against the customer within C-TMS). No changes are necessary to this functionality within the application.
No changes will be made to the layout of the screen from the standard functionality. If consolidated jobs have been selected, the screen can allow more information to be seen, as in the following screenshots:
- Job Details
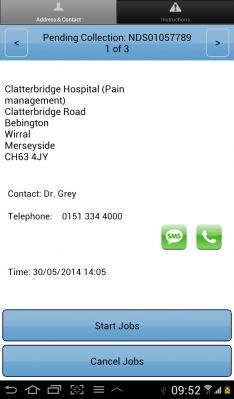
Address and Contact Information
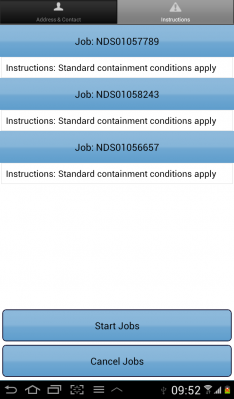
Instructions


Note the job counts and the navigation buttons available to the driver to page through the details of each job, and also the consolidated view of the instructions for each job (if they have any).
On clicking the Start Job button, the application will note whether the job or jobs being started are system-generated (i.e. EPL_GENERATED for the job is "Y"). If this is the case, the application will not send a message to the server to inform it that the job has started or that the job needs updating (a JOB_LOCK message). This is because the server does not yet know of this job. ![]() Note: Any non-system generated jobs as part of a consolidation should have a job lock message sent to the server, to show that they are started.
Note: Any non-system generated jobs as part of a consolidation should have a job lock message sent to the server, to show that they are started.
Collect / Deliver
Note that if the collection or delivery is part of a consolidation, the screen can allow more information to be seen, as in the following screenshots:
- Collect / Deliver Screens when Consolidated
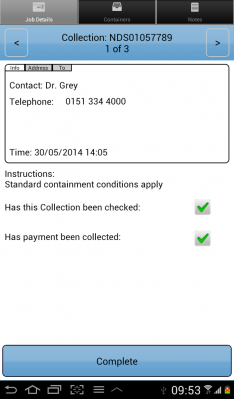
Job Details
Items (Containers)


![]() Note: The existing Items tab is there to show all preadvised items - unplanned collection of items will be shown on a different tab (described later). The Items (Container) tab will only be shown if there are items preadvised for the jobs. If there are none, this tab will not be present.
Note: The existing Items tab is there to show all preadvised items - unplanned collection of items will be shown on a different tab (described later). The Items (Container) tab will only be shown if there are items preadvised for the jobs. If there are none, this tab will not be present.
![]() Note: The Complete button should only appear on the Job Details tab if any of the following conditions are true:
Note: The Complete button should only appear on the Job Details tab if any of the following conditions are true:
- There are no preadvised items to collect or deliver.
- The application is configured for Ad Hoc Collection (EPL_ADHOC_COLLECTION is enabled).
For NHSBT, the items on each job may be repeated, showing that the items for the jobs have been packed together into the same polar box (a reusable asset). The Items (Containers) list will be modified as part of this change to ensure that these reusable assets appear once only in the list.
So, if there are two orders, one packed into asset IDs 00001 and 00002, and the second into asset IDs 00002 and 00003, the application would normally show 4 rows, as follows:
- Item ...00001 for Order1
- Item ...00002 for Order1
- Item ...00002 for Order2
- Item ...00003 for Order2
The application will now show only 3 rows:
- Item ...00001 for Order1
- Item ...00002 for 2 consignments
- Item ...00003 for Order2
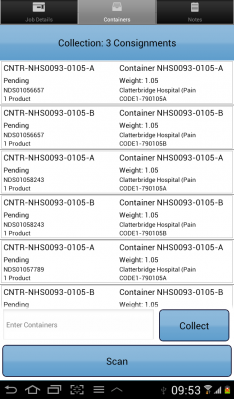
The proposed layout for the items is to show:
- Item/Asset (Container) ID
- Asset Type
- Status
- CODE 1 - a multi-use field. If this is blank in the interface, nothing will be displayed here.
- Job ID - The chosen identifier of the job from which the item came. If this came from multiple jobs, this would show a count of these i.e. "X Consignments".
- Customer Name - the name of the location (hospital or depot).
The expected layout is as follows:
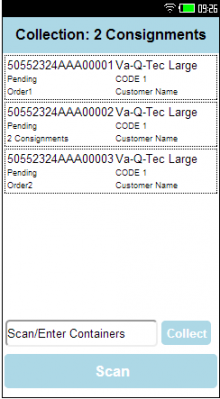
Items (Containers) Proposed Layout

- As part of this change, the existing container tableview and contents should be converted to scrolling views instead.
- The layout of the container rows should be modified so that they can grow or shrink based on content, rather than fixing the height of the row as now. To achieve this, a combination of horizontal and vertical layout schemes with Ti.UI.SIZE properties should be applied to the views and the elements contained therein. These have been prototyped and are available on request.
- Any existing customer-specific layouts should be modified and tested to ensure that they work with the new layout mechanism.
- The consolidation of containers together may be achieved similarly to the consolidation of the Job List.
- With the above in mind, the linking to a container or containers when selecting it (from the table, key entry or scan) should look the container up in the list of containers for the jobs, as in the case of funFindContainer, for example in btnScan's click event. This would require modification to return an array of containers rather than the single container found, as now, as the container may be in multiple Jobs.
- Bearing in mind multi-phase scanning (i.e. scan at truck), the list of containers for each job should show all containers at all times, including any already scanned (status C) or cancelled (status X). When binding or looking up containers on the PDACONTAINERS collections, this should bear in mind the phase of scanning and reject status C or X containers accordingly.
- When marking containers as complete or cancelled, the PDACONTAINER objects in the PDACONTAINERS arrays should be updated directly, rather than retrieving a new object from the database, then updating, then refreshing the PDACONTAINERS lists or PDAJOB objects again. This will result in faster operation, as the Confirm and Cancel methods of the PDACONTAINER objects already refresh their parent object's internal data.
- With this in mind, the refreshing of the container list after marking a container as complete or cancelled should not recreate the entire list, but simply re-bind the data from the existing list.
- The majority of these changes are achieved through changes to the existing BindContainerData function.
![]() Note: As the system is expected to be configured for "Forced Container and Product Entry" (EPL_FORCED_ENTRY enabled), pressing or long-pressing on the grid should not have any options to Collect or Deliver items, although all other options should be present. This constitutes a change to the way that the process works at this time, which simply prevents press and long-press events from showing options. In this case, the options will be shown, minus the Collect/Deliver options.
Note: As the system is expected to be configured for "Forced Container and Product Entry" (EPL_FORCED_ENTRY enabled), pressing or long-pressing on the grid should not have any options to Collect or Deliver items, although all other options should be present. This constitutes a change to the way that the process works at this time, which simply prevents press and long-press events from showing options. In this case, the options will be shown, minus the Collect/Deliver options.
The Info option from this drop-down menu shows details of the selected item on a pop-up screen. Amongst other items, for consolidations, the screen displays:
- Job Identifier - An identifier for the job, configured through the Admin system flag "Display Job As" (EPL_PDA_DIS_JOB_CODE displayed as EPL_JOB_DISP_ID).
- Customer Name - Location Name from the Job.
In the case where the container is consolidated on the list, this screen should show a list of all the jobs and locations in sequence. This pop-up screen will allow the user to scroll to see all of the data if this exceeds the available space.
For the NHSBT style only, long-pressing on an item in the table for consolidated jobs will not offer the option to deconsolidate that item from the collection or delivery, as the items are expected to be packed together and therefore cannot be split.
The process supports the scanning of the barcode of the items preadvised to be collected, either through an attached external barcode scanner (through additional software and hardware purchases) or an internal laser scanner – this is entered through the Enter Container text box and Collect/Deliver button provided, or using the device's camera to scan within the application, using the Scan button provided. In both cases, the scanning of the items should validate the data.
When entering item IDs through the text box, the whole asset ID must be entered, including any leading application identifiers. Through training, the driver must be informed to not enter the parentheses - if entered, the ID will not be recognised. When the Collect/Deliver button is pressed, the following will checked, if the application is configured for style NHSBT:
- The leading 2 character will be extracted and checked.
- If '00', the remaining text in the ID will be checked - if this is numeric only and 18 digits, then this will be accepted as a single trip Asset ID. If not, the Item will be rejected.
- If '80', the next 2 characters will be extracted and checked - if this is '04, and the remaining length in the ID is 14 characters, then this will be accepted as Permanent Asset ID. If not, the item will be rejected.
- If none of the above, the item will be rejected.
The rejection message will be "Item is in invalid format - rejected".
It is expected that the configuration on the device ("Scan Errors Intrusive" not enabled on flag EPL_SCAN_ERRORS) will be such that the message will not interrupt the driver or require them to clear the error - the message will simply appear on the bottom of the device, then clear after a few seconds. However, if this is enabled, then the message will default to an alert. This will stop the scanning process and display an alert that requires acceptance before continuing.
When entering items through the Scan button, the application will configure and display a scanning reticule using the device camera. The configuration for this will be modified so that the barcode scanner screen will accept only barcode type CODE 128. This configuration will be applied as part of the NHSBT style.
The system styles may be used to complete this configuration. Create generic styles for barcode scanning, namely:
- barcodeConfig
- barcodeConfigContainer
- barcodeConfigProduct
All should generically be empty objects.
Style-specific version of these class configuration objects may then be added to the customer-specific section of the configItems object, to add in the configuration, in this case:
barcodeConfigContainer : {
    acceptedFormats: [7]
}
7 is the Ti.barcode declared value of the constant FORMAT_CODE_128.
The barcode object's scan method in Barcode.js will then require modification to allow a style to be passed, and to merge that style into the object, using the standard style object methods.
The call to the scan method in the containers and products tabs in this screen will be modified to pass in the style object to configure the scan, i.e.
Ti.App.Barcode.Scan('barcodeConfigContainer');
Note that this will also affect Services code, therefore similar configurations should be created for any uses of the Barcode.Scan method in the services code.
![]() Note: When entering barcodes using a wedge or integrated scanner, rather than the application scanner, the application has no direct control over the wedge scanner, so it is not possible to limit the wedge scanner in terms of which barcodes it is allowed to scan. If this is required, it requires device-specific configuration of the scanner and further bespoke code written within the application. As wedge scanners have not at this time been confirmed, this is not part of the scope of this change.
Note: When entering barcodes using a wedge or integrated scanner, rather than the application scanner, the application has no direct control over the wedge scanner, so it is not possible to limit the wedge scanner in terms of which barcodes it is allowed to scan. If this is required, it requires device-specific configuration of the scanner and further bespoke code written within the application. As wedge scanners have not at this time been confirmed, this is not part of the scope of this change.
Scanning through the Scan button will validate the scanned IDs is exactly the same way as they are when entered through the Enter Container text box and Collect/Deliver button.
Scanning through the Scan button will be modified to allow continuous scanning (i.e. not returning to application between scans were possible). This configuration is controlled by the new flag EPL_SCANNING_FLAG. This is to ensure the fasting scanning possible through the application and the device's camera.
The changes that will be made generically to achieve this are:
- The overlay/scanning window size should be maximised for the device, to ensure that larger barcodes may be scanned more easily.
- Items scanned successfully should be immediately marked as collected or delivered without requesting a pop-up dialogue confirmation.
If the new flag is configured, the following will also be enabled:
- Unknown items will be identified with a message, but scanning will be allowed to continue without interruption.
Scanning may be interrupted for the following reasons:
- When scanning preadvised items at collection and delivery, and all items have been found.
- When ad hoc scanning an unadvised item, that requires Location or Asset Type entry (see the Ad Hoc Collection section)
- When a critical scanning alert is encountered while scanning, that requires the user to accept a message.
Note that Critical scanning dialogues do not include scanning an incorrect format barcode (i.e. the wrong type, the wrong length, not numeric, etc.) - these messages will be displayed but will not cause an alert box to be shown. Additionally, scanning an item again that has already been successfully scanned before will display a transient message but will not interrupt the scanning.
- The barcode object's Scan method will be again modified to check the value of this flag. If enabled, this will set a flag against the object (to declare that continuous scanning has been enabled) and set configure the scanner with the 'keepOpen' object property set to 'true'. A Stop method will also be created to cancel continuous barcode scanning (by calling the barcode object's cancel() method. This new Stop method must be used whenever the application wishes to close the scanning reticule, at the times shown above.
- The code for this already prototyped and can be provided on request.
- When the application is set up for intrusive scan errors, only Scanning an item ID that does not exist for the job should be seen to be intrusive. All other errors should be audible, vibrate the device and display a transient message, but should not display and blocking alert dialogue box.
When all preadvised items have been scanned as collected/delivered (or marked as cancelled), the application currently recognises this and automatically moves on to the Job Completion stage. This will not occur if this is a collection job, and the application has been configured for Ad Hoc Collection (EPL_ADHOC_COLLECTION). In this case, the device will simply display the empty items list (as there are no more items to scan) and wait, as there may be unplanned items to scan as part of the Ad Hoc Collection process (in the next section).
Ad Hoc Collection Tab
The Ad Hoc Collection process allows the driver to specify the items collected, at the point of collection, without the specific items for those collections being planned in advance. This appears as a separate tab on the PDA within the Collections process, labelled as "Ad Hoc" when this feature is enabled (through the flag EPL_ADHOC_COLLECTION for Collection-type jobs only). This tab will be to the right of the existing Containers and Products tabs, but before the Notes tab.
The layout of the tab will be almost identical to the existing Items (Containers) tab. The following are sample screen layouts for the features of the tab.
- Ad Hoc Collection Prototype Screen-shots
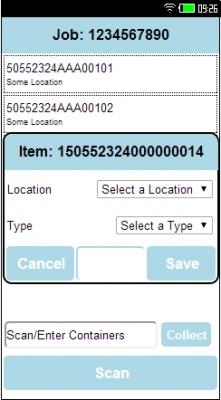
Unplanned item details
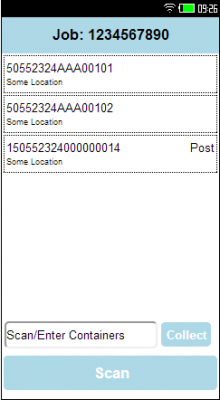
Ad Hoc item list


The tab will allow items to be entered in exactly the same way as the Items (Containers) tab:
- Through a "Scan Container" text box and Collect button.
- Through the use of the built in Camera Scanner feature, through the Scan button.
Note that there is no method of entry through the table (i.e. pressing or long-pressing on the table row will show no Collect option).
This table of items on the screen will start empty - as items are scanned, these will be added to the table. ![]() Note: Developer Note: The table should be built to the same scrolling view mechanism as the Items (Container) table on that tab.
Note: Developer Note: The table should be built to the same scrolling view mechanism as the Items (Container) table on that tab.
Like the Items (Containers) tab, this tab will only allow asset formats to be scanned in the formats detailed in the Scanning section - any invalid formats will be discarded with a transient message displayed on the screen.
The tab will check whether the scanned item is an item that has been preadvised for the job. If so, and the item has already been confirmed as received, a transient message will inform the driver "This item already scanned". If this preadvised item has not yet been scanned for collection, the tab will interrupt the scanning (if continuous scanning is enabled) and will display an alert "Ad Hoc Collection"/"Preadvised items must be scanned on the Items tab". If this preadvised item has been marked as cancelled on the preadvised list, the tab will interrupt the scanning (if continuous scanning is enabled) and will display an alert "Ad Hoc Collection"/"Preadvised item has been cancelled and cannot be collected.".
The tab will check whether the scanned item has already been scanned by the Ad Hoc Collection process. If so, a transient message will inform the driver "This item already scanned".
The different types of Asset will be dealt with differently:
- Fixed (Permanent) Assets IDs will always be associated with a particular Asset Type in C-TMS, so the application will not require the driver to confirm the Asset Type for a Fixed Asset. These will simply be added directly to the table.
- Single Trip Assets must have an asset type entered.
Additionally, the application will check to see if this collection is part of a consolidation (multiple collection jobs) with multiple delivery destinations, by checking for the planned linked delivery job (the job with the same EPL_JOB_CODE value). If the Customer Codes found are different (and not linked together by C-TMS's EPL_LINKED_ID on the delivery jobs), then the driver must be prompted to enter a destination location
After these checks are made on a scanned Item ID, and further entry is required, the application will stop the scanning process (if continuous scanning is in use) and display a pop-up data entry screen. This will have the following fields:
- Header label, showing the scanned Item ID.
- Location label and drop-down list. These will only be shown if there are multiple destination locations that are not linked. If this is the case, the locations will be listed in a drop-down list (showing EPL_CUSTOMER_NAME), forcing the driver to select one. The default entry on the drop-down list will be "Select a Location".
- Type label and drop-down list. These will only be shown if the item scanned is a single-trip format Item ID. If this is the case, all DUs (Asset Types) will be displayed in a drop-down list, forcing the driver to select one. The default entry on the drop-down list will be "Select a Type". The list will be built from all DU-type codes on the Reason Codes table (EPL_DESCRIPTION from EPOD_REASON_CODE where EPL_REASON_TYPE = "DU").
- A Cancel button. When pressed, this closes the pop-up data entry screen. The scanned ID will be discarded and not added to the Ad Hoc Items list.
- A Save button. When pressed, this button will validate that all required data is entered. If not, the screen will display a pop-up alert showing the item that has not been entered ("Ad Hoc Additional Details"/"You must select a (Field)", where (Field) is replaced with the data type that has not been entered, i.e. "Type" or "Location"). When this alert is cleared, the user will be returned to the pop-up entry screen. If there are no errors found when clicking the Save button, the pop-up data entry screen will be closed and the item will be added to the Ad Hoc Items list.
If items have been scanned and need to be added to the list, they will be added as a new row on the EPOD_CONTAINER table, as follows:
- EPL_JOB_ID - This will be from the job being scanned. If there are consolidated jobs with the same (or linked) destinations, this will be the Job ID of the first job. If there are consolidated jobs with different destinations, this will be the Job ID of the job with the destination as selected by the driver in the pop-up details entry screen.
- EPL_CONTAINER_ID - As scanned, minus the leading barcode application identifiers ("00" or "8004")
- EPL_CONTAINER_PACKAGE_CODE - If this is a permanent Asset barcode ("8004"), this will be left blank. If not, this will be the code of the asset type selected by the driver in the pop-up details entry screen (EPL_REASON_CODE).
- EPL_CONTAINER_PACKAGE_DESC - If this is a permanent Asset barcode ("8004"), this will be left blank. If not, this will be the description of the asset type selected by the driver in the pop-up details entry screen (EPL_DESCRIPTION).
- EPL_STATUS - "C"
- EPL_TYPE - "A", to indicate that this is an Ad Hoc Collection
- EPL_SEQUENCE - Set as 3-digit numeric counting from 001, incrementing with each item added to this screen.
All other items will be blank or added as normal.
These records will be added as a new row at the top of the list, by retrieving all records in reverse sequence order (through the PDA_CONTAINER DAL function SelectAllContainersForJob with parameter p_blnAdHoc set to true). This will return only scanned Ad Hoc items, in reverse sequence. The details displayed will differ, depending on the information collected:
- Item ID - EPL_CONTAINER_ID
- Type - EPL_CONTAINER_PACKAGE_DESC
- Location - EPL_CUSTOMER_NAME of EPOD_JOB
Pressing or long-pressing on an item in this Ad Hoc table will allow the driver to remove an item from the collection. The application will display a pop-up alert "Ad Hoc Collection"/"Do you want to remove this item?" with options "Yes" and "No". Choosing "No" will leave the item on the list. Choosing "Yes" will delete the item from the scanned containers and refresh the list without this item.
A Complete button should be available on the Job Details tab, to allow the users to manually indicate that all items have now been collected. Clicking this will instigate the Job Completion stage. If at this time no items have been scanned as part of the Ad Hoc Scanning tab for this collection (and Ad Hoc Collection is enabled), a pop-up alert will be displayed, showing "Unplanned Items"/"Please confirm that there are no unplanned items to scan", with options "Confirm" and "Cancel". Choosing "Confirm" will move on to Job Completion, whereas "Cancel" will return to the Collection process and activate the Ad Hoc scanning tab.
Job Confirmation
![]() Note: Regardless of whether any signatures are required for this job, this section covers all the functionality required within the processing of completing a job.
Note: Regardless of whether any signatures are required for this job, this section covers all the functionality required within the processing of completing a job.
For delivery jobs, the user will be required to obtain a signature (by the configuration on the job) and therefore this screen will be shown.
As this screen is displayed, the screen will check on all the preadvised items delivered to this location, to ensure that the items have not been out of cold storage too long. This will be achieved by comparing the Valid date and time (EPL_VALID_DATE/TIME) of each container scanned for each job being confirmed (as this may be a number of consolidated jobs being checked) against the actual time.
If the current time is greater than the valid time against an item (where populated), the item will be updated with Clause text "Issue life exceeded - product must be checked".
If the current time is greater than the valid time against any item (where populated), an alert will be displayed to the driver "Item Validation"/"Issue life exceeded on some items. Please see the detail of the items affected below".
The items delivered are displayed on an Items (Container) tab on this screen. Each item claused in this way will be shown with a status of "Claused", text colour orange.
The population of this list must change if there are consolidated jobs being completed here. In the same way as the Items (Containers) list in the Collection process, if containers have the same ID, they should be listed once only here. If an item is clicked on in this grid, this will show a pop-up screen to allow for Cause text to be entered - in the case where the item clicked on is a consolidated item, the pop-up screen will display all of the jobs that the item has product for, much like the Info pop-up in the Collection process:
- Job Identifier - An identifier for the job, configured through the Admin system flag "Display Job As" (EPL_PDA_DIS_JOB_CODE displayed as EPL_JOB_DISP_ID).
- Customer Name - Location Name from the Job.
When updating from this Clause pop-up screen, any text entered against an item will saved against all jobs for which this item has contents.
For collection jobs, they will be configured to not require a signature, so this screen will not be displayed.
Regardless of the type of job, the process will then confirm the job as completed, which will require several more actions to be checked and completed.
Current functionality is as follows (if the flag EPL_LINKED_C_D is enabled):
- For collections, find the linked job if present and cancel any containers on the delivery that were not collected, with the same reason code.
- For cancelled collections, find the linked job if present and cancel it, with the same reason code.
This will be modified for planned collections with ad hoc scanned containers on it:
- Find the linked job if present) and add any ad hoc scanned containers to it. If one is not found, this does not need to be added at all.
If the new EPL_RETURNS_DEPOT_FLAG is enabled:
- For deliveries with cancelled items on it, search for a system-generated Unloading job following this one with a Job ID of "UNL_", plus the Load ID. If one is not found, find a job following this one, marked as an Unloading job, to find the return location and create one (with the ID as specified above) and link this to the other unloading jobs (through the EPL_LINKED_ID). Add any cancelled containers from this delivery to that unloading job. If no containers are cancelled or an unload job is not found, this does not need to be added at all.
- For cancelled deliveries, find or create an Unloading as above, and add all the containers from that cancelled delivery job on it. If an unload job is not found, this does not need to be added at all.
- For new Ad Hoc Collections (i.e. created in response to the driver requesting them from the menu, or confirming that one is required from the prompt when completing other jobs), add a job to the next following Unloading location, with the same details of the job, with a new generated Job ID but the same Job Code and other references. Link this to the existing unloading tasks. Note: If no following unloading task is found following the unplanned Ad Hoc Collection at all, one does not need to be added.
Jobs created in this way will be marked as system-generated (by setting the new flag EPL_GENERATED to "Y"). This will allow the server (and eventually C-TMS) to be aware that these jobs were system-generated and may not have concomitant jobs on their databases. They must also be marked as Unloading tasks (by setting the new flag EPL_LOADING_TYPE to "U"). All other configuration for the jobs should be copied from the found existing unload job at that location (for example, Job Group). All reference data on the generated jobs will be copied from the job that created it (for example, EPL_JOB_CODE, EPL_SO_REF, etc.).
Once this creation and amendment of jobs is completed, the completed job should be sent back to the C-EPOD server through the standard message queuing processes, exporting the messages in the format as specified earlier in the document.
![]() Note: System generated Unload jobs (for return of undelivered items to the depot, generated with a code of "UNL" above) should not be returned to the server for updating. These jobs are created simply to allow the device to scan the items off the vehicle upon return and have no bearing in terms of track and trace. These jobs should be marked in such a way that they can be ignored when completed and messages are being created to be sent back to the server.
Note: System generated Unload jobs (for return of undelivered items to the depot, generated with a code of "UNL" above) should not be returned to the server for updating. These jobs are created simply to allow the device to scan the items off the vehicle upon return and have no bearing in terms of track and trace. These jobs should be marked in such a way that they can be ignored when completed and messages are being created to be sent back to the server.
Appendix A: TEST PLAN
| Test Script / Scenario Reference | C-EPOD Collection Changes | Call Number(s): 317761 SCR15 |
| Test Script / Scenario Description | Test the C-EPOD changes made for NHSBT. | PASS / ISSUES / FAIL |
| Menu Access | None | |
| Pre-requisites | Data set up as per Data Setup section; Note that individual setup information is provided for each test area. | Tested By: |
| Test Objective | To test that: Jobs are imported with new fields; Admin can view this information and maintain configuration for the changes; the EPOD Client application can perform Loading, Unloading and Ad Hoc collections, can scan continuously, validate scanned items and generate jobs for collections and for the return of items to depots; information is returned to the server and on to C-TMS. | Date: |
| Step | Action | Result | Remarks | P/F |
| 1 | Import Tests | |||
| Ensure that C_TMS changes have been completed and the system is configured correctly to connect to C-EPOD. | ||||
| 1.01 | Trigger the send of Loads and Jobs to C-EPOD from within C-TMS, including all new fields (EPL_LOADING_TYPE on EPOD_JOB and EPL_VALID_DATE and EPL_VALID_TIME on EPOD_CONTAINER). The jobs should include Loading and Unloading tasks, with collections and deliveries scheduled for the same locations, across multiple stops. | Jobs and loads should be written to the database as expected. The load should be allocated to the driver and vehicle. Loading and Unloading jobs should be marked as such by the new data. Containers should have a valid date and time associated against them, for product validation purposes. |
| Step | Action | Result | Remarks | P/F |
| 2 | Admin Tests | |||
| 2.01 | Log in to the Admin system. Check the main menu. | The Maintenance menu should show "Codes" rather than "Reason Codes". | ||
| 2.02 | Enter the Site Maintenance screen. Ensure the new fields are present and can be set and maintained. | New fields can be set, changed and saved:
|
||
| 2.03 | Enter the Codes Maintenance screen. Ensure that codes of type "DU" may be created, found, amended and deleted. | As follows:
|
||
| 2.04 | Enter the Job Details screen. Find all the jobs for a Load created from the import. | Loading jobs are shown and "Collection (Loading)". Unloading jobs are shown as "Delivery (Unloading)" | ||
| 2.05 | Search for only Delivery jobs on that load. | Delivery and Unloading jobs are shown. | ||
| 2.06 | Search for only Collection jobs on that load. | Collection and Loading jobs are shown. |
| Step | Action | Result | Remarks | P/F |
| 3 | PDA Login Tests | |||
| Ensure that the system is configured as in the Data Setup section of this document | ||||
| 3.01 | Start application. At the login screen, immediately exit. | No LOGOFF_REQUEST message should be written in the User Tracking. | ||
| 3.02 | Start application. Log in to the system. | A LOGON_REQUEST message should be written in the User Tracking. | ||
| 3.03 | At Vehicle Checks, exit the system. | A LOGOFF_REQUEST message should be written in the User Tracking. | ||
| 3.04 | Start the application and log in. Complete vehicle checks. From the Job List, exit the system. | A LOGOFF_REQUEST message should be written in the User Tracking. | ||
| 3.05 | Start the application and log in. From the Job List, hit the Menu button. | The menu should be shown with the new options on it. No icons should be displayed. | ||
| 3.06 | Choose Re-logon. | The application should return to the login screen. | ||
| 3.07 | Exit the system. | A LOGOFF_REQUEST message should be written in the User Tracking. | ||
| 3.08 | Start the application and log in. From the Job List, hit the Menu button and choose Re-logon. Log in to the application. | A LOGON_REQUEST message should be written in the User Tracking. | ||
| 3.09 | From the Job List, hit the Menu button and choose Change Vehicle. | The application should return to the login screen. User and Password should be disabled. | ||
| 3.10 | Change the vehicle and log in. | The application should return to the job list. A VEHICLE_CHANGE_REQUEST message should be written in the User Tracking. The VEHICLE_CHANGE_REQUEST message may have requested no update required. A VEHICLE_CHANGE_RESPONSE message should be returned. | ||
| 3.11 | Use the device's task switcher to kill the application. Start the application again. | The application should not immediately resume to the Job List page, but ask for login details again. | ||
| 3.12 | Exit the application. Disable any network connection on the device. Re-start the application and log in. Enable the data connection on the device. | The stored LOGON_REQUEST message should be written in the User Tracking. The LOGON_REQUEST message should have requested no update required, and the LOGON_RESPONSE message should be returned with no standing data details. |
| Step | Action | Result | Remarks | P/F |
| 4 | PDA Completing Planned Jobs | |||
The load that must be set up to follow these tests is as follows:
|
||||
| 4.01 | Log in to the application and pick up the load. | The 'Job List' is displayed:
|
||
| 4.02 | Choose any job other than the first. When 'Job Details' is displayed, attempt to start the job. | An error message should be displayed, to prevent starting a job out of sequence. | ||
| 4.03 | Return to the job list and select the Loading job. | 'Job Details' is displayed:
|
||
| 4.04 | Click Start Job. | The device checks for any changes to the jobs. When checked, the 'Collection' screen is displayed:
|
||
| 4.05 | Click the Complete button. | An error should be displayed showing that there are still items awaiting scanning. | ||
| 4.06 | Switch to the Items tab | The Items list is displayed:
|
||
| 4.07 | Using the provided text box, enter "invalid". Click Collect. | A transient error should be displayed, showing that the format is invalid. | ||
| 4.08 | Enter "8004invalid". Click Collect. | A transient error should be displayed, showing that the format is invalid. | ||
| 4.09 | Enter "800400000000AAA00000". Click Collect. | A transient error should be displayed, showing that the item is not for this job. | ||
| 4.10 | Enter "00invalidlength". Click Collect. | A transient error should be displayed, showing that the format is invalid. | ||
| 4.11 | Enter "00invalidformat00000". Click Collect. | A transient error should be displayed, showing that the format is invalid. | ||
| 4.12 | Enter "00123456789012345678". Click Collect. | A transient error should be displayed, showing that the item is not for this job. | ||
| 4.13 | Enter an unconsolidated item on this job (preceded by the correct AI, assuming 8004 for permanent assets and 00 for single trip assets). | The item should be removed from the list. A transient message should be displayed, showing that the item has been collected. | ||
| 4.14 | Click on a single item in the list. | An options pop-up should display - no Collect or Deconsolidate option should be on the list. | ||
| 4.15 | Select Info. | A pop-up information screen should be shown, with details about the item. The job for the item is shown. | ||
| 4.16 | Return from the Info pop-up and click a consolidated item in the list and choose Info. | A pop-up information screen should be shown, with details about the item. The jobs that have product in that item are shown. | ||
| 4.17 | Return from the Info pop-up. Press the Scan button. | A Scan reticule should be displayed, allowing barcodes to be scanned. | ||
| 4.18 | Repeat the item tests for invalid formats and items above ("invalid", "8004invalid", "800400000000AAA00000", "00invalidlength", "00invalidformat00000", "00123456789012345678") | Each time these items are scanned, a transient error should display, as previously. The Scan reticule should stay open. | ||
| 4.19 | Scan an invalid barcode type (for example, a CODE 39 or EAN-8 or EAN-13 barcode). | A transient error should display, showing that the format is invalid. The Scan reticule should stay open. | ||
| 4.20 | Scan a valid unconsolidated item. | A transient message should be displayed, showing that the item has been collected. The Scan reticule should stay open. | ||
| 4.21 | Scan a valid consolidated item. | A transient message should be displayed, showing that the item has been collected. The Scan reticule should stay open. | ||
| 4.22 | Close the Scan reticule. | The Items list should be displayed again. The 2 items scanned should be removed from the list. | ||
| 4.23 | Click the Scan button and scan all planned items. | The Scan reticule should close and the user returned to the Items list. All items should be gone from the list. | ||
| 4.24 | Move to the Job Details tab and press the Complete button. | A pop-up should ask whether any unplanned items are required. | ||
| 4.25 | Press "Yes". | The pop-up should clear and the Ad Hoc tab shown. | ||
| 4.26 | Move to the Job Details tab and press the Complete button. At the pop-up request, say "No". | A transient message should display that the job is complete. The Job List should be redisplayed. The Loading task will be removed from the list. The jobs will be completed in Admin. | ||
| 4.27 | Choose the Delivery at the first location. | 'Job Details' is displayed:
|
||
| 4.28 | Click Start Job. | The device checks for any changes to the job. When checked, the 'Delivery' screen is displayed:
|
||
| 4.29 | Switch to the Items tab | The Items list is displayed:
|
||
| 4.30 | Repeat the invalid format text entry and scan tests from above. | As Above | ||
| 4.31 | Scan or enter all items on the job. | The Scan reticule should close. The 'Signature' screen is displayed:
|
||
| 4.32 | Click on the Items tab. | A list of all delivered items is shown. | ||
| 4.33 | Click on any of the items. | A pop-up Clause window is displayed, showing the item details and the job. | ||
| 4.34 | Enter some clause information and click Save. | The 'Signature' screen is displayed again, showing the item selected as claused. | ||
| 4.35 | Complete the signature and enter the signatory. Click Done. | A transient message should display that the job is complete. The job will be completed in Admin.
The Delivery task will be removed from the Job List. The 'Job Details' screen is displayed for the Collection at that location:
|
||
| 4.36 | Click Start Job. | The device checks for any changes to the jobs. When checked, the 'Collection' screen is displayed:
|
||
| 4.37 | On the Items tab, click on any item and choose Cancel. | An 'Exception' screen is shown. | ||
| 4.38 | Select a reason for cancelling and confirm this with the OK button. | A transient message will show that the item has been cancelled. The Item tab will be shown, with the item removed from the Item list. | ||
| 4.39 | Complete scanning all other items here and complete the job with the Complete button. |
A transient message should display that the job is complete. The Job List should be redisplayed. The Delivery and Collection tasks for Location 1 will be removed from the list. The job will be completed in Admin. The Unloading job back at the depot should show 1 less item to be unloaded. | ||
| 4.40 | Select the Delivery job at Location 2. | 'Job Details' is displayed:
|
||
| 4.41 | Click Start Job. | The device checks for any changes to the jobs. When checked, the 'Delivery' screen is displayed:
|
||
| 4.42 | On the Items tab, cancel 1 consolidated and 1 single item (not the ones outside of issue life) and confirm the exceptions with reason codes. Scan or enter all other items. | The 'Signature' screen is displayed:
|
||
| 4.43 | Click on the Claused consolidated item (out of issue life). | A pop-up Clause window is displayed, showing the item details and the jobs that have product in the Asset. The Clause text is pre-set to show that the issue life is exceeded. | ||
| 4.44 | Exit the Claused window. Click on the other consolidated item. Enter some clause information and click Save. | The 'Signature' screen is displayed again, showing the item selected as claused. The item is updated on both orders. ( |
||
| 4.45 | Complete the signature and enter the signatory. Click Done. | A transient message should display that the job is complete. The job will be completed in Admin.
The Delivery task will be removed from the Job List. The 'Job Details' screen is displayed for the Collection at that location:
|
||
| 4.46 | Click Start Job. | The device checks for any changes to the jobs. When checked, the 'Collection' screen is displayed:
|
||
| 4.47 | On the Items tab, cancel 1 consolidated item and confirm the exceptions with reason codes. Scan or enter all other items. Click the Completed button and complete the job as-is. | A transient message should display that the job is complete. The Job List should be redisplayed. The Delivery and Collection tasks for Location 2 will be removed from the list. The jobs will be completed in Admin. The Unloading job back at the depot should show 1 more item to be unloaded (1 item not collected, 2 items not delivered), and one more consignment (the generic unload job for the undelivered items). | ||
| 4.48 | Select the Delivery job at Location 3. Start the job. Scan all items. Complete the signature. | A transient message should display that the job is complete. The job will be completed in Admin.
The Delivery task will be removed from the Job List. The application will prompt whether an unplanned collection is required at this location. |
||
| 4.49 | Click "No". | The Job List will be displayed. | ||
| 4.50 | Select the Collection job at Location 4. Click the Cancel button. | The Exceptions screen will be displayed. | ||
| 4.51 | Choose a reason code and confirm the cancellation with the OK button. | A transient message will show that the job has been cancelled. The job will be cancelled in Admin.
The Collection task will be removed from the Job List. The Job List will be displayed. The Unloading job back at the depot should show as many less items to be unloaded as there were items on the cancelled collection. There should be one less consignment to be unloaded. |
||
| 4.52 | Start the job. Scan all items. Complete the job. | A transient message should display that the job is complete. The job will be completed in Admin.
The Collection task will be removed from the Job List. The Job List will be displayed. |
||
| 4.53 | Select the Delivery job at Location 3. Click the Cancel button. | The Exceptions screen will be displayed. | ||
| 4.54 | Choose a reason code and confirm the cancellation with the OK button. | A transient message will show that the job has been cancelled. The job will be cancelled in Admin.
The Delivery task will be removed from the Job List. The application will prompt whether an unplanned collection is required at this location. |
||
| 4.55 | Click "No". | The Job List will be displayed. The Unloading job back at the depot should show as many more items to be unloaded as there were items on the cancelled delivery. | ||
| 4.56 | Select the Unloading job back at the depot. | 'Job Details' is displayed:
|
||
| 4.57 | Click Start Job. | The device checks for any changes to the all jobs except system-generated unloading jobs (the generic Depot Return unloading job and Unplanned Ad Hoc deliveries to depot). When checked, the 'Delivery' screen is displayed:
|
||
| 4.58 | Scan all items. Complete the signature. | A transient message should display that the job is complete. The jobs will be completed in Admin.
The Unloading task will be removed from the Job List. The application will show that there is no more work. |
| Step | Action | Result | Remarks | P/F |
| 5 | PDA Ad Hoc Collections - planned and unplanned. | |||
The load that must be set up to follow these tests is as follows:
|
||||
| 5.01 | Log in to the application and pick up the load. | The 'Job List' is displayed:
|
||
| 5.02 | Press the Menu button and choose Unplanned Ad Hoc Collection from the menu. | An error will be displayed, saying that an Ad Hoc collection can't be done here. | ||
| 5.03 | Select the Loading job. | 'Job Details' is displayed:
|
||
| 5.04 | Click Start Job. | The device checks for any changes to the jobs. When checked, the 'Collection' screen is displayed:
|
||
| 5.05 | Click the Complete button. | An error should be displayed showing that there are still items awaiting scanning. | ||
| 5.06 | Switch to the Items tab. Cancel one of the items and confirm the exception with a reason code. | The Items list is displayed with only one item on it. | ||
| 5.07 | Switch to the Ad Hoc tab | The Items list is displayed (with nothing in it). The screen is laid out as expected. | ||
| 5.08 | Using the provided text box, enter "invalid". Click Collect. | A transient error should be displayed, showing that the format is invalid. | ||
| 5.09 | Enter "8004invalid". Click Collect. | A transient error should be displayed, showing that the format is invalid. | ||
| 5.10 | Enter "00invalidlength". Click Collect. | A transient error should be displayed, showing that the format is invalid. | ||
| 5.11 | Enter "00invalidformat00000". Click Collect. | A transient error should be displayed, showing that the format is invalid. | ||
| 5.12 | Enter a valid permanent Asset ID. Click Collect. | The pop-up 'Details' window should be shown, prompting for Location only. The Location list should show the 4 delivery locations and a default entry. | ||
| 5.13 | Click Cancel | The Ad Hoc tab should be shown. The item should not be added to the list. | ||
| 5.14 | Enter a valid permanent Asset ID. Click Collect. Click Save in the pop-up up 'Details' window. | An error should be displayed, asking for Location details. | ||
| 5.15 | Select Location 1. Click Save | The item should be added to the list, showing for Location 1. The format of the list row should be as expected. | ||
| 5.16 | Enter a valid Single Trip Asset. Click Collect. | The pop-up 'Details' window should be shown, prompting for Location and Asset Type. The Location list should show the 4 delivery locations and a default entry. The Asset Type list should show all Asset Types and a default item. | ||
| 5.17 | Select Location 2. Click Save | An error should be displayed, asking for Type details. | ||
| 5.18 | Select an asset type. Click Save | The item should be added to the list, showing for Location 1 and of the correct asset type. The format of the list row should be as expected. | ||
| 5.19 | Press the Scan button. | A Scan reticule should be displayed, allowing barcodes to be scanned. | ||
| 5.20 | Repeat the item tests for invalid formats and items above ("invalid", "8004invalid", "00invalidlength", "00invalidformat00000") | Each time these items are scanned, a transient error should display, as previously. The Scan reticule should stay open. | ||
| 5.21 | Scan an invalid barcode type (for example, a CODE 39 or EAN-8 or EAN-13 barcode). | A transient error should display, showing that the format is invalid. The Scan reticule should stay open. | ||
| 5.22 | Scan the cancelled item from the planned items list. | The Scan reticule should be closed and the Ad Hoc tab be displayed, showing a pop-up error, saying that the item must not be collected, as it has already been cancelled. | ||
| 5.23 | Press the Scan button. Scan the remaining planned item from the planned items list. | The Scan reticule should be closed and the Ad Hoc tab be displayed, showing a pop-up error, saying that the item must be collected through the Items tab. | ||
| 5.24 | Switch to the Items tab and scan the item. | A transient message should be displayed, showing that the item has been collected. The Scan reticule should be closed and the Items tab be displayed, with no items on the Items list. | ||
| 5.25 | Switch to the Ad Hoc tab and scan the same item. | A transient message should be displayed, showing that the item has already been collected. The Scan reticule should stay open. | ||
| 5.26 | Scan an item that is already on the Ad Hoc items list. | A transient message should be displayed, showing that the item has already been collected. The Scan reticule should stay open. | ||
| 5.27 | Continue scanning until there are two items for each location and one extra for any location (9 in total), entering all requested details. Close the Scan reticule. | The Ad Hoc tab and Items list should be displayed, showing the items scanned, with the latest at the top. | ||
| 5.28 | Click on the top item. | An alert should ask whether the item should be removed. | ||
| 5.29 | Click No. | The Ad Hoc tab and Items list should be displayed again, with item selected still on the list. | ||
| 5.30 | Click on the top item. When prompted, click Yes. | The Items list should be displayed again. The item selected should be removed from the list. | ||
| 5.31 | Move to the Job Details tab and press the Complete button. | No pop-up confirmation should be displayed. A transient message should display that the job is complete. The Job List should be redisplayed. The Loading task will be removed from the list. The jobs will be completed in Admin. Each of the delivery jobs in the job list should show 2 items except the one to location 2, which should have 3 (one planned confirmed, one planned cancelled, two unplanned ad-hoc scanned). | ||
| 5.32 | Press the Menu button and choose Unplanned Ad Hoc Collection from the menu. | An error will be displayed, saying that an Ad Hoc collection can't be done here. | ||
| 5.33 | Choose the Delivery at the first location. | 'Job Details' is displayed:
|
||
| 5.34 | Click Start Job. | The device checks for any changes to the job. When checked, the 'Delivery' screen is displayed:
|
||
| 5.35 | Switch to the Items tab and scan all items. | The Scan reticule should close. The 'Signature' screen is displayed:
|
||
| 5.36 | Click on the Items tab. | A list of all delivered items is shown. | ||
| 5.37 | Complete the signature and enter the signatory. Click Done. | A transient message should display that the job is complete. The job will be completed in Admin.
The Delivery task will be removed from the Job List. The 'Job Details' screen is displayed for the Collection at that location:
|
||
| 5.38 | Click Start Job. | The device checks for any changes to the jobs. When checked, the 'Collection' screen is displayed:
|
||
| 5.39 | Switch to the Ad Hoc tab and scan 2 valid items of any type. Switch to the Job Details tab and complete the job with the Complete button. | A transient message should display that the job is complete. The Job List should be redisplayed. The Delivery and Collection tasks for Location 1 will be removed from the list. The job will be completed in Admin. The Unloading job back at the depot should show 2 more items to be unloaded. | ||
| 5.40 | Select the Delivery job at Location 2. | 'Job Details' is displayed:
|
||
| 5.41 | Click Start Job. | The device checks for any changes to the jobs. When checked, the 'Delivery' screen is displayed:
|
||
| 5.42 | On the Items tab, cancel 1 of the previously-scanned unplanned items and confirm the exceptions with reason codes. Scan or enter all other items. | The 'Signature' screen is displayed:
|
||
| 5.43 | Complete the signature and enter the signatory. Click Done. | A transient message should display that the job is complete. The job will be completed in Admin.
The Delivery task will be removed from the Job List. The 'Job Details' screen is displayed for the Collection at that location:
|
||
| 5.44 | Click Start Job. | The device checks for any changes to the jobs. When checked, the 'Collection' screen is displayed:
|
||
| 5.45 | On the Items tab, cancel one of the planned items for collection and confirm the exception with a reason code. Scan or enter all other planned items. Click the Completed button. | A pop-up message should ask if any unplanned containers are to be scanned. | ||
| 5.46 | Click Yes. On the Ad Hoc tab, scan 2 valid items. Click the Completed button and complete the job. | A transient message should display that the job is complete. The Job List should be redisplayed. The Delivery and Collection tasks for Location 2 will be removed from the list. The jobs will be completed in Admin. The Unloading job back at the depot should show 2 more item to be unloaded (1 planned item not collected, 2 unplanned items collected, 1 planned delivery cancelled), and one more consignment (the generic unload job for the undelivered items). | ||
| 5.47 | Select the Delivery job at Location 3. Start the job. Scan all items. Complete the signature. | A transient message should display that the job is complete. The job will be completed in Admin.
The Delivery task will be removed from the Job List. The application will prompt whether an unplanned collection is required at this location. |
||
| 5.48 | Click Yes. | The job will be created and the 'Job Details' screen displayed:
|
||
| 5.49 | Click Start Job. | The device will not check for any changes to the job - the 'Collection' screen is immediately displayed:
|
||
| 5.50 | On the Ad Hoc tab, scan 2 valid items. Click the Completed button and complete the job. | A transient message should display that the job is complete. The Job List should be redisplayed. The Delivery task for Location 3 will be removed from the list. The job will be completed in Admin. An AdHoc Collection will be added in Admin. The Unloading job back at the depot should show 2 more item to be unloaded (2 unplanned items collected), and one more consignment (the return to depot of the generated Ad Hoc collection). | ||
| 5.51 | Select the Delivery job at Location 4. Start the job. Scan all items. Complete the signature. | A transient message should display that the job is complete. The job will be completed in Admin.
The Delivery task will be removed from the Job List. The application will prompt whether an unplanned collection is required at this location. |
||
| 5.52 | Click No. | The 'Job List' screen will be displayed. | ||
| 5.53 | Press the Menu button and choose Unplanned Ad Hoc Collection from the menu. | The job will be created and the 'Job Details' screen displayed:
|
||
| 5.54 | Click Start Job. | The device will not check for any changes to the job - the 'Collection' screen is immediately displayed:
|
||
| 5.55 | On the Ad Hoc tab, scan 2 valid items. Click the Completed button and complete the job. | A transient message should display that the job is complete. The Job List should be redisplayed. The Delivery task for Location 4 will be removed from the list. The job will be completed in Admin. An AdHoc Collection will be added in Admin. The Unloading job back at the depot should show 2 more item to be unloaded (2 unplanned items collected), and one more consignment (the return to depot of the generated Ad Hoc collection). | ||
| 5.56 | Select the Unloading job back at the depot. | 'Job Details' is displayed:
|
||
| 5.57 | Click Start Job. | The device checks for any changes to the jobs (except the generic unloading job). When checked, the 'Delivery' screen is displayed:
|
||
| 5.58 | Scan all items. Complete the signature. | A transient message should display that the job is complete. The jobs will be completed in Admin.
The Unloading task will be removed from the Job List. The application will show that there is no more work. |
| Step | Action | Result | Remarks | P/F |
| 6 | Regression Test | |||
The Site configuration should be reset as follows:
The load that must be set up to follow these tests is as follows:
|
||||
| 6.01 | Start the application. Ensure there is no data connection. Log in. | No LOGON_REQUEST will be seen in Admin. | ||
| 6.02 | Exit from vehicle checks. | No LOGOUT_REQUEST message will be seen in Admin | ||
| 6.03 | Start the application. Log in. Complete vehicle checks. Exit from Job List. | No LOGOUT_REQUEST message will be seen in Admin | ||
| 6.04 | Start the application. Log in. Press Menu. | No Unplanned Ad Hoc Collection option exists on the menu. The icons should still be removed, however. | ||
| 6.05 | Use the device's task switcher to kill the application. Start the application again. | The application will immediately resume to the Job List screen without asking for login details again. | ||
| 6.06 | Select the Loading task from the list. Start the job. | No Ad Hoc tab is displayed. | ||
| 6.07 | On the Items tab, start scanning. Scan an item. | The Scan reticule will be closed and the Items tab redisplayed again. | ||
| 6.08 | Complete scanning all items. | The job will automatically complete and return to the Job List. | ||
| 6.09 | Select the Delivery task from the list. Start the job. On the Items tab, start scanning. Scan an item. | The Scan reticule will be closed and the Items tab redisplayed again. | ||
| 6.10 | Cancel an item. Complete all others. Complete the delivery normally. | The application does not generate a Depot Return job for the cancelled item. The collection at the same location does not automatically start; No Ad Hoc Collection is prompted for. | ||
| 6.11 | Select the Delivery task from the list. Start the job. | No Ad Hoc tab is displayed. | ||
| 6.12 | On the Items tab, start scanning. Scan an item. | The Scan reticule will be closed and the Items tab redisplayed again. | ||
| 6.13 | Log out of and re-start the application. Change the application style to another style (e.g. Generic). Log in to the application. | The Job List should be correctly formatted for that style. | ||
| 6.14 | Start a collection or delivery job. | The Items (Containers) list should be correctly formatted for that style. | ||
| 6.15 | Repeat the last two tests to check every style is unaffected by these changes. |
| Step | Action | Result | Remarks | P/F |
| 7 | Export Tests | |||
Ensure that jobs have been completed for:
|
||||
| 7.01 | Run the Auto Export process. | All jobs except system-generated Unload tasks returning cancelled delivery items to depot will be sent back to CTMS.
|
Appendix B: Quote & Document References
| Cost Details | ||||
| Activity | Estimate No. of Days |
No. of Days | Rate per Day (£) | Cost (£ Exc. VAT) |
| Requirements | 0.00 | 0.00 | 0 | £0.00 |
| Change Request Evaluation | 0.00 | 0.00 | 0 | £0.00 |
| Functional Specification | 7.00 | 6.00 | 0 | £0.00 |
| Technical Specification | 0.00 | 0.00 | 0 | £0.00 |
| Development | 35.50 | 35.50 | 0 | £0.00 |
| Testing and Release | 7.25 | 8.25 | 0 | £0.00 |
| Implementation | 0.00 | 0.00 | 0 | £0.00 |
| Project Management | First argument to "number_format" must be a number. | First argument to "number_format" must be a number. | 0 | £First argument to "number_format" must be a number. |
| TOTAL | First argument to "number_format" must be a number. | First argument to "number_format" must be a number. | £First argument to "number_format" must be a number. | |
| Estimate excludes training, release to live and go live support. |
B.1 References
| Ref No | Document Title & ID | Version | Date |
| 1 | NHSBT High Level Solution Design v2.0.doc | 2.0 | 21/05/2014 |
| 2 | FS 317907 CSR01 EPOD-TMS Interface | & | & |
B.2 Glossary
| Term | Definition |
|---|---|
| EPOD | Electronic Proof of Delivery. The OBS EPOD system is CALIDUS ePOD. |
| CALIDUS eSERV | The OBS mobile system to complete Service functionality in the field. This is part of the CALIDUS ePOD system. |
| PDA | The mobile device on which the C-ePOD system will run in the field. This can be a Phone, EDA or industrial PDA, running Android. |
| DAL | Data Access Layer. A mechanism for accessing data by the system that is removed from the application, allowing for simplified access and providing protection to the data, as only approved DAL methods can be used to modify it. |
| GPS | Global Positioning System. A mechanism of retrieving accurate positioning information in the form of Latitude and Longitude (Lat-Long) co-ordinates from a device. |
| GPRS, 3G, HSDPA, Data Service | All terms referring to mobile device network connectivity, and the speed at which the device connects to the internet. |
B.3 Authorised By
Julie Scott | Project Manager | _____________________________ |
Ed Bond | Client Representative | _____________________________ |