FS 318084 SCR17 NHSBT C-EPOD Swap Van
![]()
NHSBT
Swap Van
CALIDUS ePOD
10th June 2014 - 0.3
Reference: FS 318084 SCR17
Contents
Functional Overview
Client Requirement
The following changes from the Solution Design document are included in this specification:
- SCR-316403-91 - CTMS-EPOD Interface
- The EPOD interface to the device regarding users and vehicles must be modified to ensure that only changed vehicles and drivers are interfaced (including any drivers/vehicles that have been deleted).
- SCR-316403-99 - Swap Van
- Ensure driver informed to swap vehicle; perform vehicle checks
Solution Overview
On some BMV journeys (rather than waiting for a BMV to get to the correct temperature), and also on Birmingham-Stoke-Manchester journeys specifically, the entire contents of the vehicles are swapped. In this case, the items are not scanned off and on each vehicle, but instead the drivers simply swap vehicles.
To achieve this functionality within the systems, changes will be required to complete this (SCR-316403-06 and SCR-316403-99). The functionality would be expected to be as follows:
The decision to swap vehicles is made by the planners, and therefore there needs to be a capability to set this on the trip drops before they depart. If the trip is marked as a swap required by the planners, then the C-EPOD device must be configured not to scan items on or off the vehicle, just provide instructions about to whom to pass the keys. Signature will still be required for the delivery aspect, however.
Driver - Collect at Depot:
The loading of the items at the depots can include single-trip assets (i.e. for other transport). The items that are being loaded may be for multiple orders and therefore multiple destinations.
- The driver navigates to the depot using TomTom.
- The driver selects the location from the CALIDUS ePOD Job List screen. If there are multiple orders being collected, the orders will be consolidated into one location. The device will show how many of each asset type are expected to be loaded.
- The driver scans to collect through the Asset ID (either permanent Cage assets or Single Trip assets, like post). If there are multiple destinations on the orders, the C-EPOD device will prompt the user to select the destination for the cage from a drop-down list. This is the same process as BMV movements.
- A signature is not required.
Driver - Deliver at Swap Vehicle location:
- The driver navigates to the depot using TomTom.
- The driver selects the location from the CALIDUS ePOD Job List screen. If there are multiple orders being delivered, the orders will be consolidated into one location.
- The Job Details screen will display instructions to "swap to vehicle X and obtain driver signature".
- The device will show how many of each asset type are expected to be delivered.
- The driver will click the Start Job button.
- The Delivery screen is not shown, as there are no details to confirm for the delivery job.
- A signature is required when delivering – the signature of the other driver will be obtained.
- The driver changes the driver ID on the TomTom device in cab on the new vehicle.
Driver - Collect at Swap Vehicle location:
- The Collection (i.e. the Swap Van) from this location immediately starts.
- The Job Details screen shows that this is a Swap Vehicle job, showing the registration to be swapped to.
- The driver will click the Start Job button.
- The device will prompt the driver to confirm the vehicle being swapped to, displaying the registration. The driver will press a Confirm button.
- The device will then display the Vehicle Defect checks for the new vehicle - these must be completed for the new vehicle.
- Once defect checks are completed, the job will be completed. There is no Collection screen to be shown - no Item details are presented for this job - and a signature is not required for collections. The device will move back to the Job List screen.
Driver - Deliver to destination location:
- The driver navigates to the depot using TomTom.
- The driver selects the location from CALIDUS ePOD. If there are multiple orders being delivered, the orders will be consolidated into one location.
- The driver scans to deliver through the Asset ID - all items are scanned off the vehicle. The device will show all deliverable items.
- A signature is required when delivering.
Scope
Set-up
Pre-requisites
- A working CALIDUS ePOD system.
CALIDUS TMS Interface Changes
The interface of jobs through to C-EPOD will include the following details and changes:
- The interface will include details of the availability of vehicles, through the existing C-EPOD EPOD_IMPORT tag EPOD_VEHICLES. These changes regarding the EPOD interface will be completed under reference 317907/SCR01.
- The changes regarding the EPOD interface for Swap Vehicle will be completed under reference 317771/SCR17:
- The interface will identify when a vehicle swap is being made against the collection and delivery jobs at this location through a new flag EPL_SWAP_VEHICLE against all the job records on the trips at this location.
- The interface will also identify when the vehicle being swapped to against the collection job at this location, through the use of the Trailer ID (EPL_TRAILER_ID of EPOD_JOB).
- Item/container details will be present for the delivery and collection jobs at this Swap Vehicle location as normal - C-EPOD will handle whether the items must be displayed, based on whether it is marked as a Swap Vehicle job.
- The instructions for the collection and delivery jobs at this "Swap Vehicle" location will show instructions to "Swap with Driver X, vehicle Y and obtain signature".
- If trips have been created that swap vehicles with other depots, the vehicles should be added to both depots when this was indicated by the user. This should be through the standard EPOD_VEHICLES interface format. This may be prepended to the EPOD_TRIP message sent in to the driver, although if required this will require a change to the sequence of tabs in the standard C-EPOD upload XSD.
 Note: Changes to planned vehicles on the trips that have planned a Swap Vehicle cross-dock of this type will require the orders on both trips updating, at the delivery and collection jobs (for instructions and to change the trailer ID). It is expected that this will not happen automatically and will be achieved manually through the screens in C-TMS.
- The interface to the TomTom device will show all locations up to the swap location from trip 1, then all locations from that swap location on trip 2. Changes for the TomTom interface are specified under reference 316291/SCR02.
Menu Structure
None
Data
- Device configured to NHSBT style
- Sites set up for each depot (carrier), with the following PDA options:
- "Trailer/Vehicle Combined" enabled (EPL_TRAILER_VEHICLE_FLAG = "Y")
Functional Description
Database/DAL changes
Table EPOD_USER requires the following modification:
- EPL_USER_ACTIVE will be modified to nvarchar(2)
Existing packages will be modified to allow the creating, editing and selecting of the new fields, including but not limited to:
- EPOD_USER_INSERT
- EPOD_USER_NAMESELECT
- EPOD_USER_SEARCH
- EPOD_USER_SELECT
- EPOD_USER_SELECT_UPDATED_DATA
- EPOD_USER_SELECT2
- EPOD_USER_UPDATE
The existing EPOD_USER DAL object will be changed to effect this field length modification.
Table EPOD_VEHICLE requires the following modification:
- EPL_STATUS will be modified to nvarchar(2)
Existing packages will be modified to allow the creating, editing and selecting of the new fields, including but not limited to:
- EPOD_VEHICLE_INSERT
- EPOD_VEHICLE_SELECT
- EPOD_VEHICLE_SELECT_UPDATED_DATA
- EPOD_VEHICLE_UPDATE
The existing EPOD_VEHICLE DAL object will be changed to effect this field length modification.
Table EPOD_SITE requires the following modifications:
- EPL_TRAILER_VEHICLE_FLAG - nvarchar(1), NOT NULL DEFAULT 'N', values 'Y' or 'N'.
Existing packages will be modified to allow the creating, editing and selecting of the new flag, including but not limited to:
- EPOD_SITE_INSERT
- EPOD_SITE_SELECT
- EPOD_SITE_SELECT_UPDATED_DATA
- EPOD_SITE_UPDATE
The existing EPOD_SITE DAL object will be changed to:
- Read the new flag
![]() Note: It is not necessary to add this flag as a search-able item. However, if allowing this keeps the packages and DAL objects standard in design, then this can also be done, within the DAL and the packages.
Note: It is not necessary to add this flag as a search-able item. However, if allowing this keeps the packages and DAL objects standard in design, then this can also be done, within the DAL and the packages.
The XML Export of EPOD_SITE records will look as follows:
 <EPOD_SITE>
   <EPL_SITE_ID></EPL_SITE_ID>
   <EPL_DESCRIPTION></EPL_DESCRIPTION>
   <EPL_SERVICE_POD_FORMAT></EPL_SERVICE_POD_FORMAT>
   <EPL_DELIVERY_POD_FORMAT></EPL_DELIVERY_POD_FORMAT>
   <EPL_COLLECTION_POD_FORMAT></EPL_COLLECTION_POD_FORMAT>
   <EPL_SERVICE_ACTIVITIES></EPL_SERVICE_ACTIVITIES>
   <EPL_SERVICE_PREWORK></EPL_SERVICE_PREWORK>
   <EPL_SERVICE_INFO></EPL_SERVICE_INFO>
   <EPL_SERVICE_PRODUCTS></EPL_SERVICE_PRODUCTS>
   <EPL_SERVICE_MC_REF></EPL_SERVICE_MC_REF>
   <EPL_SERVICE_DIAGNOSIS></EPL_SERVICE_DIAGNOSIS>
   <EPL_SERVICE_POSTWORK></EPL_SERVICE_POSTWORK>
   <EPL_AUTO_COMPLETE_EMAIL></EPL_AUTO_COMPLETE_EMAIL>
   <EPL_AD_HOC_COLLECTION></EPL_AD_HOC_COLLECTION>
   <EPL_DEL_DRIVER_SIGN></EPL_DEL_DRIVER_SIGN>
   <EPL_COL_DRIVER_SIGN></EPL_COL_DRIVER_SIGN>
   <EPL_DELIVERY_PAYMENT></EPL_DELIVERY_PAYMENT>
   <EPL_DOCUMENT_PHOTO></EPL_DOCUMENT_PHOTO>
   <EPL_CONTAINER_ONLY></EPL_CONTAINER_ONLY>
   <EPL_PDA_DIS_JOB_CODE></EPL_PDA_DIS_JOB_CODE>
   <EPL_LINKED_C_D></EPL_LINKED_C_D>
   <EPL_METRICS_ENTRY></EPL_METRICS_ENTRY>
   <EPL_NOTES></EPL_NOTES>
   <EPL_FORCED_ENTRY></EPL_FORCED_ENTRY>
   <EPL_SYSTEM_TYPE></EPL_SYSTEM_TYPE>
   <EPL_UPDATE_FUNCTIONS></EPL_UPDATE_FUNCTIONS>
   <EPL_VEHICLE_CHECK_CONFIG></EPL_VEHICLE_CHECK_CONFIG>
   <EPL_JOB_LIST_CFG></EPL_JOB_LIST_CFG>
   <EPL_ARRIVAL_FLAG></EPL_ARRIVAL_FLAG>
   <EPL_SCAN_ERROR_FLAG></EPL_SCAN_ERROR_FLAG>
   <EPL_LAST_CHANGED_DATE></EPL_LAST_CHANGED_DATE>
   <EPL_LAST_CHANGED_TIME></EPL_LAST_CHANGED_TIME>
   <EPL_RESEQUENCE></EPL_RESEQUENCE>
   <EPL_CLAUSE_DELIVERY></EPL_CLAUSE_DELIVERY>
   <EPL_JOB_STATUS></EPL_JOB_STATUS>
   <EPL_CONSOLIDATION></EPL_CONSOLIDATION>
   <EPL_VEHICLE_STOCK_FLAG></EPL_VEHICLE_STOCK_FLAG>
   <EPL_SCAN_AT_VEHICLE></EPL_SCAN_AT_VEHICLE>
   <EPL_PDA_FULL_ADDRESSES></EPL_PDA_FULL_ADDRESSES>
   <EPL_JOB_TRANSFER></EPL_JOB_TRANSFER>
   <EPL_NEXT_JOB_FLAG></EPL_NEXT_JOB_FLAG>
   <EPL_RETURNS_DEPOT_FLAG></EPL_RETURNS_DEPOT_FLAG>
   <EPL_SCANNING_FLAG></EPL_SCANNING_FLAG>
   <EPL_AUTOLOGIN_FLAG></EPL_AUTOLOGIN_FLAG>
   <EPL_ADHOC_ANYTIME_CONFIG></EPL_ADHOC_ANYTIME_CONFIG>
   <EPL_AUDIT_LOGIN_FLAG></EPL_AUDIT_LOGIN_FLAG>
   <EPL_TRAILER_VEHICLE_FLAG></EPL_TRAILER_VEHICLE_FLAG>
 </EPOD_SITE>
Table EPOD_JOB requires the following modification:
- EPL_SWAP_VEHICLE - nvarchar(1), NOT NULL DEFAULT 'N', values 'Y' or 'N'.
Existing packages will be modified to allow the creating, editing and selecting of the new field, including but not limited to:
- EPOD_JOB_INSERT
- EPOD_JOB_SEARCH
- EPOD_JOB_SELECT
- EPOD_JOB_SELECT_DATE_RANGE
- EPOD_JOB_UPDATE
The existing EPOD_JOB DAL object will be changed to:
- Export the new field in XML requests
- Read the new field
![]() Note: It is not necessary to add this field as a search-able item. However, if allowing this keeps the packages and DAL objects standard in design, then this can also be done, within the DAL and the packages.
Note: It is not necessary to add this field as a search-able item. However, if allowing this keeps the packages and DAL objects standard in design, then this can also be done, within the DAL and the packages.
The XML Export of EPOD_JOB records will now look as follows:
   <EPOD_JOB>
     <EPL_SITE_ID></EPL_SITE_ID>
     <EPL_JOB_ID></EPL_JOB_ID>
     <EPL_LOAD_ID></EPL_LOAD_ID>
     <EPL_JOB_TYPE></EPL_JOB_TYPE>
     <EPL_JOB_GROUP></EPL_JOB_GROUP>
     <EPL_JOB_INSTRUCTION></EPL_JOB_INSTRUCTION>
     <EPL_JOB_SIGNATURE></EPL_JOB_SIGNATURE>
     <EPL_REASON_CODE></EPL_REASON_CODE>
     <EPL_LINKED_REASON></EPL_LINKED_REASON>
     <EPL_STATUS></EPL_STATUS>
     <EPL_CUSTOMER_CODE></EPL_CUSTOMER_CODE>
     <EPL_PHOTO_ID></EPL_PHOTO_ID>
     <EPL_PHOTO></EPL_PHOTO>
     <EPL_ENG_SIGNATURE></EPL_ENG_SIGNATURE>
     <EPL_SEQUENCE></EPL_SEQUENCE>
     <EPL_START_PLANNED_DATE></EPL_START_PLANNED_DATE>
     <EPL_START_PLANNED_TIME></EPL_START_PLANNED_TIME>
     <EPL_END_PLANNED_DATE></EPL_END_PLANNED_DATE>
     <EPL_END_PLANNED_TIME></EPL_END_PLANNED_TIME>
     <EPL_START_ACTUAL_DATE></EPL_START_ACTUAL_DATE>
     <EPL_START_ACTUAL_TIME></EPL_START_ACTUAL_TIME>
     <EPL_END_ACTUAL_DATE></EPL_END_ACTUAL_DATE>
     <EPL_END_ACTUAL_TIME></EPL_END_ACTUAL_TIME>
     <EPL_DISTANCE_PLANNED></EPL_DISTANCE_PLANNED>
     <EPL_DISTANCE_ACTUAL></EPL_DISTANCE_ACTUAL>
     <EPL_DRIVING_TIME></EPL_DRIVING_TIME>
     <EPL_CUSTOMER_NAME></EPL_CUSTOMER_NAME>
     <EPL_INVOICED></EPL_INVOICED>
     <EPL_CUST_SIGNATORY></EPL_CUST_SIGNATORY>
     <EPL_JOB_CODE></EPL_JOB_CODE>
     <EPL_CUST_REF></EPL_CUST_REF>
     <EPL_OFFICE_INSTRUCTION></EPL_OFFICE_INSTRUCTION>
     <EPL_SIGNED_UNCHECKED></EPL_SIGNED_UNCHECKED>
     <EPL_SO_NUMBER></EPL_SO_NUMBER>
     <EPL_TNCS></EPL_TNCS>
     <EPL_ORDER_DATE></EPL_ORDER_DATE>
     <EPL_ORDER_TIME></EPL_ORDER_TIME>
     <EPL_SALES_CONTACT></EPL_SALES_CONTACT>
     <EPL_USER_NOTES></EPL_USER_NOTES>
     <EPL_OWNER_NAME></EPL_OWNER_NAME>
     <EPL_SERVICE_LEVEL></EPL_SERVICE_LEVEL>
     <EPL_LAST_CHANGED_DATE></EPL_LAST_CHANGED_DATE>
     <EPL_LAST_CHANGED_TIME></EPL_LAST_CHANGED_TIME>
     <EPL_ARRIVAL_DATE></EPL_ARRIVAL_DATE>
     <EPL_ARRIVAL_TIME></EPL_ARRIVAL_TIME>
     <EPL_XF_VALUES></EPL_XF_VALUES>
     <EPL_EXT_REF></EPL_EXT_REF>
     <EPL_TRAILER_ID></EPL_TRAILER_ID>
     <EPL_PF_DEPOT></EPL_PF_DEPOT>
     <EPL_PF_TRACKING_NO></EPL_PF_TRACKING_NO>
     <EPL_JOB_STATUS></EPL_JOB_STATUS>
     <EPL_UDF_JOBDETS></EPL_UDF_JOBDETS>
     <EPL_LINKED_ID></EPL_LINKED_ID>
     <EPL_ACCOUNT></EPL_ACCOUNT>
     <EPL_LOADING_TYPE></EPL_LOADING_TYPE>
     <EPL_GENERATED></EPL_GENERATED>
     <EPL_SWAP_VEHICLE></EPL_SWAP_VEHICLE>
     <EPOD_CONTAINERS></EPOD_CONTAINERS>
     <EPOD_SERVICES></EPOD_SERVICES>
   </EPOD_JOB>
Import/Export Messages
Both the dataservice webservices (ePOD_DataService.asmx and ePOD_DataService2.asmx) and the AutoImport application will need to change the way Vehicles are imported into C-EPOD.
When receiving records, an Action tag is received, showing what should be done with the message. The values of this EPL_ACTION field should be:
- "A" - Add/Amend the indicated Vehicle
- "D" - Delete the indicated Vehicle
- "X" - Delete all Vehicles for the indicated site
When deleting, the status of the vehicle (EPL_STATUS) should be set to "X".
When adding or updating, ensure that the service checks for a record present first and, if found, updated accordingly.
When updating records through this interface, the Last Changed date and time should be updated if the details have changed in any way. ![]() Note: Just issuing an update to a record is not a reason to set the Last Changed record - actual changes must be made to other data to do this.
Note: Just issuing an update to a record is not a reason to set the Last Changed record - actual changes must be made to other data to do this.
When refreshing all Vehicle records for a site, the received file should start with a request to delete all vehicle records for the site, then a record for each item to be added again. The incoming file should resemble the following example:
<EPOD_VEHICLES>
   <EPOD_VEHICLE>
       <EPL_SITE_ID>SITE</EPL_SITE_ID>
       <ACTION>X</ACTION>
   </EPOD_VEHICLE>
   <EPOD_VEHICLE>
       <EPL_SITE_ID>SITE</EPL_SITE_ID>
       <EPL_VEHICLE_ID>1</EPL_VEHICLE_ID>
       <EPL_VEHICLE_REG>AB12XYZ</EPL_VEHICLE_REG>
       <EPL_DESCRIPTION>LWB Transit</EPL_DESCRIPTION>
       <EPL_VEHICLE_MILEAGE>0</EPL_VEHICLE_MILEAGE>
       <EPL_STATUS>Y</EPL_STATUS>
       <ACTION>A</ACTION>
   </EPOD_VEHICLE>
   ...
</EPOD_VEHICLES>
In this case, the process should first mark all records as potential to be deleted (by inserting "X" after the current value of the EPL_STATUS field against EPOD_VEHICLE e.g. EPL_STATUS of "Y" becomes "YX"). Each subsequent entry in the file will then update the concomitant EPOD_VEHICLE record in the database, checking whether anything has changed, ensuring that the value of EPL_STATUS in the EPOD_VEHICLE file is checked against only the first character in the database field. If nothing has changed, only the EPL_STATUS field should be updated, not the Last Changed Date and Time fields. If any other fields have changed, the Last Update fields should be changed to the current date and time stamp. Once all Vehicle records in the incoming file are dealt with, the process should check for any records with an EPL_STATUS field of 2 characters, set the EPL_STATUS field to "X", and update the Last Changed date and time to the current date and time.
When refreshing all User records for a site, the received file should start with a request to delete all user records for the site, then a record for each item to be added again. The incoming file should resemble the following example:
<EPOD_USERS>
   <EPOD_USER>
       <EPL_SITE_ID>SITE</EPL_SITE_ID>
       <ACTION>X</ACTION>
   </EPOD_USER>
   <EPOD_USER>
       <EPL_SITE_ID>SITE</EPL_SITE_ID>
       <EPL_USER_ID>USER1</EPL_USER_ID>
       <EPL_USER_NAME>D. River-Name</EPL_USER_NAME>
       <EPL_USER_ADMIN>N</EPL_USER_ADMIN>
       <EPL_USER_ACTIVE>Y</EPL_USER_ACTIVE>
       <ACTION>A</ACTION>
   </EPOD_USER>
   ...
</EPOD_USERS>
In this case, the process should first mark all records as potential to be deleted (by inserting an X after the current value of the EPL_USER_ACTIVE field against EPOD_USER e.g. EPL_USER_ACTIVE of "Y" becomes "YX"). Each subsequent entry in the file will then update the concomitant EPOD_USER record in the database, checking whether anything has changed, ensuring that the value of EPL_USER_ACTIVE in the EPOD_USER file is checked against only the first character in the database field. If nothing has changed, only the EPL_USER_ACTIVE field should be updated, not the Last Changed Date and Time fields. If any other fields have changed, the Last Update fields should be changed to the current date and time stamp. Once all User records in the incoming file are dealt with, the process should check for any records with an EPL_USER_ACTIVE field of 2 characters, set the EPL_USER_ACTIVE field to "X", and update the Last Changed date and time to the current date and time.
Both the dataservice and PDA web request servers (ePOD_DataService.asmx, ePOD_DataService2.asmx and Calidus_ePOD.asmx) and the AutoExport and AutoImport applications will need to import and export the new EPOD_JOB field EPL_SWAP_VEHICLE. The messages affected are:
- AutoImport and ePOD_DataService:
- EPOD_XML_IMPORT
- AutoExport:
- EPOD_EXPORT_LOAD
- EPOD_EXPORT_JOB
- ePOD_DataService
- EPOD_EXPORT_LOAD_RESPONSE
- EPOD_EXPORT_JOB_RESPONSE
![]() Note: All XSDs should be modified to include the new field, along with the standard documentation. This includes but is not limited to:
Note: All XSDs should be modified to include the new field, along with the standard documentation. This includes but is not limited to:
- XMLUpload.xsd
The field definition should be added to the XSD in the appropriate position as follows:
   <xsd:element name="EPL_SWAP_VEHICLE" nillable="true" minOccurs="0" maxOccurs="1">
     <xsd:annotation>
       <xsd:documentation>
         Indicates whether the job is a vehicle swap (i.e. requires no item-related action in C-EPOD)
       </xsd:documentation>
     </xsd:annotation>
     <xsd:simpleType>
       <xsd:restriction base="xsd:string">
         <xsd:maxLength value="1" />
       </xsd:restriction>
     </xsd:simpleType>
   </xsd:element>
The element will be added in the EPOD_JOB tag as the last elements before EPOD_CONTAINERS.
The PDA web request server (Calidus_ePOD.asmx, both the XML and JSON versions) will be modified to ensure that only changed vehicles and drivers are interfaced (including any drivers/vehicles that have been deleted).
The LOGON_REQUEST message will be modified to add a new value to the existing UPDATE_REQUIRED tag, as follows:
<LOGON_REQUEST ID="" ...>
 <EPL_SITE_ID>XXXXXXXXXX</EPL_SITE_ID>
 <EPL_USER_ID>XXXXXXXXXX</EPL_USER_ID>
 <EPL_VEHICLE_ID>XXXXXXXXXX</EPL_VEHICLE_ID>
 <EPL_LAST_UPDATE_DATE_TIME>2011-01-01T09:09:09</EPL_LAST_UPDATE_DATE_TIME>
 <PDA_VERSIONS>
     <EPOD_CLIENT version="" debug="" />
     <EPOD_UPDATER version="" />
 </PDA_VERSIONS>
 <JSONIF>Y</JSONIF>
 <UPDATE_REQUIRED>C</UPDATE_REQUIRED>
</LOGON_REQUEST>
If the "UPDATE_REQUIRED" tag is present with a value of "C", the process will respond with details in the same way as it does if the flag is "Y", except for the EPOD_VEHICLE and EPOD_USER tables.
Currently, the process retrieves all records for these tables for the site, if any record on the table has changed since the last successful logon response message was processed by the device (the values in EPL_LAST_UPDATE_DATE_TIME>.
For these tables, the process will change to retrieve only the records with a Last Changed date and time after the value in the EPL_LAST_UPDATE_DATE_TIME flag and return those records only.
Note that the UPDATE_REQUIRED tag will be returned with the LOGON_RESPONSE message, with the value as set in the LOGON_REQUEST message. Note also that this does not affect initial logon messages - these will still retrieve and return all standing data for all tables.
In order for this change to work as expected, there must be a firm control of when the last update date and time are changed for these records. This should be as follows:
- When records are changed from an inbound webservice or the AutoImport process.
- When standing data is changed through the maintenance screens.
The last update date and time fields should not be changed if:
- Any of the following fields are updated against the user:
- EPL_USER_ACTIVITY_DATE
- EPL_USER_ACTIVITY_TIME
- EPL_USER_VEHICLE
- EPL_USER_LOAD
- EPL_USER_JOB
- Any of the following fields are updated against the vehicle:
- EPL_DESCRIPTION
- EPL_VEHICLE_MILEAGE
- EPL_LAST_POSITION
- EPL_LAST_POSITION_DATE
- EPL_LAST_POSITION_TIME
![]() Note: This may be achieved within the EPOD_USER and EPOD_VEHICLE DAL objects, so that this functionality may also be replicated within the Admin screens without any additional effort.
Note: This may be achieved within the EPOD_USER and EPOD_VEHICLE DAL objects, so that this functionality may also be replicated within the Admin screens without any additional effort.
The PDA web request server (Calidus_ePOD.asmx) will be modified to ensure that swapped vehicles are updated when the Job is updated. This affects the JOB_UPDATE_REQUEST message processor.
The process will be modified to update the trailer on the job from the incoming message (EPL_TRAILER_ID of EPOD_JOB).
If the new processing is required (EPL_TRAILER_VEHICLE_FLAG = "Y"), the process will also be modified to:
- Update the current user with the new vehicle from the Trailer ID (EPL_USER_VEHICLE of EPL_USER set to EPL_TRAILER_ID).
- To mark this vehicle as Active (EPL_STATUS = "Y" of the EPOD_VEHICLE record where for this site and EPL_TRAILER_ID).
- To mark the vehicle previously used on this load as inactive (set EPL_STATUS = "N" where the EPOD_VEHICLE record for this site and EPL_VEHICLE_ID of EPOD_LOAD).
- To mark the Load as now using this vehicle (EPL_VEHICLE_ID of EPOD_LOAD set to the value in EPL_TRAILER_ID).
The XMLUpload XSD file and all standard documentation must be updated to show all the changes identified here. Additionally, this must be changed to move the sequence of data tags around as follows:
- EPOD_CUSTOMERS
- EPOD_SERVICE_PRODUCT_MASTERS
- EPOD_VEHICLES
- EPOD_USERS
- EPOD_REASON_CODES
- EPOD_LOADS
- EPOD_JOBS
This is to ensure that standing data is created before transactional data, ensuring that they can both be specified and used in the same file without the transactional data failing validation.
Admin Changes
The Site maintenance screen (site_header.aspx) will be modified to allow the system to be configured for:
- EPL_TRAILER_VEHICLE, a checkbox, labelled as "Change Vehicle through Trailer", defaulting to 'N' (Disabled).
This configuration field will be added to the PDA tab of this maintenance screen.
![]() Note: Ensure that the new check-boxes line up with the existing fields.
Note: Ensure that the new check-boxes line up with the existing fields.
The Vehicle maintenance screen (vehicle_maintenance.aspx) will be modified as follows:
- The Delete button will now only mark records for deletion, by setting the Status field to "X".
- Pressing the Delete button on a record that has been marked for deletion will delete the record from the database.
- The filter (accessible through the Find button) will allow the selection of Deleted as one of the options in the Status drop-down list.
- Pressing the Search button with no Status selected will only show records that are not marked for deletion by default.
- The Status drop-down list will be able to show the value "Deleted" when editing (through the Select button) but not when adding new vehicles (through the New button).
- The vehicles table will display the status as "Deleted" if the record is found and displayed with that status.
![]() Note: Changes to the vehicle Description or Mileage should not result in the Last Changed Date and Time being changed. This is most likely controlled already through changes to the EPOD_VEHICLE DAL object.
Note: Changes to the vehicle Description or Mileage should not result in the Last Changed Date and Time being changed. This is most likely controlled already through changes to the EPOD_VEHICLE DAL object.
The Users maintenance screen (vehicle_maintenance.aspx) will be modified as follows:
- The Delete button will now only mark records for deletion, by setting the Status field to "X".
- Pressing the Delete button on a record that has been marked for deletion will delete the record from the database.
- The Search filter (found through clicking the Find button) will have the "User Active" field added (with label "Status"), to allow filtering of the users. This new drop-down list will show values "Active", "Inactive" and "Deleted" for selection, as well as a default value.
- Pressing the Search button with no Status selected will only show records that are not marked for deletion by default.
- The Active drop-down list will be able to show the value "Deleted" when editing (through the Select button) but not when adding new users (through the New button).
- The users table will display the status as "Deleted" if the record is found and displayed with that status.
PDA Changes
Database/DAL changes
Table EPOD_SITE requires the following modifications:
- EPL_TRAILER_VEHICLE_FLAG - nvarchar(1), default 'N'.
Table EPOD_JOB requires the following modification:
- EPL_TRAILER_ID - nvarchar(20), DEFAULT ' '.
- EPL_SWAP_VEHICLE - nvarchar(1), DEFAULT ' '.
The DAL objects for the tables above must be modified as follows:
- Add these items as parameters to every method definition and SQL parameter that uses the tables, along with all other functions within the DAL js files, dealing with the tables.
- The functions for populating the tables will be modified to ensure that the default values are correctly set for the fields.
The PDA objects affected are:
- PDA_SITE
- PDA_JOB
The XML Export of EPOD_JOB will change to add the new field EPL_TRAILER_ID. This will be changed in the PDA_JOB DAL object method ToUpdateXElement. The new format will be as follows:
<EPOD_JOB>
  <EPL_SITE_ID></EPL_SITE_ID>
  <EPL_LOAD_ID></EPL_LOAD_ID>
  <EPL_JOB_ID></EPL_JOB_ID>
  <EPL_USER_ID></EPL_USER_ID>
  <EPL_VEHICLE_ID></EPL_VEHICLE_ID>
  <EPL_START_DATE_TIME></EPL_START_DATE_TIME>
  <EPL_ARRIVAL_DATE_TIME></EPL_ARRIVAL_DATE_TIME>
  <EPL_END_DATE_TIME></EPL_END_DATE_TIME>
  <EPL_STATUS></EPL_STATUS>
  <EPL_CONTACT></EPL_CONTACT>
  <EPL_INVOICED></EPL_INVOICED>
  <EPL_SIGNED_UNCHECKED></EPL_SIGNED_UNCHECKED>
  <EPL_USER_NOTES></EPL_USER_NOTES>
  <EPL_TNCS></EPL_TNCS>
  <EPL_AMENDED_FLAG></EPL_AMENDED_FLAG>
  <EPL_JOB_STATUS></EPL_JOB_STATUS>
  <EPL_UDF_JOBDETS></EPL_UDF_JOBDETS>
  <EPL_LINKED_ID></EPL_LINKED_ID>
  <EPL_GENERATED></EPL_GENERATED>
  <EPL_TRAILER_ID></EPL_TRAILER_ID>
  <CONFIRMATION>
      <EPL_ENG_SIGNATURE></EPL_ENG_SIGNATURE>
      <EPL_JOB_SIGNATURE></EPL_JOB_SIGNATURE>
  </CONFIRMATION>
  <EXCEPTION type="job">
      <EPL_REASON_CODE></EPL_REASON_CODE>
  </EXCEPTION>
  <ADDITIONAL>...</ADDITIONAL>
  <SERVICES>...</SERVICES>
  <CONTAINERS>...</CONTAINERS>
</EPOD_JOB>
The updating of job-level information from server update messages will change to ensure that changes to the collection details of a job (i.e. the number of items/containers of products) will not automatically trigger an alerted to the driver that the jobs have changed - only a change to key Job-level fields will trigger this. This affects the processing of the following messages:
- JOB_LOCK_RESPONSE
- LOAD_RESPONSE
- AUTO_UPDATE_RESPONSE
In order to achieve that, the PDA_JOB DAL object will be changed to ignore changed updates from container records (in function ProcessJobUpdate).
Login
When a driver logs in to the application, or Re-logs in or changes vehicle (through the Job List menu), the application will show the Login screen.
If an on-line login has been completed successfully, the server will return a Logon Response message, detailing the standing data in the system.
Under this new mechanism, this message will be processed differently by the server and the content of the Vehicle and User portions of these portions of the Logon Response message will now be solely the changes that have occurred since the last successful "log on" message was processed. This will be indicated in the Logon Response message by the UPDATE_REQUIRED tag being returned as "C".
The Logon Response process will be modified to reflect this, by:
- No longer deleting all User and Vehicle records when a Login message is received.
- Add, Update or Delete User and Vehicle records as they are received instead.
- For an on-line login, set the UPDATE_REQUIRED tag on the LOGON_REQUEST message to "C". The value of this tag will be returned in the LOGON_RESPONSE message.
- The ProcessLoginResponse function will check for the UPDATE_REQUIRED tag.
- If "Y", the process will act as now. If "C":
- For EPOD_VEHICLE records:
- If the field EPL_STATUS = "X", find and delete the EPOD_VEHICLE record indicated.
- In any other case, attempt to find the indicated record first. If not found, create the record, if found, update the record.
- For EPOD_USER records:
- If the field EPL_USER_ACTIVE = "X" or "N", find and delete the EPOD_USER record indicated.
- In any other case, attempt to find the indicated record first. If not found, create the record, if found, update the record.
- This change does not affect first logon messages.
Job Details
When a job is selected from the Job List, the Job Details screen is displayed.
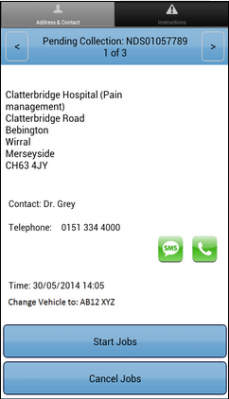
Swap Vehicle showing on Job Details

Swap Vehicle Dialogue


When delivering to the Swap Vehicle location, the information on the jobs at this location will show the Vehicle and Driver with whom to swap vehicles. This will be as sent through from C-TMS to C-EPOD. The text is expected to say "Swap with Driver X, vehicle Y and obtain signature".
The Address & Contact tab will be modified to display the vehicle registration of the vehicle that the user is expected to collect. This will be the registration of the vehicle ID sent through to C-EPOD from C-TMS, on the collection job only. This can be seen in the screen prototypes above.
This will be sent to the EPOD device in the existing field EPL_TRAILER_ID of EPOD_JOB. This field and label will only be displayed if the EPL_TRAILER_ID field has data, otherwise this will not be added to the screen.
When the driver presses the Start Job button, the screen will check whether the device is configured for vehicle changes through the trailer ID (EPL_TRAILER_VEHICLE_FLAG = "Y"). If so, and the Trailer ID of the job has been set, the device will display a pop-up alert, asking for confirmation that the vehicle has been swapped with the text "Confirm Swap Vehicle"/"Confirm swapping to vehicle X", where X is the vehicle registration, and the options are Cancel and Confirm. If the user clicks Cancel the device will return to the Job Details screen. If the user clicks Confirm, the screen will call the Vehicle Check process, to perform the defect checks on the new vehicle, if they are required.
![]() Note: The vehicle checks must be completed. This requires either that there is no way to exit the vehicle checks, or that, if pressed, an appropriate pop-up choice is provided and the user taken back to the Job Details screen.
Note: The vehicle checks must be completed. This requires either that there is no way to exit the vehicle checks, or that, if pressed, an appropriate pop-up choice is provided and the user taken back to the Job Details screen.
When the vehicle defect checks are completed, the process will then action the job. Note that the vehicle will be marked on the internal database as having had vehicle checks completed on that vehicle by that driver. Therefore, if the driver backs out of the job and re-starts at any later time, vehicle checks will no longer be required.
If the "Trailer-Vehicle" configuration is as expected, and the Trailer ID has not been set against the job, the Trailer ID should be defaulted to be the current vehicle ID (i.e. EPL_TRAILER_ID set to EPL_USER_VEHICLE of EPOD_USER).
If the "Trailer-Vehicle" configuration is disabled, the Trailer ID should be left blank and the device should not prompt for anything - this may be expanded at a future time for Trailer Swap functionality.
![]() Note: The Trailer ID will only be pre-set in this way on the Collection job from the Job Swap location.
Note: The Trailer ID will only be pre-set in this way on the Collection job from the Job Swap location.
The process will recognise that the job is a Swap Vehicle job (through the new EPOD_JOB flag EPL_SWAP_VEHICLE). In this case, the process will not call the Delivery or Collection process, but will instead simply complete the job.
The process will then action the job completion which, for the different job types, requires a different process (i.e. delivery to the swap location requires a signature, collection from it does not), all defined by the configuration against the job itself. In this case, the application will apply the logic of the Collection/Delivery process here (i.e. check the configuration and call the signature process appropriately).
- The completion for the job will require the job to be set to completed status, and also for all containers and products on the job to be set to completed also, if they have not already been cancelled. A new method to the PDA_JOB DAL object may be the best way to approach this.
- The decision regarding which Job Completion processes to instigate is through the existing nextJobEndTask function of the ColDel.js module. This will need to either be replicated in JobDetail.js or, better, extracted to an external function that can be maintained in one place and called on demand from both modules.
![]() Note: Cancellation of a Swap Vehicle delivery job will generate Return to Depot tasks for the orders not delivered. Cancellation of the Job Swap collection jobs will automatically cancel the deliveries associated to them. All of this functionality is generic and requires no changes.
Note: Cancellation of a Swap Vehicle delivery job will generate Return to Depot tasks for the orders not delivered. Cancellation of the Job Swap collection jobs will automatically cancel the deliveries associated to them. All of this functionality is generic and requires no changes.
Job Completion
Delivery jobs are expected to be configured to require a customer signature and so the device will display the Customer Signature screen. This will be completed by the other driver, capturing the driver name and signature.
Collections are expected to be configured without any required signature and so will immediately display that the job has been completed.
![]() Note: No software changes are required for this functionality above - this is the standard configuration of jobs for this customer.
Note: No software changes are required for this functionality above - this is the standard configuration of jobs for this customer.
When the collection job is completed for a job swap (i.e. a different vehicle in the trailer ID to the one that the driver is currently using), the vehicles should be updated on the device. If the new processing is required (EPL_TRAILER_VEHICLE_FLAG = "Y"), the process will also be modified to:
- Update the current user with the new vehicle from the Trailer ID (EPL_USER_VEHICLE of EPL_USER set to EPL_TRAILER_ID).
- To mark this vehicle as Active (EPL_STATUS = "Y" of the EPOD_VEHICLE record where for this site and EPL_TRAILER_ID).
- To mark the vehicle previously used on this load as inactive (set EPL_STATUS = "N" where the EPOD_VEHICLE record for this site and EPL_VEHICLE_ID of EPOD_LOAD).
- To mark the Load as now using this vehicle (EPL_VEHICLE_ID of EPOD_LOAD set to the value in EPL_TRAILER_ID).
Appendix A: TEST PLAN
| Test Script / Scenario Reference | Swap Van | Call Number(s): 318084 SCR17 |
| Test Script / Scenario Description | Test the Swap Van functionality. | PASS / ISSUES / FAIL |
| Menu Access | None | |
| Pre-requisites | Data set up as per Data Setup section. | Tested By: |
| Test Objective | To test that: vehicles and users are correctly interfaced from C-TMS; vehicles and users are incrementally updated correctly to the Android application; Swapping a van at a specific point on two trips is recognised and prompted; swapped vehicles are defect checked. | Date: |
| Step | Action | Result | Remarks | P/F |
| 1 | Import/Export Tests | |||
| This series of tests depends on developments completed under reference 317907/SCR01. | ||||
| 1.01 | Test adding a new vehicle through the webservices Import interface. | The new vehicle should be added. The Last Updated Date and Time should be now. | ||
| 1.02 | Test editing a vehicle through the webservices Import interface. Change any of the following:
|
The vehicle should be updated with the changed details. The Last Updated Date and Time should not be changed. | ||
| 1.03 | Test editing a vehicle through the webservices Import interface. Change any field but the ones in the last test. | The vehicle should be updated with the changed details. The Last Updated Date and Time should be now. | ||
| 1.04 | Test deleting a vehicle through the webservices Import interface. | The vehicle should be marked as deleted (status = "X"). The Last Updated Date and Time should be now. | ||
| 1.05 | Test adding a new user through the webservices Import interface. | The new user should be added. The Last Updated Date and Time should be now. | ||
| 1.06 | Test editing a user through the webservices Import interface. Change any field. | The user should be updated with the changed details. The Last Updated Date and Time should be now. | ||
| 1.07 | Test deleting a user through the webservices Import interface. | The user should be marked as deleted (User Active = "X"). The Last Updated Date and Time should be now. |
| Step | Action | Result | Remarks | P/F |
| 2 | Admin Tests | |||
| 2.01 | Enter the Site Maintenance screen. Ensure the new field is present and can be set and maintained. | New checkbox field "Change Vehicle through Trailer" can be set, changed and saved: The tabs are well organised, making good use of space. | ||
| 2.02 | Enter the Vehicle Maintenance screen. Find all vehicles. Press Select against a vehicle and then Delete to delete the vehicle. | The vehicle should disappear from the table of vehicles. | ||
| 2.03 | Press the find button. Filter by Status. | An option of "Deleted" is available. | ||
| 2.04 | Filter by Deleted status | Only the previously deleted vehicle is shown on the table. The status is shown as "Deleted". | ||
| 2.05 | Edit the vehicle | The status should show as "Deleted". This should be an available option in the Status drop-down list. | ||
| 2.06 | Press the Delete button. | The record should be deleted. The Vehicle table should be redisplayed with no items in it. | ||
| 2.07 | Press the New button. | The pop-up screen should be shown. The Status drop-down list should not contain "Deleted". | ||
| 2.08 | Add the vehicle back again and click Save | The vehicle should be added. | ||
| 2.09 | Enter the Users Maintenance screen. Find all users. Press Select against a user and then Delete to delete the user. | The user should disappear from the table of users. | ||
| 2.10 | Press the find button. | A Status drop-down list is available. Options of "Active", "Inactive" and "Deleted" are available. | ||
| 2.11 | Filter by "Deleted" status | Only the previously deleted user is shown on the table. The status is shown as "Deleted". | ||
| 2.12 | Edit the user. | The status should show as "Deleted". This should be an available option in the Active drop-down list. | ||
| 2.13 | Press the Delete button. | The record should be deleted. The Users table should be redisplayed with no items in it. | ||
| 2.14 | Press the New button. | The pop-up screen should be shown. The Active drop-down list should not contain "Deleted". | ||
| 2.15 | Add the user back again and click Save | The user should be added. |
| Step | Action | Result | Remarks | P/F |
| 3 | PDA Login Tests | |||
| Start from a clean installation of the device application. | ||||
| 3.01 | Set-up and log on to the device. Perform the initial grace log-on. | The LOGON_REQUEST message should not request changed data only. All data should be shown on the LOGON_RESPONSE message and downloaded onto the device. | ||
| 3.02 | Add a user and vehicle to the C-EPOD data (through Admin or WebServices). Log on as a valid user, vehicle and password. | The LOGON_REQUEST message should request changed data only. Only the added user and vehicle should be shown on the LOGON_RESPONSE message. All other data should be preserved. | ||
| 3.03 | Amend a vehicle (through Admin or WebServices), changing only the following fields:
|
The LOGON_REQUEST message should request changed data only. No vehicle data should be shown on the LOGON_RESPONSE message - all data should be preserved. | ||
| 3.04 | Amend a user and vehicle to the C-EPOD data (through Admin or WebServices). Log on as a valid user, vehicle and password. | The LOGON_REQUEST message should request changed data only. Only the changed user and vehicle should be shown on the LOGON_RESPONSE message. All other data should be preserved. | ||
| 3.05 | Delete a user and vehicle - setting the status to deleted - through Admin or WebServices. Log on as a valid user, vehicle and password. | The LOGON_REQUEST message should request changed data only. Only the deleted user and vehicle should be shown on the LOGON_RESPONSE message. These marked records should be deleted - all other data should be preserved. |
| Step | Action | Result | Remarks | P/F |
| 4 | PDA Swap Vehicle Tests | |||
Create and plan 3 orders for delivery between 2 depots (order 1 from depot 1 to depot 2, and orders 2 and 3 from depot 2 to depot 1):
Ensure that the new Site flag "Change Vehicle through Trailer" is enabled. Ensure that driver 1 and 2 are operated on separate EPOD devices, as they will be operating concurrently. |
||||
| 4.01 | Set both trips to Accepted status in C-TMS. | Both loads and all jobs should be created in C-EPOD. The jobs at depot 3 should all be Swap Vehicle jobs, with instructions to swap with the appropriate driver/vehicle. Only the collections at depot 3 should show a trailer ID assigned, which should be the vehicle ID of the other trip. Vehicle 2 on depot 1 and vehicle 1 on depot 2 should be Inactive. | ||
| 4.02 | DRIVER 1: Log on to C-EPOD as driver 1, vehicle 1 and load order 1 at depot 1. As Hoc Scan an item onto the job. Complete the job. | The job should be completed. C-TMS and C-EPOD should update all jobs for both trips for this order to show the additional item. | ||
| 4.03 | DRIVER 1: Select the delivery to depot 3 on the job list. | The Job Details screen should be displayed, showing the instructions to swap with driver 2 on vehicle 2. | ||
| 4.04 | DRIVER 1: Click Start Job. | The Delivery process should not be shown. The signature screen should be shown, requesting the customer signature. | ||
| 4.05 | DRIVER 1: Enter the driver 2 signature and name and confirm the job. | The delivery should be marked as complete, as well as all items on that delivery. The Job List should be displayed. | ||
| 4.06 | DRIVER 2: Log on to C-EPOD as driver 2, vehicle 2 and load orders 2 and 3 at depot 21. As Hoc Scan an item. Complete the job. | The jobs should be completed. C-TMS and C-EPOD should update all jobs for both trips for these orders to show the additional item. | ||
| 4.07 | DRIVER 2: Select the consolidated delivery to depot 3 on the job list. | The Job Details screen should be displayed, showing the instructions for both jobs to swap with driver 2 on vehicle 2. | ||
| 4.08 | DRIVER 2: Click Start Job. | The Delivery process should not be shown. The signature screen should be shown, requesting the customer signature. | ||
| 4.09 | DRIVER 2: Enter the driver 1 signature and name and confirm the job. | The delivery jobs should be marked as complete, as well as all items on those deliveries. The Job List should be displayed. | ||
| 4.10 | DRIVER 1: Select the consolidated Collection at depot 3 on the job list. | The Job Details screen should be displayed, showing the consolidated instructions to swap with driver 2 on vehicle 2 for orders 2 and 3. The Vehicle should be shown on the Address & Contact tab. | ||
| 4.11 | DRIVER 1: Click Start Job. | The application should prompt for confirmation of the vehicle through a pop-up. | ||
| 4.12 | DRIVER 1: Click Cancel | The Job Details screen should be displayed again. | ||
| 4.13 | DRIVER 1: Click Start Job. Click Confirm. | Vehicle Defect Checks should be prompted for. | ||
| 4.14 | DRIVER 1: Back out of the vehicle checks (if allowed) | The Job Details screen should be displayed again. | ||
| 4.15 | DRIVER 1: Click Start Job. Click Confirm. Complete vehicle checks. | The Collection process should not be shown. The signature screen should not be shown. The application should display the jobs as completed. The Job List should be displayed. The collections for order 2 and 3 should be marked as complete, as well as all items on those collections. Vehicle 1 on depot 1 should be marked as Inactive. Vehicle 2 on depot 1 should be Active. | ||
| 4.16 | DRIVER 2: Select the Collection at depot 3 on the job list. | The Job Details screen should be displayed, showing the instructions to swap with driver 2 on vehicle 2. The Vehicle should be shown on the Address & Contact tab. | ||
| 4.17 | DRIVER 2: Click Start Job. | The application should prompt for confirmation of the vehicle through a pop-up. | ||
| 4.18 | DRIVER 2: Click Cancel | The Job Details screen should be displayed again. | ||
| 4.19 | DRIVER 2: Click Start Job. Click Confirm. | Vehicle Defect Checks should be prompted for. | ||
| 4.20 | DRIVER 2: Back out of the vehicle checks (if allowed) | The Job Details screen should be displayed again. | ||
| 4.21 | DRIVER 2: Click Start Job. Click Confirm. Complete vehicle checks. | The Collection process should not be shown. The signature screen should not be shown. The application should display the job as completed. The Job List should be displayed. The collection for order 1 should be marked as complete, as well as all items on that collection. Vehicle 2 on depot 2 should be marked as Inactive. Vehicle 1 on depot 2 should be Active. | ||
| 4.22 | DRIVER 1: Select the final consolidated unloading jobs at depot 1 on the job list. | The job details screen should display, showing the details of orders 2 and 3. | ||
| 4.23 | DRIVER 1: Click Start Jobs. | The Delivery process should start, showing all the items to be unloaded from this vehicle at depot 1 for orders 2 and 3, including the Ad Hoc items loaded at depot 2. | ||
| 4.24 | DRIVER 1: Scan to unload all items. | A signature should be prompted for. | ||
| 4.25 | DRIVER 1: Complete the signature. | The 2 jobs are completed in depot 1. The Job List is displayed, and the device checks for any more work for driver 1 using vehicle 2. | ||
| 4.26 | DRIVER 2: Select the final unloading job at depot 1 on the job list. | The job details screen should display, showing the details of order 1. | ||
| 4.27 | DRIVER 2: Click Start Jobs. | The Delivery process should start, showing all the items to be unloaded from this vehicle at depot 2 for order 1, including the Ad Hoc item loaded at depot 1. | ||
| 4.28 | DRIVER 2: Scan to unload all items. | A signature should be prompted for. | ||
| 4.29 | DRIVER 2: Complete the signature. | The job is completed in depot 2. The Job List is displayed, and the device checks for any more work for driver 2 using vehicle 1. |
| Step | Action | Result | Remarks | P/F |
| 5 | PDA Regression Tests | |||
| Ensure that the new Site flag "Change Vehicle through Trailer" is disabled. | ||||
| 5.01 | Send through the jobs as the previous tests. Complete jobs through to seeing the details of the job at the collection at depot 3 by driver 1. Click Start Job. | No pop-up confirmation of vehicle should be shown. The Collection process should start, showing all items to be collected. | ||
| 5.02 | Send through a normal collection and delivery job (not at the user's depot). Select the Delivery job and click Start Job on the Job Details screen. | No pop-up confirmation of vehicle should be shown. The Delivery process should start, showing all items to be delivered. | ||
| 5.03 | Select the Collection job and click Start Job on the Job Details screen. | No swap vehicle should be shown on the Job Details. No pop-up confirmation of vehicle should be shown. The Collection process should start, showing all items to be collected. |
Appendix B: Quote & Document References
| Cost Details | ||||
| Activity | Estimate No. of Days |
No. of Days | Rate per Day (£) | Cost (£ Exc. VAT) |
| Requirements | 0.00 | 0.00 | 0 | £0.00 |
| Change Request Evaluation | 0.00 | 0.00 | 0 | £0.00 |
| Functional Specification | 1.25 | 2.00 | 0 | £0.00 |
| Technical Specification | 0.00 | 0.00 | 0 | £0.00 |
| Development | 6.00 | 8.25 | 0 | £0.00 |
| Testing and Release | 1.25 | 2.00 | 0 | £0.00 |
| Implementation | 0.00 | 0.00 | 0 | £0.00 |
| Project Management | First argument to "number_format" must be a number. | First argument to "number_format" must be a number. | 0 | £First argument to "number_format" must be a number. |
| TOTAL | First argument to "number_format" must be a number. | First argument to "number_format" must be a number. | £First argument to "number_format" must be a number. | |
| Estimate excludes training, release to live and go live support. |
B.1 References
| Ref No | Document Title & ID | Version | Date |
| 1 | NHSBT High Level Solution Design v2.0.doc | 2.0 | 21/05/2014 |
| 2 | FS 317907 SCR01 EPOD-TMS Interface | ||
| 3 | FS 317761 SCR15 NHSBT C-EPOD Collection Changes | 0.4 | 04/06/2014 |
| 4 | FS 317771 SCR17 NHSBT C-TMS Swap Van | ||
| 5 | FS 316291 SCR02 NHSBT TomTom Interface |
B.2 Glossary
| Term | Definition |
|---|---|
| EPOD | Electronic Proof of Delivery. The OBS EPOD system is CALIDUS ePOD. |
| CALIDUS eSERV | The OBS mobile system to complete Service functionality in the field. This is part of the CALIDUS ePOD system. |
| PDA | The mobile device on which the C-ePOD system will run in the field. This can be a Phone, EDA or industrial PDA, running Android. |
| DAL | Data Access Layer. A mechanism for accessing data by the system that is removed from the application, allowing for simplified access and providing protection to the data, as only approved DAL methods can be used to modify it. |
| GPS | Global Positioning System. A mechanism of retrieving accurate positioning information in the form of Latitude and Longitude (Lat-Long) co-ordinates from a device. |
| GPRS, 3G, HSDPA, Data Service | All terms referring to mobile device network connectivity, and the speed at which the device connects to the internet. |
B.3 Authorised By
Julie Scott | Project Manager | _____________________________ |
Ed Bond | Client Representative | _____________________________ |