REQ 330814 Zenith ePOD Requirements
![]()
Zenith Hygiene
CALIDUS ePOD/TTM Solution Design
CALIDUS ePOD
8th December 2015 - 0.7
Reference: REQ 330814
Contents
- 1 Introduction
- 2 Client Requirements
- 2.1 Operational Overview
- 2.2 General System Overview
- 2.3 Data Import
- 2.4 Administration
- 2.5 PDA Login
- 2.6 Vehicle Checks
- 2.7 Obtain Workload/Job List
- 2.8 Job Swap
- 2.9 Job Details
- 2.10 Standard Delivery Process
- 2.11 Opening Delivery Process
- 2.12 Collection Process
- 2.13 Break Process
- 2.14 Job Completion
- 2.15 Post-Load
- 2.16 POC/POD Documents
- 2.17 Data Export
- 2.18 Further Reporting and Queries
- 2.19 Track and Trace
- 3 Appendix A: Table of SCRs and Ballpark Estimates
- 4 Appendix B: Document References
Introduction
This document is the CALIDUS ePOD/TTM Solution Design.
Objective
The primary purpose of this document is to document the requirements gathered from Zenith Hygiene, on 14/10/2015 at the Zenith Hygiene office.
This document has been written in a manner such that it can be approved by non-technical representatives of Zenith Hygiene whilst also being of sufficient detail to allow the Functional or Technical Specification phase for this area to begin.
Scope and Limitations
This document is based on the documentation provided by Zenith Hygiene, as referred to in the appendices, as well as information gleaned from site visits and workshops with Zenith Hygiene.
- The changes will be made in the latest version of the CALIDUS ePOD system, operating the Android version of the ePOD Client application.
- Changes relating to information passed through to CALIDUS ePOD from external systems (i.e. Sage) are subject to analysis and design, which may affect the other changes in this document or generate other work if the process described within this document cannot be followed by the external system.
![]() Warning: The following changes may be out of scope of or not essential to this project, as follows:
Warning: The following changes may be out of scope of or not essential to this project, as follows:
- Multiple Time Windows
These may be reinstated at a later date at additional cost.
There is some question as the number of products being advised on a jobs for this contract. CALIDUS ePOD has been tested and sized based on the following standard loads:
- 35 standard delivery jobs with 10 totes and 20 loose products
- 10 standard delivery jobs with 10 totes and 20 loose products, plus a single opening job with 20 totes/pallets and 20 loose products.
Based on this sizing, and with modifications to the standard software (specified elsewhere in this document), the system is capable and reactive to the user with no reported issues. The impact on this to the standard functionality is as follows:
- There is no facility to see the products within a container (pallet or tote) on the device on a standard delivery.
- It is not possible to calculate the total weight or total number of unique products on a standard delivery.
If these restrictions are not acceptable, further modifications to the software may be required at additional cost.
Alternatively, the total weight and total unique products for a container or loose products could be sent through from Sage against the container (in the weight and Code 1 fields respectively) and these used to calculate and display on the Job Detail screen on the device.
![]() Note: Calculating the total weight and total unique products for a job is a task that will affect the performance of the display of the job list. Due to the high volume of data being sent through (in numbers of jobs, containers and products), this will lead to the performance of the display of the job list being hampered if shown here. The design in this document shows this displayed on the Job Details screen.
Note: Calculating the total weight and total unique products for a job is a task that will affect the performance of the display of the job list. Due to the high volume of data being sent through (in numbers of jobs, containers and products), this will lead to the performance of the display of the job list being hampered if shown here. The design in this document shows this displayed on the Job Details screen.
Due to the high volume of data being sent to the device, the automatic load updater will be slow. While this is updating data (from the Job List and Details screens), the application will delay in responding to user touches. An indicator will show when this update is occurring to prevent non-responsiveness of the application.
For crew members swapping jobs with a driver, the device will by standard request Load Start/End Metrics if configured to do so. There is no option to configured these drivers to be allowed to skip these metrics. If this is required, a further change may be required at additional cost.
For crew members swapping jobs with a driver, the device will by standard request vehicle defect checks be completed if configured for the vehicle. It is recommended that a 'CREW' vehicle be used with checks configured with no questions, and the crew members encouraged to use this in lieu of the specific vehicle. The driver should still use the specific vehicle when logging on.
Client Requirements
Listed below are the proposed processes that will be followed by the operatives using CALIDUS ePOD. Also shown are the SCRs required for this to be achieved.
Operational Overview
Zenith Hygiene are the UK's largest independent manufacturer and supplier of cleaning and hygiene chemicals and ancillary products.
General information gathered from sales meetings:
- The Primary tracking reference for Zenith is the delivery note number.
- There are potentially 500 items on one order.
- UAT scheduled for January.
- The implementation roll-out will be depot by depot.
- Zenith have their own internal IT team and will develop their interface to map to the EPOD format.
- Orders are generally 2 types:
- Opening Orders - full stocking of a premises, up to 500 products, predominantly in totes and pallets, with some loose product.
- Standard deliveries to a premises, predominantly in totes, with some loose product.
Devices
- Android operating system
- There is a very high level of scans, so an integrated barcode scanner must be available on the hardware.
- Devices to be decided in November.
 Warning: Matt Turner to advise in SDD what hardware to buy and when it must be ordered by.
 - There are currently internal questions from Zenith as to where the labels and barcodes will be generated.
General System Overview
The core systems are Sage and DPS, with OBS Logistics' systems providing execution (CALIDUS ePOD) and order tracking (CALIDUS Portal).
- Orders come into Sage.
- Sage interfaces the orders to DPS, for Routing purposes, then back to Sage.
- Sage interfaces routes and orders to CALIDUS ePOD (trigger to be defined).
- CALIDUS ePOD sends driving instructions to TomTom on demand.
- CALIDUS ePOD updates CALIDUS Portal's Track and Trace module (TTM) with information for order tracking.
Data Import
All files (inbound to and outbound from CALIDUS ePOD) will be transferred using an FTP method. It was noted that at a later stage Zenith would like to use webservices, but will use FTP to start as this is quicker for Zenith.
All jobs of any type will be sent to the CALIDUS ePOD system with a configuration element known as Job Group - this will define the process to be followed against each job, such as:
- Driver Signature.
- POC/POD document format.
- POC/POD business address and logo.
- Terms and Conditions displayed.
The Job Groups will be defined and agreed in advance between the back-end software providers and OBS Logistics.
It is expected that there will need to be at least three Job Group configurations:
- Normal Deliveries with Pricing
- Normal Deliveries without Pricing
- Opening Deliveries with Pricing
- Opening Deliveries without Pricing
- Break jobs
![]() Note: Collections may require a different Job Group, depending on the functionality required.
Note: Collections may require a different Job Group, depending on the functionality required.
![]() Note: Jobs without Pricing may be sent with 0 cost per unit, which will then display as 0 on the POD note - if this is acceptable, this means that fewer job groups need to be created and maintained.
Note: Jobs without Pricing may be sent with 0 cost per unit, which will then display as 0 on the POD note - if this is acceptable, this means that fewer job groups need to be created and maintained.
If Job Groups are sent to CALIDUS ePOD that have not been created in advance, the interface will create them as a skeleton record, defaulting the configuration.
The exact confirmation of the Job Group configuration will be decided at implementation stage.
The Jobs and Loads themselves will be interfaced with the data required to complete the jobs. This will be mapped outside of this document.
Details for each Delivery job include:
- Route ID will be sent through as the driver and a batch number or Drivers name and Date to keep the Load ID within CALIDUS ePOD unique.
- Job References, such as Delivery Number (which will be the unique job reference) and Purchase Order Number
- TM (Territory Manager - sent as the Sales Contact
- Customer Details:
- Account Number
- The addresses shown on the POC and POD Notes can be a single customer address (expected to be the account depot address) and a job address (expected to be the final delivery or collection address).
- Email addresses are required for the customers requesting POD notes to be immediately emailed to them upon confirmation of collection or delivery.
- Consolidation - When delivering orders, there could be multiple deliveries per address. Consolidation of orders at delivery/collection is required. This may be controlled manually by the driver, but is more commonly controlled by the jobs being linked together on the Route received by ePOD from Sage.
- An Owner must be specified against each job. It is expected that this will be the same for all jobs and will be agreed during the mapping exercise.
- Container (Pallet and Tote) information to include:
- Container/Tote ID - unique for the delivery
- Weight - for total weight calculations on Opening Jobs
- Code 1 - may be used to send total unique products within the container for Opening Jobs
- Product Information to include:
- Product Code
- Product Description - These are 40 characters within CALIDUS ePOD - this is consistent with the length supported by Sage.
- Product quantities regarding Ordered and Planned Delivered quantities are required.
- Unit Price - May be zero for items that require no pricing on the POD note.
- Weight
For Collection jobs, different information may need to be required, for example:
- Special Instructions - Job Instructions will be used to indicate to the driver whether the job is a collection or delivery.
- Job Group
There is a requirement for a Driver to be advised of a break. Zenith can potentially send a 'Break' job through to CALIDUS ePOD with dummy customer details etc. Zenith to confirm whether this is possible. In this instance, the following will be required:
- Special instructions
- A dummy customer (e.g. BREAK) to define break.
- A dummy Address Line 1 and Post Code, as these are always required.
- No item (container or product) details.
- A specific Job Group, as no Signatures will be required for these jobs.
![]() Note: OBS Logistics have created standard Interfacing documentation and this will be passed to the Sage development team. At this time, no mapping exercise has started. There are no expected modifications of the interface within CALIDUS ePOD, but it falls to OBS Logistics to specify and control the modifications to external systems.
Note: OBS Logistics have created standard Interfacing documentation and this will be passed to the Sage development team. At this time, no mapping exercise has started. There are no expected modifications of the interface within CALIDUS ePOD, but it falls to OBS Logistics to specify and control the modifications to external systems.
| SCR-330814-1: | ePOD-Sage Integration meetings and specification. |
There are additional interfaces to CALIDUS ePOD in order to keep standing data in line within the system, for example:
- Drivers - used to allocate loads to drivers
- Vehicles - used to allocate loads to tractors/trailers/vehicles
- Reason Codes - used when exceptions are encountered (cancelling jobs, containers, products, changing quantity)
Each of these items can be agreed in advanced or administered within CALIDUS ePOD, negating the need for a developed interface. Furthermore, if drivers are assigned to a Load on a message and are not in CALIDUS ePOD, the interface will create them as a skeleton record, with the User ID as the Driver ID sent in, and the Name and Password defaulted, with default access created. As part of the interface mapping exercise, this standing data will be agreed, regardless of whether the interfaces above are implemented within Sage.
![]() Note: It is expected that the standing data will not be transferred through from Sage to CALIDUS ePOD. It will be a manual process to keep both systems in line. At a later data Zenith may perform development to send standing data to CALIDUS ePOD. There are internal questions within Zenith regarding the high turnover of drivers due to agency workers.
Note: It is expected that the standing data will not be transferred through from Sage to CALIDUS ePOD. It will be a manual process to keep both systems in line. At a later data Zenith may perform development to send standing data to CALIDUS ePOD. There are internal questions within Zenith regarding the high turnover of drivers due to agency workers.
![]() Note: Routes (Loads) must be allocated to a driver and/or vehicle for them to be picked up by the devices. If this cannot be achieved by Sage or any routing systems attached to it, then the CALIDUS ePOD Admin system (Load or User screens) may be used to manually allocate drivers to loads.
Note: Routes (Loads) must be allocated to a driver and/or vehicle for them to be picked up by the devices. If this cannot be achieved by Sage or any routing systems attached to it, then the CALIDUS ePOD Admin system (Load or User screens) may be used to manually allocate drivers to loads.
Once Order and Trip information is received into CALIDUS ePOD, CALIDUS Portal TTM (the Track and Trace module) will be kept up to date with tracking events.
It is a requirement to send an email to the customer with a link to CALIDUS Portal TTM for tracking purposes. On receipt of the original order information, CALIDUS Portal TTM will initiate this email to the email address associated to the job's address.
| SCR-330814-2: | Customer Tracking Email |
Details of the configuration of this are shown in section Track and Trace later in this document.
When this information configured on the Order or Trip Creation event, this will trigger the email.
Sample email:
From: [email protected]
Subject: Your Zenith Order X123 is in progress
Body:
Jack Jones,
Please track your order through the following link:
http://.../
If you have any issues, please contact the Zenith team on …

Yours,
The Zenith Delivery Team

Note: This is an unmonitored email account - please do not reply to this email.
Administration
The CALIDUS ePOD system provides functionality to handle the process of Proof of Delivery electronically. The system aids this process by providing both a management interface and a client application for use completing tasks. The system supports three job types at this point which encompass the functionality to complete many more tasks with them. At this point the system can be used to complete and record; Deliveries, Collections and Services.
The ePOD administration software is a web-based application that handles all of the administrative side of the ePOD devices.
The purpose of the application can be broken down into the following sections:
- To create and maintain users of the ePOD devices.
- To create and maintain reference data for the system (e.g. Reason Codes, Vehicles, Customers).
- To create Jobs of all types and group them together onto Loads.
- To assign Loads to Users.
- To view the Jobs and Loads created.
- To print or email a POD.
![]() Note: If loads are not assigned to Drivers or Vehicles through the Sage interface, CALIDUS ePOD provides a facility to manually assign Loads to drivers, through the following mechanisms:
Note: If loads are not assigned to Drivers or Vehicles through the Sage interface, CALIDUS ePOD provides a facility to manually assign Loads to drivers, through the following mechanisms:
- Through the Load, assigning a user directly
- Through the User, selecting from any Pending Load.


Assigning a User to Loads


Assigning Loads to a user
Vehicles will be assigned automatically as the driver logs on to the device application and confirms which vehicle they are using.
Standing Data (i.e. Vehicles, Reason Codes, Users) may be uploaded in mass through the appropriate maintenance screens - XLS templates may be downloaded from the screens. ![]() Note: If enabled, Postponement reason codes may be maintained through the Reason Codes maintenance screen an uploaded through templates.
Note: If enabled, Postponement reason codes may be maintained through the Reason Codes maintenance screen an uploaded through templates.
If required and enabled, Postponement Reason Codes will be shown in the Jobs maintenance screen detail pop-up. ![]() Note: This is optional and may not be required.
Note: This is optional and may not be required.
A full guide to the use of the system can be found referenced in Appendix A.
The POD note format requires Pricing and VAT information for some customers. This will require some Admin changes to support this.
- A new VAT Rates maintenance screen.
- The Product/Container screen must be modified to allow entry of Unit Price and VAT Rate
- The Job Group Maintenance screen must be modified to allow maintenance of a flag to control whether pricing information is used for jobs in this group.
| SCR-330814-3: | Pricing. |
PDA Login
The application will have a customised style created for Zenith Hygiene, which will include:
- A blue colour scheme
- The logo on the login page.
- A larger quantity and appropriate level of information on the Product list
| SCR-330814-4: | Create customer-specific style on device. |

Login

Additionally, the layout of certain tables may be modified if required, and confirmed before development begins on the project work.
The drivers will be provided a user-name and password, and the loads will be allocated to specific drivers, ensuring that they can complete only the loads required. The users and their passwords must be configured within CALIDUS ePOD.
A driver logs on to a device using their provided user name, password and vehicle. The device will remember the last used User name and Vehicle, but will always require that the password is entered.
Vehicle Checks
When log-in is complete, the device will prompt the driver for the vehicle checks required. The content and frequency of these checks is configurable, from the CALIDUS ePOD Admin system.

Vehicle Checks Sample

Sample 2

Sample 3


Vehicle checks will be based on the information already provided and will include:
- Fuel Tank Level - a drop-down list of options, requiring selection of 1/4, 1/3, 3/4 or Full
- First Aid Kit
- Tyres
- Lights
- Oil
- Water
- Windows
- Mirrors
- COSHH Manual
- Vehicle Defects - a text entry box
All questions (except Fuel Tank Level and Vehicle Defects) are expected to be required entry, check-box only, to allow the user to confirm that the checks have taken place. Fuel Tank level will be required entry of a drop-down list. Vehicle Defects will be an optional entry of free text.
![]() Note: Vehicle checks must be completed before the user is allowed to continue - there will not be an option to postpone Vehicle Checks.
Note: Vehicle checks must be completed before the user is allowed to continue - there will not be an option to postpone Vehicle Checks.
![]() Note: Completed vehicle checks can be viewed through the CALIDUS ePOD Admin screen, which also allows some selection criteria (by vehicle, user and date). These completed vehicle checks can also be exported, either by request through a web service request, or automatically exported. Both methods export the completed vehicle checks in a standard XML format.
Note: Completed vehicle checks can be viewed through the CALIDUS ePOD Admin screen, which also allows some selection criteria (by vehicle, user and date). These completed vehicle checks can also be exported, either by request through a web service request, or automatically exported. Both methods export the completed vehicle checks in a standard XML format.
No signature is prompted for by the device during vehicle checks - the user name and password will have already ensured that the user is tagged as the checker at this time.
![]() Note: The Vehicle checks prompted for are the same for all vehicle types. If some questions are not applicable to some vehicle types, the question may be configured to be optional and/or have a "N/A" answer attached to them that the driver may select. It is also possible to have specific vehicle checks for specific vehicle types, and it is recommended that this is done for a 'CREW' vehicle, used for crew members when swapping jobs.
Note: The Vehicle checks prompted for are the same for all vehicle types. If some questions are not applicable to some vehicle types, the question may be configured to be optional and/or have a "N/A" answer attached to them that the driver may select. It is also possible to have specific vehicle checks for specific vehicle types, and it is recommended that this is done for a 'CREW' vehicle, used for crew members when swapping jobs.
Obtain Workload/Job List
When vehicle checks are complete, the assigned work-list will be downloaded onto the device, showing all the jobs in sequence on a Job List screen. If no workload has been assigned to the Driver (or vehicle), the device will tell the user that there is no work available. The driver can exit, or try to download again. If the driver has no assigned load, but is sharing work from another driver, an option to Swap Jobs is available here - see section Job Swap later for details.
Once a Load has been downloaded to the device, the device can optionally request entry of Metrics at this time. It is expected that this would contain the following checks:
- ODO - Required numeric entry
- Load Secure Visual Check
- Sack Barrow on Vehicle
All checks are expected to be required entry, and all except ODO will be check-box only. ODO will be a numeric entry. Load Metrics must be completed before the trip may be started.

Load Metrics

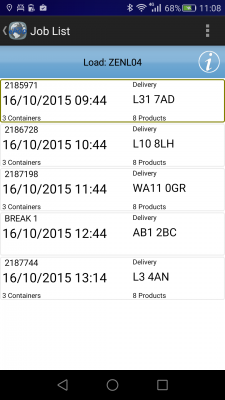
Once the metrics are complete (or if there are no metrics configured), the device will display the details of the load in a Job List.

Job List

The list of the jobs on this load will show the following:
- Job Reference - configured to be one of the following:
- Job ID - ePOD internal unique job reference
- Job Code - as mapped from Sage
- Cust Ref - as mapped from Sage
- SO Ref - as mapped from Sage
- Ext Ref - as mapped from Sage
- Job Type - Collection/Delivery
- Customer Name - Bold
- Planned Date/Time
The screen will display the status of the jobs on the load through a coloured outline, as follows:
- Red - Cancelled
- Green - Completed
- Blue - Completed (with amendments)
- Yellow - In Progress
- None - Pending/Incomplete
Note that this status is also displayed prominently in the Job Details screen (following).
The jobs are displayed in the sequence in which they should be completed, with the first job selected. However, the jobs can be viewed in any sequence by clicking the line of the job you want to complete - the device will display the Job Details page.
The Menu button can be used here to allow the following options:
- Show All / Outstanding Jobs - Toggle between showing all or only incomplete jobs.
- Refresh - Refresh the Load/Work-list
- Consolidate or Deconsolidate groups of jobs
The system can be configured to control allowing the drivers' ability to complete jobs out of sequence, as follows:
- No re-sequencing of jobs - this is not allowed by the driver - the jobs must be completed in the order planned, or cancelled if they cannot be completed.
- Confirm re-sequencing allowed - this requests the user to confirm first.
- Always allowed - no confirmation.
This configuration will be decided at the point of implementation, but is expected that re-sequencing is not allowed. Note that, if enabled, Postponed jobs will not prevent starting a job later in the sequence than the postponed job.
If any jobs have been added to a Load while the load is in progress, the Refresh option (which also is timed to happen on a regular interval) will get the details of the new job and add it to the job list, showing the user a summary of the job(s) added. This functionality will also pick up any amendments to the jobs, for example, if quantities have been amended or products have been added/removed. This can also be triggered by long-pressing against the label showing the load identifier on the screen.
Jobs can be cancelled by the driver at this time, by long-pressing on the job in the table and choosing Cancel from the pop-up options. The user will be prompted to enter a reason why this job is being cancelled, and optionally take a picture. If a job is confirmed cancelled, the device will show the Job List again with the cancelled job removed from the list.
If enabled, the cancellation option will also show Postponement reason codes, clearly labelled as such in the drop-down list of reasons. In the case that a postponement reason code is selected rather than a cancellation reason code, the driver will be allowed to optionally enter a comment, and the option to take an image will be removed. If confirmed, the postponed job will not be removed from the list, but will instead be marked as Postponed - see later for more information on Postpone Jobs. Note that, if enabled, Postponed jobs will not prevent starting a job later in the sequence than the postponed job.
The system may be configured for Image Capture in the following ways:
- Force Image Capture at all times when cancelling or changing quantity (i.e. at Job and Detail level)
- Optional Image Capture at all times.
Separate to the above configuration, Image Capture at the end of a job (if enabled) may be configured to be optional or required.
The driver may choose to consolidate jobs together, to process them together for speed. This is available through several options on the device, allowing:
- Manual consolidation, by selecting all jobs to be consolidated individually, accessible through the Consolidate menu option.
- To group single jobs with other consolidations, through the Create Group option accessed when long-pressing against a job or consolidated group.
Additionally, jobs may already be consolidated together when the load was created - this is expected to be the case for the appropriate jobs received from Sage.
![]() Note: This functionality can be disabled if not required.
Note: This functionality can be disabled if not required.
When consolidated jobs are present, a single line is shown summarising the information from all the jobs (i.e. total number of consignments, etc). These can be seen in more details when completing the job (see later in this document).
The driver also has access to several functions to deconsolidate consolidated groups of jobs:
- Singly, by selecting the job to split out, through the Deconsolidate menu option.
- Breaking the entire group back to single jobs, through the Break Group option accessed when long-pressing against a consolidated group.
![]() Note: This functionality can be disabled if not required.
Note: This functionality can be disabled if not required.
It is a requirement from Zenith Hygiene to postpone a job, and enter a reason code for this.
| SCR-330814-5: | Postpone Job with Reason Code |
If enabled, an option to Postpone Job will be available when long-pressing against a job in the list. If selected, the driver will be taken to the Exception screen, where they will be provided a list of Postponement reason codes only and an optional comment box. If confirmed, the job will be marked as Postponed in the list, and other jobs may then be started ahead of it.
As an extension to this, it is a future requirement to support multiple delivery windows within Sage and the CALIDUS suite of products. This is out of scope of this project at this time. When required, a separate change request will require raising with OBS Logistics to add this functionality.
| SCR-330814-6: | Multiple Time Windows |
Job Swap
Drivers go out in pairs. When they arrive at a location they spread the work between them. This cannot be planned by Sage. To achieve this, CALIDUS ePOD provides Job Swap functionality in several different ways.
A user who has not been provided a Load can swap jobs from another driver's load - in this case, a new load will be created for the driver.

Job Swap - No Load

Job Swap - Enter Swap Load


A user that has been provided a load can still swap jobs - this is available from the menu on the Job List screen.

Job Swap menu from Job List

The user will then be prompted to enter the Load from which the jobs are being swapped, as above.
The device will display a list of jobs from the indicated load.

Job Swap List

The user can select the jobs to be swapped, or can scan a container (Pallet or Tote) to select the job delivering that container.
Once all jobs have been selected for swapping, the user will click Swap Jobs. This will copy the jobs from one load to the other. For Delivery jobs, this will create a Collection jobs on the driver's load. These must be completed as normal collections to indicate that all the items have been swapped correctly.

Job List showing new jobs

Job confirming swap


The two loads will be updated in the Admin system to show that the jobs have been swapped.
Swapped jobs (deliveries or collections) will be completed as normal jobs, as shown in the following sections.
When a new load is created for a crew member for the swapped jobs, the device will also create a Return to Depot job - this is created to keep the load open for more potential swaps later in the trip. This may be completed after all jobs on the load are complete.
When a new load is created for a crew member for the swapped jobs, the device will require entry of load start metrics, if configured for the operation. Additionally, when the swap load is complete, Load End metrics will be requested if configured. If this is required to be removed for Job Swap loads, this will require further development at additional cost. This has not been specified in this document.
When a crew member logs onto the application, if they choose a vehicle they will be prompted for vehicle checks. This can be disabled by creating a 'CREW' vehicle on CALIDUS ePOD. This will be configured to require no vehicle defect checks. The crew members should be encouraged to use this vehicle for job swapping.
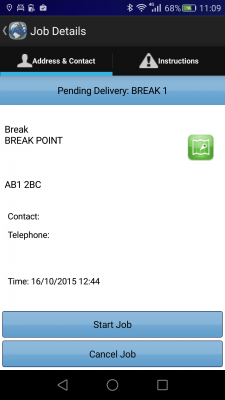
Job Details
Selecting a job from the Job List will show the user the job report and customer contact details (on a Job Details screen). The user can back out of the selected Job and view any Job on the list.

Job Details - Address and Contact

Instructions


The screen has several Tabs, showing:
- The Job Type (Collection, Delivery, Service)
- The customer details (Customer Code, Name, Address and Postcode)
- The contact information (Contact name and number)
- The Instructions for the job
Clicking on the tabs will display the information.
If the jobs are consolidated, the < and > buttons can be used to move between the all the consolidated jobs, to see any specific details. The Instructions tab will show all instructions for all the jobs, as well as any additional information passed through for the job.
This Instructions tab will be modified to display the total weight of all the products, and the count of unique products on the job or jobs.
| SCR-330814-7: | Display Total Weight/Products |

Total Weight/Unique Products display

The screen allows the user to contact the customer (through text or phone).
When the user has selected their Job, they can choose the Job with the Start Job button.
If there have been instructions provided on the Job, the device will switch to the Instructions tab, to force the user to see the instructions before starting.
When a Job is successfully started, this will take the Job to 'In Progress' status.
Jobs can be cancelled by the driver at this time by clicking the Cancel Job button. The user will be prompted to enter a reason why this job is being cancelled, and optionally take a picture. If a job is confirmed cancelled, the device will show the Job List again with the cancelled job removed from the list. If enabled, the cancellation option will also show Postponement reason codes, clearly labelled as such in the drop-down list of reasons. As before, in the case that a postponement reason code is selected rather than a cancellation reason code, the driver will be allowed to optionally enter a comment, and the option to take an image will be removed. If confirmed, the postponed job will not be removed from the list, but will instead be marked as Postponed - see later for more information on Postpone Jobs.
Note that, if enabled, Postponed jobs will not prevent starting a job later in the sequence than the postponed job.
The screen allows the user to navigate to the customer's address (available only after choosing to start the job).
The device will use any navigation application installed on the device for this navigation. It is expected that this will be through the TomTom navigation application.
Once the user arrives as the destination, they can indicate this and start processing the Job by clicking the Arrive Job button.
When confirmed complete, the device will move on to the Delivery or Collection process, depending on the job type.
Standard Delivery Process
Both container and loose product delivery is required within the same job. The delivery can consist of a Pallet or Tote with multiple products (with only the pallet or tote needing to be scanned) and also loose products, which will be scanned individually.
The following are the standard tabs that are expected to be displayed:

Job Details Tab

Containers Tab

Products Tab


![]() Note: There is an optional User Notes tab that can be displayed, allowing the user to enter any notes against the Job before completion.
Note: There is an optional User Notes tab that can be displayed, allowing the user to enter any notes against the Job before completion.
The Job Details tab has multiple sections:
- Contact information
- Address information - if supplied, both current address and origin address are shown.
- Job Instructions
From the Containers tab, the device will show a list of the pallets or totes that are to be delivered on these jobs.
![]() Note: The Containers tab will only be displayed if there are Pallets or Totes as part of the delivery.
Note: The Containers tab will only be displayed if there are Pallets or Totes as part of the delivery.
The Container list may show the following items per line:
- Container ID
- Type
- Status
- Total Products
- Code 1 (a multi-purpose code)
It is expected that, as part of the styling process, the layout of this table will be modified (i.e. elements removed, or resized). The data displayed is dependent on the information passed to CALIDUS ePOD from Sage. At this time, it is expected that the following will be displayed:
- Container ID
- Type
- Status
If there are also loose products to deliver, a Loose Products container will be displayed in the same way.
If this is a consolidated job, the list will show all containers required to be delivered on all jobs - containers will only appear once, no matter how many jobs have products in that container. The list will also display the customer code and the number of consignments in this container.
Each container on the list can be confirmed as delivered by either:
- long-clicking on the item in the list and choosing Deliver from the pop-up menu.
 Note: This option can be removed by configuration if not required.
 - entering the container ID manually and clicking Deliver
- scanning the container ID
When marked as delivered, the item will be removed from the list.
![]() Note: The system will be configured so that, regardless of whether a pallet or tote contains products, the device will mark all as delivered when the container is confirmed delivered - the user will not be given the option to scan the products in a container.
Note: The system will be configured so that, regardless of whether a pallet or tote contains products, the device will mark all as delivered when the container is confirmed delivered - the user will not be given the option to scan the products in a container.
If a container can't be found on the vehicle, it can be removed from the list with the pop-up option Cancel. Again, the exception screen will be shown where the driver can enter the reason why.
![]() Note: During this exception process, the user will have the facility to take a photo against the cancelled container, but this is optional.
Note: During this exception process, the user will have the facility to take a photo against the cancelled container, but this is optional.
For Loose Products, clicking on the item in the container list will immediately display the Products tab, which will display a list of the loose products (i.e. not on a pallet or tote) to be delivered, showing:
- The Product Code
- The Sequence
- The full Description
- Any Customer Reference associated to this product
- The Planned Quantity
- The Item Type
- The Unit Type
It is expected that, as part of the styling process, the layout of this table will be modified (i.e. elements removed, or resized). The data displayed is dependent on the information passed to CALIDUS ePOD from Sage. It is expected to be:
- The Product Code
- The full Description
- Any Customer Reference associated to this product
- The Planned Quantity
If this is a consolidated job, the list will show all products required to be delivered on all jobs, including an indication of which order this product is for. ![]() Note: If the same product is present on two jobs consolidated together, the product will appear twice, to allow accurate recording of quantity delivered.
Note: If the same product is present on two jobs consolidated together, the product will appear twice, to allow accurate recording of quantity delivered.
![]() Note: There is some concern that the quantity of products on a job (estimated as 500) will make the application unstable, due to the memory requirements of building a large Product list, and to ensure that the device will receive only container information (pallet or tote), without contained products, to reduce the size of the jobs on the device. A change to the CALIDUS ePOD will be required to handle this.
Note: There is some concern that the quantity of products on a job (estimated as 500) will make the application unstable, due to the memory requirements of building a large Product list, and to ensure that the device will receive only container information (pallet or tote), without contained products, to reduce the size of the jobs on the device. A change to the CALIDUS ePOD will be required to handle this.
| SCR-330814-8: | Amendments to handle large numbers of Products |
Each product on the list can be confirmed as delivered by either:
- long-clicking on the item in the list and choosing Deliver X from the pop-up menu. Note: This option can be removed by configuration if not required.
- entering the product code manually and clicking Deliver X from the pop-up menu.
- scanning the product code and clicking Deliver X from the pop-up menu.
When marked as delivered, the item will be removed from the list.
The driver can change the quantity by choosing Change Quantity from the pop-up menu - the device will direct them to an exception screen where the quantity can be changed, and a reason code entered as to why the quantity is changed. This will allow entry of quantity, and will display the unit type, for clarification. The product description will also be displayed here.
If a product can't be found on the vehicle, it can be removed from the list with the pop-up option Cancel. Again, the exception screen will be shown where the driver can enter the reason why.
![]() Note: During this exception process (either quantity change or product cancellation), the user will have the facility to take a photo against the product changed, but this is optional. Note that this is optional at the driver's discretion, rather than depending on the reason code selected by the driver.
Note: During this exception process (either quantity change or product cancellation), the user will have the facility to take a photo against the product changed, but this is optional. Note that this is optional at the driver's discretion, rather than depending on the reason code selected by the driver.
When all containers and products have been confirmed as delivered or cancelled, the Delivery process will close and the user will be directed to the Job Completion process.
Opening Delivery Process
Both container and loose product delivery is required within the same job. The delivery will consist of Pallets or Totes with multiple products (with products requiring to be scanned) and also loose products, which will be scanned individually.
The screens will look as per a normal delivery.
From the Containers tab, the device will show a list of the pallets or totes that are to be delivered on these jobs.
![]() Note: The Containers tab will only be displayed if there are Pallets or Totes as part of the delivery.
Note: The Containers tab will only be displayed if there are Pallets or Totes as part of the delivery.
The Container list will be displayed with the same information as a normal delivery.
If there are also loose products to deliver, a Loose Products container will be displayed in the same way.
Each container on the list can be confirmed as delivered by the same mechanism as a normal delivery, as follows:
- long-clicking on the item in the list and choosing Deliver from the pop-up menu. Note: This option can be removed by configuration if not required.
- entering the container ID manually and clicking Deliver
- scanning the container ID
When selected in this way, the device will display the products within this pallet or tote only. The products list will display the same level of information as Loose Products on a normal delivery.
Products within the container will then be scanned and marked as delivered in the same way that loose products can be scanned on a normal delivery.
When all products within a container are marked as complete (delivered or cancelled), the device will redisplay the Containers tab and will remove the completed container from the list
If a container can't be found on the vehicle, it can be removed from the list with the pop-up option Cancel. Again, the exception screen will be shown where the driver can enter the reason why.
![]() Note: During this exception process, the user will have the facility to take a photo against the cancelled container, but this is optional.
Note: During this exception process, the user will have the facility to take a photo against the cancelled container, but this is optional.
Loose Products may be delivered as in a normal delivery, clicking on the Loose Products entry in the container list. The products list will display the same level of information as Loose Products on a normal delivery.
Each product on the list can be confirmed as delivered in the same manner as a normal delivery, as follows:
- long-clicking on the item in the list and choosing Deliver X from the pop-up menu. Note: This option can be removed by configuration if not required.
- entering the product code manually and clicking Deliver X from the pop-up menu.
- scanning the product code and clicking Deliver X from the pop-up menu.
When marked as delivered, the item will be removed from the list.
The driver can change the quantity by choosing Change Quantity from the pop-up menu in the same way as a normal delivery.
If a product can't be found on the vehicle, it can be removed from the list with the pop-up option Cancel. Again, the exception screen will be shown where the driver can enter the reason why.
![]() Note: During this exception process (either quantity change or product cancellation), the user will have the facility to take a photo against the product changed, but this is optional. Note that this is optional at the driver's discretion, rather than depending on the reason code selected by the driver.
Note: During this exception process (either quantity change or product cancellation), the user will have the facility to take a photo against the product changed, but this is optional. Note that this is optional at the driver's discretion, rather than depending on the reason code selected by the driver.
When all containers and products have been confirmed as delivered or cancelled, the Delivery process will close and the user will be directed to the Job Completion process.
Collection Process
![]() Note: There is currently no concept of a Collection within Zenith's current version of Sage. All orders will come through as a delivery but will highlight to a driver that it is a collection through the use of Special Instructions against the job. It has been highlighted to Zenith this could cause confusion with the drivers.
Note: There is currently no concept of a Collection within Zenith's current version of Sage. All orders will come through as a delivery but will highlight to a driver that it is a collection through the use of Special Instructions against the job. It has been highlighted to Zenith this could cause confusion with the drivers.
Break Process
There is no specific Break functionality within CALIDUS ePOD.
If breaks are interfaced to CALIDUS ePOD from Sage as Deliveries, they will be displayed and process as follows:
Job List showing a break
Details of a Break job
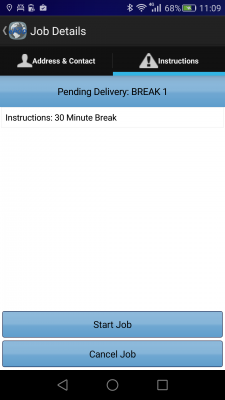
Instructions of a Break Job
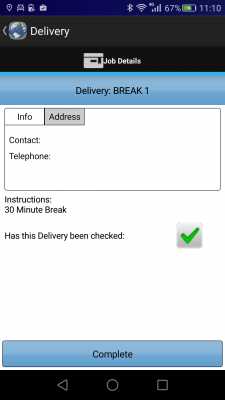
Completing a Break job


The job must still be started, arrived and completed as a normal job.
Once completed by pressing the Complete button, the job will be configured to complete without any signatures (i.e. the following section does not apply to Break jobs).
Job Completion
All jobs will be sent to the CALIDUS ePOD system with a configuration element known as Job Group - this will define the process to be followed against each job, configuring the following items:
- The Terms and Conditions displayed
- Customer Signature required
- Driver Signature required
- Completion document format
All of these processes are controlled during Job Completion.
![]() Note: At this time, the expectation is that the configuration will require the Customer only to sign for collection and delivery of goods.
Note: At this time, the expectation is that the configuration will require the Customer only to sign for collection and delivery of goods.
The device will prompt for Customer Signature.

Signature and T&Cs

Containers

Products


The signatory will default to the customer contact sent through on the job, but this can be changed. If one is not sent through, the driver will be forced to enter one.
The screen displays several tabs, allowing the user to see:
- Terms and Conditions, plus any data entry the user is required to confirm. These are configurable.
- Pallets and Totes collected/delivered.
- The quantity of loose products only being collected/delivered.
- If this is a consolidated group of jobs, a further tab will display the Job references.
The Terms and Conditions are configurable, but will appear in the same place on the screen (under the signature). Unlimited T&Cs text can be configured, along with check-boxes and data entry. This may be configured at any time.
It is expected that this process will be modified to allow the user to confirm the email of the contact and the Telephone Number for POD purposes. To achieve this, the Email and Telephone Number will be added to the Terms and Conditions tab.
| SCR-330814-9: | Re-key Email/Contact/Tel at Signature |
The process will display the original email and Telephone Number and allow this to be changed. A change has also been requested to confirm the customer contact, which will be through the entry of the Signatory on this screen. For all fields, the server will be modified as part of this change to update the customer record with this information.
As each job (or group of jobs) is completed, the information is updated back to the system, with all information captured on the device (actual times, quantities, signatures, images, updated email address, etc) updated. The updates are sent whenever the driver has an internet connection, and may be delayed until that time.
The user will be returned to the Job List screen and the completed Job will be removed from the list.
Post-Load
Once all Jobs have been completed, the Load will be marked as completed when the user returns to the Job List screen.
At this time, if configured to do so, the device will prompt the user to enter Load End Metrics.

Load End Metrics

Load End Metrics


The metrics required are expected to be:
- ODO - Numeric entry
- Fuel Cost - Numeric entry
- Litres Bought - Numeric Entry
- Parking Ticket Number - optional text entry
All checks will be required, except Parking Ticket Number.
![]() Note: The following checks may also be added if this is required:
Note: The following checks may also be added if this is required:
- Delivery Notes Signed/Printed
- Full Uniform Worn
- Failures phoned in
- Checked back at depot
- Sack Barrow Returned
All of these metrics are expected to be required entry, check-box only.
![]() Note: Vehicle Checks may be configured for the end of the load. However, this document assumes that the end load checks are provided by the Load End Metrics checks. Regardless, a second check may be configured if required.
Note: Vehicle Checks may be configured for the end of the load. However, this document assumes that the end load checks are provided by the Load End Metrics checks. Regardless, a second check may be configured if required.
Once complete, the device will attempt to download a new load for the user and/or vehicle. If one has not been provided, the device will confirm this and allow the user to check again or log off the system.
POC/POD Documents
![]() Note: The POD document format is being changed for the purposes of this project. The current format has been provided as a sample, as below:
Note: The POD document format is being changed for the purposes of this project. The current format has been provided as a sample, as below:

Sample POD Format
It is expected that the new POD format will remove or modify the existing format in some small way. As such, a prototype of how this will look within {{#var:System)) has not at this time been completed. This will be done at functional specification stage.
At this time, the following elements are on the POD format, and can be supported by the CALIDUS ePOD system, except where indicated.
Header
- Header with Logo - Fixed
- Zenith Address/contact information
- Driver Name
- TM (Territory Manager) Name
- "DELIVERY NOTE" - Fixed Text
- Date
- Account Number
- Purchase Order Number
- Delivery Number
Addresses:
- INVOICE TO
- DELIVERY TO
Product List:
- Product Code
- Product Description
- Qty Ord
- Qty Del
- Unit Price Note: Not displayed if the job is configured to not have pricing information
- Total Price Note: Not displayed if the job is configured to not have pricing information
- Weight
Footer:
- "HAVE YOU TRIED OUR ON-LINE ORDERING WEBSTORE WWW.ZHGPLC.COM" - Fixed Text
- Print Name
- Signature
- Date
- NETT Note: Not displayed if the job is configured to not have pricing information
- VAT Note: Not displayed if the job is configured to not have pricing information
- TOTAL Note: Not displayed if the job is configured to not have pricing information
- NOTES
- Footer with logos - fixed.
The POD produced will expect to be paginated to accommodate the quantity of products on a single delivery job.
No images are required to be shown on the POD note, whether they are taken on the device or not.
The definition of what data maps to which fields on the POD depends on the mapping of the interface of jobs into and will be confirmed after discussion with Sage and at functional specification stage.
| SCR-330814-10: | POD Note Format |
Data Export
All files (inbound to and outbound from CALIDUS ePOD) will be transferred using an FTP method. It was noted that at a later stage Zenith would like to use webservices, but will use FTP to start as this is quicker for Zenith.
When jobs have been completed all the job is updated in the CALIDUS ePOD server, these jobs are then available for exporting to external systems. This is also true of cancelled jobs. All completed and cancelled Jobs may be transferred to Sage through the standard interface. This is a pushed update, sent at a configurable interval, usually every 5 minutes.
- All shortages at delivery (i.e. when CALIDUS ePOD cancels or changes the delivered quantity of an item) may go on back order - this depends on the reason for the quantity change.
- All cancelled collections/deliveries (i.e. the driver cancels the job) should be manually re-booked within Sage - the interface back to Sage must be confirmed, and this must be handled by the Sage interface.
There are no expected changes to the existing export format or methodology. The information regarding this has been forwarded to the Sage consultants.
For jobs that have been completed, POD documents will be sent to the customer. In this case, the jobs that require this would have the email address populated when the job is sent to , or entered an the POD device at confirmation of the delivery. As part of the export, any jobs with this email address will be automatically sent with a PDF attachment of the POD report. Multiple recipients may be supported through the use of comma- or semicolon-delimited lists of emails addresses (the exact delimiter is based on the email server defined for the system's use).
![]() Note: This feature requires access to a mail server for the use of the customer. If this is hosted by OBS Logistics Ltd, this would be expected to be through the OBS Logistics mail server.
Note: This feature requires access to a mail server for the use of the customer. If this is hosted by OBS Logistics Ltd, this would be expected to be through the OBS Logistics mail server.
Automatic emails may also be sent to a central email address if required. This may be configured at any time.
The CALIDUS ePOD system may be modified to allow POD notes to be sent via FTP or other file transfer to an external document handling system. This is required for Zenith Hygiene. The files may be images or PDF format, and the name may be configured in several different ways.
Further Reporting and Queries
The CALIDUS ePOD Admin system allows admin users (i.e. non-PD users) the ability to access loads, jobs and product details, as mentioned previously.
When jobs are being processed, the status of the jobs and loads changes to show progress:
- Pending - not yet assigned to a driver.
- Assigned - Assigned to a driver, but not yet started. This is highlighted grey.
- In Progress - Started by the driver. This is highlighted yellow.
- Complete - Complete by the driver - This is highlighted green.
- Cancelled - Job cancelled by the driver. This is highlighted red.
- Complete (With Amendments) - job completed, but not exactly as planned. This is also highlighted green.
POD/POC reports and full product details can be accessed from this screen.
User activity may also be accessed, to show auditing of messages from the user, for example:
- Log on
- Vehicle defect checks complete
- Load picked up
- Job started
- Job arrived
- Job completed
- Load completed
- Log off
Track and Trace
CALIDUS Portal TTM (Track and Trace) provides several enquiry and auto-updating screens to allow information to be collated and provided in easy to use formats. The system supports multiple user-defined groups that control the configuration of a user, allowing the control of data access for various different purposes, for example:
- End customers
- Contracts/Owners
- Customer Service Queries
- Transport Office
It is expected that ETAs will be shown on the Portal - this functionality requires the purchase of a Nokia Maps account. If the system is hosted through OBS Logistics, this cost may be part of a hosting agreement.
The following is a brief description of functionality available within CALIDUS Portal TTM Module - full user guides are referenced in Appendix B.
Trip/Order Enquiry
This screen allows CALIDUS Portal users to track the status and events held against trips and orders, selecting them through a large variety of parameters.
Order Enquiry

Order Enquiry Parameters
The enquiry responds with a results table summarising the matched orders:

Order Enquiry Results
These results can be expanded for further details of the Trip Stops, and the order can be clicked to drill-down into specific details of the order. This table data can also be exported to XML format in multiple ways:
- Manifest - Trip/Stop information
- Manifest/Order - Trip/Stop/Order information
- Order - Order Header information
- Order Detail - Order Header / Order Detail information
- Order Events - Order Header / Event information
Trip Enquiry

Trip Enquiry Parameters

Trip Enquiry Results
These results can be expanded for further details of the Orders, and the order can be clicked to drill-down into specific details of the order. This table data can also be exported to XML format in multiple ways:
- Manifest - Trip/Stop information
- Manifest/Order - Trip/Stop/Order information
- Order - Order Header information
- Order Detail - Order Header / Order Detail information
The screen supports configurable RAG colouration, to highlight trips that are late or incomplete, and ETAs.
Order Detail

Order Details
Details can be found of the following:
- Events – the Messages received by the LOTS system via WMS, TMS and other systems.
- Info – Details of all of the header information stored on the system
- Route – Details of the trips/stops that the order is currently assigned to.
- SO Details – the Stock details received from the TMS or WMS.
- Reasons – Details of the Order level reasons placed against the order.
- Map – A map of the current location of the order (if co-ordinates have been supplied by an external system). The Mapping page will only be available to groups where the ‘Mapping’ parameter against the User Group is set to ‘Available’ and where licensing is available.
- Notes – Allows the entry of user notes against the order. These are only kept on the Portal system.
If enabled, Postponed jobs will be clearly visible in these screens, as follows:

Events Tab showing the Postponement event - prototype

Reasons Tab showing the Postponement reason code - prototype
Airport Screens
CALIDUS Portal supports several Airport-style screens:
- Arrive/Depart screen
- Order Status screen
Both screens allow for customised parameter entry, and refreshing data at intervals, making them ideal for overhead displays or continuous transport queries
Sample results pages:

Arrive/Depart screen

Order Status Screen
Both screens allow the user to drill-down or expand on data to get more details, through pop-ups or further details screens.
Tracking Emails
CALIDUS Portal can be configured for automatically triggered emails at certain system or operational events.
Events are configured in the Event Maintenance page:

Portal Events Maintenance
If enabled, each event has a button which will take the user into the Event Email maintenance page.

Portal Events Maintenance
Both Subject and Body of the email can be completely defined through a text area. Clicking on the Data Field icon allows data items to be inserted in the text, from the following fields:
- Contact Name
- Owner
- Order Number
- Booking Reference
- TMS Reference
- PO Reference
- Customer Name
- Planned Arrival Date/Time
- Delivered Date/Time
- Signed By
- Tracking Link (only Body)
Customer Tracking Gateway
On clicking the tracking link from an external system or email, the customer is asked to enter the consignment reference (the customer reference) they have been provided and the post code for the delivery location of the order being checked. Note that the consignment number can be sent through from the calling system, to help the customer obtain their details but post code must always be entered by the customer as a security measure.

Enter Consignment
The gateway then checks the order on the system, matching the customer reference and post code to the information on the system. The search for the order to be checked is not case-sensitive - the gateway will match the entry if entered in upper or lower case, and the postcode entered can be in any format, with or without spacing. If an order is not found that matches the information entered, the screen will display that no information can be found in a pop-up message.
If a unique order is found, the gateway displays a summary of the information on the order being checked, similar to the following:
![]()
Consignment Tracking
![]() Note: Only information from the order being checked is displayed on this screen, as well as some information relating to times and execution of the Trip on which this order is being delivered. At no time is any information from any other order (on this trip or otherwise) displayed on this screen.
Note: Only information from the order being checked is displayed on this screen, as well as some information relating to times and execution of the Trip on which this order is being delivered. At no time is any information from any other order (on this trip or otherwise) displayed on this screen.
The screen displays:
- The Order Status of the order being checked, which may be one of several items, based on how the systems are being used:
- Ordered.
- Loaded.
- Out for Delivery.
- Delivered.
- Cancelled
- Last Delivery Sequence - The number of the last stop serviced on the trip that is delivering the order being checked. Note: This is only the stop number, not the full address of the last stop serviced.
- Your Delivery Sequence - The stop on which the order being checked will be delivered. Note: This is only the stop number, not the full order address - this is displayed below.
- Order Reference - The customer's order reference of the order being checked.
- Full Address - The full delivery address of the order being checked.
- Courier - If known, the courier completing the delivery of the order being checked.
- Driver - The full name of the driver completing the trip on which the order being checked is being delivered.
The screen also displays a time-line bar, showing all the statuses the order being checked has passed though. Successfully-completed statuses are coloured green, and the date/time the status was changed (if provided) is displayed under the status on the bar.
If the order being checked is out for delivery, the screen displays a map showing:
- The last known location of the vehicle making the delivery.
- The customer’s delivery location
![]() Note: The last known location of the vehicle making the delivery could be the address of another customer receiving a delivery on that trip. However, no address information or labels are shown against the locations displayed in the map and no information is divulged regarding the reason the vehicle is currently at that location.
Note: The last known location of the vehicle making the delivery could be the address of another customer receiving a delivery on that trip. However, no address information or labels are shown against the locations displayed in the map and no information is divulged regarding the reason the vehicle is currently at that location.
If provided to CALIDUS Portal, this screen can also display the ETA at the location of the order being checked. ![]() Note: This functionality requires the use of HERE maps for calculation of the ETA.
Note: This functionality requires the use of HERE maps for calculation of the ETA.
If provided to CALIDUS Portal, this screen can also display the Signatory and Signature on this gateway screen, when the order being checked is marked as Delivered.

Gateway - Consignment Signature
Appendix A: Table of SCRs and Ballpark Estimates
Essential
| SCR# | System | Area | Description | Estimate (Days) | Notes |
| 1 | Sage | Integration | ePOD-Sage Integration meetings and specification. | 1.00 | |
| 2 | Portal | Customer Tracking Email. | 2.75 | OBS Cost | |
| 3 | ePOD | Consolidation | Pricing. | 10.00 | |
| 4 | ePOD | Look and Feel | Create customer-specific style on device. | 0.00 | |
| 5 | ePOD | Delivery | Amendments to handle large numbers of Products. | 8.00 | OBS Cost |
| 6 | ePOD | Reporting | POD Note Format. | 4.50 |
Notes:
- Any high level ballpark estimates for development are based on the basic information provided and are subject to detailed design and creation of an SCR.
Non Essential
| SCR# | System | Area | Description | Estimate (Days) | Notes |
| 1 | ePOD/Portal | Exception | Postpone Job with Reason Code. | 13.50 | 2 |
| 2 | ePOD/Portal | Tracking | Multiple Time Windows | 0.00 | Out of Scope |
| 3 | ePOD | Delivery | Display Total Weight/Products | 2.75 | |
| 4 | ePOD | Signature | Re-key Email/Contact/Tel at Signature. | 4.50 |
Notes:
- Any high level ballpark estimates for development are based on the basic information provided and are subject to detailed design and creation of an SCR.
- Cost shown is for a full tracking solution within EPOD and Portal. If Portal tracking only is required, the cost in 9d. If Sage is to cancel and reissue a new job, 0d.
Appendix B: Document References
B.1 References
| Ref No | Document Title & ID | Version | Date |
| 1 | UG 291094 EPOD Admin User Guide | 3.0 | 16/10/2014 |
| 2 | UG 291097 EPOD Client User Guide | 4.0 | 16/10/2014 |
| 3 | FS 291096 Interface with CALIDUS ePOD | 1.0 | 05/02/2015 |
| 4 | Portal User Guide - TTM | 6.8 | 12/11/2015 |
B.2 Glossary
| Term | Definition |
|---|---|
| EPOD | Electronic Proof of Delivery. The OBS EPOD system is CALIDUS ePOD. |
| CALIDUS eSERV | The OBS mobile system to complete Service functionality in the field. This is part of the CALIDUS ePOD system. |
| PDA | The mobile device on which the C-ePOD system will run in the field. This can be a Phone, EDA or industrial PDA, running Android. |
| DAL | Data Access Layer. A mechanism for accessing data by the system that is removed from the application, allowing for simplified access and providing protection to the data, as only approved DAL methods can be used to modify it. |
| GPS | Global Positioning System. A mechanism of retrieving accurate positioning information in the form of Latitude and Longitude (Lat-Long) co-ordinates from a device. |
| GPRS, 3G, HSDPA, Data Service | All terms referring to mobile device network connectivity, and the speed at which the device connects to the internet. |
B.3 Authorised By
Michael Rayner | Zenith Hygiene | _____________________________ |
Matt Turner | OBS Logistics | _____________________________ |