Asset Returns
The asset returns page can be used to enter details of assets which require collection from a collection point. The page will initially prompt the user for the following information:
- Dealer/Customer - This will be a list of customers' setup against the group to which the login belongs, or all customers if no restriction exists. If only a single customer is available then the drop-down will only show this value. If multiple customers are available, a single customer must be selected.
- Location/Collection Point - This will be a list of collection point's setup against selected customer.
- Asset Status - Values "All", "Empty", "Open" or "Closed". This is the status of the asset i.e. whether it contains items and has been closed - it is not the status of the collection/return.
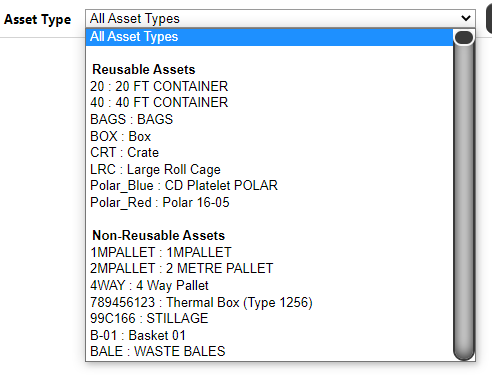
- Asset Type - This is a list of Asset Types held on the Calidus TMS system. The list will be split into Reusable and Non-Reusable asset types as defined on the Calidus TMS system.
Once the options have been selected, the user will click the 'Find' button, and the system will retrieve all current assets which are at the location i.e. assets which have yet to be collected. Once an asset is collected, it will no longer be visible on this page, and the user should then use the asset tracking page to track the asset.
Header
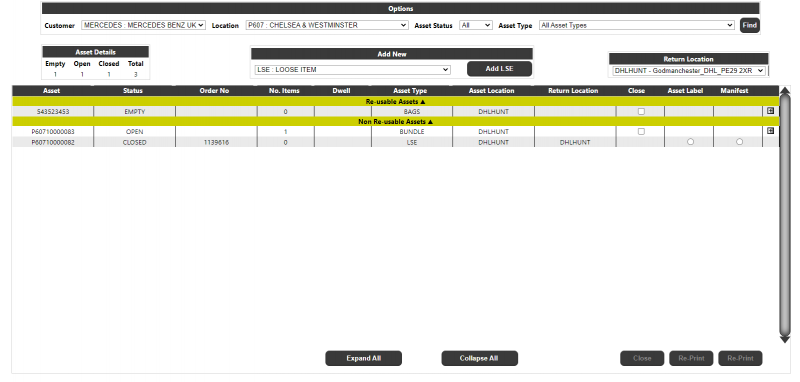
- Asset Details - This section will display a summary of the Assets at the location - Empty, Open, Closed and the Total number of assets.
- Add New Asset/Loose Item - a drop-down box of all defined asset types to allow the user to create a new permanent or non-permanent asset which is not currently tracked as being at the selected location. For a non-permanent (loose) asset, clicking the button will generate a new asset on the Calidus TMS system with an 'Empty' status which will then be displayed in the details. The user can then add into this asset as they would any other.
If the user selects a permanent asset type, then an input will be displayed to enter the Asset Id:
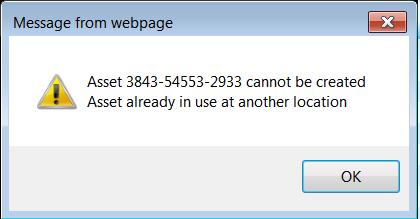
When pressing the 'Add Asset' button (Note: the name of the button will be changed dependent on the Asset type selected e.g. 'Add LRC' in the above example) the Calidus Portal system will call the Calidus TMS system to validate and add the new asset (if valid). The Asset Returns page will be refreshed and the asset, if valid, will appear in the assets listed for the location where it can then be selected for return and item contents can be added as per the normal functionality. If the asset cannot be added into Calidus TMS, then the user will be alerted to the issue, for example:
- Return Location - This will identify the location to which the assets are returned.
Detail
The page details will display a list of the assets currently at the location. The list will be split by Re-Usable and Non Re-Usable assets. Clicking on the headings for each of these sections will expand/collapse that section.
- Asset - the ID of the asset.
- Status - the status of the asset i.e. Empty, Open, Closed
- Order No - for closed assets, yet to be collected, the Order No will be displayed
- No. Items - the current no. Items added to the cage.
- Dwell - the dwell time of the asset i.e. the number of days the asset has been at that location.
- Asset Type - the type of the asset.
- Asset Location - the current location associated with the asset.
- Return Location - the return location associated with the asset.
- Close - A select box against an asset which is empty or open. The user can select one or more assets to close and then click the Close button. Note: All of the selected assets in a single closure will be assigned the same returns reference on the Calidus TMS system.
- Asset Label - used to re-print an asset label by selecting the asset, then clicking on the Re-Print button at the base of the column.
- Item Labels - used to re-print item labels for an asset by selecting the asset, then clicking on the Re-Print button at the base of the column.
- Manifest - used to re-print a manifest for an asset by selecting the asset, then clicking on the Re-Print button at the base of the column.
Note:
The user can either close, add or re-print - they cannot perform multiple actions at the same time.
Each detail line will also have a '+' button to expand the individual line:
Expanding the detail will show the user the contents of the asset. For 'empty' and 'open' cages, there will also be the ability to add a new item/claim into the asset, or remove an existing item/claim. Note: Only one part may be added or removed to/from an asset at a time. For closed assets the Add/Remove line and buttons will not be visible i.e. no further parts may be added or removed once the aseet is closed (and no option will be given to re-open an asset).
If the Item Content Type on Calidus TMS is 'ITEM' then the page will display as above in the screenshot, but if the content type is 'CLAIM' then the "Item" box will be replaced with a "Claim Reference" box.
The following details may be added to an asset:
- Item/Claim Reference - the Item or Claim Reference dependent on the content type.
For a Claim Reference, the following validation will be performed:
If the Claim Type selected is from "A" to "Z" then the Claim reference will be validated to be a 6 digit alphanumeric field
For any other Claim Type values i.e. currently "1" or "2" then the Claim reference will be validated to be a 7 digit alphanumeric field
- Type - A drop-down list of item or claim types. For items, once an item has been added to an asset then the type will be 'locked' for that asset, so only items of the same type may be added.
- Description - A free-text field.
If the user adds a claim into an asset, then a button will be available to print an item label:
Note: Once an asset is closed, the user cannot print individual item labels, and must re-print all items using the label selection against the asset.
When the user closes an asset, they will be presented with the following:
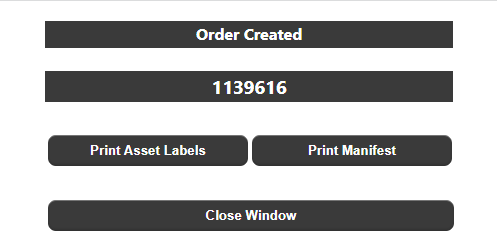
The user can Cancel the closure, or optionally select a Parent Asset before confirming the closure. The default will be 'No Parent Asset' but the user can select any Closed asset currently in the location as the parent asset. This will assign all assets selected for closure as children of the selected parent asset. Once closed, a box will be displayed to show the order created and allow printing of asset labels and a manifest:


