Order Entry - TMS: Difference between revisions
(Initial Creation) |
m (moved Order Entry to Order Entry - TMS) |
(No difference)
| |
Revision as of 10:50, 2 August 2024
The order entry page consists of a series of sections. The sections and fields visible visible will depend on the configuration of individual systems, and non-mandatory fields may also be hidden to meet client requirements.
Header
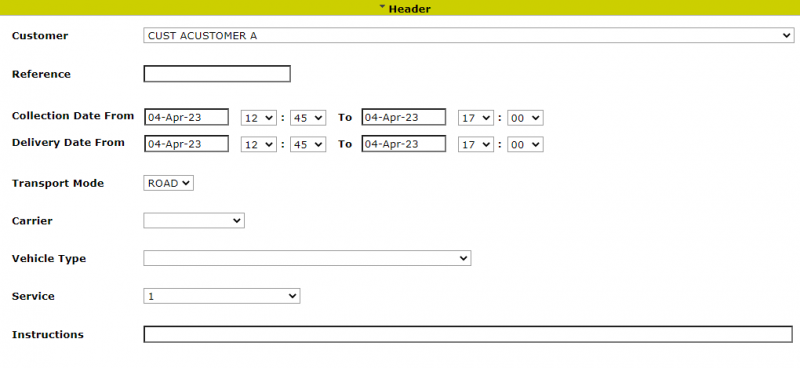
The user will first select a Customer from a drop-down list of customers on the Calidus TMS system. If only one customer is available to the user, then this will automatically be displayed/selected. The customers available to the user may be restricted at user group level by using functionality within the Calidus Portal system.
After selection of the customer, an order reference must then be entered - this is a required field.
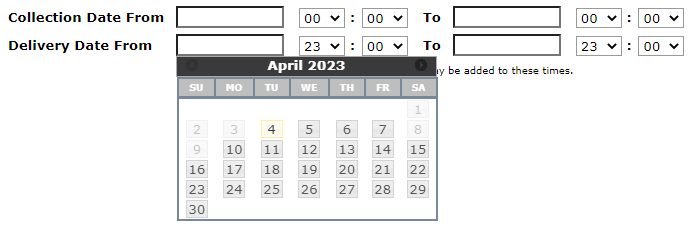
If the system is configured to prompt for time windows, the user will then enter the Collection and Delivery dates/times which are required. The 'To' date/time must be greater than the respective 'From' date/time and the Collection 'From' will be validated to be less than the Delivery 'To'; and the Collection 'From' date and time must be greater than the current date and time at the time of input.
A transport mode can then be selected, based on a list from the Calidus TMS system.
A carrier can also be selected, based on a list from the Calidus TMS system. If chosen, it will be used to validate that the resulting transport order is planned to a trip operated by the designated carrier.
A vehicle type may also be selected. If chosen, the entered weight and calculated volume from the order details section (the latter via an RPE calculation) will be validated to be appropraite for the attributes of the vehicle type.
If the system is configured to prompt for a service level, then one may be selected based on the service levels setup on the Calidus TMS system. The service levels will be sorted by the PRIORITY field on the CNT_SERVICE_LEVEL table (allowing the first value in the drop-down to be defaulted). The service levels available to the user may be restricted at user group level by using functionality within the Calidus Portal system.
Finally some free-text instructions may be entered.
When the user navigates into the next section i.e. Collection Details, the above Header section will be validated and if any of the required fields have not been entered, the user will be alerted and they will not be able to move to the next section before they have entered the required fields.
Collection
The user can choose to select a default address (if set), an existing address on the Calidus TMS database, or create a new address which will be stored on the Calidus TMS system.
The ability to use a default address and add a new address is configurable at a user group level within the TMS Options page:
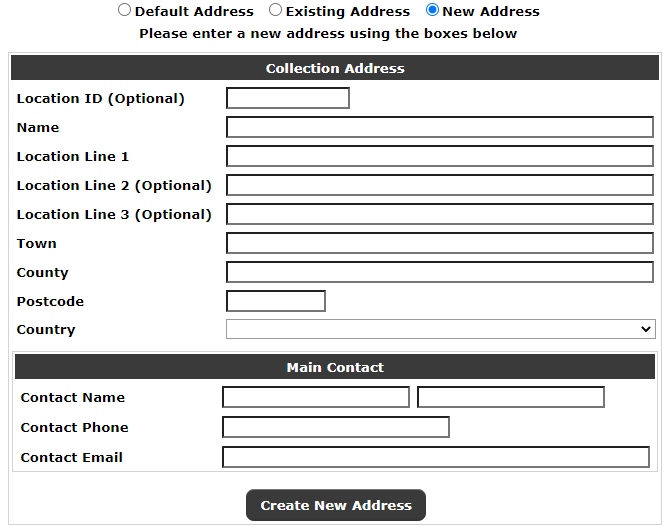
To create a new address on the Calidus TMS system, the user should select 'New Address' from the radio buttons. This will display an entry form for creating the new address:
The user can then enter the new address details. Once the details have been entered, the user can click the 'Create New Address' button. This will validate that all of the mandatory fields (with the exception of Location Id, and Address lines 2 and 3) have been entered, and that (if entered) the Address Id is not already in use. If the address Id is already used, the address will not be created and the user will receive an error.
If validation is passed, the system will either generate a new Calidus TMS address ID (if no Location ID was entered) or create a new address with the entered Location Id then store the entered address details again the Id on the GEO_LOCATION file.
Once the address is created, the page will be updated to show the new address as if it had already been selected as an existing address (see below).
To find an existing address the user may enter a Partial (or full) address ID and/or text from any of the address fields in the 'Address contains' text box. Additionally, if addresses have been defined in groups on the Calidus TMS ('CUST_CLIENT_CODE') a Group Name drop-down will also appear. This drop-down will only be visible if Group Names can be retrieved from the Calidus TMS system. The default will be 'Any'.
When the user clicks 'Find Address' a list of the relevant addresses will be displayed for the user to select the required address:
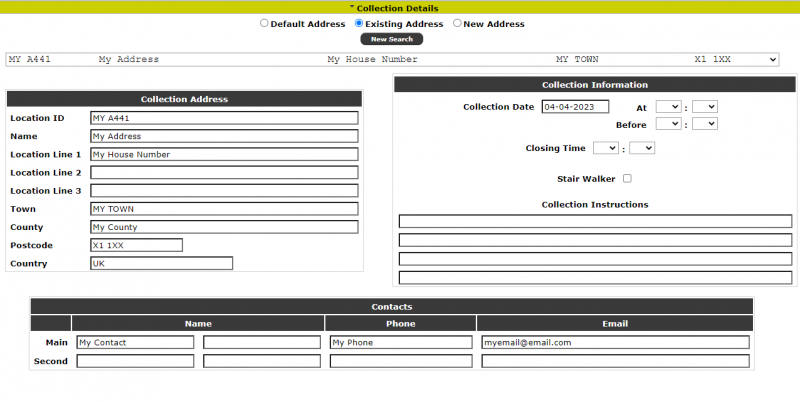
Once the user has selected the collection address, or if a new address has been created, the page will display the address and the other collection details to be input:
- Collection Address - this will display the chosen address.
- Collection Information :
- If configured, a Collection Date and At/Before Time selection may be displayed for entry.
- A closing time (for the delivery at the site) may optionally be entered.
- Instructions (optional) for the collection (or delivery depending on the address being entered). There will be 4 lines of 250 characters, which will be joined together to form a 1000 character string and stored against the order/address/address type i.e. collection or delivery.
- Main Contact - This will be an optional entry of contact details for the collection (or delivery when in the delivery section). A contact name, phone and email can be entered.
- Second Contact - This will be an optional entry of secondary contact details for the collection (or delivery when in the delivery section). A contact name, phone and email can be entered.
The contact(s) will be stored in Calidus TMS against the relevant location collection or delivery address on the order and the email addresses will be used for any automated correspondence with the collection and delivery locations.
Delivery
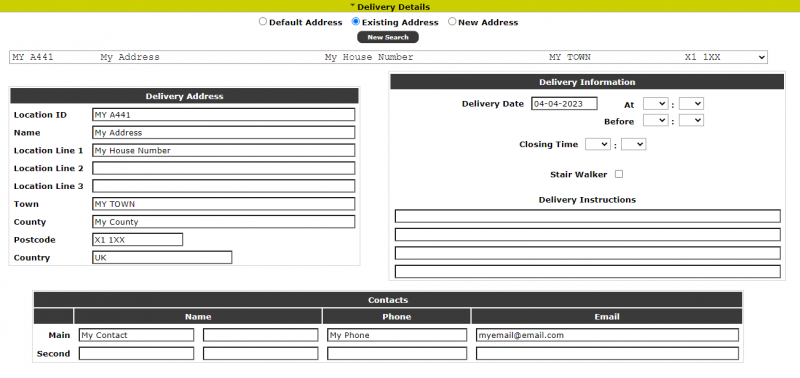
This section will be the same as the collection details, but will apply to the Delivery. The comments and contact information will be stored against the delivery address for the order.
Times
If the 'Use Windows' parameter is set to 'F', then an additional section will be displayed to search for a pre-existing route or ad hoc delivery.
- Delivery Type (Service) - a drop-down list of delivery types, filtered from the Calidus TMS list of delivery types. The list will be displayed in Priority sequence, with the highest priory delivery type being the default value. If Ad Hoc is selected, a pop-up alert (with configurable text) will be displayed.
- Date - the date for the collection or delivery.
- The Collection and Delivery Date and Time entry fields. These will be enabled for entry if the Delivery type selected is anything except Ad Hoc and Standard, and will also be enabled if Ad Hoc is selected with the Manual option selected from the Trips Selection drop-down list (see below). In all other cases, these will be disabled for entry, but will always be visible.
- Route Selection - If a Standard Delivery Type is selected, a list of routes will be retrieved from the Calidus TMS for the selected date, Collection and Delivery addresses. A text item "Please select a route" will be displayed as the default item.
Selecting a route will update the (read-only) Collection and Delivery Date and Time fields.
- Trips Selection - If the Delivery Type is not standard, a list of trips (similar to the above route list) will be retrieved from Calidus TMS for the selected date, Collection and Delivery addresses. A "Manual" option will also be present at the bottom of the drop-down list.
Selecting a trip will update the (read-only) Collection and Delivery Date and Time fields.
If no trips are retrieved, or if the user selects the 'Manual' option, then the Collection and Delivery Date and Time fields will be enabled, and the user can manually enter the required Delivery Date and Time.
Note: A window will be added to the entered times:
This will be set from the configuration parameter:
The parameter will be added to the beginning and end of the times to give the additional window.
Details
The order details section will contain (dependent on configuration) the following fields:
- Line - A sequential count of the number of lines on the order
- No. Packages - The number of packages / delivery units on the order. Required.
- Product Type - A drop-down list of the product types stored in Calidus TMS on the PRD_PRODUCT_TYPE table. This field will be required.
- Commodity - A drop-down list of the commodity code stored in Calidus TMS on the PRD_COMMODITY table. If displayed, this field will be required.
- Class - A drop-down list of the classes against the commodity code stored in Calidus TMS on the PRD_HAZARDOUS_CLASS table. If displayed, this field will be required.
- UN No. - A text field to input a UN number against the line detail. This field will only be validated to be numeric.
- DU Type - A list of delivery units stored in Calidus TMS on the RES_DESPATCH_UNIT_TYPE table. A value of 'Other' will always be available at the end of the drop-down list.
- Inner Type - A list of delivery units stored in Calidus TMS on the RES_DESPATCH_UNIT_TYPE table. A value of 'Other' will always be available at the end of the drop-down list.
- Packaging Required - A dropdown where 'Du Type' or 'Inner Type' or both may be selected to denote that the customer is to use their own packaging.
- Dry Ice Qty- The quantity of dry ice packs required for the item
- Gel Pack Qty- The quantity of gel packs required for the item
- Weight - The weight field is a required field to record the total Weight (kg) of the packages on the line. This will be validated as numeric to 2 decimal places.
- Dimensions - Dimensions will be defaulted from the Calidus TMS system upon selection of a DU type (unless 'Other' is selected). Dimensions are required, so if the dimensions cannot be retrieved from the Calidus TMS defaults, or the carton type is 'OTHER' then the dimensions will have to be entered by the user.
- Description - A free-text box for entering a description of the delivery units. This field is optional.
At the end of each detail line will be a series of buttons.
- Add Items - If the system is configured for Items i.e. the Add Items configuration is 'H' or 'S' then an additional 'Add Items' button will be displayed to enter item details - see the next section for details
- Remove Line - This will remove the detail line from the order. If the line is the only record i.e. the first and last line, then the data will be cleared from the line so that a line is still available to re-start the entry.
Underneath the detail lines will be:
- Add New Line - This will create a new (blank) detail line after the current last line on the order.
- Totals - If multiple lines are entered, a total will be displayed for No. Packages, Dry Ice, Gel Packs and Weight.
Items
Once the line information is entered, if items are configured then they will be required to be entered. The user must press the Add Items button to add the details of the items. The system will then generate a number of Items based on the requested number of items specified at line level:
Package Field
For non-permanent asset types, the user must type in or scan the one-way label. If entered, the value will be validated as 18 digits long, or 20 digits long if the first 2 digits are 00. If valid, and leading 00 values will be removed.
For permanent asset types, the user can type in or scan the full permanent asset ID, with or without the leading 8004. The screen will validate that this is 16 alphanumeric characters long or 20 if it begins with 8004. If the full asset ID is entered, the screen will validate the asset ID against the permanent asset register. If this is not present or inactive, the asset may not be used.
Alternatively, the user can type in at least 3 characters from the end of the Asset ID and the system will retrieve any available permanent asset IDs matching the entered characters at the end of the string. When found, the results will be displayed in the Results drop-down list. The user can then select an Asset ID from this list. If one is not selected, the order will not be allowed to be submitted.If no matching assets are found, the system will display "No Matching Assets". If more than 50 are found, the system will display "Too Many Results".
Units Field
If configured on the system, the number of Units in the package must be entered.
Weight
If configured on the system, the weight of the individual packages may optionally be entered.
Dimensions
If configured on the system, the dimensions of the individual packages may optionally be entered - these will default to the dimension of the DU Type eneterd on the detail line.
Submit
At the end of the details page, a Submit button will be available. Clicking the button will re-validate all of the above sections to check that the required information, numeric values etc. are correct. If the information is OK then the order will be submitted to the Calidus TMS system and the order will be created.
Once submitted, the user will be shown an order summary page as follows:
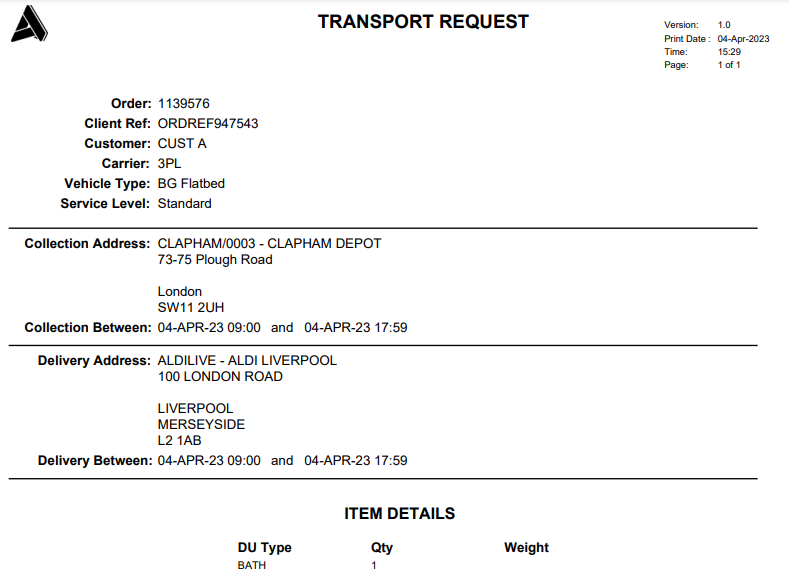
Clicking on the 'Print Summary' button will produce a PDF document with a summary of the entered details which can be saved or printed by the user. Example:
If configured for display, clicking on the 'Print Labels' button will produce the Calidus TMS labels for the order as a PDF document with a summary of the entered details which can be saved or printed by the user.
Clicking on 'Create New Order' will refresh the page back to its initial state for entry of a new order.
