Group User Maintenance
The Group/User maintenance page will allow the user to create a group and assign users into groups. It will also allow the maintenance of group options including security levels and visibility of modules etc.
Initially, if Parent Groups are setup (to 'group' Groups for easier maintenance) then a Parent Group drop-down will be available, otherwise just the group selection drop-down will be visible:
The User should select the group they wish to modify and click the 'find' button to retrieve the details for that group. Note: Group creation is done by selecting an existing group and copying it to a new one, as detailed later.
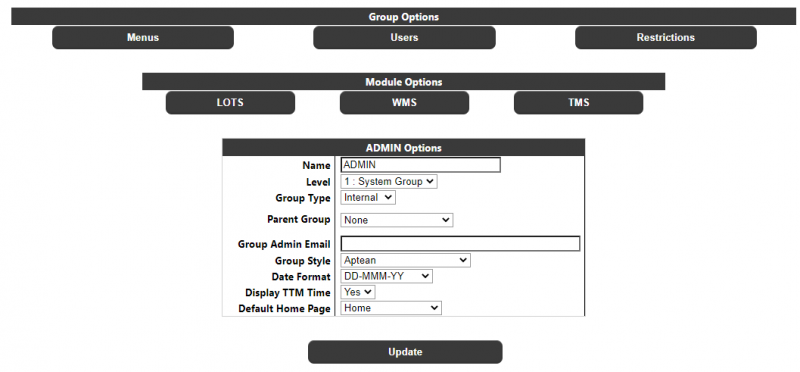
Once the group has been selected, the options for the group will be displayed:
Group Options
Menus Button This will take the user into the Menu Maintenance page. See section 2.4.1
Users Button This will take the user into the User Maintenance page. See section 2.4.2
Restrictions Button This will take the user into the Restrictions Maintenance page. See section 2.4.3
Module Options
This section will contain a button for each of the non-core modules available in the system. Each button will take the user into the specific options page for that module. See the relevant module documents for details.
Group <group> Options
- Name The name of the group
- Level The security level of the group. The following options are available:
- Aptean Group Reserved for Aptean Administrators
- System Group Highest privilege level
- Admin Group Standard privilege level
- User Group Restricted privilege level
The security level will determine the availability of certain functions within the system
Note: A user cannot see a security level above his/her own level.
- Group Type The type of group. The following levels will always be available:
- Internal For internal users i.e. Aptean and Aptean clients
- External For external users i.e. the clients of Aptean clients.
In addition to these groups, dependent on the modules installed, other group types may be available e.g. Supplier or Store for the TMS module or Haulier for the WMS module.
As with security levels, the group type will determine the availability of certain functions within the system.
- Parent Group This can be used to assign a parent group. This can then be used to find groups by parent in the Group Maintenance page below.
- Group Admin Email The collective email address of the group - used in modules e.g. WMS Error reporting to alert the group administrators. NOTE: This is not the email used for password resets - that is the email against the user.
- Group Style The colour scheme for the group. The initial login page will always have a fixed style, but this setting allows the user to select the groups preferred colour scheme once logged into the system.
- Date Format This is the date format that is displayed in the TTM pges
- Display TTM Time This determines if the time portion of certain dates within the TTM module e.g. on enquiry results are displayed, or just the date.
- Default Home Page This sets the initial page on login. Dependent on the system, available pages will be available in addition to the standard/default Home page.
- Update Button This will update all of the above details for the selected group.
- Copy Group This section is used to copy the currently selected group and it's settings to a new group. Note: Only the group will be copied - the Users and Restrictions of the current group will not be copied.
- Delete Group This will delete the group and its users/restrictions. This option is only available to level 0 users.
Group/User Maintenance - Menus
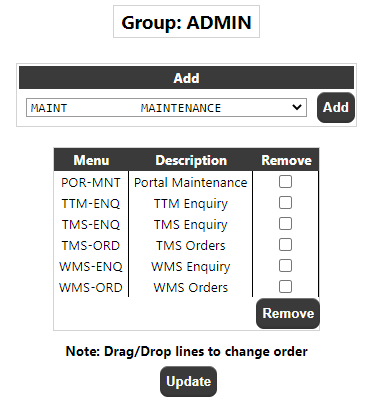
This is a restricted option to maintain the menus available to a group.
Add This drop-down will display the menus (see section 2.3) available to the group, which may be added to the groups' menu layout by selecting the menu and clicking the 'Add' button. Note: If the group has all of the available menus assigned to them then the Add section will not be displayed.
Under the 'Add' section are the current menus available to the selected group. The user may drag/drop these menus up and down to sequence the order they appear on the menus, and may also select/remove the menu from the groups' visibility if required.
Group/User Maintenance - Users
The Users button on the Group Maintenance page will take the user into the User Maintenance Page. Initially the following will be displayed:
Create New User
This section is used to create a new user with the currently selected group. The user will be created with the default system settings. The password will be validated using the pasword parameters set up on the system.
A checkbox, selected by default, will specify whether the created account will be prompted to change their password on the first (and subsequent if not changed) login for this user.
The email will be required for new users.
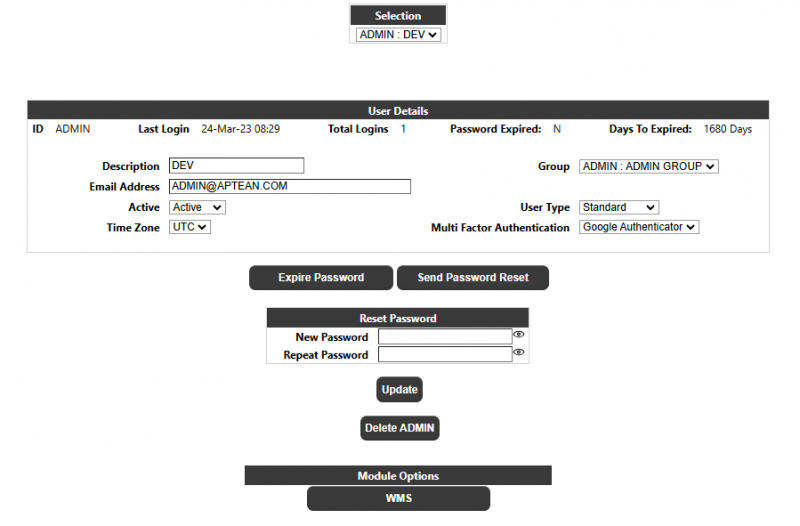
Selection
A drop-down will display all the users within the selected group. Selecting a user and clicking 'Find' will display the details for the user.
User Details
Id The name of the user
Last Login The date/time the user last logged in
Total Logins The total no. of times the user has accessed the Portal System
If the system is setup to expire passwords, the following 2 fields will also be displayed:
- Password Expired A Y/N flag to indicate if the users password has expired
- Days To Expired The number of days before the users password expires.
Description The Name of the user (this is not the users Id)
Group The users group can be changed by selecting a different group from the list.
Email Address The email address for the User. Note: This is the email used in the password reset
functionality.
Active The user can be set to active or inactive. The default is 'Active' for new users.
Type Whether the user is a Standard User, or a user for the Web Service
Timezone If the system is multi-timezone, then the users timezone can be selected from the
dropdown.
- Multi Factor Authentication This setting is used to control/override an individual users MFA type, if MFA is enabled
at the System level. The values are None, Google Authenticator or Email.
- Expire Password If the system is setup to expire passwords and the users' password is not already expired, this
button can be used to immediately expire the users password, which will require them to change
the password on their next login into the system.
- Send Password Reset This button can be used to send a password reset email to the selected user for them to log into the system and reset their password
Reset Password Allows an Administrator to change another users Password
Update To update the user details.
Delete To delete the selected user.
Module Options If there are any user specific options for a module, they may be accessed here.
See the relevant module documentation for details.
Group/User Maintenance - Restrictions
The Restrictions button on the Group Maintenance page will take the user into the Group Restrictions Page, which will allow the entry of restrictions against the group so that, for example, the selection of supplier, owners etc. can be limited i.e. so a group can only see certain data.
NOTE: By default, if restrictions are not specified, then a group may see all available data for each type.
Once a restriction has been set against a type, the user will then be restricted to only view data setup against their group.
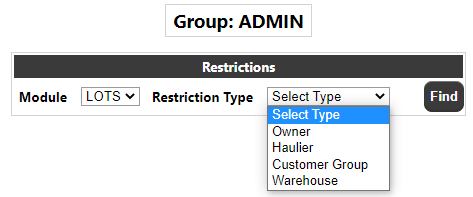
The user should select a module e.g. LOTS (TTM) from the list of available modules and a list of restriction types for that module will appear:
The user should then select the required restriction and if necessary the Restriction Key - this is an additional key e.g. Owner code to limit the restriction within a restriction type. Clicking the 'Find' button will view the current restrictions.
Add Restriction
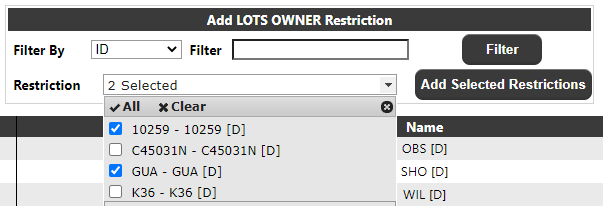
The 'Add Restriction' section allows the user to add a new restriction. A filter will be available to limit the restrictions for selection. The user may select to filter by ID or Description then enter the filter they require (Note: this is optional, and a filter does not have to be entered, but retrieval of certain data lists on the module systems e.g. customers may take a long if not filtered and there is a limit to the number of records that can be displayed - if this is exceeded a message will be shown in the dropdown and the user must use the filter to restrict the number of records retrieved).
Clicking the Filter button will populate the Restriction Drop-down:
The user can then select a specific restriction to add to the group or select multiple restrictions from the drop-down list then click 'Add Selected Restrictions' to add into the groups restrictions.
NOTE: The Filter is used against Adding Restrictions - this does not apply to the group's current restrictions, all of which will always be displayed.
The user can use the Select boxes to select and remove restrictions by clicking on the 'Remove' button. They can also specify the default restriction, which is used by some of the pages in certain modules.

