Calidus Portal User Guide - TMS
![]()
Aptean
Calidus Portal User Guide - TMS
Calidus Portal - 11.1.x
2nd August 2024 - 11.1.x
Reference: TRAINING
Introduction
This document is the user guide for the TMS components of the Aptean Calidus Portal.
Please see the Calidus Portal User Guide - CORE for a description of core Calidus Portal functionality
(User maintenance, menu maintenance, configuration etc.)
TMS Maintenance
TMS Group Maintenance
From the Group Maintenance page the user will have access to the group options for the TMS module of the Calidus Portal:
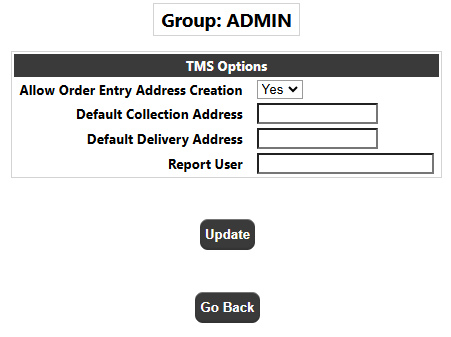
Clicking the TMS button will take the user into the TMS specific options page:
These options relate to the TMS Order Entry / Booking page:
Allow Order Entry Address Creation - Determines whether users in this group have the option to create a new address from within the order entry page
Default Collection Address - if set to a valid Address Id on the Calidus TMS system, then this will be used as the default address for collection.
Default Delivery Address - if set to a valid Address Id on the Calidus TMS system, then this will be used as the default address for delivery.
Report User - The CTMS Oracle user to link to this group for showing/running ORS reports from CTMS
TMS Page Options
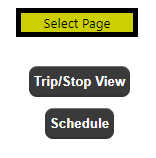
The user will initially select the page which they wish to maintain options for:
Trip/Stop View
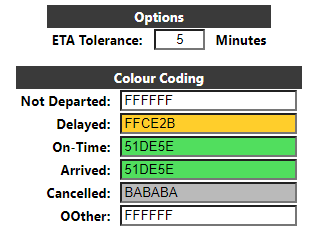
This page is used to maintain parameters for the TMS Trip/Stop View Screen. The ETA Tolerance in minutes and the colours displayed for order status may be amended.
Schedule / Airport Page
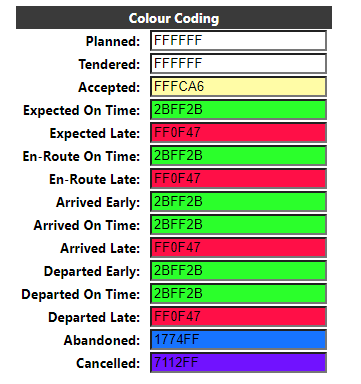
This page is used to maintain parameters for the TMS Schedule/Airport Page. The colours displayed for order status may be amended.
Order Defaults
The Order Defaults maintenance page allows the user to create "sets" of default settings per customer for the Order Entry page in section 3.1
Initially the user can select a Customer they wish to create the defaults for, and enter a description for the set of Order Defaults:
Once the defaults have been created or the user has selected an existing customer from the drop-down list and selected the required Description (set) the parameters will be displayed for maintenance:
Note: The User Groups dropdown is used to "Enable" the selected defaults for the customer. Initially on creation, a default set will have No User Groups Set against it, meaning that the set of defaults will not be used in the order entry page. To enable a set for use, the user should set the User Groups that these defaults should be used for when the relevant customer is selected.
Ordering
Order Entry
The order entry page consists of a series of sections. The sections and fields visible visible will depend on the configuration of individual systems, and non-mandatory fields may also be hidden to meet client requirements.
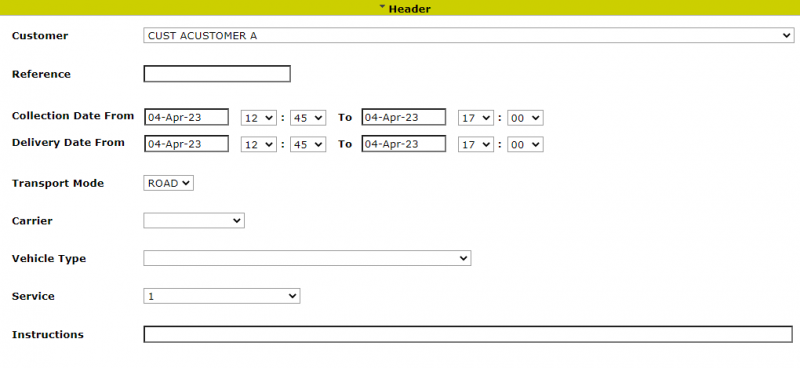
Header
The user will first select a Customer from a drop-down list of customers on the Calidus TMS system. If only one customer is available to the user, then this will automatically be displayed/selected. The customers available to the user may be restricted at user group level by using functionality within the Calidus Portal system.
After selection of the customer, an order reference must then be entered - this is a required field.
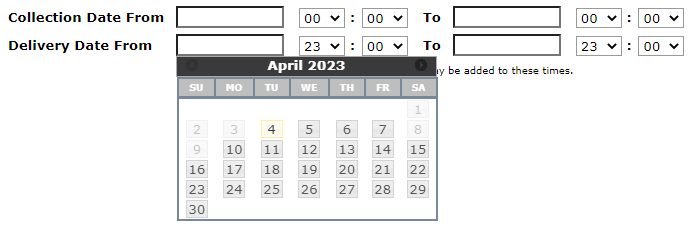
If the system is configured to prompt for time windows, the user will then enter the Collection and Delivery dates/times which are required. The 'To' date/time must be greater than the respective 'From' date/time and the Collection 'From' will be validated to be less than the Delivery 'To'; and the Collection 'From' date and time must be greater than the current date and time at the time of input.
A transport mode can then be selected, based on a list from the Calidus TMS system.
A carrier can also be selected, based on a list from the Calidus TMS system. If chosen, it will be used to validate that the resulting transport order is planned to a trip operated by the designated carrier.
A vehicle type may also be selected. If chosen, the entered weight and calculated volume from the order details section (the latter via an RPE calculation) will be validated to be appropraite for the attributes of the vehicle type.
If the system is configured to prompt for a service level, then one may be selected based on the service levels setup on the Calidus TMS system. The service levels will be sorted by the PRIORITY field on the CNT_SERVICE_LEVEL table (allowing the first value in the drop-down to be defaulted). The service levels available to the user may be restricted at user group level by using functionality within the Calidus Portal system.
Finally some free-text instructions may be entered.
When the user navigates into the next section i.e. Collection Details, the above Header section will be validated and if any of the required fields have not been entered, the user will be alerted and they will not be able to move to the next section before they have entered the required fields.
Collection
The user can choose to select a default address (if set), an existing address on the Calidus TMS database, or create a new address which will be stored on the Calidus TMS system.
The ability to use a default address and add a new address is configurable at a user group level within the TMS Options page:
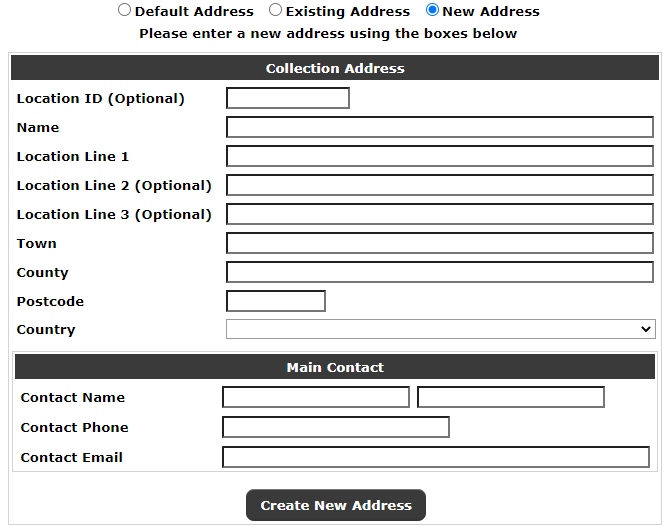
To create a new address on the Calidus TMS system, the user should select 'New Address' from the radio buttons. This will display an entry form for creating the new address:
The user can then enter the new address details. Once the details have been entered, the user can click the 'Create New Address' button. This will validate that all of the mandatory fields (with the exception of Location Id, and Address lines 2 and 3) have been entered, and that (if entered) the Address Id is not already in use. If the address Id is already used, the address will not be created and the user will receive an error.
If validation is passed, the system will either generate a new Calidus TMS address ID (if no Location ID was entered) or create a new address with the entered Location Id then store the entered address details again the Id on the GEO_LOCATION file.
Once the address is created, the page will be updated to show the new address as if it had already been selected as an existing address (see below).
To find an existing address the user may enter a Partial (or full) address ID and/or text from any of the address fields in the 'Address contains' text box. Additionally, if addresses have been defined in groups on the Calidus TMS ('CUST_CLIENT_CODE') a Group Name drop-down will also appear. This drop-down will only be visible if Group Names can be retrieved from the Calidus TMS system. The default will be 'Any'.
When the user clicks 'Find Address' a list of the relevant addresses will be displayed for the user to select the required address:
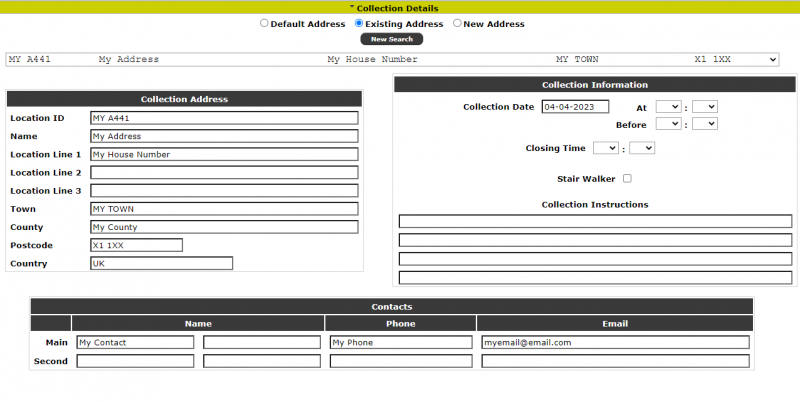
Once the user has selected the collection address, or if a new address has been created, the page will display the address and the other collection details to be input:
- Collection Address - this will display the chosen address.
- Collection Information :
- If configured, a Collection Date and At/Before Time selection may be displayed for entry.
- A closing time (for the delivery at the site) may optionally be entered.
- Instructions (optional) for the collection (or delivery depending on the address being entered). There will be 4 lines of 250 characters, which will be joined together to form a 1000 character string and stored against the order/address/address type i.e. collection or delivery.
- Main Contact - This will be an optional entry of contact details for the collection (or delivery when in the delivery section). A contact name, phone and email can be entered.
- Second Contact - This will be an optional entry of secondary contact details for the collection (or delivery when in the delivery section). A contact name, phone and email can be entered.
The contact(s) will be stored in Calidus TMS against the relevant location collection or delivery address on the order and the email addresses will be used for any automated correspondence with the collection and delivery locations.
Delivery
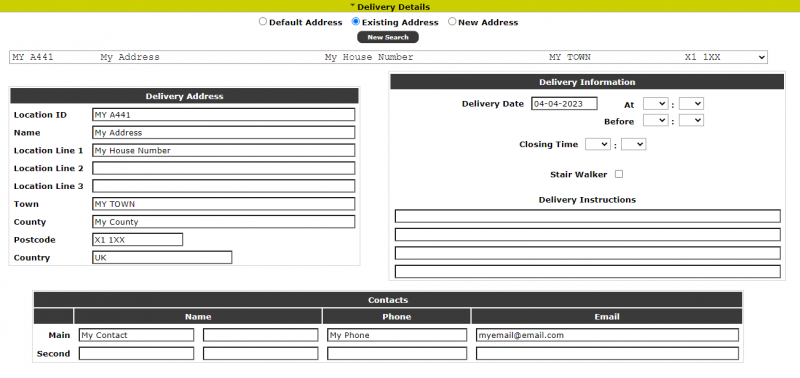
This section will be the same as the collection details, but will apply to the Delivery. The comments and contact information will be stored against the delivery address for the order.
Times
If the 'Use Windows' parameter is set to 'F', then an additional section will be displayed to search for a pre-existing route or ad hoc delivery.
- Delivery Type (Service) - a drop-down list of delivery types, filtered from the Calidus TMS list of delivery types. The list will be displayed in Priority sequence, with the highest priory delivery type being the default value. If Ad Hoc is selected, a pop-up alert (with configurable text) will be displayed.
- Date - the date for the collection or delivery.
- The Collection and Delivery Date and Time entry fields. These will be enabled for entry if the Delivery type selected is anything except Ad Hoc and Standard, and will also be enabled if Ad Hoc is selected with the Manual option selected from the Trips Selection drop-down list (see below). In all other cases, these will be disabled for entry, but will always be visible.
- Route Selection - If a Standard Delivery Type is selected, a list of routes will be retrieved from the Calidus TMS for the selected date, Collection and Delivery addresses. A text item "Please select a route" will be displayed as the default item.
Selecting a route will update the (read-only) Collection and Delivery Date and Time fields.
- Trips Selection - If the Delivery Type is not standard, a list of trips (similar to the above route list) will be retrieved from Calidus TMS for the selected date, Collection and Delivery addresses. A "Manual" option will also be present at the bottom of the drop-down list.
Selecting a trip will update the (read-only) Collection and Delivery Date and Time fields.
If no trips are retrieved, or if the user selects the 'Manual' option, then the Collection and Delivery Date and Time fields will be enabled, and the user can manually enter the required Delivery Date and Time.
Note: A window will be added to the entered times:
This will be set from the configuration parameter:
The parameter will be added to the beginning and end of the times to give the additional window.
Details
The order details section will contain (dependent on configuration) the following fields:
- Line - A sequential count of the number of lines on the order
- No. Packages - The number of packages / delivery units on the order. Required.
- Product Type - A drop-down list of the product types stored in Calidus TMS on the PRD_PRODUCT_TYPE table. This field will be required.
- Commodity - A drop-down list of the commodity code stored in Calidus TMS on the PRD_COMMODITY table. If displayed, this field will be required.
- Class - A drop-down list of the classes against the commodity code stored in Calidus TMS on the PRD_HAZARDOUS_CLASS table. If displayed, this field will be required.
- UN No. - A text field to input a UN number against the line detail. This field will only be validated to be numeric.
- DU Type - A list of delivery units stored in Calidus TMS on the RES_DESPATCH_UNIT_TYPE table. A value of 'Other' will always be available at the end of the drop-down list.
- Inner Type - A list of delivery units stored in Calidus TMS on the RES_DESPATCH_UNIT_TYPE table. A value of 'Other' will always be available at the end of the drop-down list.
- Packaging Required - A dropdown where 'Du Type' or 'Inner Type' or both may be selected to denote that the customer is to use their own packaging.
- Dry Ice Qty- The quantity of dry ice packs required for the item
- Gel Pack Qty- The quantity of gel packs required for the item
- Weight - The weight field is a required field to record the total Weight (kg) of the packages on the line. This will be validated as numeric to 2 decimal places.
- Dimensions - Dimensions will be defaulted from the Calidus TMS system upon selection of a DU type (unless 'Other' is selected). Dimensions are required, so if the dimensions cannot be retrieved from the Calidus TMS defaults, or the carton type is 'OTHER' then the dimensions will have to be entered by the user.
- Description - A free-text box for entering a description of the delivery units. This field is optional.
At the end of each detail line will be a series of buttons.
- Add Items - If the system is configured for Items i.e. the Add Items configuration is 'H' or 'S' then an additional 'Add Items' button will be displayed to enter item details - see the next section for details
- Remove Line - This will remove the detail line from the order. If the line is the only record i.e. the first and last line, then the data will be cleared from the line so that a line is still available to re-start the entry.
Underneath the detail lines will be:
- Add New Line - This will create a new (blank) detail line after the current last line on the order.
- Totals - If multiple lines are entered, a total will be displayed for No. Packages, Dry Ice, Gel Packs and Weight.
Items
Once the line information is entered, if items are configured then they will be required to be entered. The user must press the Add Items button to add the details of the items. The system will then generate a number of Items based on the requested number of items specified at line level:
Package Field
For non-permanent asset types, the user must type in or scan the one-way label. If entered, the value will be validated as 18 digits long, or 20 digits long if the first 2 digits are 00. If valid, and leading 00 values will be removed.
For permanent asset types, the user can type in or scan the full permanent asset ID, with or without the leading 8004. The screen will validate that this is 16 alphanumeric characters long or 20 if it begins with 8004. If the full asset ID is entered, the screen will validate the asset ID against the permanent asset register. If this is not present or inactive, the asset may not be used.
Alternatively, the user can type in at least 3 characters from the end of the Asset ID and the system will retrieve any available permanent asset IDs matching the entered characters at the end of the string. When found, the results will be displayed in the Results drop-down list. The user can then select an Asset ID from this list. If one is not selected, the order will not be allowed to be submitted.If no matching assets are found, the system will display "No Matching Assets". If more than 50 are found, the system will display "Too Many Results".
Units Field
If configured on the system, the number of Units in the package must be entered.
Weight
If configured on the system, the weight of the individual packages may optionally be entered.
Dimensions
If configured on the system, the dimensions of the individual packages may optionally be entered - these will default to the dimension of the DU Type eneterd on the detail line.
Submit
At the end of the details page, a Submit button will be available. Clicking the button will re-validate all of the above sections to check that the required information, numeric values etc. are correct. If the information is OK then the order will be submitted to the Calidus TMS system and the order will be created.
Once submitted, the user will be shown an order summary page as follows:
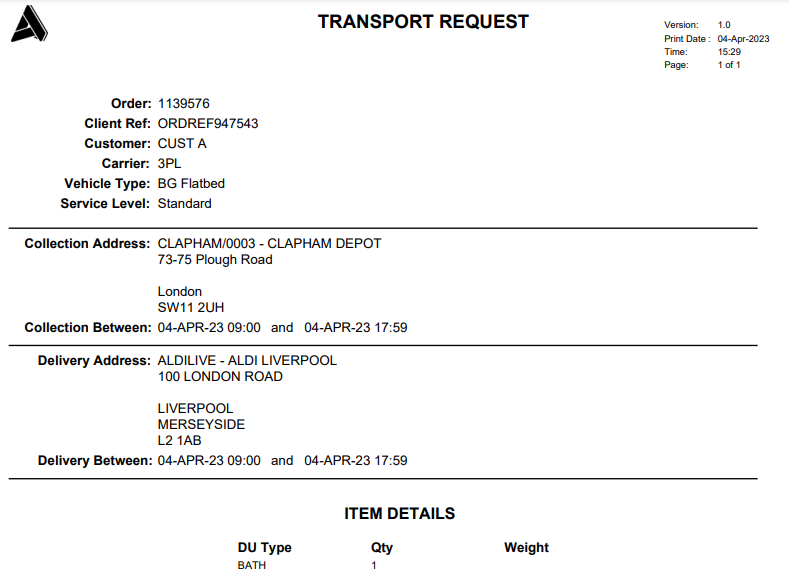
Clicking on the 'Print Summary' button will produce a PDF document with a summary of the entered details which can be saved or printed by the user. Example:
If configured for display, clicking on the 'Print Labels' button will produce the Calidus TMS labels for the order as a PDF document with a summary of the entered details which can be saved or printed by the user.
Clicking on 'Create New Order' will refresh the page back to its initial state for entry of a new order.
Order Upload
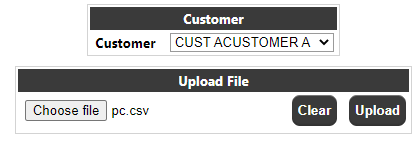
The header section will allow the upload of an Order CSV file into Calidus TMS:
• Customer - A drop-down based on the users' visibility of customers. This will control the visibility of the CSV files in the main section and the customer used against the uploaded orders.
• Upload File - this will allow the user to upload a new CSV file through their browsers standard file selection box. Only files with an extension of 'csv' will be found in the file selection window. The file must conform to the Calidus TMS CSV upload format, and will not be validated at the upload stage on the Calidus Portal.
Underneath this will be a parameters section which includes a set of filters for finding existing file uploads:
• Upload Date (Range) - the date the file was originally uploaded. The default for both the From/To will be the current date
• Upload Status - either 'All', 'PENDING', 'SUCCESS' or 'FAILED'.
The default status will be 'All'.
• 'Find' Button - to display the files for the above selection.
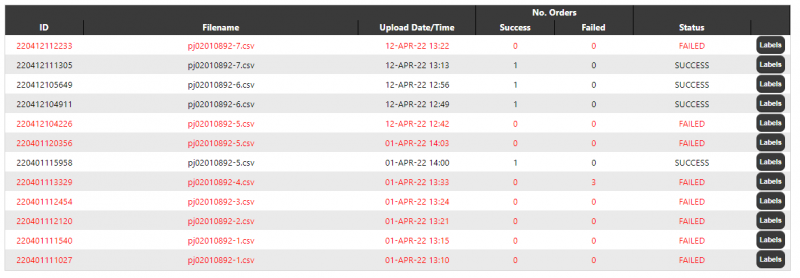
The main section will display the found orders based on the above selection criteria. Initially, all CSV uploads for the current day (and selected customer) will be displayed in descending order of Upload date i.e. newest to oldest.
- Id - the unique ID generated by the Calidus Portal during the file upload
- Filename - the uploaded filename
- Upload Date/Time - the date/time the file was uploaded onto the Calidus Portal
- No. Orders Success - the number of orders processed in the file (only visible if the status is not 'PENDING')
- No. Orders Failed - the number of orders processed in the file (again only visible if the status is not 'PENDING'
- Status:
- 'PENDING' - The file has been uploaded by the Calidus Portal but not yet processed on Calidus TMS
- 'SUCCESS' - The file has been loaded into Calidus TMS with no errors
- 'FAILED' - At least one order was not successfully loaded into Calidus TMS.
- Labels - this will be a button which will call a Calidus TMS report to produce multiple labels for all SUCCESS orders uploaded within the selected file.
For FAILED CSV files, clicking on the line will open a window with details of the error(s):
The details will contain: Detail Id, Line Number, External Ref, Level (Order, Line or Item) and Error message
If a CSV file partially fails, all lines that have successfully been processed will create orders within Calidus TMS, failed lines will have to be re-sent back through the Calidus Portal within a NEW file. Orders that originally failed can be re-sent in the new file using the original reference number and order details with the errors fixed within the order.
If CSV file completely fails, then as long as the file/order errors are fixed the same file can be re-sent via Calidus Portal to be reprocessed.
Order Upload Process
The configuration for the order upload can be found in the Calidus Portal Setup page:
From the Order Upload page, the user will select the file through their browsers standard file selection box. The Calidus Portal will then create a record on the Calidus TMS table IMP_HIST_HEADER then upload and transfer the file onto the Calidus TMS machine via an FTP process.
The import history header record will be created and the HIST_HEADER_ID will be set to the next sequence value. The Calidus Portal will also stamp the current date/time to when the import started and update the filename with the file being uploaded. The status will be set to 'PENDING' and the processed; success & failed fields will have default values of zero.
Once FTP'd, the file will remain in the Calidus TMS inbound directory until picked up by the scheduled Calidus TMS import process.
Once Calidus TMS has processed the file the Calidus TMS system will update the status of the IMP_HIST_HEADER record and populate the IMP_HIST_DETAIL table if any errors occurred.
The HIST_HEADER_ID will be assigned to each order created within the Source Ref column.
Once the import has completed on the Calidus TMS system the IMP_HIST_HEADER will be updated with the status of either 'SUCCESS' or 'FAILED', as well as the number of orders processed, and counts of which were either successful or failed.
Any orders that fail will have an associated record insert into the IMP_HIST_DETAIL table with the linking HIST_HEADER_ID, relevant line number and orders details as well as the error that occurred while trying to process the order.
Manifesting
Manifest Entry
This page will allow the creation of a collection manifest with the ability to add selected orders onto the manifest.
The page will initially display available suppliers (based on restrictions) and a collection date. The user will select a supplier (if only one supplier is available, it will already be selected) and if the supplier users a cross-dock location, that must also be selected before choosing a collection date from the calendar. Clicking on the 'Find' button will display a list of orders for the selected supplier and collection date:
Only orders which are not on a 'Closed' manifest will be displayed.
The data fields displayed can be seen in the above screenshot. The data will initially be sorted by Store Name, but clicking on any of the headings will sort by that column.
To add orders to a manifest, the user should tick the required Select boxes.
In the 'Assign To' section the user will have the option to create a new manifest, or they can select 'Existing Manifest' from the drop-down on the screenshot above. If this is selected, another drop-down will appear next to this with a list of 'Open' manifests for the current supplier.
To add/append orders to a manifest, the user should click the 'Create Manifest' button. Note, the text for this button will change to 'Append To Manifest' if an existing manifest is selected.
Once the user has selected to create/append a manifest, they will be taken onto the Manifest Details page where all of the orders on the manifest will be displayed:
For each order, the Despatch Units (DU's) setup against the supplier on the TMS system will be displayed. Initially the quantities will all be zero.
The user will enter the required DU quantities for each order and click the 'Save' button to store the information. Note that at this point only the DU level information will be stored on the TMS.
The user can either return to add more orders onto the manifest, or if the manifest is now complete, they can close the manifest by clicking on the 'Close Manifest' button. NOTE: This will 'Close' the manifest, and orders cannot be added or removed to/from the Manifest after this point.
The user does not have to close the manifest at this point - they can do it at a later date by using the Manifest Processing page.
Closing the manifest will update the Calidus TMS system and lines will be generated for each DU quantity entered on the orders e.g. entering 3 bags, 2 pallets will generate 5 line items. Once the manifest is closed, the order information will be confirmed back to the user:
Moving the mouse over these lines will highlight the individual orders. Clicking on one of the lines will take the user into the Manifest Order Detail page. See section Error! Reference source not found. below.
After closure, at the bottom of the manifest entry page, two buttons will be available:
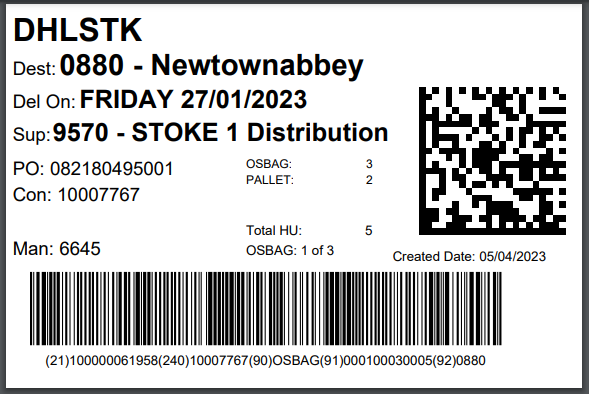
Print All Labels Clicking this button will produce a PDF file containing 'pallet' labels in the required format. A label will be produced for every line item for all orders on the manifest. Once produced the user will be given the option to Open or Save the file. The user can open the file and print using standard Windows functionality.
Example Label
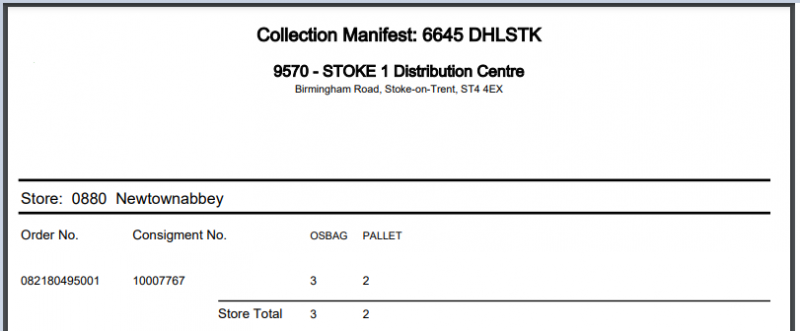
Print Manifest Clicking this button will produce a PDF Manifest sheet in the required format. As with the labels, this may be opened or saved.
Example Manifest
Manifest Order Details
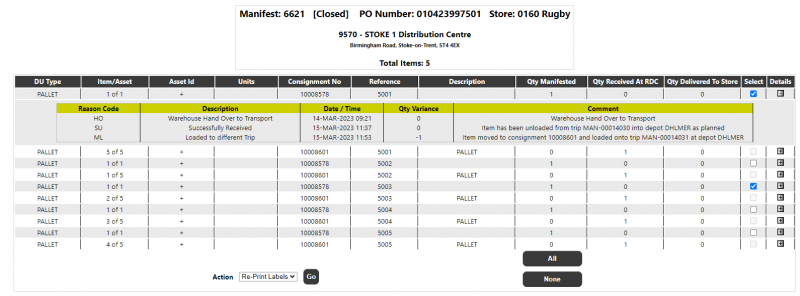
The Manifest Order Details page will show line level details of an individual order on a manifest.
From this page, the user can re-pint individual labels or delete individual lines from the order by selecting the required lines in the select tick box, selecting the required action then clicking the 'Go' button.
Note that deleting all of the lines from a specific DU type will also delete the corresponding line level DU record. Deleting all of the lines from all DU's will remove all line level DU records and the order will be set to invalid on the Calidus TMS system, BUT WILL REMAIN ON THE MANIFEST.
Manifest Processing
The Manifest Processing page will allow the user to Close or Print a manifest or Print Manifest Labels.
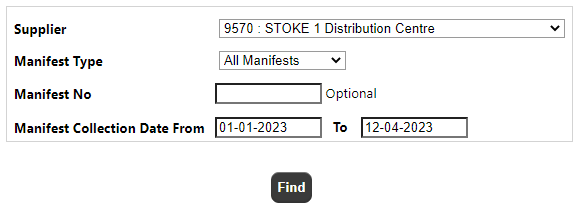
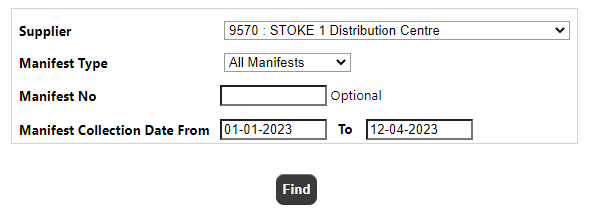
Initially, a parameter page will be displayed:
Supplier The drop-down will display a list of available suppliers (based on restrictions). If only one supplier is available, it will already be selected.
Manifest Type The type of manifest - 'All', 'Open' or 'Closed'
Manifest No An optional entry of a specific Manifest ID.
Manifest Collection Date An optional collection date range for manifests.
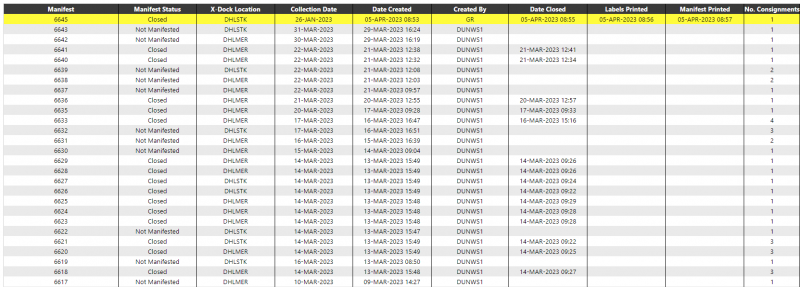
After entry of the required parameters, the user should click the 'Find' button to retrieve a list of manifests within the selection criteria:
Selecting an 'Open' Manifest will take the user into the Manifest Details page as previously described.
Selecting a 'Closed' manifest will take the user into the same page as the 'Open' Manifest, but at the point where the manifest was closed. At this point, the user can print/re-print all the labels for the manifest and/or the manifest note, or click on an order line to go to the Manifest Order Details page.
Manifest Enquiry
The Manifest Enquiry page will allow the user to enquire on the details of a manifest. Initially, the parameter page from the Manifest Processing page will be displayed:
After selection, the user will be taken into the Manifest List page.
In the enquiry pages all of the data is read-only i.e. no modifications will be allowed to the manifest. Selecting an order will take the user into the Manifest Page:
And clicking on a manifest detail line will take the suer into the Manifest Details page, where the user can drill-down into any audit and non-conformances that may exist on the order, or select a line, or multiple lines to re-print the Manifest labels.
Manifest/Order Tracking
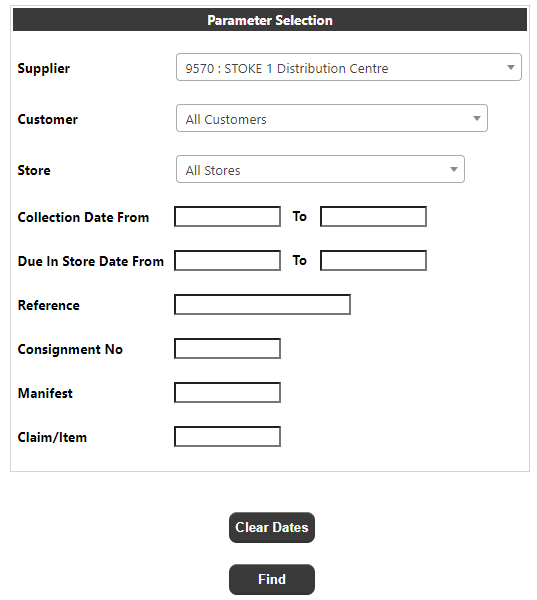
The Order Tracking page will allow the user to enquire on the time-line of events for a specific order on a manifest. Initially a parameter page will be displayed:
Supplier The drop-downs will display a list of available suppliers, customers and stores (based on restrictions).
Collection Date A range for collection dates.
Delivery Date/Due In Store A range for delivery dates.
Order No/Reference An order number (PO Ref).
Consignment No A Calidus TMS OMS Reference. Leading 0's are not required
Collection Manifest A manifest ID. Leading 0's are not required
Claim/Item No. A sepcific claim or Item ID on the order/manifest
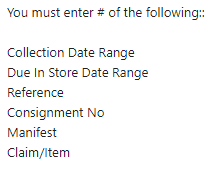
If any of the required parameters are not present, the use will receive the following error:
Once the parameters have been entered and the user clicks on the 'Find' button, a list of orders matching the criteria will be displayed:
A 'RAG' indicator in the first column will display clean/non-conformance order status.
Clicking on an individual order will take the user into the Tracking events page:
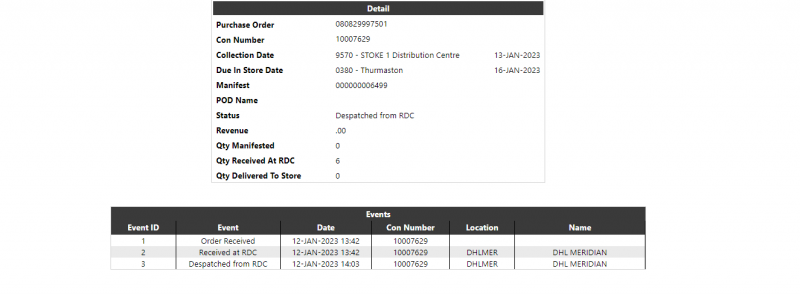
The tracking page will display detailed information on the order, as displayed above.
Note: The full list of events that could be displayed is not included in the above screenshot.
Clicking on the 'View Order Details' button will take the user into Manifest Enquiry Order Details page:
Trip Planning
Trip Planning
The Trip Planning page (tripLegView) shows the planned trip/leg information for a given Schedule Date and depot. Initially the page will display data based on the schedule for the current system date, and the default depot (which for most users will be the only available depot) with no filters applied to the data.
The user can select an alternate date and a series of other filters will be available for a selection of the fields.
- Schedule Date - the date upon which the trips are planned for execution (and not the planned date of actual load/unload). Clicking on the date field will bring up a calendar for the user to select a single schedule date.
- Trip - A list of every trip for the selected schedule date / depot. **
- Driver - A list of every driver for the selected schedule date / depot. **
- Vehicle - A list of the registration numbers in use for the selected schedule date / depot. **
- Activity - Will contain the values 'Any', 'Load' and 'Unload'
- Trip Status - A list of the status from the TMS system.
- Depot - A list of the depots available to the user (which are setup against the users group). For most users, this will be a single depot, but certain groups may be configured to view more than one depot in which case an 'all' option will also be available.
- Location - This will consist of two drop-down boxes. The first location drop-down will contain the type of location to be filtered:
- Any - Either of the two location types below
- Previous
- Next
The second location drop-down will contain a list of any of the locations in use for the selected schedule date combined for any of the three location types (Previous, Current and Next).
- ETA Status - a list of values from the calculated ETA status of the trip/leg:
- Not Departed
- On Time
- Delayed
- Arrived
- Note that these filters i.e. the filters which use data from Calidus TMS will always contain a full list of the information for the selected schedule date and the selected depot, regardless of the current filters, so that once a filter is applied, the user can choose another/different set of criteria for the schedule date, without having to reset all of the filters.
A reset button will be available to clear all of the current filters, with the exception of the currently selected Schedule Date and Depot.
Initially upon entering the page, or once the user has amended any of the filters and clicks on the 'Filter' button, the details for the selection will be displayed. The detail data will initially be sorted by Planned Departure time (earliest departure first) but the user may select a different sort sequence by clicking on the heading of any of the columns in the detail section.
The data displayed in the detail section will be as follows.
- Trip - the trip ID/Route number.
- Stop - the leg/stop sequence
- Driver - the name of the driver on the trip/leg
- Vehicle - the registration of the vehicle assigned to the trip/leg
- Previous location - the location ID and name of the location last visited on the trip. If the trip has not departed this field will be blank.
- Current location - the location ID and name where the vehicle is currently en-route to or has arrived at. If the vehicle has not departed en-route from the start depot, this will be the start-up depot location.
Note: This column is only displayed of more than one depot is selected.
- Next Location - the next location ID and name on the trip, after it has left its current location. Once the vehicle has arrived at its final destination for the trip, this will be blank.
- Activity - the current activity. Either Load or Unload.
- RPE - The RPE Qty total for the orders on the trip/leg (this will be configured to be the stacks of baskets for bakery products and pallets for snacks product)
- Planned Arr - the planned arrival date and time data on Calidus TMS
- ETA - if available, an ETA date and time at the next location will be displayed
- ETA Status - a calculated field with the following logic:
- Not Departed - If Actual Depart is null
- Delayed - If ETA is greater than Planned Arrival **
- On time - If ETA is less than or equal to Planned Arrival **
- Arrived - If Actual Arrival is not null
- Cancelled - If the trip status is Cancelled
- Blank - if none of the above conditions can be applied.
- A configurable tolerance (in minutes) will be applied to the times, so for Delayed the ETA will have to be X minutes greater than the Planned Arrival, and for On Time the ETA will have to be within X minutes of the Planned Arrival.
- Actual Arr - the actual arrival date and time data on Calidus TMS
- Planned Dep - the planned departure date and time data on Calidus TMS
- Actual Dep - the planned departure date and time data on Calidus TMS
- Movement Status - the Calidus TMS trip status.
A RAG colour coding will be applied to the detail lines on the page. The defaults will be:
- Green - On time or Arrived
- Amber - Delayed
- Grey - if trip/leg is Movement Status "Cancelled"
- White - for lines which do not meet any of the above conditions
Note: The RAG colour coding is configurable in the TMS Page Options page. See section 2.2.1
Clicking on the highlighted line will take the user into a new page to enter Actual details for that trip/leg. (See section Error! Reference source not found.)
Below the detail section will be a series of 'action' buttons
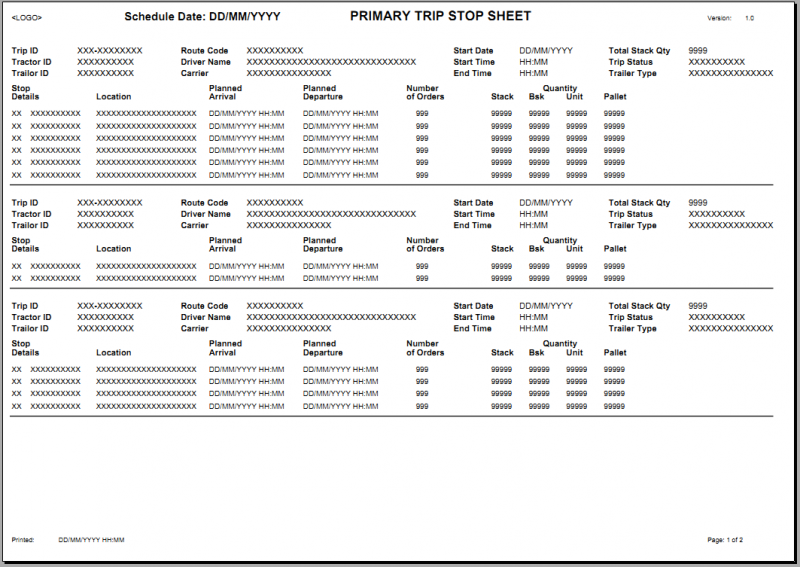
Trip Sheet - will produce a trip sheet for the selected Schedule Date and Depot.
Example Trip Sheet
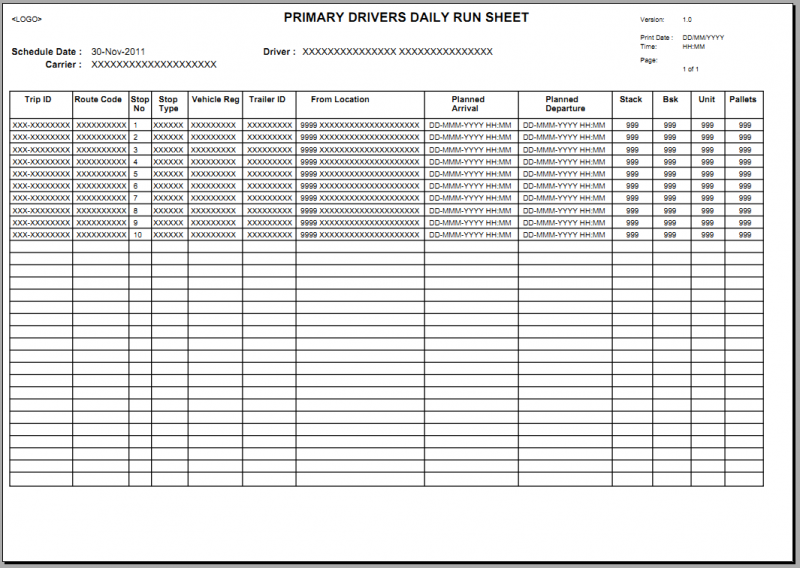
Driver Run Sheet - Selecting a Driver from the drop-down list (a single driver must be selected - an 'All' option will not be available) then clicking on the Driver Run Sheet button will produce a Driver Run Sheet for the selected Schedule Date. Note that only drivers assigned to trips visiting the user's depot will be available in the drop down list.
Example Driver Run Sheet
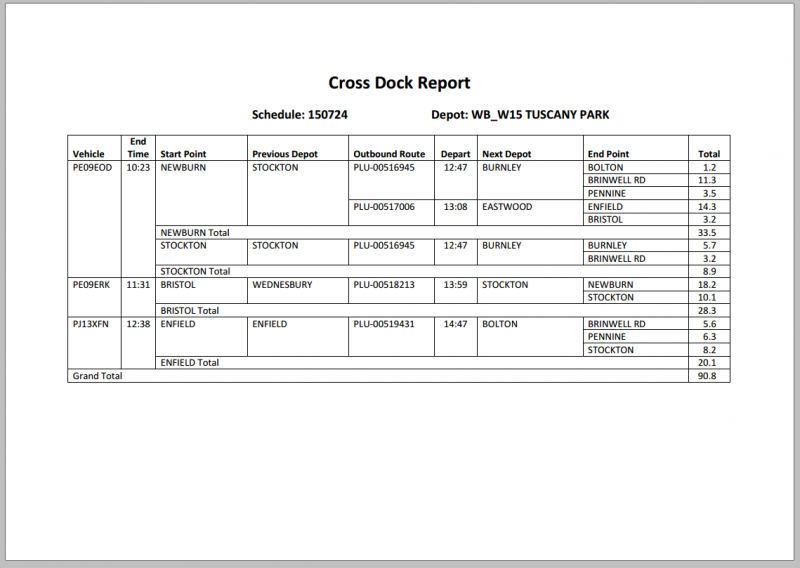
Cross Dock Report - will produce a Cross Dock Report for the selected Schedule Date and Depot.
Example Cross Dock Report
Note: For the above sheets/reports, selecting individual lines from the detail section will have no effect - all the available details will always be displayed.
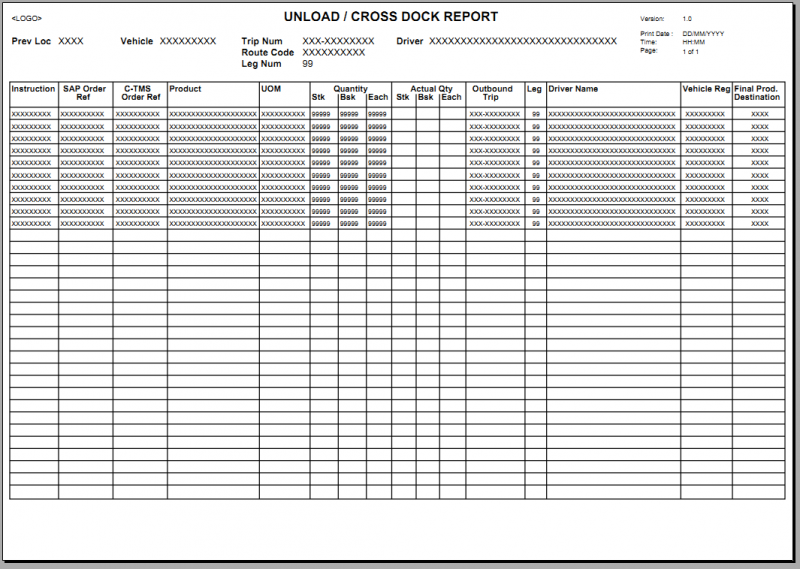
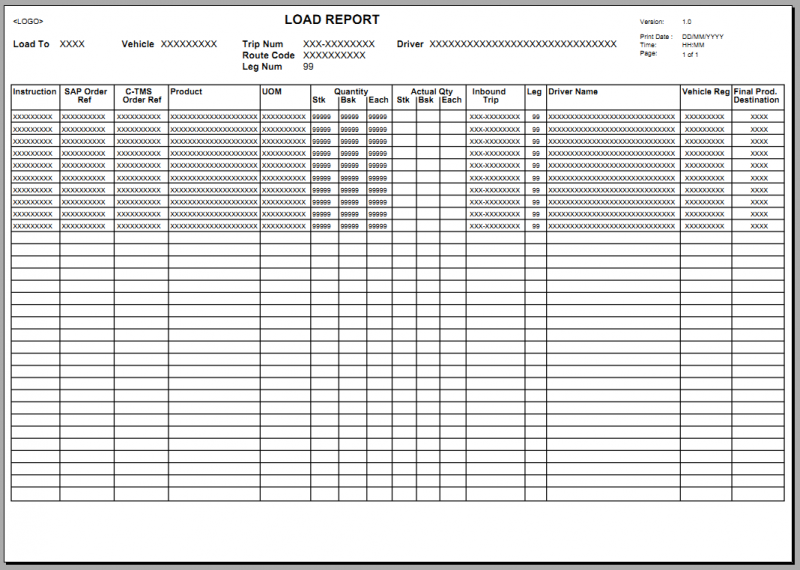
Load/Unload report - The 'Select All' and 'Select None' buttons can be used to select/deselect all of the currently displayed detail lines on the page. Alternatively, the user can select individual (or multiple) detail lines by clicking on the individual select boxes on the end of each detail line. Once the user has selected the desired detail lines, they can click either the load or unload report buttons to run the specified report for the selected.
Example Load Report
Example Unload Report
Trip Actuals
If the user selects an individual detail line on the Trip Processing by clicking on it, they will be taken into a detail page to update the 'actuals' for the selected trip/leg.
The header section will contain details for the trip, as displayed above.
The detail section will contain the following information/read-only fields:
- Calidus TMS Order Reference
- Product Code
- Product Description
- Product Type
- Container Type/UOM
- Planned Quantity - the Calidus TMS Planned values
- Actual Quantity - If the actual quantities already exist they will be displayed, else if the actual quantities are null then the planned quantities will be displayed. If required and by exception, the user can amend the actual quantities (which will highlight the changed quantities by surrounding the text-box with an amber highlight). Other than validating that the input is a positive number less than the maximum value, no other validation will be performed on the quantity fields. Quantities over the planned qty will be permitted.
An 'Update' button will be available at the base of the page to confirm the entered (or defaulted) quantities back to the Calidus TMS. Note: It is assumed that debrief entry into the Calidus Portal screens will override any values already updated from any automated debrief updates into Calidus TMS.
Assets
Asset Returns
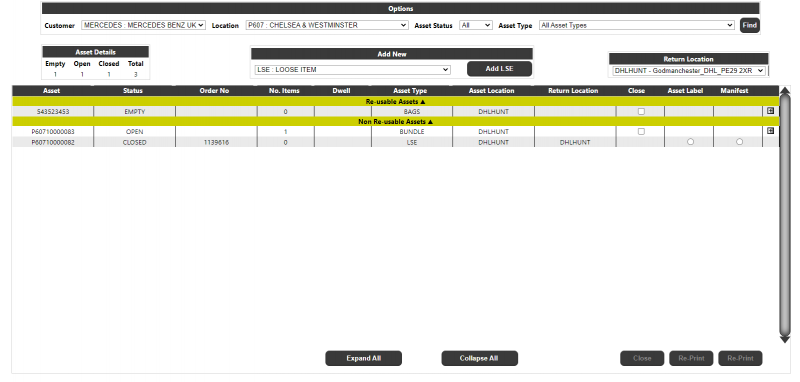
The asset returns page can be used to enter details of assets which require collection from a collection point. The page will initially prompt the user for the following information:
- Dealer/Customer - This will be a list of customers' setup against the group to which the login belongs, or all customers if no restriction exists. If only a single customer is available then the drop-down will only show this value. If multiple customers are available, a single customer must be selected.
- Location/Collection Point - This will be a list of collection point's setup against selected customer.
- Asset Status - Values "All", "Empty", "Open" or "Closed". This is the status of the asset i.e. whether it contains items and has been closed - it is not the status of the collection/return.
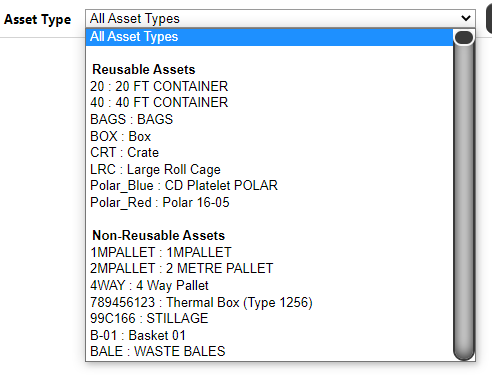
- Asset Type - This is a list of Asset Types held on the Calidus TMS system. The list will be split into Reusable and Non-Reusable asset types as defined on the Calidus TMS system.
Once the options have been selected, the user will click the 'Find' button, and the system will retrieve all current assets which are at the location i.e. assets which have yet to be collected. Once an asset is collected, it will no longer be visible on this page, and the user should then use the asset tracking page to track the asset.
Header
- Asset Details - This section will display a summary of the Assets at the location - Empty, Open, Closed and the Total number of assets.
- Add New Asset/Loose Item - a drop-down box of all defined asset types to allow the user to create a new permanent or non-permanent asset which is not currently tracked as being at the selected location. For a non-permanent (loose) asset, clicking the button will generate a new asset on the Calidus TMS system with an 'Empty' status which will then be displayed in the details. The user can then add into this asset as they would any other.
If the user selects a permanent asset type, then an input will be displayed to enter the Asset Id:
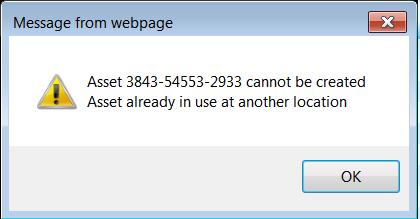
When pressing the 'Add Asset' button (Note: the name of the button will be changed dependent on the Asset type selected e.g. 'Add LRC' in the above example) the Calidus Portal system will call the Calidus TMS system to validate and add the new asset (if valid). The Asset Returns page will be refreshed and the asset, if valid, will appear in the assets listed for the location where it can then be selected for return and item contents can be added as per the normal functionality. If the asset cannot be added into Calidus TMS, then the user will be alerted to the issue, for example:
- Return Location - This will identify the location to which the assets are returned.
Detail
The page details will display a list of the assets currently at the location. The list will be split by Re-Usable and Non Re-Usable assets. Clicking on the headings for each of these sections will expand/collapse that section.
- Asset - the ID of the asset.
- Status - the status of the asset i.e. Empty, Open, Closed
- Order No - for closed assets, yet to be collected, the Order No will be displayed
- No. Items - the current no. Items added to the cage.
- Dwell - the dwell time of the asset i.e. the number of days the asset has been at that location.
- Asset Type - the type of the asset.
- Asset Location - the current location associated with the asset.
- Return Location - the return location associated with the asset.
- Close - A select box against an asset which is empty or open. The user can select one or more assets to close and then click the Close button. Note: All of the selected assets in a single closure will be assigned the same returns reference on the Calidus TMS system.
- Asset Label - used to re-print an asset label by selecting the asset, then clicking on the Re-Print button at the base of the column.
- Item Labels - used to re-print item labels for an asset by selecting the asset, then clicking on the Re-Print button at the base of the column.
- Manifest - used to re-print a manifest for an asset by selecting the asset, then clicking on the Re-Print button at the base of the column.
Note:
The user can either close, add or re-print - they cannot perform multiple actions at the same time.
Each detail line will also have a '+' button to expand the individual line:
Expanding the detail will show the user the contents of the asset. For 'empty' and 'open' cages, there will also be the ability to add a new item/claim into the asset, or remove an existing item/claim. Note: Only one part may be added or removed to/from an asset at a time. For closed assets the Add/Remove line and buttons will not be visible i.e. no further parts may be added or removed once the aseet is closed (and no option will be given to re-open an asset).
If the Item Content Type on Calidus TMS is 'ITEM' then the page will display as above in the screenshot, but if the content type is 'CLAIM' then the "Item" box will be replaced with a "Claim Reference" box.
The following details may be added to an asset:
- Item/Claim Reference - the Item or Claim Reference dependent on the content type.
For a Claim Reference, the following validation will be performed:
If the Claim Type selected is from "A" to "Z" then the Claim reference will be validated to be a 6 digit alphanumeric field
For any other Claim Type values i.e. currently "1" or "2" then the Claim reference will be validated to be a 7 digit alphanumeric field
- Type - A drop-down list of item or claim types. For items, once an item has been added to an asset then the type will be 'locked' for that asset, so only items of the same type may be added.
- Description - A free-text field.
If the user adds a claim into an asset, then a button will be available to print an item label:
Note: Once an asset is closed, the user cannot print individual item labels, and must re-print all items using the label selection against the asset.
When the user closes an asset, they will be presented with the following:
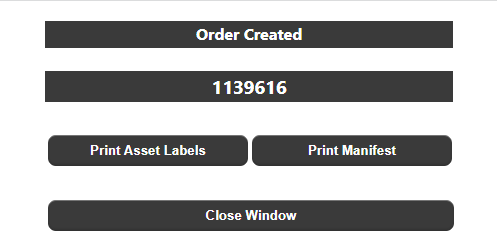
The user can Cancel the closure, or optionally select a Parent Asset before confirming the closure. The default will be 'No Parent Asset' but the user can select any Closed asset currently in the location as the parent asset. This will assign all assets selected for closure as children of the selected parent asset. Once closed, a box will be displayed to show the order created and allow printing of asset labels and a manifest:
Asset Tracking
The Asset Tracking page (assetTracking) can be used to find the location of an asset, or list of assets.
The asset(s) to find should be entered on the left side of the page in the Asset Search, then when the user clicks on Find, the location of the assets (if known) will be displayed on the right hand side along with the dwell time at the location, and whether the asset has been marked inactive on the Calidus TMS
If the asset cannot be found, the asset will be displayed as an unknown asset:
Airport Pages
Schedule
The Schedule page (orderWell) shows an 'airport' style trip/stop or order view.
Initially, the following parameters will be displayed based on the Display Type 'Trip/Stop':
If the Display Type is changed to 'Order' then the parameters will change to:
- Schedule - This will be the Calidus TMS schedule and will default to the current i.e. "Todays" schedule. A calendar will be available to select other schedules. A single schedule must always be selected
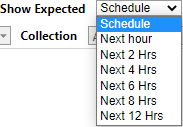
- Show Expected - This will determine the display of orders which have not yet been delivered. The values will be as follows:
The default value will be "Schedule".
Note: The time selection will be limited within the current schedule. If the selected schedule is not the current date this drop-down will be set to 'Schedule' meaning that all orders for the selected schedule will be displayed
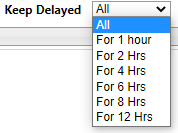
- Keep Delayed - This will determine how long orders which have not yet been delivered are kept on the display once their expected time has passed. The values will be as follows:
The default value will be "All".
Note: The time selection will be limited within the current schedule.
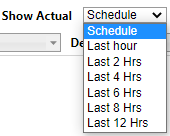
- Show Delivered/Actual - As "Show Expected", but for orders which have been delivered:
The default value will be "Schedule".
Note: The time selection will be limited within the current schedule. If the selected schedule is not the current date this drop-down will be set to 'Schedule' meaning that all orders for the selected schedule will be displayed
Note: If the Display Type is 'Order', then the title of this dropdown will change to 'Show Actual'
- Activity - This is only displayed if the Delivery Type is 'Trip/Stop'. This will allow the user to filter the data to display only Load (Collection) or Unload (Delivery) stops for trips/orders. The default will be "Any" i.e. both:
- Collect/Deliver - This is only displayed if the Delivery Type is 'Order'. This will allow the user to select if the Delivered/Actual dropdowns apply to the Collection or Delivery for the order. The default will be "Both":
- Carrier/Haulier - This will be a drop-down list of carriers/hauliers from the Calidus TMS system obtained by selecting distinct hauliers (carrier_id) from the trips (sch_trip) on the currently selected schedule:
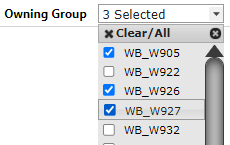
The drop-down will be 'Multi-Select' meaning that multiple values can be selected as displayed above. There will also be the option to 'Clear/All' which will remove all of the current selections and set the dropdown to 'All'. The default value will be 'All'.
Each time the schedule is changed, the haulier list will be updated. If any hauliers were previsouly selected and they still exist in the new list, they will remain selected.
- T2A Status - A select to filter on the Tag2Asset status of the order (if available). The default will be 'All'
- Owning Group / Depot - A 'Multi-Select' drop-down list of the available Owning depots i.e. the locations from the Calidus TMS system. The user/group may have restrictions on the number of depots they can see, in which case they will only see their assigned depots. The default value will be 'All' i.e. any assigned.
- Location- Only displayed if the Delivery Type is 'Trip/Stop'. A 'Multi-Select' drop-down list of addresses (Address Id and Name) from the Calidus TMS based on the addresses for the trips/stops on the currently selected schedule. The default will be "All".
Each time the schedule is changed, the location list will be updated. If any locations were previsouly selected and they still exist in the new list, they will remain selected.
- Collection - Only displayed if the Delivery Type is 'Order'. A 'Multi-Select' drop-down list of collection addresses (Address Id and Name) from the Calidus TMS based on collection addresses (activity 'SU' or 'PK') for the currently selected schedule. The default will be "All".
Each time the schedule is changed, the location list will be updated. If any locations were previsouly selected and they still exist in the new list, they will remain selected.
- Delivery - As the Collection above, but for delivery addresses (activity 'DL' or 'CL')
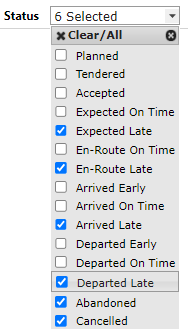
- Status - A 'Multi-Select' drop-down list of status for the trip/order:
The default will be 'All'.
See later for a description of the calculations used for each status.
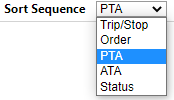
- Sort Sequence - A drop-down to determine the sequence of the retrieved data. The default will be "PTA" - Planned Time Arrival - this will be ascending so that the closest collections/deliveries will be displayed first.
As well as the above filters there will also be drop-downs to determine the page layout and function:
- Display Type - A drop-down to determine whether the retrieved data is displayed at Trip/Stop or Order/Stop level. The default will be Trip/Stop. See later for details of the detail page layout for each selection.
- Auto Refresh - A drop-down to determine whether the displayed data will auto-update and auto-scroll. The default will be "Off". See later for details of how this parameter will operate.
When the user clicks on the "Find" button, the relevant data will be retrieved and the page layout/function operations will be implemented.
Notes:
- When the page is first called it will automatically start the find process using the default/initial values for the selection criteria.
- The data retrieved will ALWAYS be limited to orders for customers/carriers that the current Calidus Portal user has access to. This means that if the user does not have visibility of a customer/carrier they will NOT see the orders for that customer regardless of the selection options.
When the results are displayed, an additional set of buttons will appear to adjust the font-size of the main results window:
This will allow the user to adjust the main window to fit the available screen space.
A drop-down at the base of the page can also be used to alter the number of records displayed on a single page, as well as navigate through the pages:
All of the parameters will be stored between finds/refreshes until the user exits the page. If the user navigates to another page or exits the system, the stored values will be reset to the initial defaults.
Trip/Stop View
If the display type is "Trip/Stop" then the following results will be displayed:
- Trip ID - The Trip ID.
- Owning Group/Depot - The depot code assigned to the trip.
- Route Code - The route code for the trip.
- Id/Location/Postcode - The location Id, Name and Postcode of the stop on the trip.
- Activity - The activity of the Trip/Stop, either Load or Unload.
- Haulier/Carrier - The name of the haulier/carrier of the trip.
- Driver - The name of the driver of the trip.
- Trailer/Vehicle - The description of the trailer type used on the trip.
- PDA - The planned arrival date at the stop.
- PTA - The planned arrival time at the stop.
- ETA - The estimated arrival time at the stop.
- ATA - The actual arrival time at the stop.
- PTD - The planned departure time from the stop
- ATD - The actual departure time from the stop.
- Status - The calculated status of the Trip/Stop. See later for details.
Hovering over a detail line will highlight the line, and clicking on the line will retrieve order information for the selected trip/stop for display:
- OMS Ref - The Calidus TMS systems order number
- Cust Ref - The customer's order reference
- Collection Location - The initial collection location for the order.
- Collection PTA - The planned arrival time at the orders initial Collection location.
- Collection ETA - The estimated arrival time at the orders initial Collection location.
- Collection ATA - The actual arrival time at the orders initial Collection location.
- Delivery Location - The final Delivery location for the order.
- Delivery PTA - The planned arrival time at the orders final Delivery location.
- Delivery ETA - The estimated arrival time at the orders final Delivery location.
- Delivery ATA - The actual arrival time at the orders final Delivery location.
The user can either click the "X" button or click away from the order details section to return to the trip/stop list.
Order/Stop View
If the display type is "Order" then the following results will be displayed:
- Trip ID - The Trip ID.
- Owning Group/Depot - The depot code assigned to the trip.
- Order / Cust Ref - The customer's order reference
- RAG - A RAG status against the T2A Status (if available - not shown above).
- T2A Status - Whether the T2A status or Complete or Incomplete (if available).
- Delivery Type - The Orders delivery type e.g. 'Standard', 'Emergency' etc.
- Route Code - The route code for the trip.
- Haulier/Carrier - The name of the haulier/carrier of the trip.
- Driver - The name of the driver of the trip.
- Vehicle/Trailer - The description of the trailer type used on the trip.
- Collection - The location Id, Name and Postcode of the orders initial Collection location.
- Status - The calculated status of the collection, based on the Trip/Stop status. See later for details.
- PDA - The planned arrival date at the orders initial Collection location.
- PTA - The planned arrival time at the orders initial Collection location.
- ETA - The estimated arrival time at the orders initial Collection location.
Will be set to the planned if there is no ETA, or blank if the trip/stop has an ATA.
- ATA - The actual arrival time at the orders initial Collection location.
- Delivery - The location Id, Name and Postcode of the orders final Delivery location.
- Status - The calculated status of the delivery, based on the Trip/Stop status. See later for details.
- PDA - The planned arrival date at the orders final Delivery location.
- PTA - The planned arrival time at the orders final Delivery location.
- ETA - The estimated arrival time at the orders final Delivery location.
Will be set to the planned if there is no ETA, or blank if the trip/stop has an ATA.
- ATA - The actual arrival time at the orders final Delivery location
Hovering over a detail line will highlight the line, and clicking on the line will retrieve order line/ item information for the selected order for display:
- Line No - The Line no from the order line.
- DU Type - The DU type from the order line.
- Asset Id - The Asset Id from the order line.
- Units - The Units from the order line.
- Line Qty - The Qty from the order line.
The following will be displayed but will only contain information if item level details exist:
- Item Id - The Item ID from the order item.
- Item Desc - The Item Description from the order item.
- Product Type - The Product Type from the order item.
- Item Qty Ordered - The Item's Order Qty
- Item Qty To Del - The Item's Qty To-Deliver.
- Item Qty Delivered - The Item's actual Delivered Qty.
An additional box will show any Order Information recorded against the order.
The user can either click the "X" button or click away from the order line section to return to the order list.
Status Calculations
The status of a Trip/Stop or Order will be a derived from the trip status and the stop level debrief values using the following rules.
| Seq | Move Status | Rule |
|---|---|---|
| 01 | Planned | Trip Status is PLANNED |
| 02 | Accepted | Trip Status is ACCEPTED |
| 03 | Expected on Time | Trip Status is EN-ROUTE and no eta, actual arrive or actual depart for the stop and previous stop is on time or early. |
| 04 | Expected Late | Trip Status is EN-ROUTE and no eta, actual arrive or actual depart for the stop and previous stop is late |
| 05 | En-Route On Time | Trip Status is EN-ROUTE and no actual arrive or actual depart and eta is before or equal to the planned depart time of the stop |
| 06 | En-Route Late | Trip Status is EN-ROUTE and no actual arrive or actual depart and eta is after the planned depart time of the stop |
| 07 | Arrived Early | Trip Status is EN-ROUTE or COMPLETED or CONFIRMED, no actual depart for the stop and actual arrive is before the planned arrive time of the stop |
| 08 | Arrived On Time | Trip Status is EN-ROUTE or COMPLETED or CONFIRMED, no actual depart for the stop and actual arrive is within the planned arrive and planned depart time of the stop |
| 09 | Arrived Late | Trip Status is EN-ROUTE or COMPLETED or CONFIRMED, no actual depart for the stop and actual arrive is after the planned depart time of the stop. |
| 10 | Departed Early | Trip Status is EN-ROUTE or COMPLETED or CONFIRMED and actual depart is before the planned arrive time of the stop |
| 11 | Departed On Time | Trip Status is EN-ROUTE or COMPLETED or CONFIRMED and actual depart is within the planned arrive and planned depart time of the stop |
| 12 | Departed Late | Trip Status is EN-ROUTE or COMPLETED or CONFIRMED and actual depart is after the planned depart time of the stop |
| 13 | Completed | |
| 14 | Abandoned | |
| 15 | Cancelled |
Notes:
The calculation of status would be the same whether looking at orders or trips/stops - in both views the status will be derived from the associated trip and stop.
Auto-Refresh
If "Auto-Refresh" is set to "On" then in addition to the standard page view with a navigation bar at the base of the screen, additional Refresh information will be displayed:
- Data Refresh - The time in minutes between data refreshes. Values will be Auto, 2, 5, and 10 minutes. Default is Auto, which means that whenever the last page of data is reached, the system will refresh and start again. Note: To limit database activity, if the number of records retrieved is less than 200 and data refresh is in in Auto mode, then the data will refresh every 2 minutes.
- Page Switch - The time in seconds between switching page data. Values will be 15, 30, 60, 120 and 180 seconds. Default is 30 seconds.
- Pause - a Pause button to stop both the data and page refresh so that the data currently displayed on the page will remain until the user presses this button again (Note: when pressed, the text of the button will be changed to 'Resume').
NOTE: The Pause button will be automatically 'pressed' when the user clicks on a detail line to display detailed information. The user will need to manually restart the data scrolling after this.
Examples
Data Refresh: Auto Page Switch: 30 Sec No. Records: 250 orders Records Per Page: 25 Sort: PTA
The page will initially display the 25 records with the nearest planned arrival time to the current time. After 30 seconds, the next 25 records will be displayed - this will continue with a new page every 30 seconds until the last page (there will be 10 pages of data in this example and given these settings the last page will take 5 minutes to display) upon which the data will be refreshed, and again the 25 records with the nearest planned arrival time to the 'new' current time will be displayed.
Data Refresh: 10 Min Page Switch: 30 Sec No. Records: 250 orders Records Per Page: 25 Sort: PTA
The page will initially display the 25 records with the nearest planned arrival time to the current time. After 30 seconds, the next 25 records will be displayed - this will continue with a new page every 30 seconds until the last page (as previous example, there will be 10 pages of data in this example). The same (non-updated) data will repeat, until the Data refresh time is exceeded (10 minutes) at which point the data will be refreshed, and again the 25 records with the nearest planned arrival time to the 'new' current time will be displayed.
Data Refresh: 5 Min Page Switch: 60 Sec No. Records: 250 orders Records Per Page: 25 Sort: PTA
The page will initially display the 25 records with the nearest planned arrival time to the current time. After 60 seconds, the next 25 records will be displayed - this will continue with a new page every 60 seconds until Data refresh time is exceeded (5 minutes) at which point the data will be refreshed, and again the 25 records with the nearest planned arrival time to the 'new' current time will be displayed. Note: With these settings, the page will never get to the oldest records retrieved, as the data refresh is less than the time it takes to page through all of the records - it will be the responsibility of the site/user to 'tweak' the Data (i.e. the tracking times) and Page refresh settings to ensure that it is displaying the data as they require.
Despatch
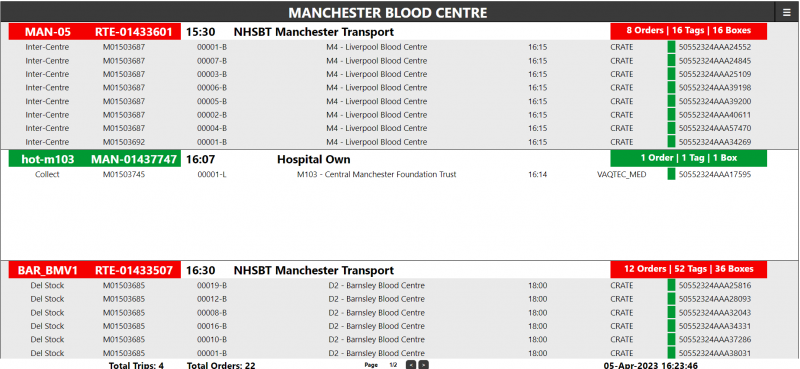
The Despatch page (enqDepartures) shows an 'airport' style view of collections/deliveries from a location.
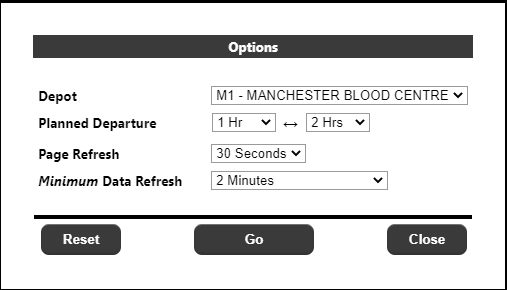
The user can access the page settings by clicking in the 'burger' menu on the top right of the main page:
- Depot - The location from which the collections/deliveries are being made. The list of locations in the drop-down wil be determined by the Calidus Portal RDC restrictions setup aginst the users group, and may only contain one value.
- Planned Departure - A time range to track collections/deliveries. For example in the above setup, the page will display planned collections/deliveries from the selected depot within the next 2 hours. Up to 12 hours can be tracked.
- Page Refresh - The page will display up to 3 collections/deliveries at any one time. If there are more than 3 collections/deliveries, then this setting determines how long each set of collections/deliveries remains on the page before the next set of collections/deliveries are displayed. The values in the drop-down are 10, 15, 30 and 60 seconds.
- Minimum Data Refresh - This setting determines the minimum time before the page returns to the server to retrieve the latest information. The page will retain the last time a data refresh was made, and once the time in the drop-down has been exceeded, the page will continue to display data until it reaches the last page of data, then refresh the data from the server. If the data refresh has not been exceeded when the last page has been reached, it will return to the first. The values in the dropdown are 2, 5 and 10 minutes.
- Reset Button - This will reset the options to their default values and refresh the page.
- Go Button - This will refresh the data using the currently selected options.
- Close Button - This will close the options page without refreshing the data, but note that any changes to the options will be kept and used on the next refresh.
The despatch board will display the selected location:
And up to 3 trips per page. A single trip may look like:
The top line of the trip contains the following information:
- Route Id The Route Id for the collection/delivery
- Trip Id The Trip Id for the collection/delivery
- Time The first planned collection/delivery from the selected location
- Carrier The name of the carrier (if available)
- Driver The name of the driver (if available)
- Trailer The Trailer ID (if available)
- Totals This consists of a total count for:
- Orders The orders being collected/delivered from the selected location
- Tags The number of 'buffer tags' i.e. distinct order/product combinations
- Boxes The number of distinct asset Id's
After the top line, the page will display the detail lines for that trip:
- Delivery Type The description of the delivery type e.g. Collect, Deliver Ad-Hoc etc.
- Order The Client Order / External Reference
- Item Id The Item Identifier
- Location The destination location for the trip leg
- Time The planned arrival at the destination location
- DU Type The description of the DU Type
- RAG Status This will have the following:
- Green If the item has been 'tag2asset' scanned.
- Red If the item requires scanning, but has not yet been scanned.
- Amber If neither of the above conditions is met, usually because the order is not a pulse order.
- Asset ID The Asset Id. If the collections/deliveries has multiple lines in the same box, a *
will be displayed next to the Asset Id.
If any of the assets are RAG Amber or Red, then the details will be highlighted, for example:
All Green:
Mixed Green/Red:
Up to 8 detail lines will be displayed for each trip detail at any one time - if the number of detail lines exceeds 8, then they will be cycled one detail at a time. Note that this scrolling is independent of the refresh parameters in the options page, and is not configurable by the user.
At the base of the page:
The footer will contain the following:
- Total Trips The total number of trips within the selected Planned Departure range for
the selected location
- Total Orders The total number of order within the selected Planned Departure range for
the selected location
- Page A page x/y display and buttons to manually cycle through the pages
- Date/Time The current date/time from the server.
TMS Oracle Reporting Suite
This is only available on Oracle based Calidus TMS systems where the user has been assigned an Oracle User as detailed in section 2.1
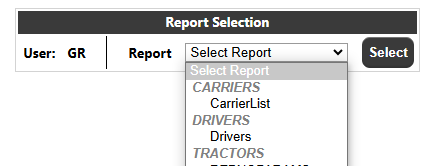
The page will initially display the Oracle user set against the User and a list of the reports assigned to that Oracle user:
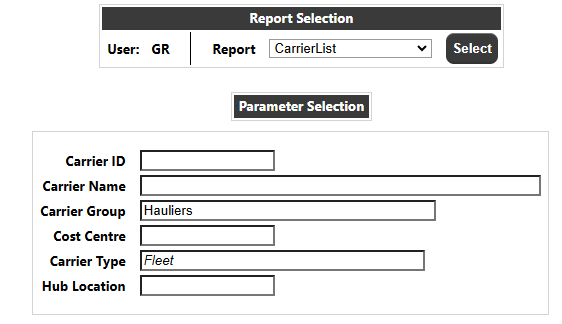
Once a report has been selected, the parameters will be retrieved from the Calidus TMS system and displayed:
Note: Parameters which are displayed in italic are fixed from the Calidus TMS system and cannot be altered.
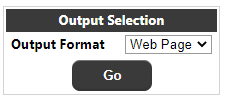
Once the user has entered any parameters, they can select the output format, which will be one of Web Page, XLS or PDF then click the Go button to execute the report.
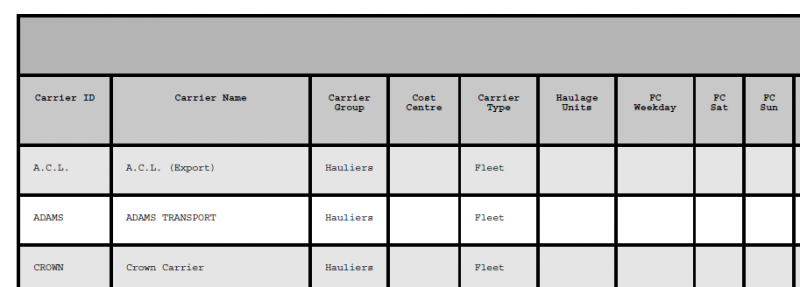
For a web page, a new window will open with a table containing the results for the report, for example:
For an XLS, a spreadsheet will be created and downloaded to the users PC (assuming the application has access), for example:
For a PDF, a PDF will be created and downloaded to the users PC (again, assuming the application has access), for example:
NOTE: For the PDF output, the system will attempt to shrink the font to display all of the reports fields onto a single line. For reports where there are many fields, this may result in a PDF which does not display as desired.
Portal TMS Configuration
The following table documents the configuration options for the TMS module on the Calidus Portal system.
| Section | Item | Admin* | Values | Description |
|---|---|---|---|---|
| CORE_CONFIG | DEPOT_TYPES_RDC | Comma separated list defining Depot Types as an RDC | ||
| CORE_CONFIG | DEPOT_TYPES_STORE | Comma separated list defining Depot Types as a Store | ||
| CORE_CONFIG | DEPOT_TYPES_SUP | Comma separated list defining Depot Types as a Supplier | ||
| MANIFEST | DAYS | 1, 2, 3, 4, 5, 6, 7, 14, 30 | No. Days User allowed to manifest in advance | |
| MANIFEST | DAYS_ADMIN | 1, 2, 3, 4, 5, 6, 7, 14, 30 | No. Days Admin User allowed to manifest in advance | |
| ORDER_ENTRY | ADD_ITEMS | No, Yes, Type S, Type H | Allow items to be added to order?. Y - Generates Item Id. S - Uses OMS Ref+Sequence for Item Id. H - Uses Sequence+Shipping Condition for Item Id | |
| ORDER_ENTRY | ADD_OTHER_PACK | No, Yes | Add \"Other\" to the Package Type drop-down? | |
| ORDER_ENTRY | DATE_CHANGE_WARN | No, Yes | Warn on change of collection/delivery date | |
| ORDER_ENTRY | DAY_END | 00, 01, 02, 03, 04, 05, 06, 07, 08, 09, 10, 11, 12, 13, 14, 15, 16, 17, 18, 19, 20, 21, 22, 23 | Hour for end of day | |
| ORDER_ENTRY | DAY_START | 00, 01, 02, 03, 04, 05, 06, 07, 08, 09, 10, 11, 12, 13, 14, 15, 16, 17, 18, 19, 20, 21, 22, 23 | Hour for start of day | |
| ORDER_ENTRY | GLZ | No, Yes | Restrict Locations by GLZ? | |
| ORDER_ENTRY | LABEL_URL | URL for TMS label | ||
| ORDER_ENTRY | MAX_BOOK_DAYS | 1, 2, 3, 4, 5, 6, 7, 14, 30 | Maximum days in advance to allow bookings | |
| ORDER_ENTRY | MAX_LINE_QTY | Maximum No. Packages per Line | ||
| ORDER_ENTRY | PACKAGING_CONTROL | No, Yes | Use TMS Packaging Control? | |
| ORDER_ENTRY | RECEIPT_LOGO | Y | Logo to use on Order Receipt/Summary | |
| ORDER_ENTRY | SUMMARY_SHEET | No, Yes | Produce a summary sheet? | |
| ORDER_ENTRY | TIME_CHANGE_WARN | No, Yes | Warn on change at/before collection/delivery times | |
| ORDER_ENTRY | WINDOW | 0, 1, 5, 10, 15, 30, 60 | Minutes to add onto start/end of collection/delivery date to get window | |
| ORDER_ENTRY | WINDOW_TYPE | System, Fixed, Type L | Type of Window | |
| ORDER_ENTRY_TEXT | ADHOC_TEXT_1 | Order Entry Ad Hoc Text Line 1 | ||
| ORDER_ENTRY_TEXT | ADHOC_TEXT_2 | Order Entry Ad Hoc Text Line 2 | ||
| ORDER_ENTRY_TEXT | ADHOC_TEXT_3 | Order Entry Ad Hoc Text Line 3 | ||
| ORDER_ENTRY_TEXT | ADHOC_TEXT_4 | Order Entry Ad Hoc Text Line 4 | ||
| ORDER_ENTRY_TEXT | ADHOC_TEXT_CONF | Ad Hoc Text on confirm | ||
| ORDER_ENTRY_TEXT | HAZ_TEXT_1 | Order Entry Hazardous Text Line 1 | ||
| ORDER_ENTRY_TEXT | HAZ_TEXT_2 | Order Entry Hazardous Text Line 2 | ||
| ORDER_ENTRY_TEXT | HAZ_TEXT_3 | Order Entry Hazardous Text Line 3 | ||
| ORDER_ENTRY_TEXT | HAZ_TEXT_4 | Order Entry Hazardous Text Line 4 | ||
| ORDER_ENTRY_TEXT | HAZ_TEXT_CONF | Order Entry Hazardous Text on confirm | ||
| ORD_UPLOAD | DIR | Directory to put the files in | ||
| ORD_UPLOAD | IP | IP of TMS machine to put files | ||
| ORD_UPLOAD | LABEL_URL | URL for the label | ||
| ORD_UPLOAD | PASS | Password for TMS Machine | ||
| ORD_UPLOAD | USER | User for TMS Machine | ||
| TRACKING_CONFIG | GEO_RESTRICT | No, Yes | Restrict By Geo Location in Order Tracking Enquiry |
- Items marked "Admin" can only be changed by System Administrators
Portal Web Service
A SOAP web service exists within the Calidus Portal application.
For the TMS module, there is currently no Web Service Functionality
PAGE DETAILS
| Type | Description | Page Key | User Guide |
|---|---|---|---|
| Maintenance | Page Options | TMS.maint.pageOptions | 2.2 |
| Maintenance | Order Defaults | TMS.maint.orderDefaults | 2.3 |
| Orders | Order Entry | TMS.ord.orderEntry | 3.1 |
| Orders | Order Upload | TMS.ord.orderUpload | 3.2 |
| Manifesting | Manifest Entry | TMS.man.dun.manifestEntry | 4.1 |
| Manifesting | Manifest Processing | TMS.man.dun.manifestProcess | 4.3 |
| Manifesting | Manifest Enquiry | TMS.man.dun.manifestProcessEnq | 4.4 |
| Manifesting | Order Tracking | TMS.enq.orderTracking | 4.5 |
| Planning | Trip/Stop View | TMS.enq.tripLegView | 5 |
| Assets | Asset Returns | TMS.ret.assetReturns | 6.1 |
| Enquiry | Asset Tracking | TMS.enq.assetTracking | 6.2 |
| Enquiry | Schedule | TMS.enq.orderWell | 7.1 |
| Enquiry | Despatch Board | TMS.enq.enqDepartures | 7.2 |

