Main Screen (HOME): Difference between revisions
No edit summary |
(Updated based on version 2.4.4) |
||
| (11 intermediate revisions by 2 users not shown) | |||
| Line 1: | Line 1: | ||
The Calidus Vision system starts by displaying this screen with summary help information. | |||
[[Image:Home.PNG|border|600px]] | [[Image:Home.PNG|border|600px]] | ||
The header contains some information regarding the system. | |||
* The title of the system, as well as the logged-on warehouse and owner configured against the user. | |||
* The last refresh time and minutes since last data refresh from the host systems are shown on the header. RAG is coloured Red if the data has not been refreshed in the last 15 minutes, Amber if not in the last 10 minutes, otherwise Green. | |||
* When a screen has been selected from the menu, the Auto-refresh option appears in the header, allowing selection of how often the selected screen should refresh. Note that Auto-Refresh does not apply to the menu or Timed Display screens, as these are governed by other parameters. Note also that having this option set when entering data (for example, in the Settings or Admin screens), the refresh will lose any data entered and not saved. The multi-tabbed Quick Screen will also reset on refresh, and a screen will not be shown until the tab is re-selected. | |||
The left side of the screen displays the main menu. This menu is displayed on all screens, except the Timed Display. | The left side of the screen displays the main menu. This menu is displayed on all screens, except the Timed Display. | ||
Menus can be opened and closed by clicking on them. | Menus can be opened and closed by clicking on them. | ||
*''[[Summary Screens]]'' show combined views of information designed to give an overview of particular areas quickly and | *''Quick Menu'' show all screens that have been configured by the user for quick access. This menu is open immediately upon accessing the system. If there are quick menus configured (through the ''Settings/User'' configuration screen), then another screen will be present here, called ''Quick Screen'' - this presents a tabbed screen with all of the defined quick screens on there. Selecting a tab will show the screen. | ||
*''[[Summary Screens]]'' show combined views of information designed to give an overview of particular areas quickly and easily. | |||
*''[[Single Screens]]'' show a single element, usually tailored for a specific purpose. | *''[[Single Screens]]'' show a single element, usually tailored for a specific purpose. | ||
*''[[Graphs]]'' show graphical versions of the summary screens. In most cases, clicking on the graph will display the data used to create the graph. | *''[[Graphs]]'' show graphical versions of the summary screens. In most cases, clicking on the graph will display the data used to create the graph. | ||
*''[[Analysis]]'' | *''[[Analysis]]'' allows the user to enquire on the productivity data using a series of defined parameters. | ||
*''[[Monitor]]'' | *''[[Monitor]]'' allows the user to view monitoring tools for the mined external systems. | ||
*''[[Actions]]'' contains the ability for the user to show a Dashboard Timed Display. | *''[[Actions]]'' contains the ability for the user to show a Dashboard Timed Display. | ||
*''[[Settings]]'' allows the user to change several parameters that affect how the system looks, feels and displays. | *''[[Settings]]'' allows the user to change several parameters that affect how the system looks, feels and displays. | ||
| Line 19: | Line 24: | ||
Each screen in the menu contains a description of what will be displayed - to see this, simply hover the mouse over the screen name. | Each screen in the menu contains a description of what will be displayed - to see this, simply hover the mouse over the screen name. | ||
----- | |||
The first item on the menu allows users to select the screens which are displayed in the main menu. Clicking on the ''System'' menu entry on the top opens up a pop-up menu, from which you can choose the system you wish to see. Vision defaults to showing all the systems you are set up to see - each screen in this case will be preceded by the system name. To select a specific system, choose it from the pop-up menu. The system will then display the main screen again, with only the selected system's options displayed in the main menu. | |||
The main menu can be shown or hidden using the Pin button on the top. When not pinned, the menu will hide to the left of the screen - floating over the bar will redisplay the menu. This menu pinning functionality can also be controlled through the [[Web|Web Settings]] screen. | |||
The main menu also has a pop-out toolbar in the top-left corner - click on the ''' '>' ''' button to show the following options: | |||
[[Image:Popup-Toolbar.png|border]] | |||
*'''System Help''' - this option starts Calidus Assist on the main page, in a new window or tab. | |||
*'''Help on this screen''' - this option starts Calidus Assist on the page associated to the screen shown in the main frame, in a new window or tab. | |||
*'''Print...''' - this option will start your browser's Print dialogue, and will only print the data shown in the main frame. | |||
*'''Search...''' - this option will display a search box. | |||
[[Image:Popup-Search.png|border]] | |||
Typing in the search box will filter all of the available menu items and display a list of all the screens that match. | |||
[[Image:Popup-SearchResults.png|border]] | |||
Clicking on an item in that list will start the screen and remove the search box. | |||
Selecting any option on this pop-out toolbar will also close the toolbar. You can also close the toolbar by clicking the ''' '<' ''' button. | |||
[[Category:Vision User Guide]] | [[Category:Vision User Guide]] | ||
[[Category:Vision User Guide Doc|016]] | |||
Latest revision as of 14:35, 18 June 2018
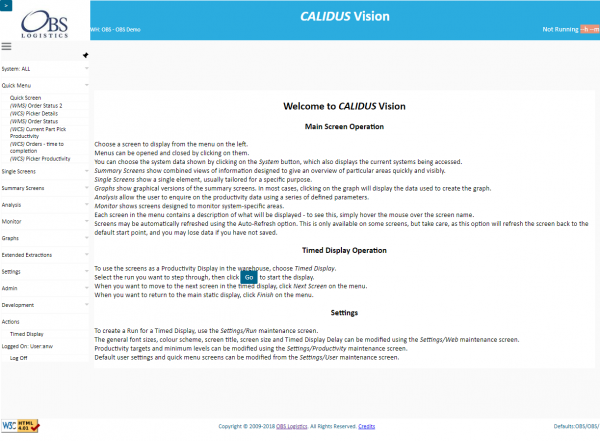
The Calidus Vision system starts by displaying this screen with summary help information.
The header contains some information regarding the system.
- The title of the system, as well as the logged-on warehouse and owner configured against the user.
- The last refresh time and minutes since last data refresh from the host systems are shown on the header. RAG is coloured Red if the data has not been refreshed in the last 15 minutes, Amber if not in the last 10 minutes, otherwise Green.
- When a screen has been selected from the menu, the Auto-refresh option appears in the header, allowing selection of how often the selected screen should refresh. Note that Auto-Refresh does not apply to the menu or Timed Display screens, as these are governed by other parameters. Note also that having this option set when entering data (for example, in the Settings or Admin screens), the refresh will lose any data entered and not saved. The multi-tabbed Quick Screen will also reset on refresh, and a screen will not be shown until the tab is re-selected.
The left side of the screen displays the main menu. This menu is displayed on all screens, except the Timed Display.
Menus can be opened and closed by clicking on them.
- Quick Menu show all screens that have been configured by the user for quick access. This menu is open immediately upon accessing the system. If there are quick menus configured (through the Settings/User configuration screen), then another screen will be present here, called Quick Screen - this presents a tabbed screen with all of the defined quick screens on there. Selecting a tab will show the screen.
- Summary Screens show combined views of information designed to give an overview of particular areas quickly and easily.
- Single Screens show a single element, usually tailored for a specific purpose.
- Graphs show graphical versions of the summary screens. In most cases, clicking on the graph will display the data used to create the graph.
- Analysis allows the user to enquire on the productivity data using a series of defined parameters.
- Monitor allows the user to view monitoring tools for the mined external systems.
- Actions contains the ability for the user to show a Dashboard Timed Display.
- Settings allows the user to change several parameters that affect how the system looks, feels and displays.
- Log Off logs the user out of the application.
Each screen in the menu contains a description of what will be displayed - to see this, simply hover the mouse over the screen name.
The first item on the menu allows users to select the screens which are displayed in the main menu. Clicking on the System menu entry on the top opens up a pop-up menu, from which you can choose the system you wish to see. Vision defaults to showing all the systems you are set up to see - each screen in this case will be preceded by the system name. To select a specific system, choose it from the pop-up menu. The system will then display the main screen again, with only the selected system's options displayed in the main menu.
The main menu can be shown or hidden using the Pin button on the top. When not pinned, the menu will hide to the left of the screen - floating over the bar will redisplay the menu. This menu pinning functionality can also be controlled through the Web Settings screen.
The main menu also has a pop-out toolbar in the top-left corner - click on the '>' button to show the following options:
- System Help - this option starts Calidus Assist on the main page, in a new window or tab.
- Help on this screen - this option starts Calidus Assist on the page associated to the screen shown in the main frame, in a new window or tab.
- Print... - this option will start your browser's Print dialogue, and will only print the data shown in the main frame.
- Search... - this option will display a search box.
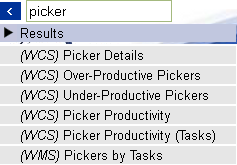
Typing in the search box will filter all of the available menu items and display a list of all the screens that match.
Clicking on an item in that list will start the screen and remove the search box.
Selecting any option on this pop-out toolbar will also close the toolbar. You can also close the toolbar by clicking the '<' button.

