Menus: Difference between revisions
No edit summary |
(Added Menu Maintenance help) |
||
| Line 4: | Line 4: | ||
A Menu Group is created in this screen. The Menu Group collates a selection of menus together, for display on the Calidus Vision main menu. | A Menu Group is created in this screen. The Menu Group collates a selection of menus together, for display on the Calidus Vision main menu. | ||
[[Image:Menu-Group1.PNG|border|600px]] | [[Image:Menu-Group1.PNG|border|600px]] | ||
The descriptions of the Groups can be maintained here by adding the description and clicking ''Save''. | The descriptions of the Groups can be maintained here by adding the description and clicking ''Save''. | ||
Any changes can be discarded by using the ''Reset'' button. | Any changes can be discarded by using the ''Reset'' button. | ||
| Line 10: | Line 12: | ||
Menu Groups can be created here by using the ''Add'' button. | Menu Groups can be created here by using the ''Add'' button. | ||
[[Image:Menu-Group2.PNG|border|600px]] | [[Image:Menu-Group2.PNG|border|600px]] | ||
Once the new Group name and description has been entered, click the ''Save'' button. | Once the new Group name and description has been entered, click the ''Save'' button. | ||
The Group can be created as a copy of an existing Group by selecting an existing Group from the drop-down list provided. | The Group can be created as a copy of an existing Group by selecting an existing Group from the drop-down list provided. | ||
| Line 18: | Line 22: | ||
==Group Menus== | ==Group Menus== | ||
This form can be used to allocate menus to a group. | This form can be used to allocate menus to a group. | ||
[[Image:Menu-GroupMenus.PNG|border|600px]] | [[Image:Menu-GroupMenus.PNG|border|600px]] | ||
| Line 43: | Line 48: | ||
[[Image:Menu-Menus1.PNG|border|600px]] | [[Image:Menu-Menus1.PNG|border|600px]] | ||
The descriptions of the Menu can be maintained here by adding the description and clicking ''Save''. | The descriptions of the Menu can be maintained here by adding the description and clicking ''Save''. | ||
Any changes can be discarded by using the ''Reset'' button. | Any changes can be discarded by using the ''Reset'' button. | ||
| Line 48: | Line 54: | ||
A new Menu can be created here by using the ''Add'' button. | A new Menu can be created here by using the ''Add'' button. | ||
[[Image:Menu-Menus2.PNG|border|600px]] | [[Image:Menu-Menus2.PNG|border|600px]] | ||
Once the new Menu name and description has been entered, click the ''Save'' button. | Once the new Menu name and description has been entered, click the ''Save'' button. | ||
The Menu can be created as a copy of an existing Menu by selecting an existing Menu from the drop-down list provided. | The Menu can be created as a copy of an existing Menu by selecting an existing Menu from the drop-down list provided. | ||
The Screens associated to the Menu can amended using the ''Edit Screens'' button. | The Screens associated to the Menu can amended using the ''Edit Screens'' button. | ||
[[Image:Menu-Menus3.PNG|border|600px]] | [[Image:Menu-Menus3.PNG|border|600px]] | ||
The buttons available here are the same as those in the Group Menus screen. | The buttons available here are the same as those in the Group Menus screen. | ||
When all changes have been made, click the ''Save'' button | When all changes have been made, click the ''Save'' button | ||
Revision as of 15:40, 23 March 2011
The Menu editing forms allow the user to maintain and change menus that are then assigned to users on the User Settings form.
Groups
A Menu Group is created in this screen. The Menu Group collates a selection of menus together, for display on the Calidus Vision main menu.
The descriptions of the Groups can be maintained here by adding the description and clicking Save. Any changes can be discarded by using the Reset button. A Group can be deleted by selecting it using the radio button provided and click the Delete button.
Menu Groups can be created here by using the Add button.
Once the new Group name and description has been entered, click the Save button. The Group can be created as a copy of an existing Group by selecting an existing Group from the drop-down list provided.
The menus associated to the Group can amended using the Edit Menus button.
Group Menus
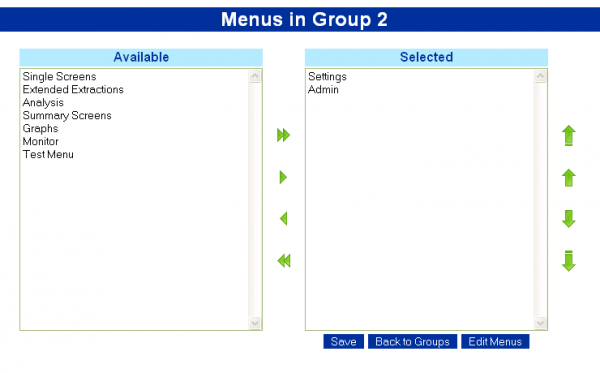
This form can be used to allocate menus to a group.
The buttons in sequence from left to right and top to bottom are as follows
- Centre Buttons
- To move all Available Menus to a Group, click the double right arrow.
- To allocate a Menu to a Group, select it from the Available menus on the left list and click the single right arrow.
- To remove a Menu from a Group, select it from the Selected menus on the right list and click the single left arrow.
- To remove all Selected Menus from a Group, click the double left arrow.
- Right Buttons:
- To move a selected Menu to the top of the list, select it from the Selected menus on the right list and click the segmented up arrow.
- To move a selected Menu up one place in the list, select it from the Selected menus on the right list and click the up arrow.
- To move a selected Menu down one place in the list, select it from the Selected menus on the right list and click the down arrow.
- To move a selected Menu to the bottom of the list, select it from the Selected menus on the right list and click the segmented down arrow.
When all changes have been made, click the Save button
To edit the contents of the Menus, click the Edit Menus button.
To return to the Groups screen, click the Back to Groups button.
Menus
This form is used to edit the screens contained within a menu. This form can be found from the 'Group Menus' screens and from the 'Admin' menu by default.
The descriptions of the Menu can be maintained here by adding the description and clicking Save. Any changes can be discarded by using the Reset button. A Menu can be deleted by selecting it using the radio button provided and click the Delete button.
A new Menu can be created here by using the Add button.
Once the new Menu name and description has been entered, click the Save button. The Menu can be created as a copy of an existing Menu by selecting an existing Menu from the drop-down list provided.
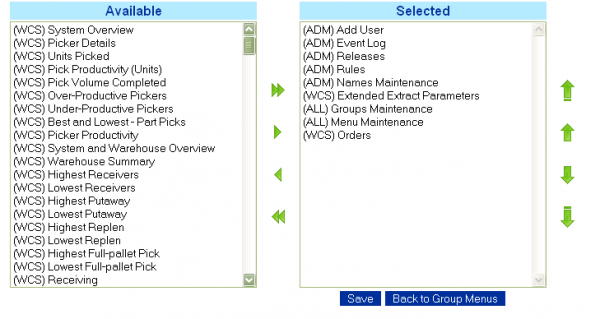
The Screens associated to the Menu can amended using the Edit Screens button.
The buttons available here are the same as those in the Group Menus screen. When all changes have been made, click the Save button
Back to Main Page


