Did You Know
This guide is intended to help you discover features delivered with your CALIDUS system.
CALIDUS Vision
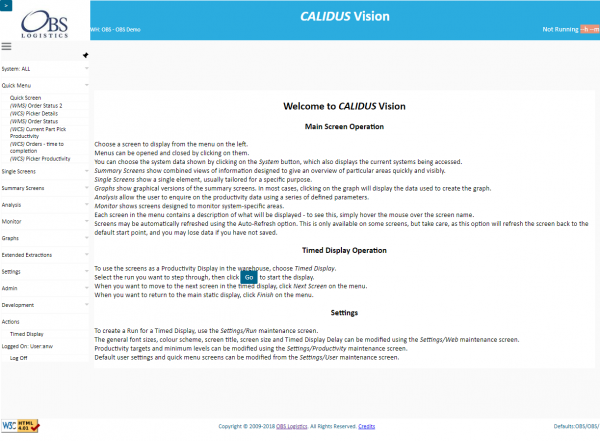
The Calidus Vision system starts by displaying this screen with summary help information.
The header contains some information regarding the system.
- The title of the system, as well as the logged-on warehouse and owner configured against the user.
- The last refresh time and minutes since last data refresh from the host systems are shown on the header. RAG is coloured Red if the data has not been refreshed in the last 15 minutes, Amber if not in the last 10 minutes, otherwise Green.
- When a screen has been selected from the menu, the Auto-refresh option appears in the header, allowing selection of how often the selected screen should refresh. Note that Auto-Refresh does not apply to the menu or Timed Display screens, as these are governed by other parameters. Note also that having this option set when entering data (for example, in the Settings or Admin screens), the refresh will lose any data entered and not saved. The multi-tabbed Quick Screen will also reset on refresh, and a screen will not be shown until the tab is re-selected.
The left side of the screen displays the main menu. This menu is displayed on all screens, except the Timed Display.
Menus can be opened and closed by clicking on them.
- Quick Menu show all screens that have been configured by the user for quick access. This menu is open immediately upon accessing the system. If there are quick menus configured (through the Settings/User configuration screen), then another screen will be present here, called Quick Screen - this presents a tabbed screen with all of the defined quick screens on there. Selecting a tab will show the screen.
- Summary Screens show combined views of information designed to give an overview of particular areas quickly and easily.
- Single Screens show a single element, usually tailored for a specific purpose.
- Graphs show graphical versions of the summary screens. In most cases, clicking on the graph will display the data used to create the graph.
- Analysis allows the user to enquire on the productivity data using a series of defined parameters.
- Monitor allows the user to view monitoring tools for the mined external systems.
- Actions contains the ability for the user to show a Dashboard Timed Display.
- Settings allows the user to change several parameters that affect how the system looks, feels and displays.
- Log Off logs the user out of the application.
Each screen in the menu contains a description of what will be displayed - to see this, simply hover the mouse over the screen name.
The first item on the menu allows users to select the screens which are displayed in the main menu. Clicking on the System menu entry on the top opens up a pop-up menu, from which you can choose the system you wish to see. Vision defaults to showing all the systems you are set up to see - each screen in this case will be preceded by the system name. To select a specific system, choose it from the pop-up menu. The system will then display the main screen again, with only the selected system's options displayed in the main menu.
The main menu can be shown or hidden using the Pin button on the top. When not pinned, the menu will hide to the left of the screen - floating over the bar will redisplay the menu. This menu pinning functionality can also be controlled through the Web Settings screen.
The main menu also has a pop-out toolbar in the top-left corner - click on the '>' button to show the following options:
- System Help - this option starts Calidus Assist on the main page, in a new window or tab.
- Help on this screen - this option starts Calidus Assist on the page associated to the screen shown in the main frame, in a new window or tab.
- Print... - this option will start your browser's Print dialogue, and will only print the data shown in the main frame.
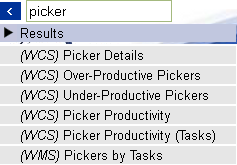
- Search... - this option will display a search box.
Typing in the search box will filter all of the available menu items and display a list of all the screens that match.
Clicking on an item in that list will start the screen and remove the search box.
Selecting any option on this pop-out toolbar will also close the toolbar. You can also close the toolbar by clicking the '<' button.
CALIDUS Assist
Searching for Help
Although all pages from your CALIDUS system link directly to the appropriate page in this CALIDUS Assist guide, you can search for help on anything in the system using the search bar. It depends on how you have CALIDUS Assist configured, but this search bar is normally either in the title at the top of the screen or in the toolbar on the left.
Did you know that you can activate this search at any time using a shortcut key combination? Hover over the Search bar now and you will see it tells you the hot-key combination, typically ALT-F or ALT-SHIFT-F. Hitting those keys together will activate the search box and you can type in what you're looking for. Be aware that these shortcuts are dependent on the browser that you are using, so check for compatibility first.
If you know the name of the page, just type it there and click the Go button. If you want to search for any text in the page, click the Search button instead, or just hit enter for CALIDUS Assist to do it for you. Typically, as you type, the search bar will quickly offer you some matches that might be what you're looking for - if it is, just click the suggestion and Assist will take you there.
Searching Tables
A lot of the pages have tables of data on them - this can be a bit difficult to see what you're after. So, in the cases where there is a large amount of data in tables, we have made the tables searchable.
On top of the table will be a search box. Type in what you're looking for and the table will be filtered to show all of the matching rows - that is, rows where any column contains that text at all, anywhere. This filters as you type.
Note that some data will be always be shown, like headers, or rows that the writers of the page have decided must always be shown.
You can clear the text out of the search box and this will display everything again - do this by either deleting it or use the provided clear button to the right of the search box.
Have a go below - maybe try entering "ap", then "app", or enter "fruit" and see the way it works.
| Fruit | Some Text - this header row is always shown |
|---|---|
| Apple | Green apples |
| Orange | Not an apple |
| Pineapple | Also not |
| Grapefruit | Very big! |
| Banana | I like bananas, so I'm always going to show them |
| Kumquat | Interesting fruit |
| Grape | Small fruit |
| Tomato | Is this a fruit or a vegetable? |
Translating
The toolbox contains a link to Google Translate to translate the page into a language of your choice. Select the language from the drop-down list, and Google will translate the whole page for you.
Printing and Exporting
You can export pages from CALIDUS Assist using the Print as PDF or Download as PFD link. Where this appears depends on the style the Assist is configured with, but by default this link will be in the Toolbox menu on the left of the screen, or on the tabs at the top right of the screen.
You can export categories as a full document in the same way - all pages in that category will be included in the PDF in the order in which they are listed in the category.
We've typically also included a link in the description of categories where this will export as a document, and we also add the DOC button next to documents that you can download from the first page of Assist.

