Android Usage Guide: Difference between revisions
m (Minor correction) |
(Added troubleshooting) |
||
| Line 50: | Line 50: | ||
The Android Back button (either physical or on the screen) is used as the CLR or ESC button. | The Android Back button (either physical or on the screen) is used as the CLR or ESC button. | ||
== Troubleshooting == | |||
When using the app on a wireless device, the application being used is subject to the connectivity of the device to the network and to the application. If there are any issues with the network connectivity or the app cannot be accessed, the application will display the main screen, showing "Error Connecting". Ensure that you have a network connection, then hit any key on any physical or popup keyboard to reconnect | |||
Revision as of 13:10, 24 April 2023
Downloading the Android App
Side-load the Barcoders Android application on your device.
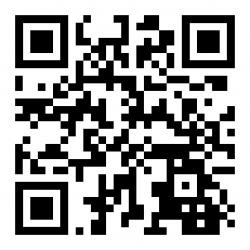
- Enter URL in Google Search or Chrome, or scan the barcode in above, or scan using Zebra Xing scanner app.
https://www.barcoders.com/app-release.apk
- Download APK (confirm if asked)
- Confirm name if asked.
- Open Downloaded APK (from open/install button or from notification drag down from top of screen or from Apps/Downloads or from Apps/Files).
- Confirm installing.
- If prompted confirm settings to allow installing unsafe apps, then return to * above.
- Install – confirm install location if requested (accept default)
The application will be named "Warehouse Terminal" and have a green Barcoders icon for its graphic. Drag to the home screen for easy access.
Configuring the Android App
- When you start the APK for the first time, it will display an IP address pointing to our RFServer here. You’ll need to change it to point to the IP address of your Android RFServer. To do this navigate to https://www.barcoders.com/make-server-barcode.php and generate a barcode PNG for the IP address of your Android RFServer. Print it out and scan it at the step above. You may have to exit and get back in for it to recognize the new IP address.
- When the menu come up, select the bottom option and test.
Using the app
Main Screen
When the application starts, you will be presented with an initial connection screen, which will then display all installed systems, usually as follows:
- (Customer) TEST system
- (Customer) LIVE system
- (Customer) LIVE system - site 2
You can click the Cancel button to exit the menu, and the back button to exit the app completely.
Settings
Application settings can be accessed by long-pressing anywhere on the screen. This allows you to change the connection timeout delay, amongst other settings.
Keyboard
You can use the device's keyboard and scanner to enter data. You can also call up a pop-up keyboard by pressing anywhere on the screen.
The application will ensure that you can see the data being entered on the screen.
Clicking the Android Back button, pressing anywhere on the screen or entering test with the tick or Enter key on the keyboard will hide the keyboard.
The application will use the configured Android system keyboard. Note that the default Android keyboard does not support the following:
- Function keys
- CLR/ESC button
- Cursor buttons.
Zebra provide a freely-downloadable enterprise keyboard that can be configured for function key presses.
Where the application uses function keys, the function keys may be used on any physical or popup keyboard.
The Android Back button (either physical or on the screen) is used as the CLR or ESC button.
Troubleshooting
When using the app on a wireless device, the application being used is subject to the connectivity of the device to the network and to the application. If there are any issues with the network connectivity or the app cannot be accessed, the application will display the main screen, showing "Error Connecting". Ensure that you have a network connection, then hit any key on any physical or popup keyboard to reconnect
