FAQ: Difference between revisions
Lwinchester (talk | contribs) No edit summary |
Lwinchester (talk | contribs) |
||
| Line 87: | Line 87: | ||
= Printer Setup= | = Printer Setup= | ||
==Obtaining the printer== | ==Obtaining the printer name== | ||
Obtain the printer name as held on the print server from either the system administrator or logon on to the print server and execute the 'lpstat' command to list all printers on the server. | Obtain the printer name as held on the print server from either the system administrator or logon on to the print server and execute the 'lpstat' command to list all printers on the server. | ||
| Line 93: | Line 93: | ||
<center>[[Image:rsz_3print_02.jpg]]</center> | <center>[[Image:rsz_3print_02.jpg]]</center> | ||
=='''Printer configuration and Maintenance'''== | =='''Printer configuration and Maintenance'''== | ||
Revision as of 15:32, 12 February 2010
Common Queries and Questions
How to Control Sell by Dates
1. Min Intake Life is the time that any item will remain in the warehouse, in addition to the time it will be on the shelf in the retail outlet.
2. Issue Life is the minimum time any item can be held in the retail outlet. If the time between today and the ‘Sell By Date’ is shorter than the ‘Issue Life’ days entered in the stock Maintenance then the system will not allocate that item
e.g. Time in warehouse = 120 Days
Time in Retail outlet = 60 Days
Therefore “Min Intake Life” is 120 + 60 = 180 Days
And the “Issue Life” = 60 Days
Any item that is within the ‘Issue Life’ timeframe (i.e. in the warehouse with less than 60 days to its ‘sell by date’) will not be allocated.
3. The “Max Intake Life” can be set at any figure greater than the “Min Intake Life” and is designed to give the stock holder some control over having outlandish ‘sell by dates’ which are too far in the future.
You can set these figures to whatever suits you as an warehouse operator but remember that the difference between the ‘Min Intake Life’ and the ‘Issue Life’ has to be long enough to allow you to perform all your normal warehouse operations from receipt to despatch (including allocation).
Incidentally you can always check the state of your ‘sell by date’ stock by running the “Out of date Stock report” which is in the Warehouse reports menu. From the above example were you to input a date 60 days in the future it would show you what stock was in the warehouse that had gone into its ‘issue Life and therefore couldn’t be allocated.
How to Create a Pick Walk Sequence
Within the WMS there is the ability to configure a specific pick walk sequence through the warehouse to help maximise picking efficiency.
WMS Set Up -
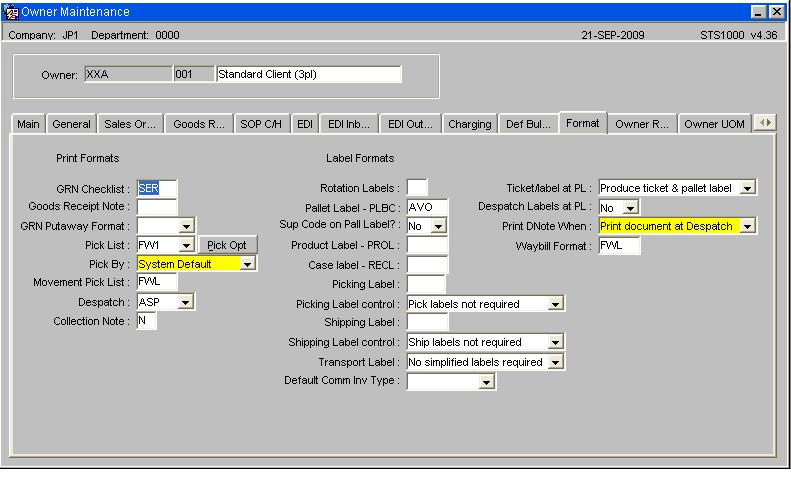
Owner Maintenance (STS1000)
- Format Tab
Key Points
Pick List Format must be set to FW1
Pick By System Default
Select the Pick Opt button to call an additional options box
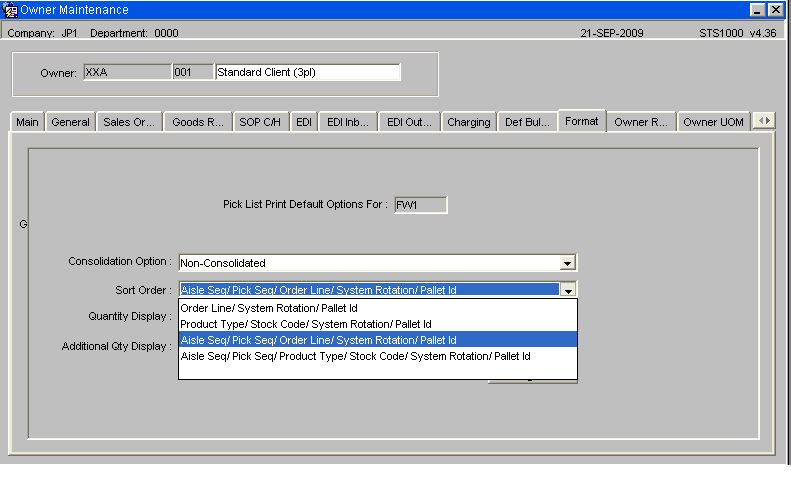
For a greater control and efficiency over the pick walk sequence select either a value of 3 or 4, so that the picking tasks will be sorted by location.
Aisle Sequence Maintenance (WHS0060)
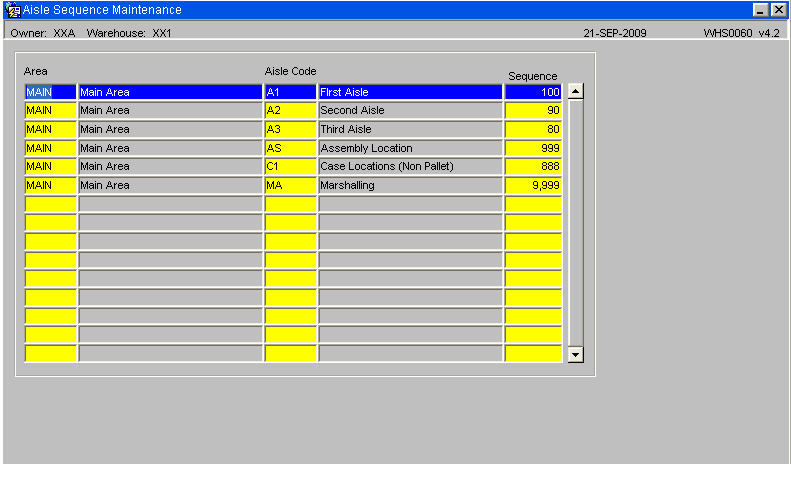
The sequence set against the aisle will help determine the sort sequence for the pick tasks, in the example above the pick tasks will be sorted in the following sequence A3, A2 and then A1.
Location Maintenance (WHS0090)
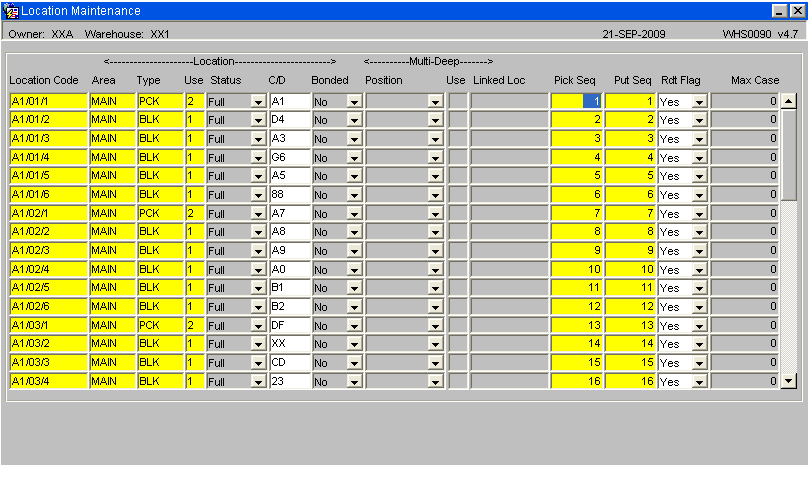
The Pick Sequence set against the location code will determine the sort sequence within a aisle for the picking tasks.
Putaway Re-Sequence Generation (WHS0472)
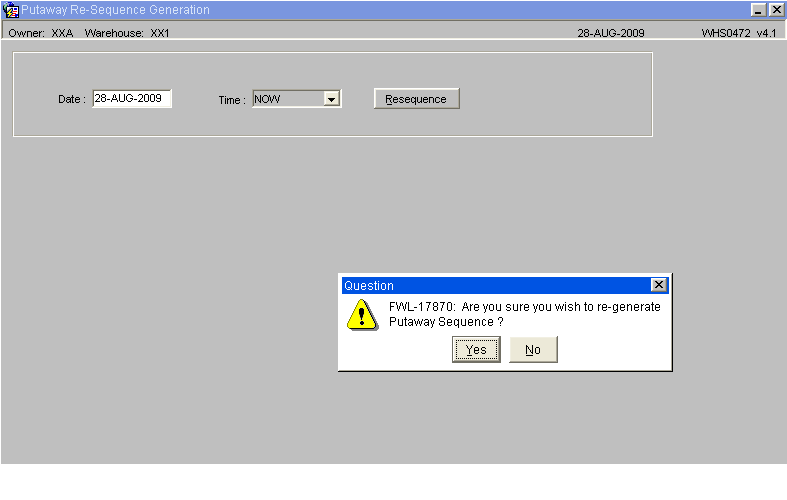
The Putaway re-Sequence Screen will generate both putaway and picking sequence numbers for the location codes.
NB: This will create a basic sequential count beginning at 1 for each individual aisle. It will also overwrite any existing records.
Free Locations (WHS0091)
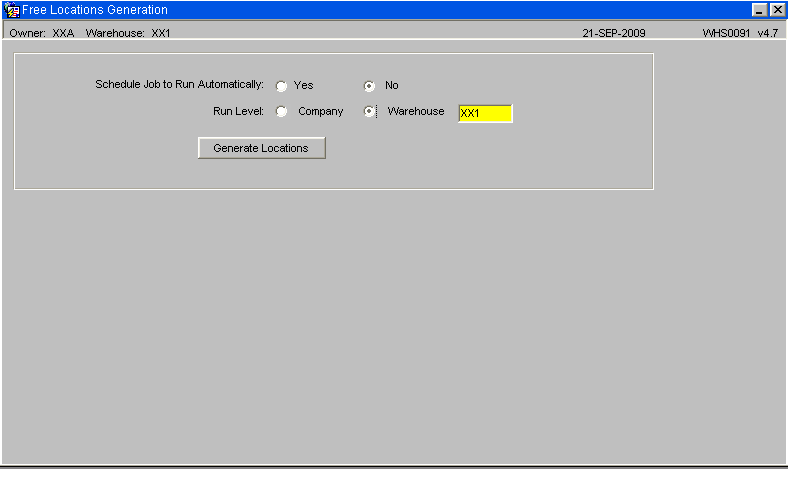
Once the Aisle and Location code have been assigned their sequence numbers, then run Free Location Generation which will create the Aisle Pick Sequence which is used to sort the picking tasks.
Printer Setup
Obtaining the printer name
Obtain the printer name as held on the print server from either the system administrator or logon on to the print server and execute the 'lpstat' command to list all printers on the server.

Printer configuration and Maintenance
Below are the steps required to set up a printer on the WMS system
Print Queue Maintenance (PHL3510)
Used to link printers on the print server to the WMS application
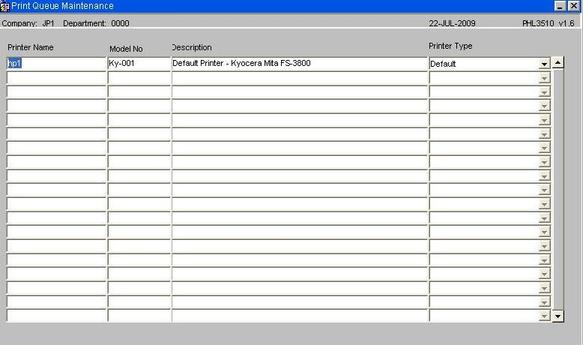
| Field Name | Description | Options | Generic Value |
|---|---|---|---|
| Printer Name | Name of the printer as held on the server | The field is case sensitive and must match the name on the server (see below) | Defined by site |
| Model No | Model Number of the printer | Free text field | Defined by site |
| Description | Free text field | Printer name as known in the warehouse | Defined by site |
| Printer Type | As selected from the drop down list | Default - HP Laser Jet - Line Printer |
Printer Groups (PHL3520)
The screen is used to group printers together, which might be by type, such as all zebra printers or possibly by area such as a warehouse or an area within a warehouse.
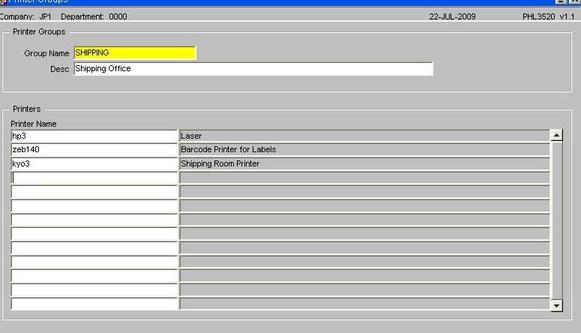
| Field Name | Description | Options | Generic Value |
|---|---|---|---|
| Printer Name | Name of the printer as held on the server | The field is case sensitive and must match the name on the server (see below) | Defined by site |
| Group Name | Specifies the group name for the selected printers | 20 character free text field | Defined by site |
| Desc | Descriptive name of the Printer group | 180 character free text field | Defined by site |
| Printer Name | The Printer name as held on the server | Must exist in Print Queue Maintenance | Selection from LOV of existing printers |
Output Manager (Runjob)
This screen allows the user to specify the device the print job is to be sent to, such as to screen or to a printer etc.
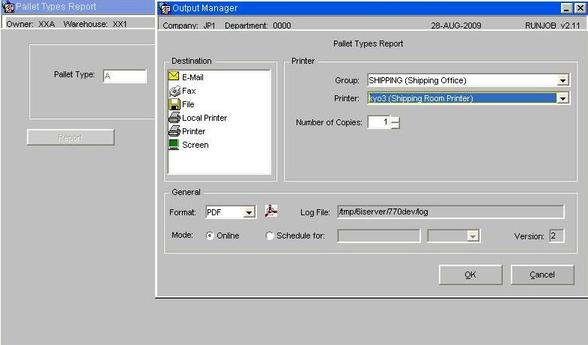
The output manger will default in the last Printer Group and Printer used, though there is the option to select an alternative if required.
Default Printers Maintenance (WHS0002)
The form is used to assign a default printer for specific documentation such as a report or label print to a user.
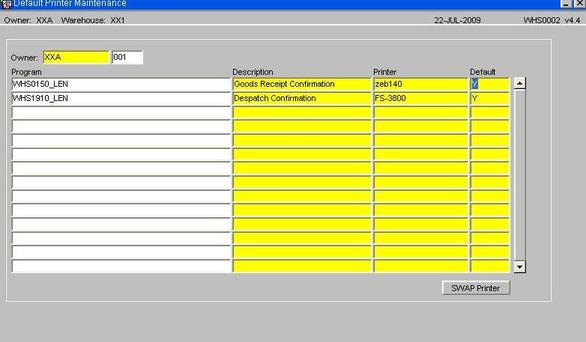
Note: Not all programs, reports and label formats are called from this screen. Below is a list of current programs which use this funtionality. OBS will advise which report and label formats can be used.
| Field Name | Description | Options | Generic Value | |
|---|---|---|---|---|
| Owner | Client or owner code as set-up on the system | The user will be able to select from a list of valid owner codes | Defined by site | |
| Program | The calling program that will generate the report or label output | The program id is entered followed by an underscore character and the user id of the person who will require the print option. | Existing program that can call the Output Manager | |
| Description | Description of the process as entered in the program field | Will default from system level information | N/a | |
| Printer | The default printer the print job is to be sent to | As maintained in Printer Queue Maintenance | Defined by the client | |
| Buttons | ||||
| SWAP Printer | Allows the user to change a printer for another one without having to change each line |
Table of existing programs that are called by the Default Printer Maintenance Screen
| Calling Program | Description |
|---|---|
| WHS0150 | Goods Receipt - Conf |
| WHS0520 | Generated Pallet Movements |
| WHS0530 | Driver Ticket Reprint |
| WHS0630 | Stock Adjustments |
| WHS0700 | Stock Movements |
| WHS0710 | Generate Stock Movements |
| WHS0915 | Pallet Enquiry |
| WHS1714 | Pick List Confirmation |
| WHS1900 | Despatch Print |
| WHS1910 | Despatch by Route/Load |
| WHS1941 | Shipment Label Print |
| WHS1945 | Order Packing |
| WHS2054 | Change Ownership of Stock |
| WHS7886 | Goods Receipt Using RDT |
| WHR1702 | Picking Label Program |
| WHS1700 | Pick List |
| WHS1710 | Pick List Confirmation |
| WHS1721 | Packing List |
Printer Address Maintenance (PHL3530)
Used to automatically send print jobs to an external 3rd party server for printing, this is achieved by sending a flat file directly via ftp, circumventing the need to run the job through the XF monitor process.
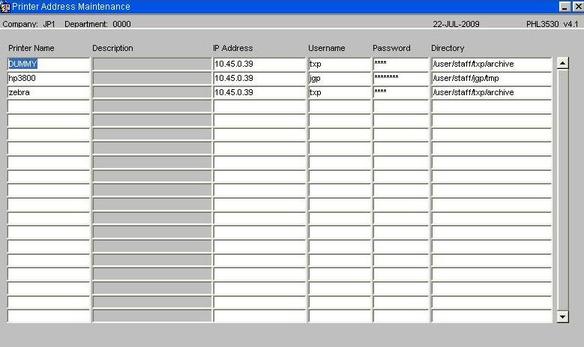
| Field Name | Description | Options | Generic Value |
|---|---|---|---|
| Printer Name | Name of the printer as held on the server | Printer associated with a specific packing station or stations | Defined by site |
| I.P. Address | I.P. address of the external server | Defined by site | |
| Username | Username of the account on the external server | Defined by site | |
| Password | Password of the account on the server | Defined by site | |
| Directory | Directory where the print job is to be delivered | Defined by site |