Creating a Customer: Difference between revisions
From WMS
Lwinchester (talk | contribs) No edit summary |
Lwinchester (talk | contribs) No edit summary |
||
| Line 7: | Line 7: | ||
# The form will open in query mode (turquoise bar top of the screen) the form must be set to entry mode. Use either the 'F4' key on the keyboard or select the cancel query icon. | # The form will open in query mode (turquoise bar top of the screen) the form must be set to entry mode. Use either the 'F4' key on the keyboard or select the cancel query icon. | ||
[[Image: | [[Image:WHSORAO35SIG1.PNG]] | ||
| Line 18: | Line 18: | ||
# '''Full Name''' - The Customer name that will be displayed on the documentation | # '''Full Name''' - The Customer name that will be displayed on the documentation | ||
[[Image: | [[Image:WHSORAO35SIG1.PNG]] | ||
Revision as of 13:01, 5 November 2010
Customer Creation
For sales orders to be entered on to the system for a specific customer then a customer code and record must exist for that customer.
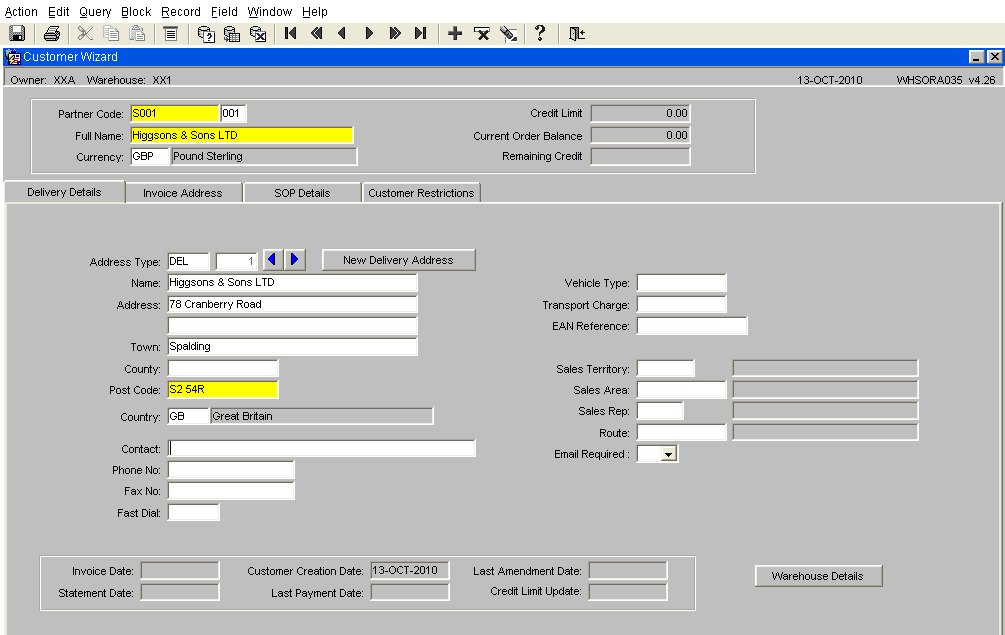
- Open the form Customer Wizard -WHSORA035 ( It is possible to find the form in the main menu using the standard search facility in the left hand tool bar, click on the magnify glass)
- The form will open in query mode (turquoise bar top of the screen) the form must be set to entry mode. Use either the 'F4' key on the keyboard or select the cancel query icon.
Delivery Details
Details to enter are the fields marked in yellow which are mandatory for the system.
- Partner Code - a unique 10 alpha/numeric code provided by head office
- Full Name - The Customer name that will be displayed on the documentation
Though not mandatory (except post code) enter all known address details, as these will be displayed on any despatch documentation such as labels, despatch note or collection note.
Once the above fields have been completed, save the entered record by either using ‘CTRL and S’ or selecting the 'Save Record' icon.
