Order Management Layer: Difference between revisions
Lwinchester (talk | contribs) |
Lwinchester (talk | contribs) |
||
| Line 493: | Line 493: | ||
<center>[[Image:OMS- | <center>[[Image:OMS-026.PNG | OMS User Defaults]]</center> | ||
Revision as of 11:44, 21 March 2011
FILE MAINTENANCE & SETUP
Order Management Control Maintenance
The new maintenance screen controls the main functions of the Order Management System.
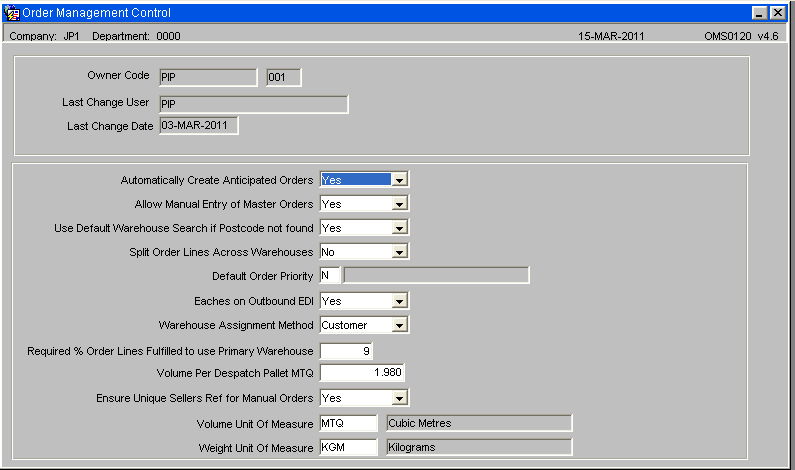
| Field Name | Description | Type | Generic Values |
|---|---|---|---|
| Owner Code | Pre-populated field | n/a | |
| Last Change User | Pre-populated field | n/a | |
| Last Change Date | Pre-populated field | n/a | |
| Automatically Create Anticipated Orders Allow manual Entry of Master Orders | When set to “Y”, the anticipated orders will be created automatically following a successful order upload. When set to “N”, the anticipated orders will not be created until the creation is requested by clicking the ‘Create Anticipated Orders’ button. The default value is “N”. | Drop down list | Yes/No |
| Use Default Warehouse Search if Postcode Not found | n/a | Drop down list | Yes/No |
| Split Order lines across Warehouses | n/a | Drop down list Yes/No | |
| Default Order Priority | n/a | List of Values | |
| Eaches on outbound EDI | n/a | Drop down list | Yes/No |
| Warehouse Assignment Method | n/a | Drop down list | Yes/No |
| Required % order Lines Fulfilled to use Primary Warehouse | % value | n/a | |
| Volume per Despatch Pallet per MTQ | Free entry of numeric weight value | n/a | |
| Volume Unit of Measure | List of Values Yes/No | n/a | |
| Weight Unit of Measure | List of Values Yes/No | n/a |
If these details have not been specifically setup then the Order Management software will operate with the pre-determined default value for each option.
Automatically Create Anticipated Orders Y/N.
When set to “Y”, the anticipated orders will be created automatically following a successful order upload. When set to “N”, the anticipated orders will not be created until the creation is requested by clicking the ‘Create Anticipated Orders’ button.
The default value is “N”.
Allow Entry of Master Orders Y/N.
When set to “Y”, it will be possible to enter a master order directly in the ‘Master Orders’ control form. This option could be used if the EDI order files have failed to reach the server or to rapidly enter an emergency order. If “N” is selected then this functionality is not available.
The default is “N”.
Use Default Warehouse Search Y/N.
When set to “Y”, if a customer exists with a postcode that cannot be found on the warehouse search table, then the default warehouse search sequence will be used. When set to “N”, if a postcode cannot be found on the warehouse search table then any orders for this post code will fail to create anticipated orders.
the default value is “Y”
Split Order Lines Over Warehouses Y/N.
When set to “Y” and a single order line cannot be satisfied from a single warehouse then the system will split the order line over the warehouses, with available stock, aiming to deliver as much stock as possible. When set to “N”, the system will assign a single order line to a single warehouse. If this warehouse does not have sufficient stock then the order line will be short.
NB. This flag should be set to “N” as the SMS system cannot handle more than one despatch message per order line.
The default value is “N”.
Default Order Priority
This flag should be set to the default order priority. When anticipated orders are created, the order priority will be set to this default.
The default value is “N”.
Eaches on Outbound EDI
This flag should be set to “Y” to run the new PIPP specific stock snapshot format and to ensure the despatch confirmation message includes the number of eaches.
The default value is “N”.
Warehouse Assignment Method
This will be a drop down list field with two possible choices.
1. Use Customer’s Warehouse Assignment Method. When this value is set, the alternative warehouse allocation method will be enabled.
2. Normal Warehouse Assignment Method. When this value is set, the normal method of warehouse allocation will be used. This value will over-ride the customer’s setting.
Required % Order Lines Fulfilled to use Primary Warehouse
This value will only be required when the Warehouse Assignment method is set to ‘Use Customer’s Warehouse Assignment Method’. This will be the percentage value used, during the creation of the anticipated orders, when a customer is set to use the alternative warehouse assignment method, to decide if the primary warehouse should be used for the order.
For example, if this value was set to 90% and 92% of the order lines could be fulfilled from the primary warehouse then the primary warehouse would be used for those order lines.
Volume Per Despatch Pallet MTQ
This value stores the volume of the despatch pallet. This value will be used in the OML to calculate the number of pallets required.
Volume Unit Of Measure
This value controls the Unit Of measure used in the OML to display the volume.
The default value is “MTQ”.
Weight Unit Of Measure
This value controls the Unit Of measure used in the OML to display the weight.
The default value is “KGM”.
Fast Customer Address Maintenance
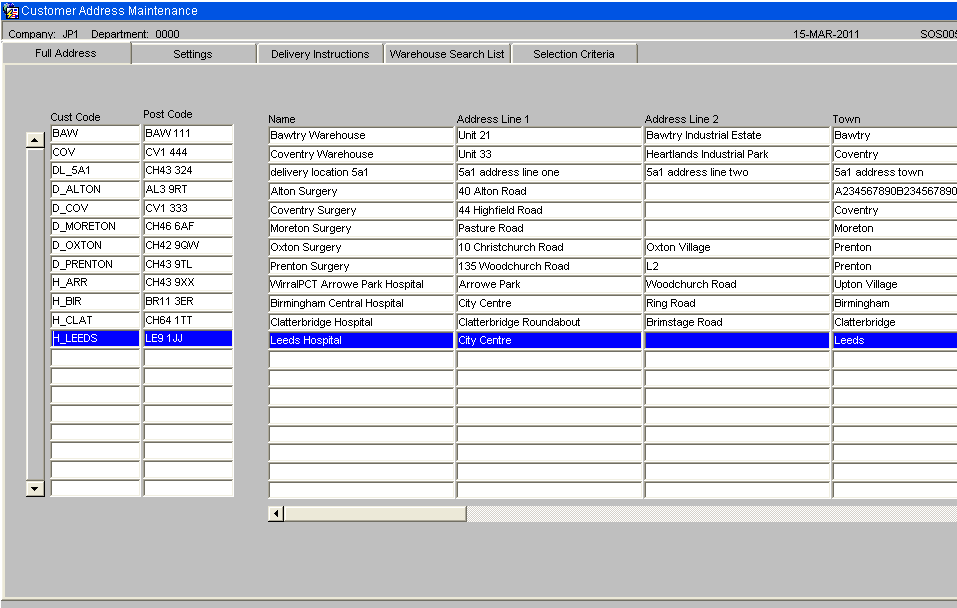
This screen displays all the customer addresses with options to search by certain selection criteria.
Full Address Tab
The screen will allow the following details to be updated:-
• Customer type
• Name
• Address line 1
• Address line 2
• Town
• County
• Post code
• Vehicle type
• Route code
• Carrier code
• Despatch instructions
• Contact
• Phone number
• E-mail address
Customer Type
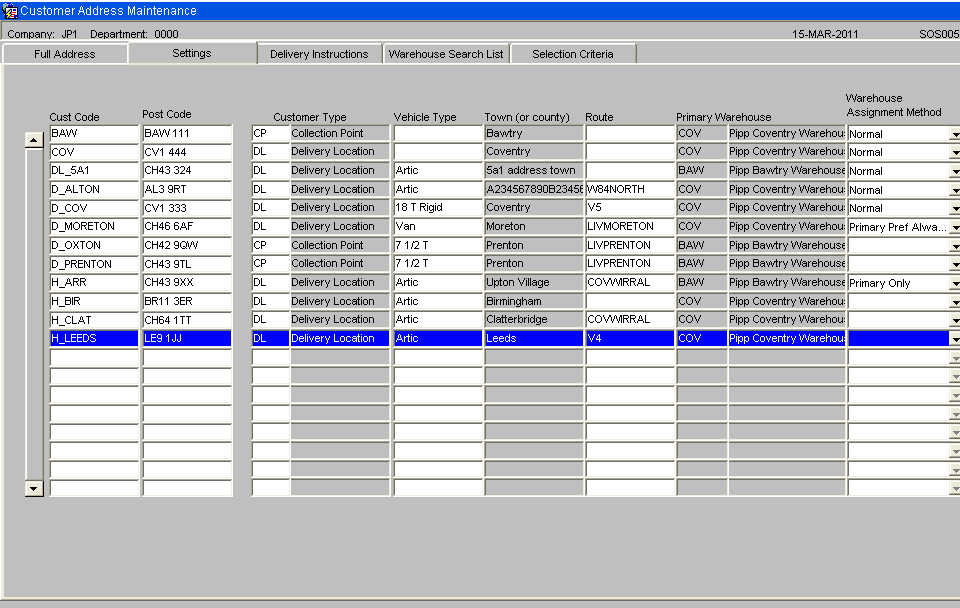
The customer type and description. A list of values available.
Vehicle Type
The default vehicle type for this customer. A list of values available.
Town
To display the approximately the first 12 characters of the customer’s town. Longer town names will be truncated. The “Full Address” tab should be used to edit the town.
Route
The customer’s default route code. A list of values will be available. Route codes are set up for each warehouse. The customer’s default route code will only apply to the anticipated orders assigned to the warehouse that the route code belongs to
Warehouse Assignment Method
The “Warehouse Assignment Method” will have the following values:-
Primary Preferred % - Use primary warehouse first if over a % order lines can be fulfilled by primary warehouse.
Primary Preferred Always - Always use primary warehouse first. Any remaining lines will be assigned a warehouse using the normal warehouse assignment rules.
Primary Only – Only ever use the primary warehouse for this customer. If any stock is unavailable in the primary warehouse then the order will be short.
Normal – Normal warehouse assignment rules. If the warehouse assignment is blank then this is the value that will be used.
Delivery Instructions
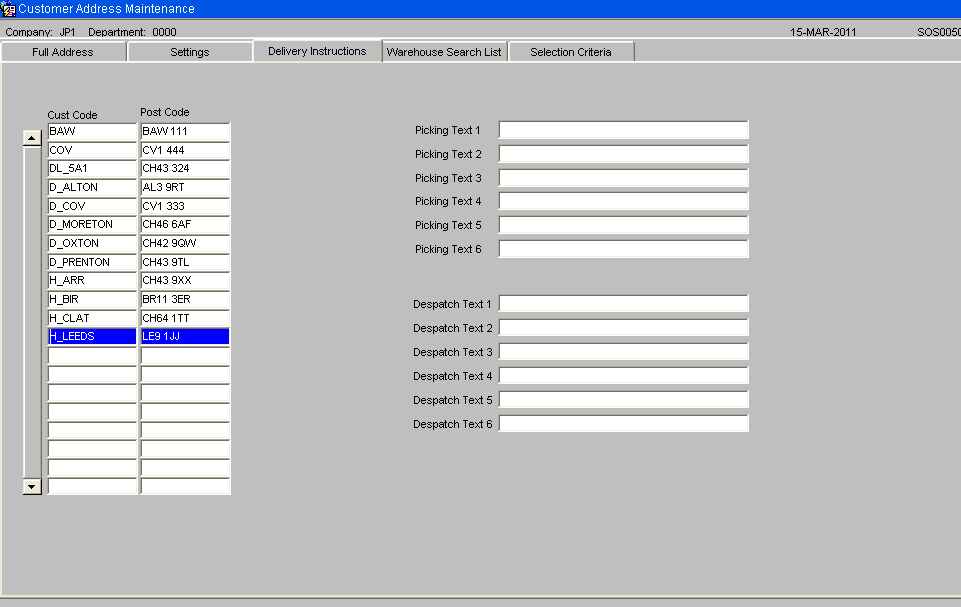
The “Delivery Instructions” tab can be used to enter picking text, which will be printed on the pick list and despatch text which will be printed underneath the “Special Instructions” heading on the PIPP format despatch note.
Warehouse Search List
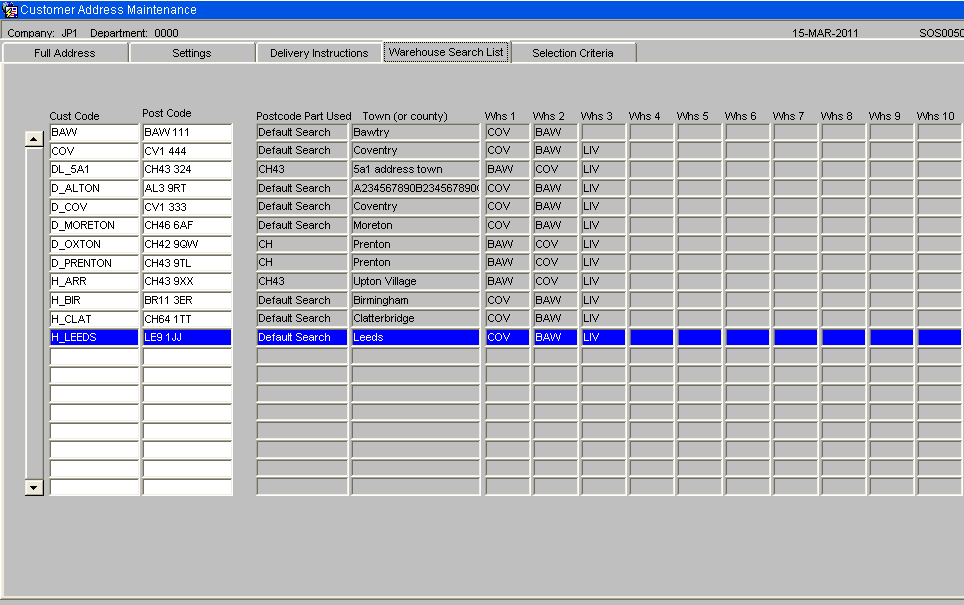
The “Warehouse Search List” tab will show the first ten warehouses in the warehouse search list for each customer based on the customer type and post code.
Selection Criteria
The selection criteria tab will be used to restrict the number of customers found and to search for customers with specific details.
(See screen shot below)
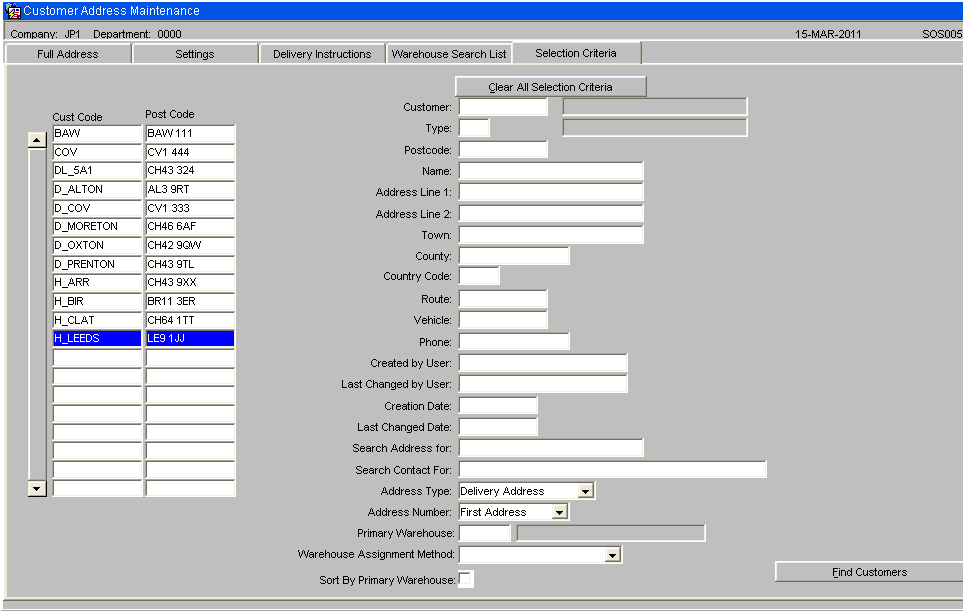
- The first part of the Postcode, Name, Address Line 1, Address Line 2, Town, County, Route or Phone Number can be entered to find records that match the start of the entered criteria.
- To search for a vehicle type, the drop down list will be used to select a value from the list of valid vehicle types.
- The “Search Address for” field will allow text to be entered. The Name, Address Line 1, Address Line 2, Town and County fields will be searched for a match.
The “Search Contact for” field will allow text to be entered. The contact field will be searched for a match.
- This search will not be case sensitive. E.g. “Hospital” will match “HOSPITAL”. If a “+” is entered then the system will return the records where the selected value is blank. E.g. If a “Route Code” of ‘+’ was searched for, then the system would find all customers that do not have a default route code set up.
- When all the required selection criteria have been entered, the ‘Find Customers’ button should be clicked. This will find the customers using the entered selection criteria.
- A “Delivery Instructions” tab will be available to view / amend any customer specific despatch or pick instructions. A “Customer Type” tab will be available to view / amend the customer type.
Selection Criteria The selection criteria tab will be changed to include “Primary Warehouse” and “Warehouse Assignment Rule” to allow customers to be found by these two selection criteria. An extra option will be included to allow the customers to be sorted by the primary warehouse.
Customer Type Maintenance
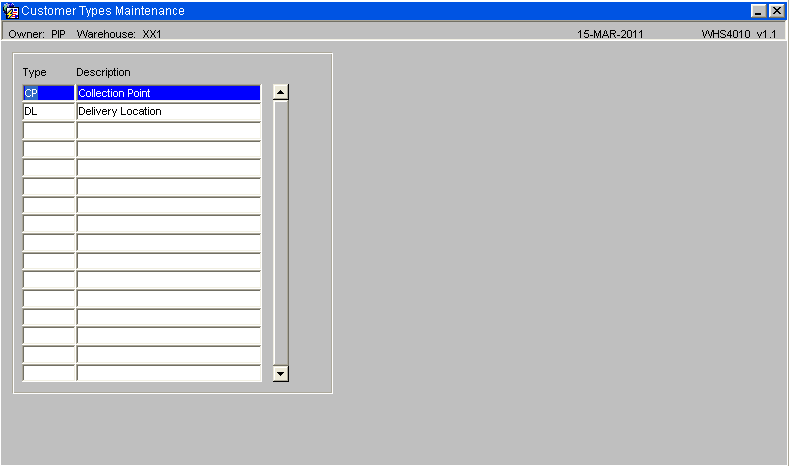
The WMS will use Customer types to identify which delivery points are hospitals. Use customer type maintenance, WHS4010 to enter this information.
Customers Wizard
This is the standard Customer Wizard which will display 1 delivery address for each query. A new “Fast Customer Address Maintenance” screen, SOS005, will be provided as part of this development which will display the address details in a tabular form for faster maintenance. Please see section 5.2 for further details.
The Collection Point codes will be set up on Unison as customers. This will be done by the use of the customer wizard or from an EDI customer upload.
NB: Special attention should be taken to ensure the customer type and post code are correct as this information will be used to identify which warehouses can be used to satisfy the orders.
The delivery address will be set-up using the ‘Delivery Details’ tab as shown below: -
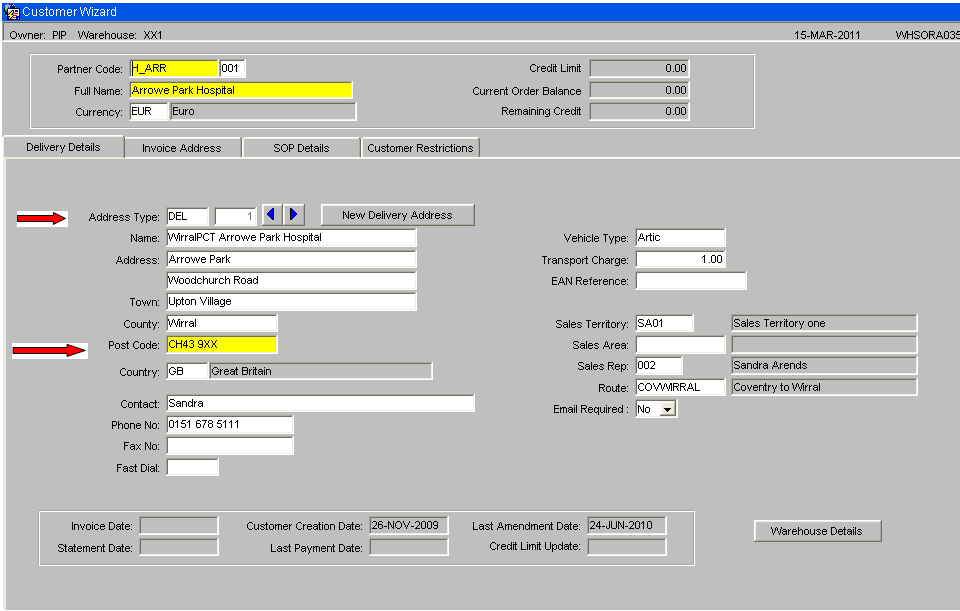
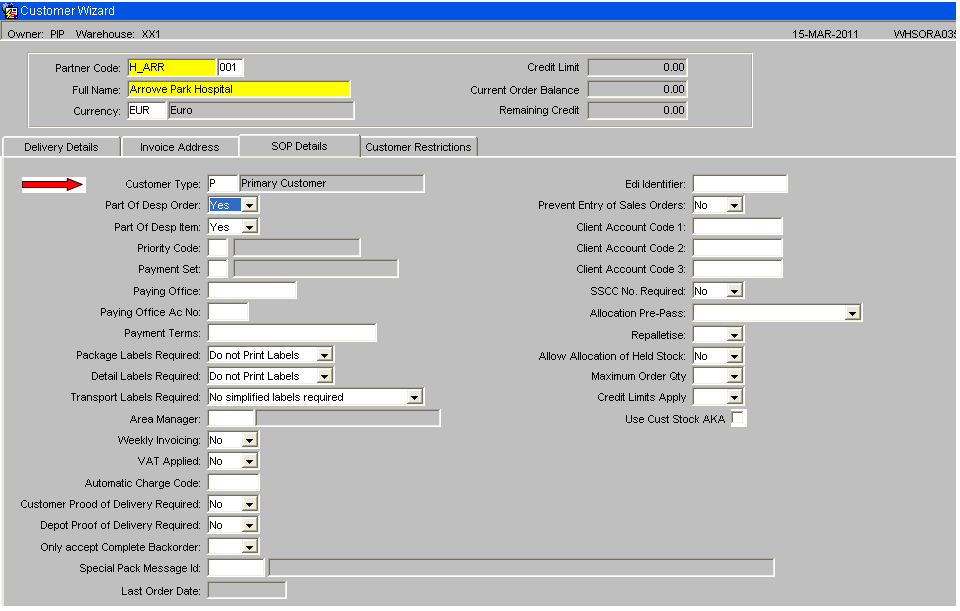
The customer type can be found on the ‘SOP Details’ tab, as shown below: -
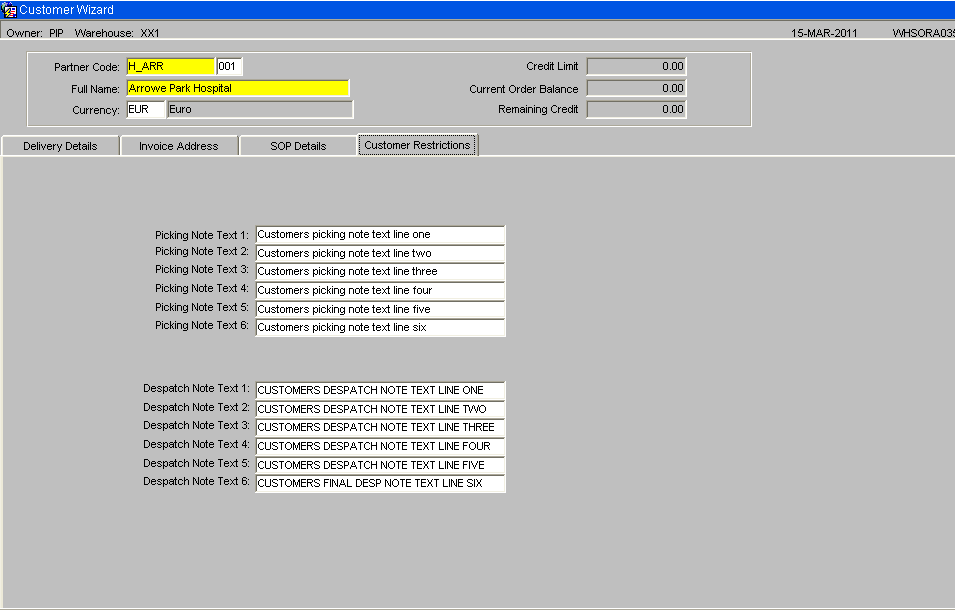
The “Customer Restrictions” tab can used to enter the “Despatch Note Text”. These details will be printed underneath the “Special Instructions” heading on the PIPP format despatch note.
Stock Codes
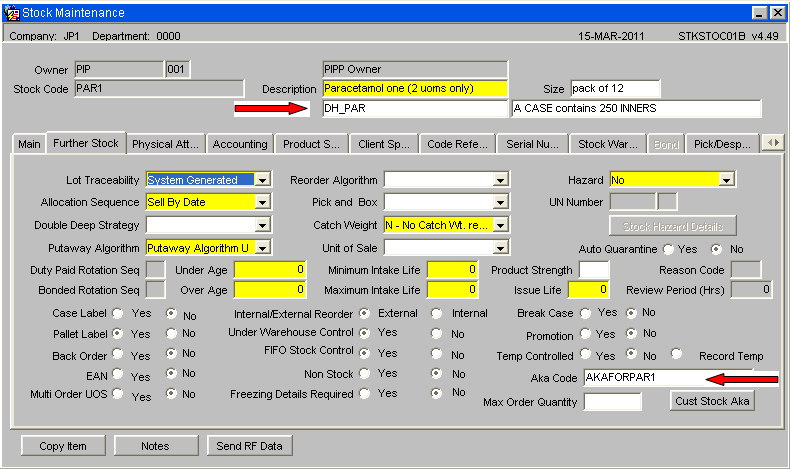
All stock codes must be set up on Unison. This includes the Generic Skus these are the stock codes used on the inbound order files. The AKA Product code, found on the ‘Further Stock’ tab, will be set to the manufacturers product code. If the stock code is ordered using a generic SKU then second line of the stock description should be set to the Generic SKU.
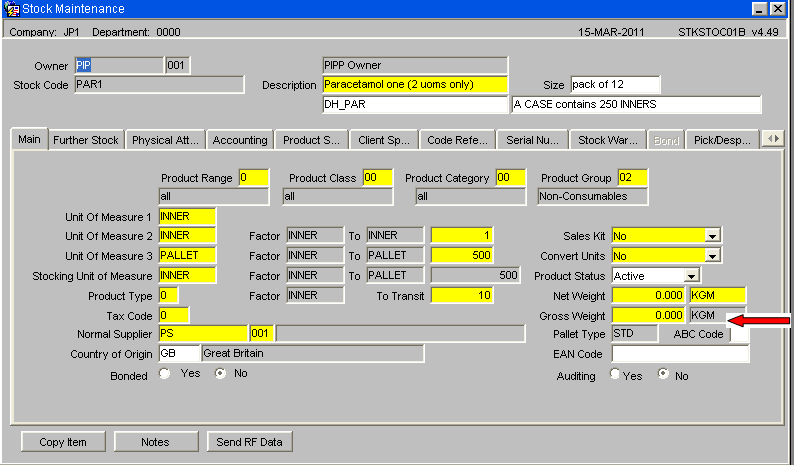
The Gross Weight of a shipping unit should be entered as this value will be used to calculate the weight of each order.
NB. The stock codes should be created by the EDI stock upload with a status of “Inactive”. After the initial creation the stock code set up should be completed using this stock code maintenance form.
The following key fields should be manually entered.
- Description 2 – set to the Generic SKU
- Description 3 - set to a unit of measure description. This information will be printed on the pick list to assist the pickers.
- Unit Of Measure 1 – This will be set to CASE or INNER or whatever the shipping unit is.
- Unit Of Measure 2 – Will be set to the same value as Unit of measure 1.
- Unit of Measure 3 – Will be set to Pallet and the number of cases/inners per pallet will be entered.
- Stocking UOM – Will be set to the shipping unit. It is expected that this will be Unit of Measure 2.
- To Transit – Will be set to the number of Eaches per shipping unit.
- ABC Code – Will be set to an agreed value to identify stock codes store on the SMS system.
- Product Status – Will be set to Active when stock code set up is complete.
- Allocation Sequence – Will be set to control which stock should be allocated first. This field is also important for the Generic Sku. The allocation sequence of the Generic Sku will be used, in the Order management layer, to decide which NCP codes should be used to fulfil an order.
- AKA Product code - set to the manufacturers product code
It is possible that different stock codes, relating to the same Generic Sku, will be set up with a different number of Eaches per Shipping Unit (stored in the ‘To Transit’ field).
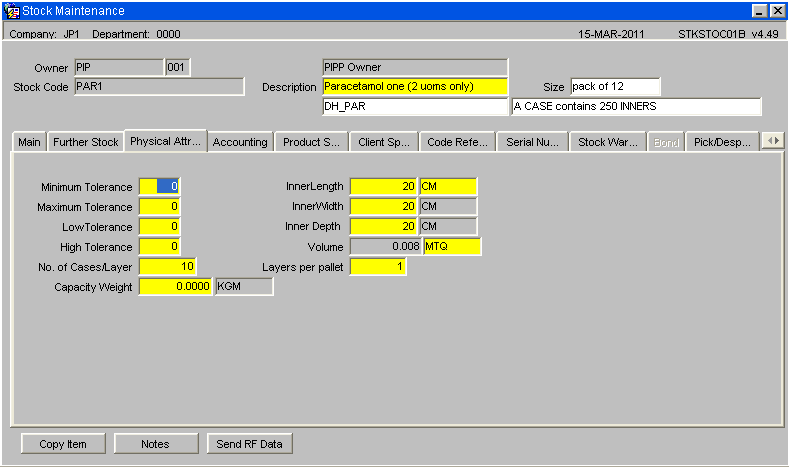
The “Physical Attributes” tab should be used to enter the dimensions of the Shipping Unit.
Substitute Products
If a stock code can be substituted by another stock code then these can be created using Substitute Product Maintenance, SOS1010. The stock code on the order file (generic sku) will be set up as the main product and the stock codes (NCP codes), used in the WMS, will be linked to it as the main product.
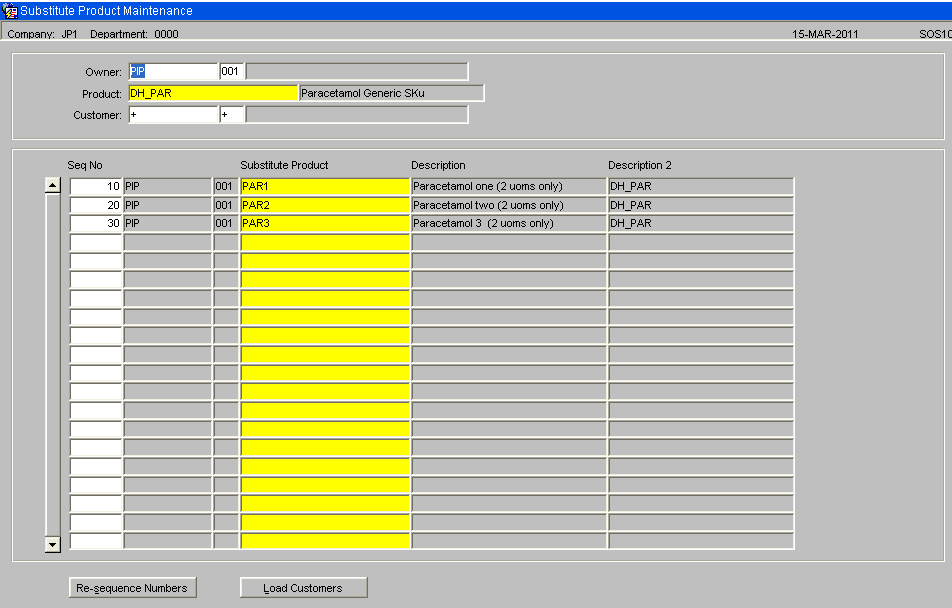
NB. The substitutes will need to be created for each warehouse.
The substitute products will be selected using the allocation rule of the generic sku. If this allocation rule returns more than 1 possible substitute product then the sequence number on this maintenance screen will be used to decide which product to use.
Carrier Codes
The carrier codes for Own fleet and DHL express will need to be created using Carrier Code Maintenance WHS0055.
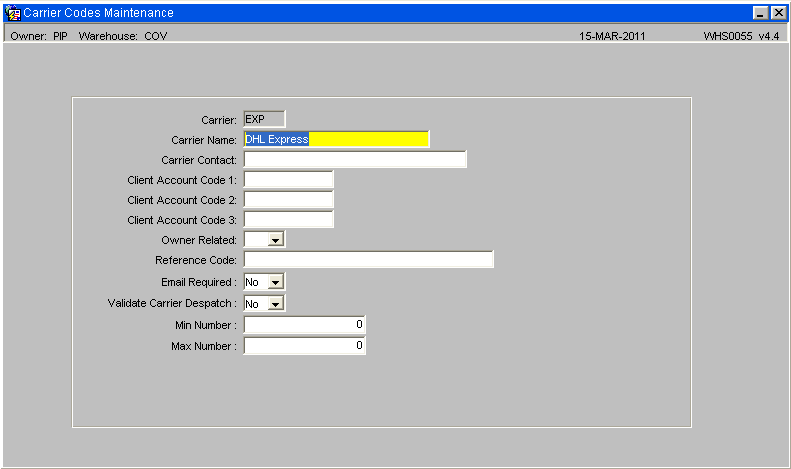
The carrier codes are created at company level.
Route Codes
Route codes will need to be setup. A route code can be created for each vehicle. The transport department will then assign which vehicle will deliver each order. The route code / vehicle ID will then be stamped against the orders before the orders are sent to the warehouse for picking.
The route codes are created at warehouse level.
ML Captions – Vehicle Type
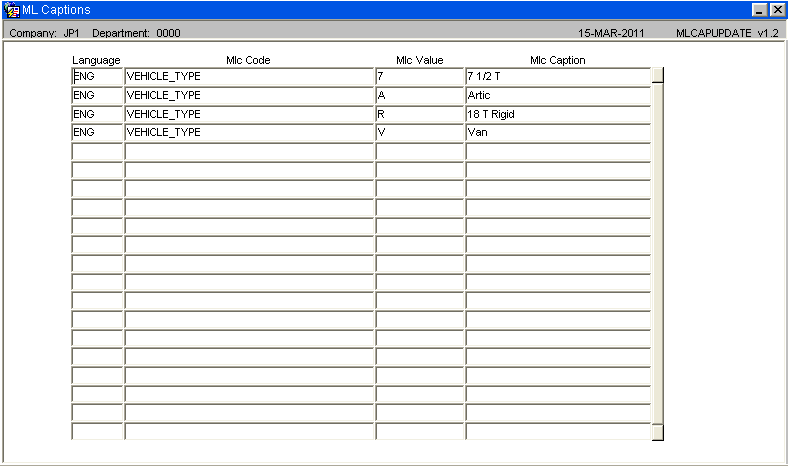
A new caption type, “Vehicle_Type” to store the list of valid vehicle types. The list of valid vehicle types will be maintainable by using the “ML Captions Update” screen on the system setup menu.
Owner Maintenance
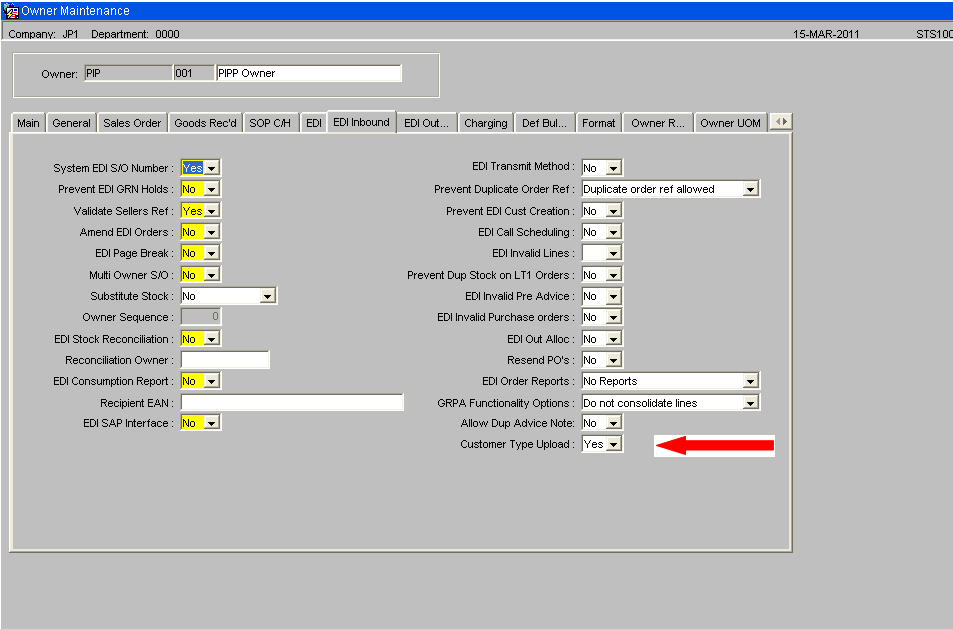
Owner Maintenance (STS1000), “EDI Inbound” tab, includes a ‘Customer Type Upload” flag. This flag should be set to “Yes” to ensure the customer types are set following the creation of new customers.
System Parameters – Auto Allocation
This system parameters screen WHS0010 includes a parameter, ‘OML Auto Allocation’. This flag can be set to “Yes“ or “No” and will only be visible when the database has an OMS control record setup. The system parameters are setup at warehouse level which means each warehouse can have this flag set to the required value.
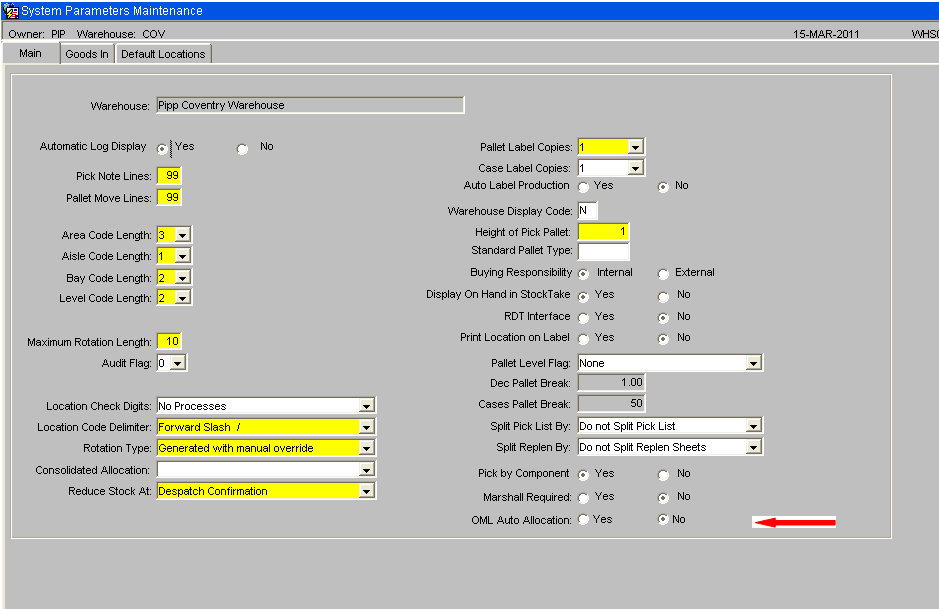
When the flag is set to “Yes” any orders that are sent from the Anticipated Order Screen to this warehouse will be automatically allocated.
System Parameters – Marshall Location
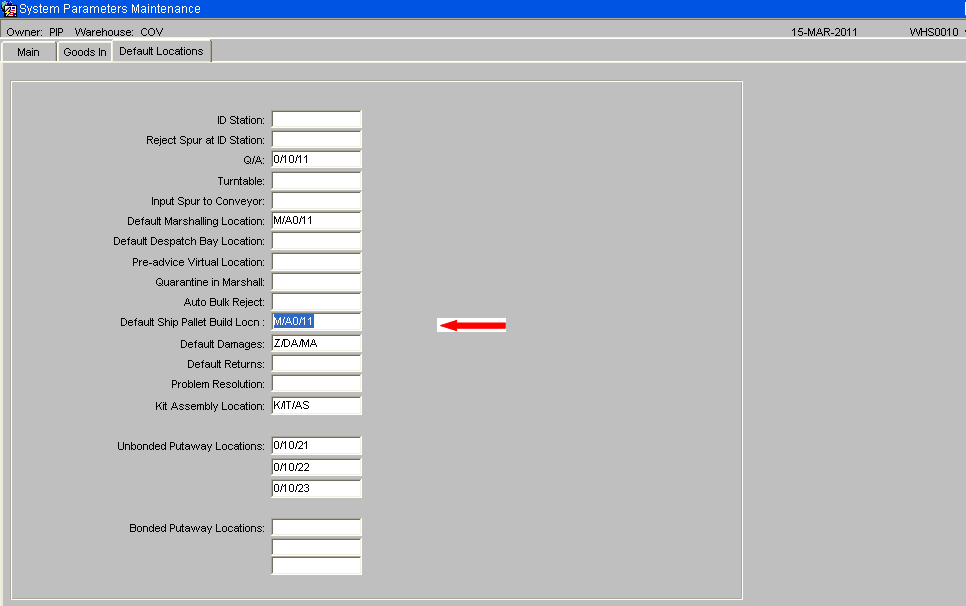
This system parameters screen WHS0010 on the “Default Locations” tab includes a parameter, “Default Marshalling Location”. This parameter can be set to a marshalling location. During the load planning process, a marshalling location must be entered. If this parameter is set then the marshalling location will default to this value when a marshalling location has not been entered.
OMS Maintenance - Warehouse Status Maintenance
A tab named “Warehouse Status” will be included on the “OMS Maintenance” screen. This screen will be used to enter which customer types can be serviced by which warehouses. An ‘Available Flag’ will be included to allow a warehouse to be set as unavailable for orders from a certain customer type.
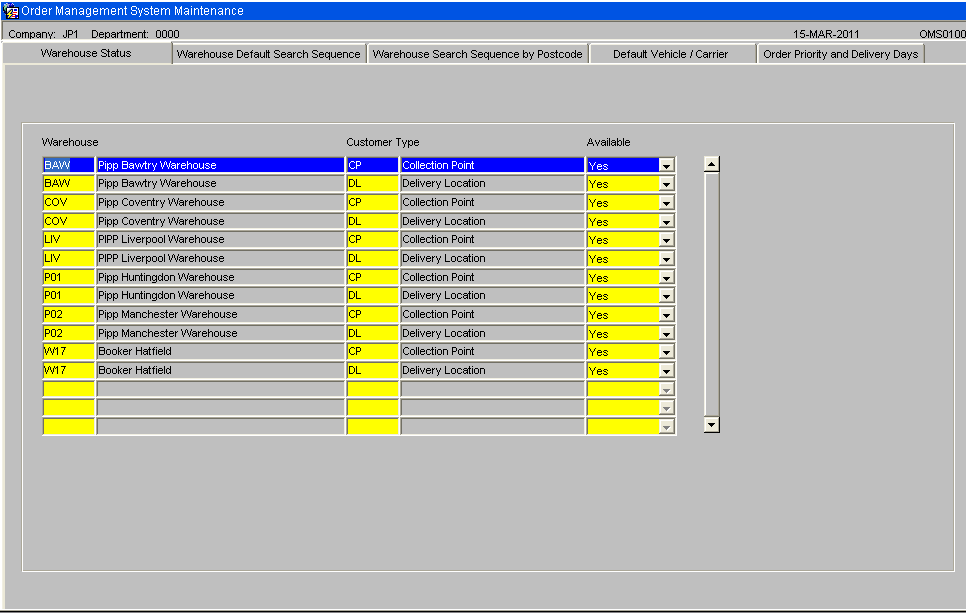
This table will be checked when EDI orders are assessed to decide which warehouse to use to fulfil the orders.
OMS Maintenance - Warehouse Default Search Sequence
A tab named “Warehouse Default Search Sequence” will be included on the “OMS Maintenance” screen. This screen will be used to enter which customer types can be serviced by which warehouse(s)
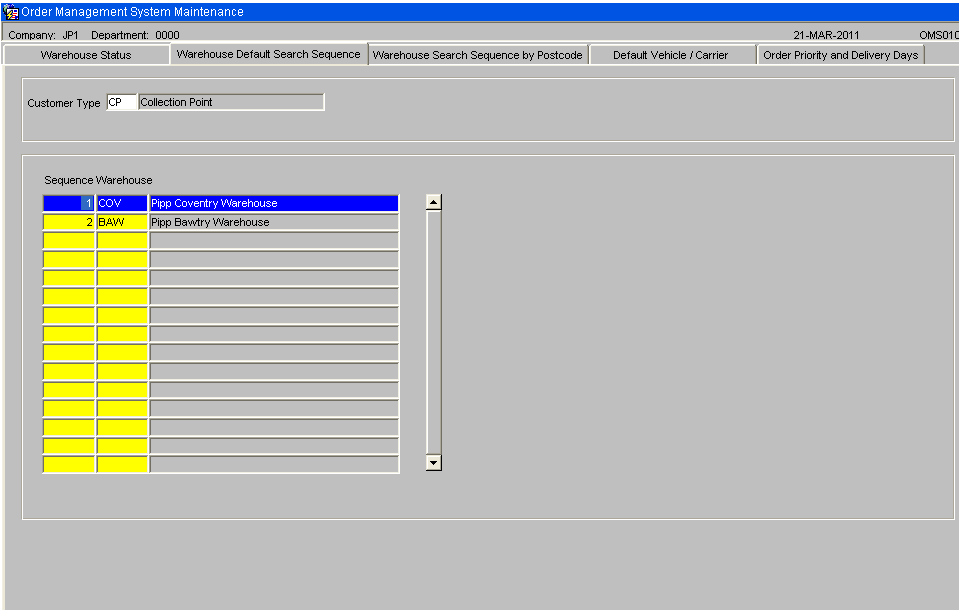
This screen will be used to enter which customer types can be serviced by which warehouse(s) in which sequence. It is expected that postcodes will have their own warehouse search sequence. This table will serve as a backup when a delivery address exists where the delivery point / postcode settings cannot be found.
OMS Maintenance - Warehouse Search Sequence by Post Code
A tab named ‘Warehouse Search Sequence by Post Code’ will be included on the “OMS Maintenance” screen.
Generally, the first part of the postcode will be used but it will be possible to enter a whole postcode.
The system will use the postcode of the customer delivery address and then search for the warehouse search sequence for this postcode as follows :-
- Search for an exact postcode match.
- Search for first 4 characters of postcode
- Search for first 3 characters of postcode
- Search for first 2 characters of postcode
- Search for first character of postcode
The customer type is included as different customer types could have a different warehouse search sequences.
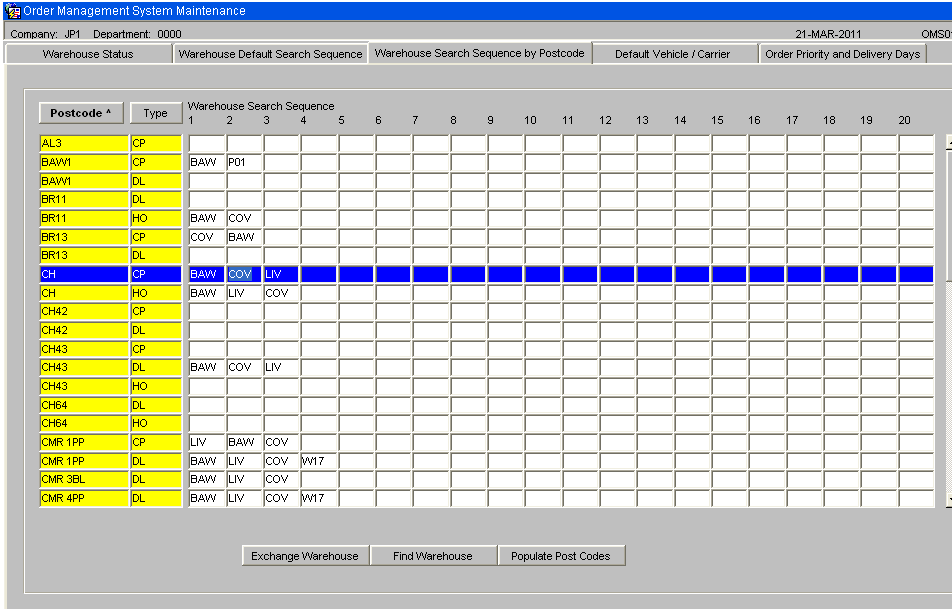
The postcodes will have a list of warehouses attached. This is the sequence in which warehouses will be checked when searching for available stock. Unavailable warehouses will be highlighted in red.
There will be options to sort this data by postcode then customer type or by customer type then post code. This will be controlled by clicking the buttons ‘Postcode’ or ‘Cust Type’ at the top of the page.
A postcode or part postcode can be found by clicking ‘Enter Query’ then selecting the postcode field and entering the start of the postcode. Upon ‘Execute Query’ the postcodes will be found. When a new warehouse search sequence is entered, an error will be given if the same warehouse id occurs more than once. The screen will include the following function buttons: -
Populate Post Codes Button.
A new database package will be written to populate the postcodes and customer types on the warehouse search sequence table.
This package will read through the customer table and link to the customers address to find the postcode. The system will use the first part of the postcode, the section before the space. If a space is not found in the postcode then the first 4 characters will be used. If the combination of customer type and start of postcode does not exist, then a record will be created with a blank warehouse. When the population is complete, the system will display the newly created postcodes.
Exchange Warehouse Button
This button will be used to replace a particular warehouse with another warehouse. When this button is clicked, the user will be prompted to enter:
- The warehouse ID to be replaced
- The replacement warehouse ID.
- Confirm Exchange.
The system will read through all warehouse search sequences looking for the warehouse ID that is to be replaced. When the warehouse ID is found, it will be replaced by the new warehouse ID. If the new warehouse ID already exists as one of the warehouses in the search sequence then the old warehouse ID will be removed.
Find Warehouse Button
When this button is clicked, the user will be prompted to enter:
- The warehouse ID to search for.
- Confirm
The system will read through all warehouse search sequences looking for the entered warehouse ID. The system will then display any postcodes that include this warehouse as part of the search sequence.
OMS Maintenance - Default Vehicle / Carrier
A tab named “Default Vehicle / Carrier” will be included on the “OMS Maintenance” screen.
This tab will be used to maintain the default carrier code and vehicle type for each customer type. Only one carrier code and vehicle type can be entered for a single customer type.
When in the carrier code field, control L can be type to display the list of values. A list of valid vehicle types will be displayed when the field is clicked upon to allow one of the displayed vehicle types to be selected. Both the vehicle type and carrier code will be validated.
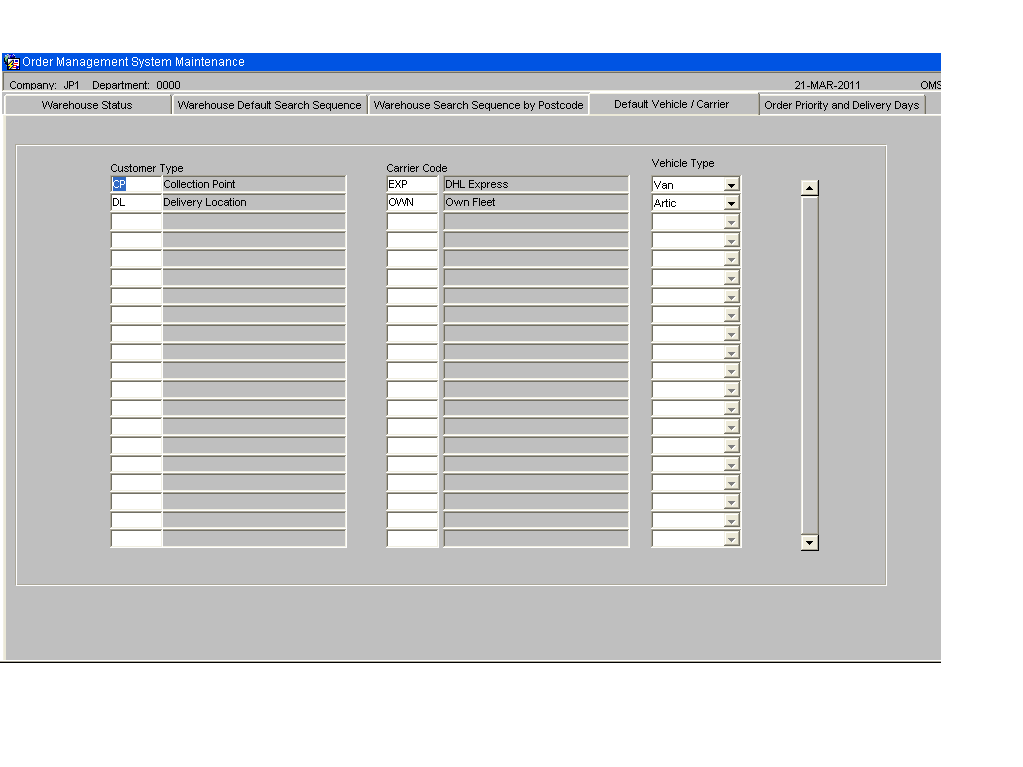
When the anticipated orders are created, the customer type will be used to find the correct carrier code for the order.
During the creation of the anticipated orders, the vehicle type will be set to the vehicle type set up against the customer’s delivery address. If a customer does not have their default vehicle type set then the vehicle type will be set to the vehicle type set up in this screen for the relevant customer type.
OMS Maintenance - Order Priority and Delivery Days
A tab named “Order Priority and Delivery Date” will be included on the “OMS Maintenance” screen.
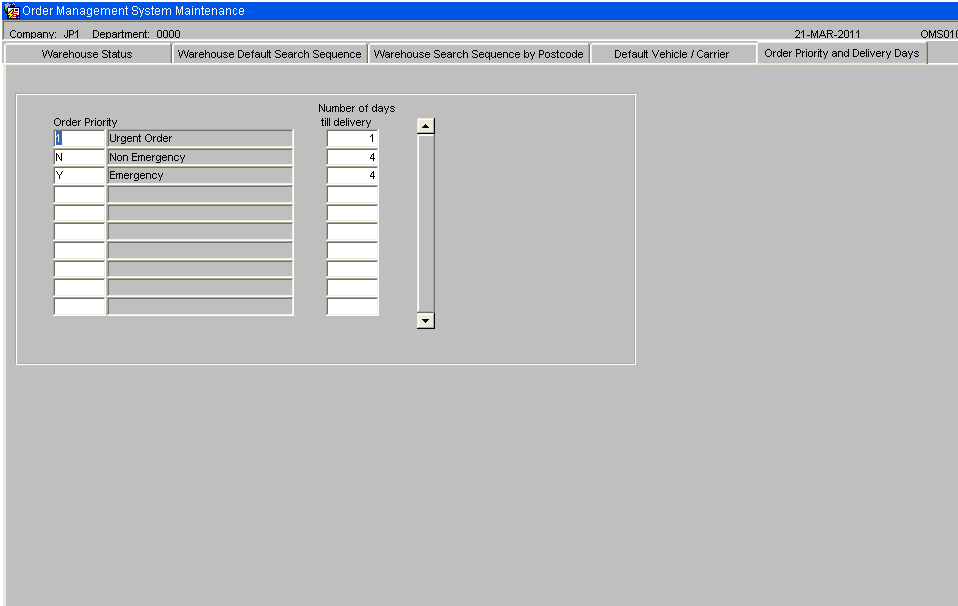
This tab will be used to control the setting of the delivery date based upon the order priority. The order priority will be entered with the number of days till delivery. If the number of days till delivery is set to zero then the delivery date will be set to today’s date. If the number of days till delivery is set to 1 then the delivery date will be set to tomorrow’s date.
The setting of the delivery date will be done when the anticipated order is created. Any re-assessment will result in the re-setting of the delivery date. It will be possible to find orders in the anticipated orders screen and amend the order priority. This will result in the delivery date being re-set to the new delivery date based upon the entered order priority.
Order Priority
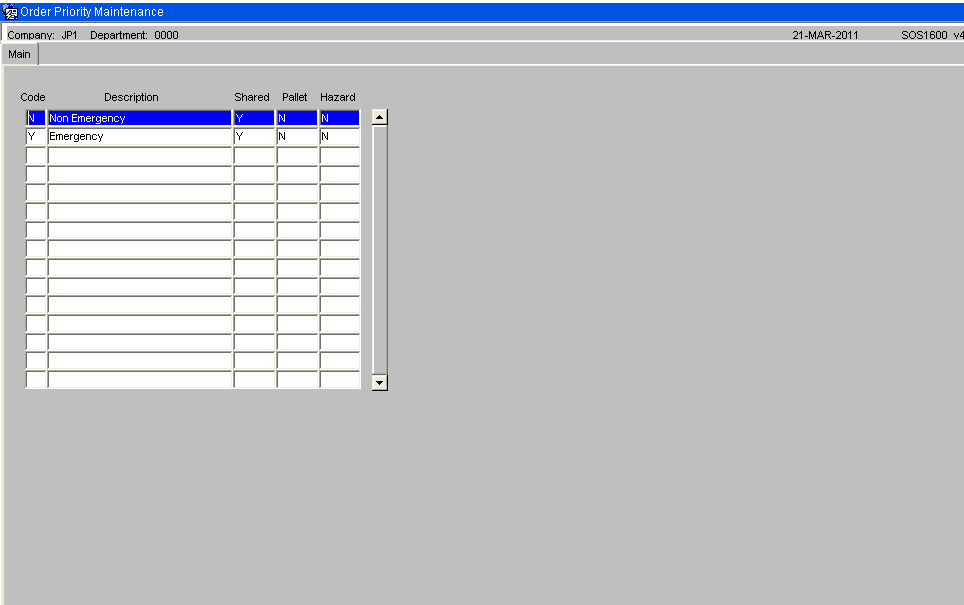
The order priority will be set to the value received on the EDI order file in the emergency order flag field. This is expected to be ‘Y’ or ‘N’. These two values will need setting up on ‘Order Priority Maintenance’ screen as shown below. Use Order Priority Maintenance, SOS1600.
OMS User Defaults
A new maintenance screen will be provided to control the main functions of the Order Management System at a user level. This screen will allow each user to be set up with their preferred settings and will allow the OML software to be configured to suit each user’s requirements. Unless stated otherwise, the user’s settings will override the OMS control settings.
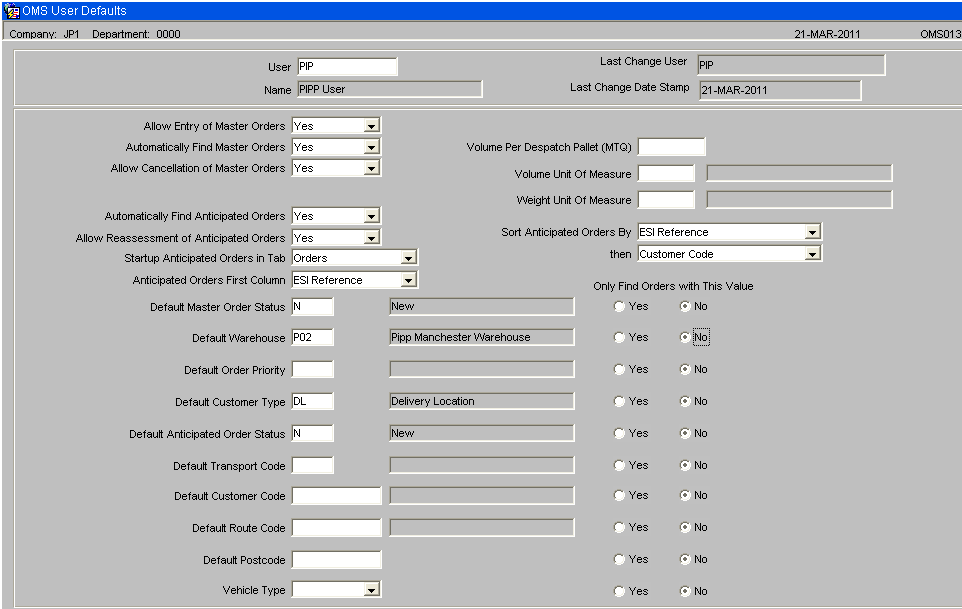
Allow Entry of Master Orders Y/N. When set to “Y”, it will be possible to enter a master order directly in the ‘Master Orders’ control form. This option could be used if the EDI order files have failed to reach the server or to rapidly enter an emergency order. If “N” is selected then this functionality is not available for this user. NB. The “Allow Entry of Master Orders” must be set to Y on OMS control as well as against the user . If the “Allow Entry of Master Orders” must be set to N on OMS control then no user will be able to enter master orders regardless of the value of this flag.
Automatically Find Master Orders Y/N. When set to Y, instead of the master order screen starting up on the Selection Criteria tab, the user will be taken straight into the main master order tab.
Allow Cancellation of Master Orders Y/N. When set Y, the user will be able to click the cancel buttons in the master orders screen. If set to N, then the Cancellation buttons will be greyed out in the master order screen.
Automatically Find Anticipated Orders Y/N. When set to Y, instead of the anticipated order screen starting up on the Selection Criteria tab, the user will be taken straight into their preferred tab, as set up on the “Startup Anticipated Orders in Tab” option.
Automatically Select Anticipated Orders Y/N.
The anticipated orders have a check box next to each order. This flag controls whether this check box is checked or left blank.
When set to Y, every time the user triggers a query in the anticipated orders screen, the system will automatically check the orders. This option should be used when the user is setup to retrieve a small number of records for each find.
NB, Queries are triggered following any possible change to the displayed orders. For example, if an order is re-assigned to a different warehouse, then the system will re-query the data as the re-assignment may have placed the order outside the “Selection Criteria”. The re-query of the data will reset the value of the check flag, to either blank or checked, depending upon the setting of this flag.
Allow Re-assessment of Anticipated Orders Y/N.
This flag controls whether this user is allowed to click the “Re-assess ALL orders at Status New” in the anticipated order screen. If this flag is set to N then the button will be greyed out.
Startup Tab on Anticipated Orders This can be set to control which tab the form displays following every re-find of orders. Values are:-
- Orders
- Order Summary
- Planning
- Delivery Address
- Stock Details
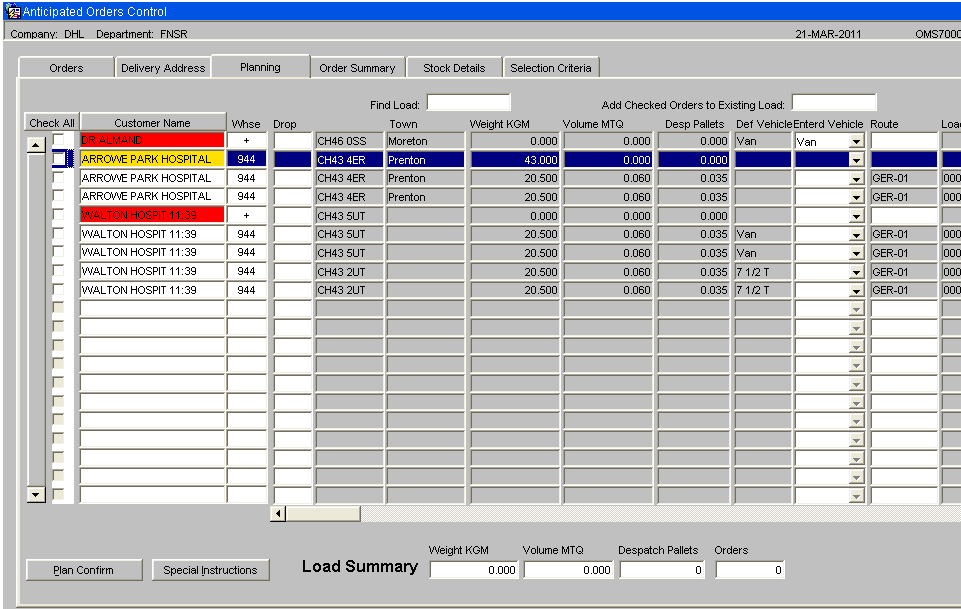
For Transport planning users this can be set to “Planning” to run the form in “Planning” mode.
Anticipated Orders First Column
This can be set to control which data value is displayed in the first column on the “Anticipated Orders” screen, Orders tab. A drop down list will be available which will allow one of the following data fields to be selected as the first column:-
- ESI reference
- Customer name
- WMS Order Number
The setting of the user’s, “Anticipated Orders First Column”, flag will control which value will be displayed in the first column of the anticipated orders screen.

Default Master Order Status
If this value is set, then the Status on the selection criteria tab on the master order screen, will be automatically filled in to this value.
Default Warehouse
If this value is set, then the warehouse on the selection criteria tab on the anticipated order screen will be automatically filled in to this value.
Default Order Priority If this value is set, then the priority on the selection criteria tab on the anticipated order screen will be automatically filled in to this value.
Default Customer Type If this value is set, then the customer type on the selection criteria tab on the anticipated order screen will be automatically filled in to this value.
Default Anticipated Order Status If this value is set, then the status on the selection criteria tab on the anticipated order screen will be automatically filled in to this value. Allowed values are:-
Document History
Copyright OBS Logistics © 2008
The information contained herein is the property of OBS Logistics and is supplied without liability for errors or omissions. No part may be reproduced or used except as authorised by contract or other written permission. The copyright and foregoing restriction on reproduction and use extend to all media in which the information may be embodied