OMS7000: Difference between revisions
(Split into separate pages) |
(Split into separate pages) |
||
| Line 230: | Line 230: | ||
As return is pressed in the “Add to Existing Load” field, the system will validate the selected orders to ensure they are for the same warehouse and delivery date as the orders currently assigned to the existing load. Providing the orders pass validation, the system will populate the route, marshalling location, load date, load time and load number of the selected orders. The system will then automatically display the new load, showing ALL the orders for the load with the new load totals at the bottom of the screen.<center>[[Image:OMS-071.PNG | Detail Display]]</center> | As return is pressed in the “Add to Existing Load” field, the system will validate the selected orders to ensure they are for the same warehouse and delivery date as the orders currently assigned to the existing load. Providing the orders pass validation, the system will populate the route, marshalling location, load date, load time and load number of the selected orders. The system will then automatically display the new load, showing ALL the orders for the load with the new load totals at the bottom of the screen.<center>[[Image:OMS-071.PNG | Detail Display]]</center> | ||
===Send Planned Orders to Warehouse=== | |||
A new database package will be written that will convert planned anticipated orders into warehouse orders. The new OML auto allocation warehouse flag will be found for the warehouse. If this flag is set to “Yes” then following the sending of each load / order to the warehouse, the allocation package will be called to automatically allocate the orders. If this flag is set to “No” then the package will create committed warehouse orders and commit the stock to the orders. The committed orders can then be allocated and processed through the WMS system. | |||
This package will be run either when the ‘Send Selected Orders To Warehouse” button is clicked or when the user completes the Planning of a load and clicks the “Send to Warehouse” button on the “Load Summary” screen. When a planned load is sent to the warehouse, this package will also create the Route / load. | |||
The ‘Send Selected Orders To Warehouse” button will allow orders at status New or Planned to be sent to the warehouse for picking. If this option is used to send an order that is at status planned and included on a load, then the order will be removed from the load before being sent to the warehouse as an individual order. | |||
Orders will be created for each warehouse with the following details set: - | |||
*Status set to 1, committed | |||
*Order Priority | |||
*Route code to the route entered against the anticipated order. | |||
*Booking date set to the date the order was created as an anticipated order. | |||
*Delivery date set to the “Entered Delivery Date”, if set or the default delivery date if a “Entered Delivery Date” has not been entered. | |||
*Carrier Code will be set to the transport code entered against the anticipated order. | |||
Order lines can be created for a number of cases and a number of singles. It is expected that the stock codes will be set up with the stocking unit of measure set to unit of measure 2. This set up will result in order lines for a number of cases or inners with the number of units set to 0. | |||
If the stock code is setup with the stocking unit of measure set to unit of measure 1, this will result in an order line for a number of units with the number of cases set to 0. | |||
The system will consider the number of eaches per shipping unit (stored in the transit factor on stock maintenance) when calculating how many cases / inners or units are required. | |||
For example, if the number of eaches ordered was 17 but product is stored in cases where each case contains 10 eaches. The order would need to despatch 2 cases of the product which equates to 20 eaches. When viewed in the order management screen, OMS7000, this line would show, qty ordered 17, qty anticipated 20. When viewed through the Order Enquiry, this line would show as 2 cases ordered. The pick list, pick confirmation screen etc will all show 2 cases ordered rather than the number of eaches. | |||
If a stock code is setup with a transit factor of zero, then the system will treat this stock as containing 1 each per stocking uom. | |||
For this release, it is expected that the pick wave screen will be used, by the warehouse, to find the orders that are ready for picking. In future, it is expected that the transport planning will set the route and load number which will allow the orders to be created already grouped into a pick wave, ready for allocation. | |||
If the warehouse is set to automatically allocate the orders then any allocation failure will result in the allocation for the entire load / order being rolled back. This means the warehouse will need to manually allocate the orders by using the allocation screen or the pick wave screen. | |||
'''NB. As the Warehouse order creation runs as a separate process, the sending of the load / order to the warehouse, will NOT be rolled back if the allocation run fails. ''' | |||
===Order Cancellation=== | |||
It is possible to Cancel the Master Order, providing the user has permission to perform this action. If the master order is cancelled, then any anticipated orders will be removed from the anticipated orders tables. The Master Order will remain with a cancelled status. It will be possible to cancel the entire order or a single master order line. | |||
When a master order is cancelled, the system will write details of a zero despatched order to the despatch confirmation transient tables. The next EDI outbound despatch confirmation run will include the cancelled master orders showing zero quantity despatched. | |||
Once orders have been sent to the warehouse for processing, they cannot be cancelled from within the Order Management Layer as stock may have been allocated or picked for the order. Instead orders should be pick confirmed to zero and despatched. This will then send a despatch confirmation message. | |||
Each time the ‘Reassess ALL Orders at Status New” button is clicked from “Anticipated Orders”, the database package that re-creates the Anticipated Orders will be run. This package will first check if any orders have been cancelled in the warehouses. If all the order lines relating to a master order detail have been cancelled then the anticipated order will be reset to status New and the warehouse will be set to ‘+’. The warehouse is set to ‘+’ to highlight the fact that orders have been cancelled in the warehouse. It is possible to enter a warehouse of ‘+’ in the selection criteria tab to find all orders that do not have a warehouse assigned. At this stage, it will be possible to cick the “Process Selected” button and re-direct the orders to a specific warehouse. Alternatively, the “Re-assess ALL Orders at Status New” button can be clicked again to recreate the anticipated orders. This second run of the process will assign the warehouse according to the warehouse assignment rules. | |||
'''NB.''' A Generic Sku may need more than 1 NPC to satisfy the order line. In this situation, all the related NPC order lines will need to be cancelled before the Order Management Layer will treat the order line as cancelled. The DH order number cannot appear more than once in a despatch confirmation message, this is why ALL the detail lines that relate to a DH order number, must be cancelled before the OML will treat the master order line as cancelled. | |||
===Special Instructions=== | |||
The anticipated orders screen (OMS7000) will include a “Special Instructions” button. When this button is clicked a despatch text entry popup will appear. | |||
<center>[[Image:OMS-072.PNG | Special Instructions]]</center> | |||
The special instructions will be displayed on the far of the “Planning” tab which can be accessed by using the scrollbar and scrolling to the right. | |||
<center>[[Image:OMS-073.PNG | Planning Tab]]</center> | |||
The special instructions will be stored at the ESI reference level. A single ESI reference could generate anticipated orders for two or more warehouses. In this case, the ESI reference will be shown more than once on the main orders screen BUT the special instructions will only need to be entered once. The special instructions can be changed at any order status. When the orders are sent to the warehouse, the special instructions (at ESI reference level) will be transferred to the despatch instructions of the WMS order number. Any changes to the special instructions within the OML will be cascaded down to the WMS order number despatch instructions. | |||
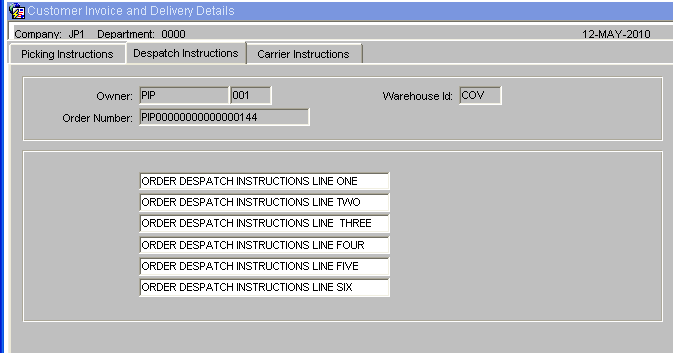
If required, the standard order entry screen (SOS1110), “Order Notes” button, can be used to amend the WMS order despatch instructions. However, if this order is then cancelled and the order re-processed through the OML the despatch instructions will revert back to the Special instructions entered in the OML.<center>[[Image:OMS-074.PNG | Order Notes]]</center> | |||
Latest revision as of 11:23, 16 June 2025
Anticipated Orders - Selection Criteria
If the user is not setup to automatically find anticipated orders, then the anticipated order screen will start on the selection criteria tab. If the user has a default values setup on “OMS Users” then these will be used to automatically populate the matching fields. If the user is setup, on “OMS users”, to only find orders with a certain default value, then these fields will be grey and the user will not be able re-enter these values on this form.
Following entry of the selection criteria, the “Find Orders” button can be clicked to display the anticipated orders that match the criteria.
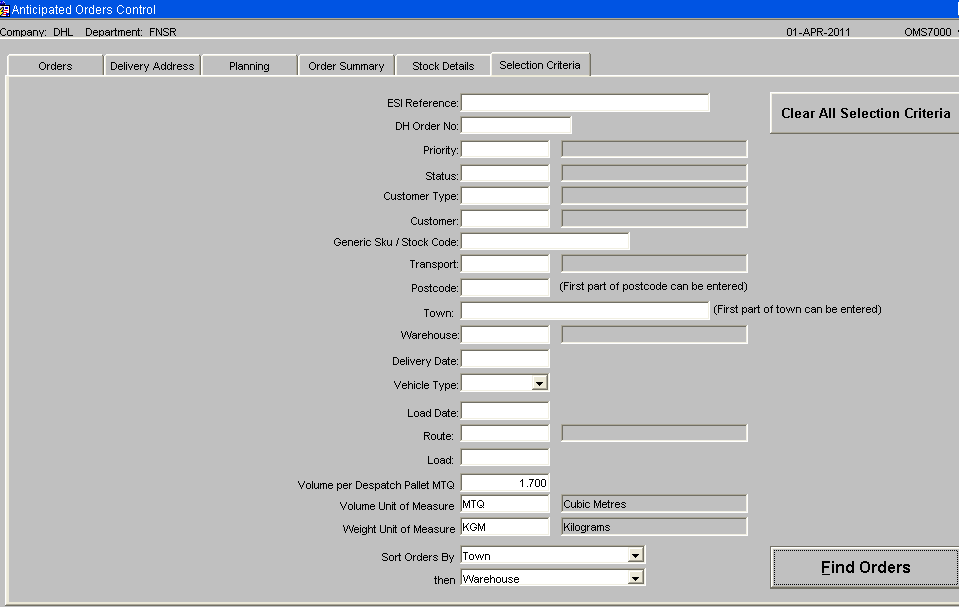
The Volume and Weight fields will be populated by the values set up for the user. If the user does not have these details set then the values set up on the “OMS Control” screen will be used. These default values can be overridden.
The delivery date field can be used to search for a specific delivery date. The delivery date is defined as the “Entered Delivery Date”, if a date has been entered or the “Default Delivery Date”, if the “Entered Delivery Date” is blank. It will be possible to enter ‘+1” to search for orders due for delivery tomorrow. “+0” for today’s date. “-1” for yesterday’s date. The “Clear All Selection Criteria” button can be used to blank out the entered details.
When the “Find Orders button” is pressed, orders matching the selection criteria will be found and displayed. If no selection criteria are entered then all the orders will be displayed.
It will be possible to enter the first part of the postcode rather than the whole postcode
When searching for a ‘Line Ref’ (DH order number), the system will display the order header containing a line for the entered ‘Line Ref’. It will be possible to then click the ‘Stock Details’ tab. ALL lines for the order header will be displayed. The entered ‘Line Ref’ will be highlighted in green to distinguish it from the other order lines, as shown below.
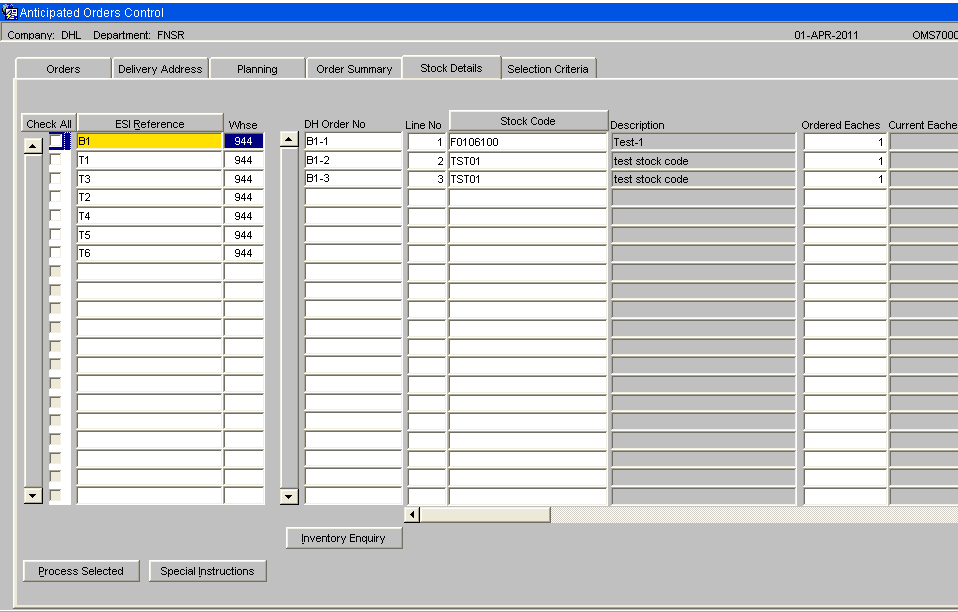
Similarly, when searching for a stock code, the system will display all order headers containing a line for the entered stock code. It will be possible to then click the ‘Stock Details’ tab. ALL lines for the order header will be displayed. The entered stock code will be highlighted in green to distinguish it from the other order lines. The system will check both the Generic Sku and the NPC code when searching by stock code.
Anticipated Orders – Orders
This screen (OMS7000) will show the anticipated orders. If the user is set up with the “Automatically Select Anticipated Orders” flag set to Y then the check box, at the start of the line, will be automatically checked.
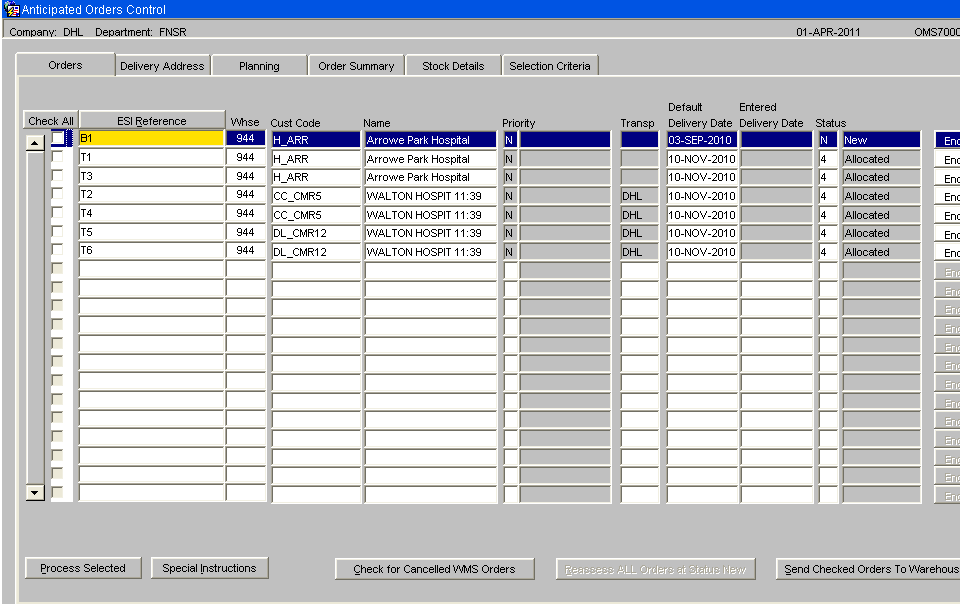
The vertical scrollbar on the left of the screen can be used to scroll up and down the orders.
A single master order (ESI reference) may contain several order lines each with a different product code. If stock levels were low across the warehouses and stock needed to be despatched from 5 warehouses then the ESI order reference would be shown as 5 lines on this screen, a line for each warehouse.
The order priority can be changed which may reset the default delivery date. The “OMS Maintenance” screen, “Order Priority and Delivery Days” tab is used to set the number of delivery days for theOrder Priority.
The “Entered Delivery Date” field can be used to override the default delivery date. If a date is entered in this field then this wil be the delivery date used when the warehouse order is created.
Anticipated Order Colour
The anticipated orders new ‘Warehouse Assignment Method” flag will be checked and used to determine the colour setting for the anticipated order.
The new colour system hierarchy will be:-
- Red for short orders.
- Amber for fulfilled orders from a warehouse other than the primary warehouse.
- Light Green for an order from the primary warehouse using the new warehouse assignment method.
- Green for a fulfilled order from the primary warehouse using the normal warehouse assignment rules.
- White for an order that has been sent to the warehouse.
When a short order is the current order, the “Stock Details” tab can be clicked to view all the order lines. The short order line will be highlighted in red. To query why an order shows as amber, the “Delivery Details” tab can be clicked and the scrollbar used to move to the far right of the delivery details. The “Display Full Current Warehouse Search List for this Postcode and Customer Type” button can be clicked to view the default warehouse search sequence. The warehouse assigned to the order will be highlighted in amber.
NB. An order that has used the new warehouse assignment method will show the order from the primary warehouse as light green. The remaining lines may have been assigned to a non-primary warehouse. These remaining lines will show as amber.
Anticipated Order Status
New – Newly created anticipated orders will have a status of New. The orders can be assigned to a new warehouse while they are at this status. If the ‘Re-assign ALL Orders’ button is clicked then all anticipated orders with a status of New will be cleared down and recreated.
Planned – The planned status will only allow limited changes. Order must be at this status before they can be sent to the warehouse.
Sent To WMS – Orders that have been sent to the warehouse for allocation, picking and despatch.
NB. The anticipated order status does not get updated following each change of warehouse order status. The screen links to the warehouse order to find the status to display the warehouse order status. For this reason, the displayed status may be 6 – Pick confirmed but it is not possible to search for orders at status 6 as the anticipated order status is S – Sent to warehouse.
Buttons
Uncheck / Check All This button can be used to Check or uncheck all the orders.
ESI Reference / Address Name / WMS Order No This button can be used to toggle the display between the ESI order reference, the delivery address name and the WMS order number. If the order has not yet been sent to the warehouse then the WMS Order No will be shown as blank.
Process Selected It is possible to select certain orders using the check box on the left hand side of the screen. The ‘Process Selected’ button opens a new window to allow an action to be specified and performed on the selected orders.
Orders Enquiry. This button will be enabled for orders that have been sent to the warehouse. It will call the standard warehouse order enquiry.
Check for Cancelled WMS Orders This button will call the database package that reads through the WMS Orders looking for any orders that have been cancelled. When this button is clicked, the system will check the warehouse orders for any cancelled order lines. When orders are cancelled using the “Manual Order Cancellation” screen, the orders may have been allocated or pick confirmed. This process will include ALL cancelled orders. NB. Despatch confirmed orders cannot be cancelled.
A single order line for a generic sku may result in several warehouse orders lines when more than 1 NPC is required to satisfy the order line. A warehouse order line will only be considered cancelled when ALL the NPC warehouse order lines relating to a DH order line, are cancelled.
NB. A short pick or a pick confirm to zero will not be classed as a cancelled order. Orders that are short picked or pick confirmed to zero will be despatch confirmed. The EDI despatch confirmation message will go back to DH showing the quantity despatched.
This “Check for Cancelled WMS Orders” process will also be run when the “Re-assess all orders at status new” button is clicked.
Reassess ALL Orders at Status New This button will call the database package that creates the anticipated orders. All anticipated orders at status new will be deleted and then recreated using the current stock levels and warehouse availability when deciding which warehouse and NPC code to use to satisfy the order. As anticipated orders are deleted and then re-created, if changes have been made such as entering delivery dates or changing order priority, then these changes will be lost.
The “Reassess ALL Orders at Status New” button will give a warning message prior to running this process. The user will be asked:
“Warning. This process will recreate orders at status “New”. If changes have been made to over-ride the default settings then these changes will be lost. Do you want to continue?”
If the No button is clicked then the process will not be run.
Send Checked Orders to Warehouse. This will run the database package, which converts anticipated orders to committed warehouse orders. Orders must show a status of ‘New; or ‘Planned’ to be sent to the warehouse for allocation. This button should only be used to send indivual orders to the warehouse. The Planning tab will be used to send a whole planned load of orders to the warehouse. If an order is at a planned status with a route and load number assigned then it will be removed from the load prior to sending it to the warehouse.
Anticipated Orders – Process Selected
The Process Selected button will display a new screen where the user can select what they wish to do with the selected orders.
Orders that have been sent to the warehouse will NOT be updated by this process.
Warehouse Change or Re-select
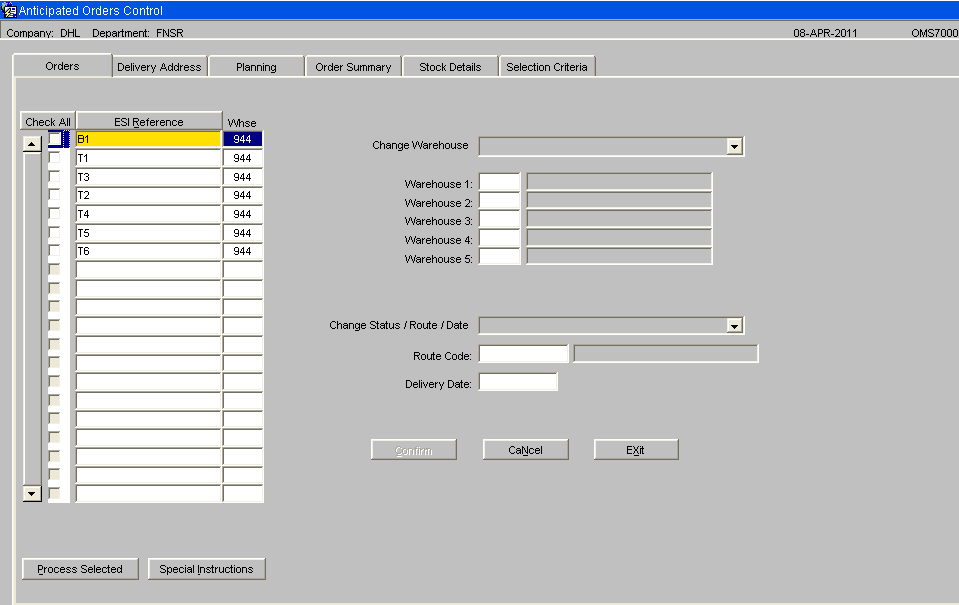
The Change Warehouse options are:-
- Over-ride Default Warehouse Search – If this option is chosen, the user can specify a new warehouse search sequence. When the confirm button is clicked the new warehouse search sequence will be used to recreate the anticipated orders.
- Default – Use Postcode to assign warehouse. This option can be used to re-assess the selected orders and assign the most appropriate warehouse based on the current settings and stock levels. This option can be used when a warehouse status has changed or stock levels have changed.
- Primary Warehouse Only – This option can be used to only select the primary warehouse when creating anticipated orders.
The selected orders must be at status “New” for this change to be allowed. Orders at status Planned will be ignored.
Change Route / Delivery Date
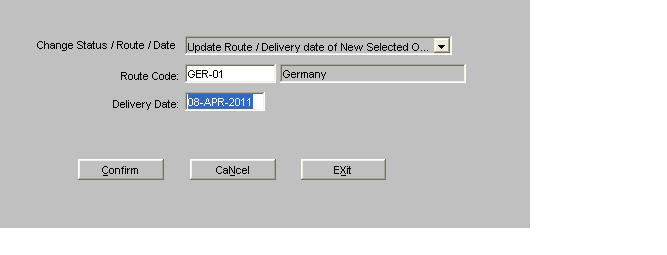
Update Route / Delivery Date This option will only process orders at a status of New. Orders at status planned or sent to warehouse will be ignored.
If this option is selected then the user will be prompted to enter a route code and delivery date. When the confirm button is clicked, the selected orders will be updated with the entered route code and delivery date, providing the selected order has a status of New.
Reset Planned Orders to Status New
Reset Selected Planned Orders to Status New This option can be used to reset the selected planned orders to a status of New. This option can only be used to change orders with a status of Planned to Status New. Orders sent to the warehouse will be ignored.
It is possible to enter a delivery date. The selected orders will have this new delivery date entered against them when the orders change to a status of New.
The following fields will be re-set as the order is no longer considered planned.
- Marshalling Location – set to blank
- Load Date – set to blank
- Load Time – set to blank
- Load Number – set to blank
- Drop Sequence – set to blank
- Default Vehicle type – set to the default vehicle type for the customer type
- Entered vehicle type – set to blank
- The postcode stamped against the anticipated order will be reset to the customer’s current postcode.
- The town stamped against the anticipated order will be reset to the customer’s current town.
- Route code - The system will find the route code setup for the customer’s delivery address. The system will then check if this route code is a valid route for the warehouse that the order is assigned to. If the route is valid then this route code will be assigned to the order. If the route is not a valid route code for the warehouse assigned to the order then the route code cannot be set to the customer’s default resulting in a blank route code.
(NB. Once orders have been sent to the warehouse there is a new Order Cancellation Screen to cancel the selected orders and deallocate stock – Change request NH-7X9CN7).
There is no option to cancel an anticipated order. Instead, the master order can be cancelled which will delete the associated anticipated order.
Anticipated Orders – Delivery Address
This screen (OMS7000) will show the anticipated orders when the delivery address tab is clicked, the address lines will be shown on the right side of the screen.
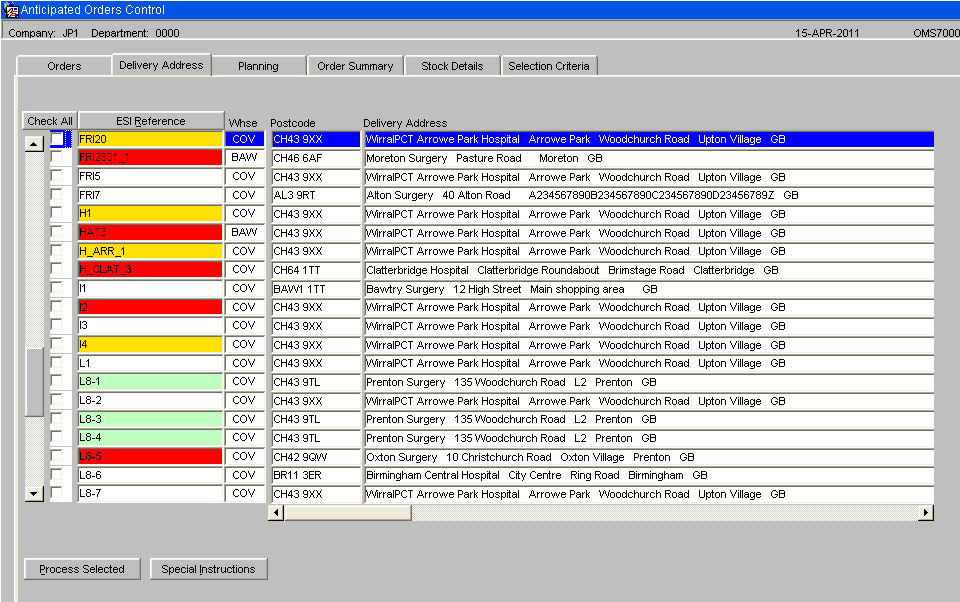
The scrollbar at the bottom of the screen can be used to display the warehouse search sequence for the postcode.
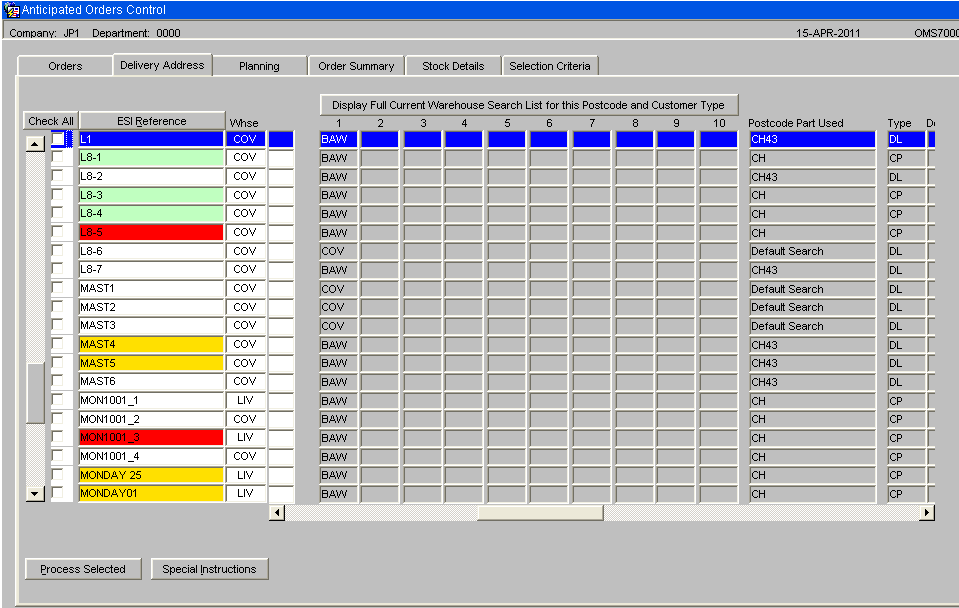
This will show the current warehouse search sequence and the Postcode part used.
NB. Any warehouse set as unavailable will be excluded from this display, as it will not be considered when re-assigning the orders.
Anticipated Orders – Summary
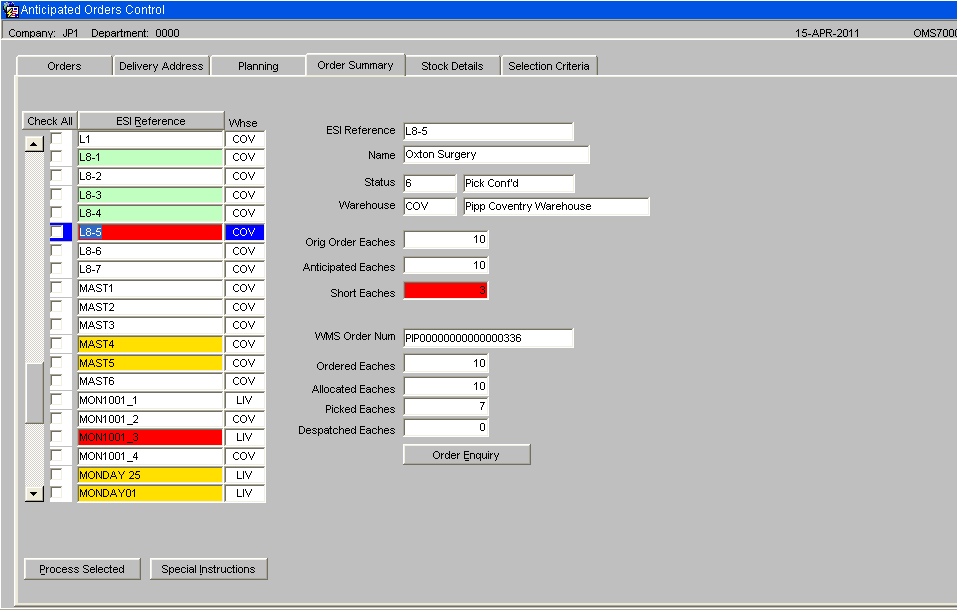
This screen (OMS7000) will show the anticipated orders when the “Order Summary” tab is clicked, the order summary details will be displayed for the current order. For orders that have been sent to the warehouse, the ‘Order Enquiry’ button can be clicked to call the standard order enquiry. This screen will give further details e.g. dates allocated, picked etc.
Anticipated Orders – Stock Details
This screen (OMS7000) will show the anticipated warehouse orders when the “Stock Details” tab is clicked, the stock lines for the current order will be displayed. If a line on the order is short, this will be highlighted in red, as shown below.
The stock code button can be clicked to change the display from the NPC code to the Generic Sku. The current quantity will show the quantity expected to be delivered. For orders that have been sent to the warehouse and allocated, the current quantity will be set depending upon the order status. For allocated orders, it will be the allocated quantity, for pick confirmed orders, it will be the pick confirmed quantity and for despatched orders it will be the despatched quantity. For orders at the anticipated status or committed status, this quantity will be the anticipated quantity.
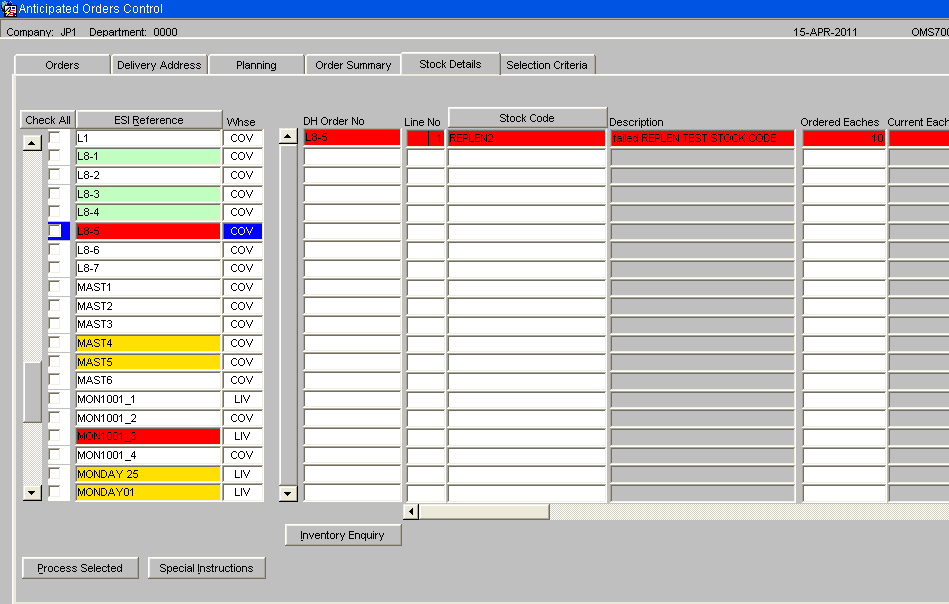
The ‘Inventory Enquiry’ button can be clicked to display the standard inventory enquiry for the current NPC code.
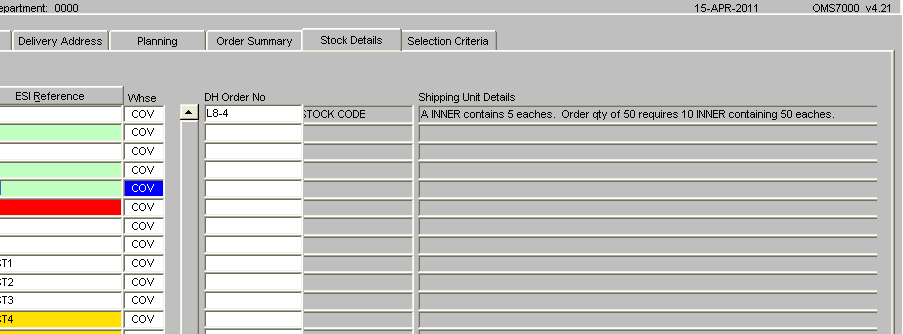
The scroll bar at the bottom of the screen can be used to display further details. All the quantity fields will be displayed as the number of eaches.

A shipping unit description will be displayed to show how the number of eaches has been converted into the quantity anticipated. The calculated required number of eaches will be zero if there is no available stock.
Anticipated Orders - Planning
This ‘Planning” tab will be used to group orders into loads. To plan orders, the selection criteria tab should used to refine the number of orders. The following minimum details should be entered.
- Status – Set to “New” or “New or Planned” as only orders at this status can be planned,
- Delivery Date – Orders grouped into a load must have the same delivery date.
- Warehouse – Orders grouped into a load must be assigned to the same warehouse.
The sort options, on the “Selection Criteria” tab, can be used to sort orders by Volume or weight.
The town has a maximum size of 30 characters. Due to limited space on this screen, the full 30 characters will NOT be displayed. The maximum number of characters that can fit within the allocated area will be displayed. This will be approximately 12 characters if the town is in uppercase or approximately 15 characters if the town is lowercase. If the town is blank then the county will be displayed instead.
The system has the ability to display the weight and volume in a specified unit of measure. The preferred units of measure and the volume per pallet are setup on “OMS Control”. Each user can then override this setting by using “OMS Users” to set their preferred units of measure againt the username. These settings can also be overridden by specifying the units of measure and volume per pallet on the “Selection Criteria” tab.
The Weight and Volume of each order will be calculated and displayed in the selected Unit of measure. The weight will be calculated as the number of eaches divided by the transit factor (to give the number of shipping units) multiplied by the weight of a shipping unit as setup on stock maintenance. The volume will be calculated as the number of eaches divided by the transit factor (to give the number of shipping units) multiplied by the volume of a shipping unit as setup on stock maintenance. The despatch pallets will be calculated as the volume divided by the Volume per pallet, as displayed on the selection criteria tab.
The “Check Box” flag will be used to Select / Deselect orders for inclusion / exclusion from a load. The totals, of the selected orders, will be displayed at the bottom of the screen.
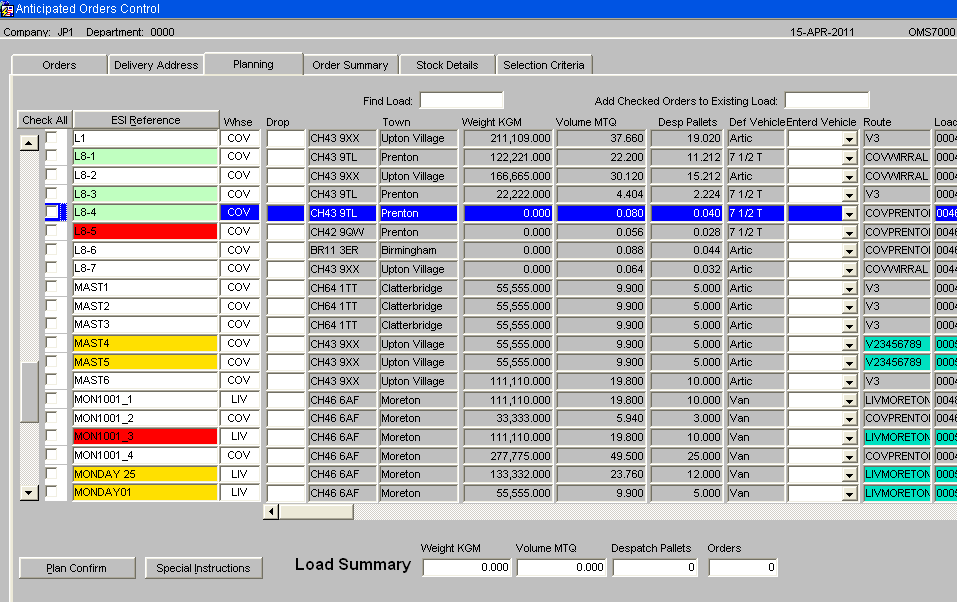
The “Find Load” field at the top of the screen can be used to find a load number. This option will ignore the search settings on the “Selection Criteria” tab and find ALL the orders assigned to the load.
NB. If a load is created but not sent to the warehouse then it will exist in the Order Management Layer at status Planned. To process this load, the “Find Load” field MUST be used to find the Load Number. This is to ensure ALL orders assigned to the load are selected, prior to using the “Plan Confirm” button.
The drop sequences should be entered and saved prior to sending the load to the warehouse as the drop sequence will sequence the assignment of the system order numbers.
The “Plan Confirm” button can be clicked to proceed. At this point, the selected orders will be validated to check they are at the correct status, for the same warehouse and for the same delivery date. An error message will be given if the validation fails.
Providing the orders pass the validation, the “Load Summary” details will be displayed.
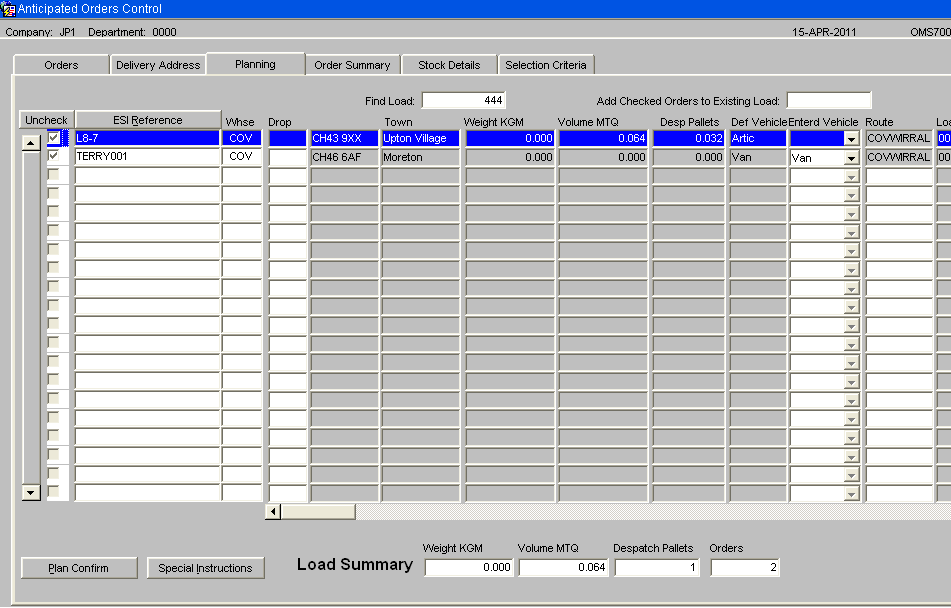
The system will check the selected orders and find the first non blank route code for the checked orders. This route code will be set as the default route code and displayed. The default can be accepted by returning over the field or a different route code can be entered.
When the “Confirm Load” button is clicked, the system will check all the orders selected for inclusion on the load. If any of the orders have a route code that does not match the entered / default route code then a warning message will be given.
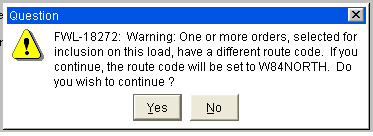
If the user clicks “yes”, then the entered / default route code will be set as the route code for all the selected orders.
The marshalling location will default to the default marshalling location for the warehouse, as set up on system parameters.
The load date and load time will be entered. Standard date processing will be available for the date field.
The “Exit” button can be used to return to the previous screen. The “Cancel and Uncheck” button can be used to reset the details to re-start planning. The “Confirm Load” button can be used to proceed to the next stage. This will stamp the route code, marshalling location, load date and time against the selected orders. The load number will be generated and displayed. The orders will change to status Planned.
The text on the “Confirm Load” button will be changed to “Send to Warehouse”.
The “Exit” button can be used to return to the planning screen. The “Cancel and Uncheck” button can be used to reset the details to re-start planning. This will blank out the route, load number, load date, load time, marshalling location and drop sequence from the orders and will set the status of these orders back to New.
The “Send to Warehouse” button can be used to send the load to the warehouse. This will move the orders onto status Committed.
The drop sequence will be used to reverse sort the orders prior to the generation of the system warehouse order numbers. The first warehouse order number will be for the last drop and the last warehouse order number will be for the first drop. When the warehouse produces the pick list for the route / load, the pick list is sorted by the warehouse order number. This means the order for the last drop will be printed at the start of the pick list as this is the order that should be loaded onto the delivery vehicle first.

Adding Orders to an Existing Load
A field “Add to Existing Load” will be included on the planning tab. Orders at status New can be added to an existing load by first using the check box to select the required orders. On the Planning tab, the “Add to Existing Load” field will be used to enter the load number.
A list of values will be available which will show the current planned loads in the OML. It will not be possible to add an order to a load that has already been sent to the warehouse.
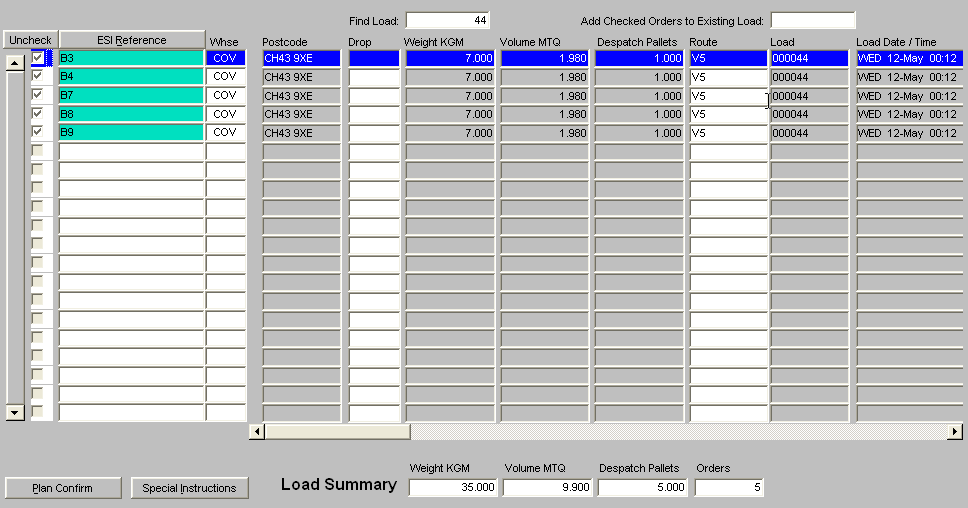
As return is pressed in the “Add to Existing Load” field, the system will validate the selected orders to ensure they are for the same warehouse and delivery date as the orders currently assigned to the existing load. Providing the orders pass validation, the system will populate the route, marshalling location, load date, load time and load number of the selected orders. The system will then automatically display the new load, showing ALL the orders for the load with the new load totals at the bottom of the screen.
Send Planned Orders to Warehouse
A new database package will be written that will convert planned anticipated orders into warehouse orders. The new OML auto allocation warehouse flag will be found for the warehouse. If this flag is set to “Yes” then following the sending of each load / order to the warehouse, the allocation package will be called to automatically allocate the orders. If this flag is set to “No” then the package will create committed warehouse orders and commit the stock to the orders. The committed orders can then be allocated and processed through the WMS system.
This package will be run either when the ‘Send Selected Orders To Warehouse” button is clicked or when the user completes the Planning of a load and clicks the “Send to Warehouse” button on the “Load Summary” screen. When a planned load is sent to the warehouse, this package will also create the Route / load.
The ‘Send Selected Orders To Warehouse” button will allow orders at status New or Planned to be sent to the warehouse for picking. If this option is used to send an order that is at status planned and included on a load, then the order will be removed from the load before being sent to the warehouse as an individual order.
Orders will be created for each warehouse with the following details set: -
- Status set to 1, committed
- Order Priority
- Route code to the route entered against the anticipated order.
- Booking date set to the date the order was created as an anticipated order.
- Delivery date set to the “Entered Delivery Date”, if set or the default delivery date if a “Entered Delivery Date” has not been entered.
- Carrier Code will be set to the transport code entered against the anticipated order.
Order lines can be created for a number of cases and a number of singles. It is expected that the stock codes will be set up with the stocking unit of measure set to unit of measure 2. This set up will result in order lines for a number of cases or inners with the number of units set to 0.
If the stock code is setup with the stocking unit of measure set to unit of measure 1, this will result in an order line for a number of units with the number of cases set to 0.
The system will consider the number of eaches per shipping unit (stored in the transit factor on stock maintenance) when calculating how many cases / inners or units are required.
For example, if the number of eaches ordered was 17 but product is stored in cases where each case contains 10 eaches. The order would need to despatch 2 cases of the product which equates to 20 eaches. When viewed in the order management screen, OMS7000, this line would show, qty ordered 17, qty anticipated 20. When viewed through the Order Enquiry, this line would show as 2 cases ordered. The pick list, pick confirmation screen etc will all show 2 cases ordered rather than the number of eaches.
If a stock code is setup with a transit factor of zero, then the system will treat this stock as containing 1 each per stocking uom.
For this release, it is expected that the pick wave screen will be used, by the warehouse, to find the orders that are ready for picking. In future, it is expected that the transport planning will set the route and load number which will allow the orders to be created already grouped into a pick wave, ready for allocation.
If the warehouse is set to automatically allocate the orders then any allocation failure will result in the allocation for the entire load / order being rolled back. This means the warehouse will need to manually allocate the orders by using the allocation screen or the pick wave screen.
NB. As the Warehouse order creation runs as a separate process, the sending of the load / order to the warehouse, will NOT be rolled back if the allocation run fails.
Order Cancellation
It is possible to Cancel the Master Order, providing the user has permission to perform this action. If the master order is cancelled, then any anticipated orders will be removed from the anticipated orders tables. The Master Order will remain with a cancelled status. It will be possible to cancel the entire order or a single master order line.
When a master order is cancelled, the system will write details of a zero despatched order to the despatch confirmation transient tables. The next EDI outbound despatch confirmation run will include the cancelled master orders showing zero quantity despatched.
Once orders have been sent to the warehouse for processing, they cannot be cancelled from within the Order Management Layer as stock may have been allocated or picked for the order. Instead orders should be pick confirmed to zero and despatched. This will then send a despatch confirmation message.
Each time the ‘Reassess ALL Orders at Status New” button is clicked from “Anticipated Orders”, the database package that re-creates the Anticipated Orders will be run. This package will first check if any orders have been cancelled in the warehouses. If all the order lines relating to a master order detail have been cancelled then the anticipated order will be reset to status New and the warehouse will be set to ‘+’. The warehouse is set to ‘+’ to highlight the fact that orders have been cancelled in the warehouse. It is possible to enter a warehouse of ‘+’ in the selection criteria tab to find all orders that do not have a warehouse assigned. At this stage, it will be possible to cick the “Process Selected” button and re-direct the orders to a specific warehouse. Alternatively, the “Re-assess ALL Orders at Status New” button can be clicked again to recreate the anticipated orders. This second run of the process will assign the warehouse according to the warehouse assignment rules.
NB. A Generic Sku may need more than 1 NPC to satisfy the order line. In this situation, all the related NPC order lines will need to be cancelled before the Order Management Layer will treat the order line as cancelled. The DH order number cannot appear more than once in a despatch confirmation message, this is why ALL the detail lines that relate to a DH order number, must be cancelled before the OML will treat the master order line as cancelled.
Special Instructions
The anticipated orders screen (OMS7000) will include a “Special Instructions” button. When this button is clicked a despatch text entry popup will appear.
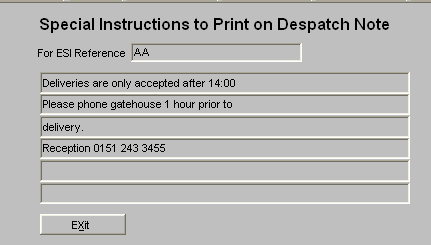
The special instructions will be displayed on the far of the “Planning” tab which can be accessed by using the scrollbar and scrolling to the right.
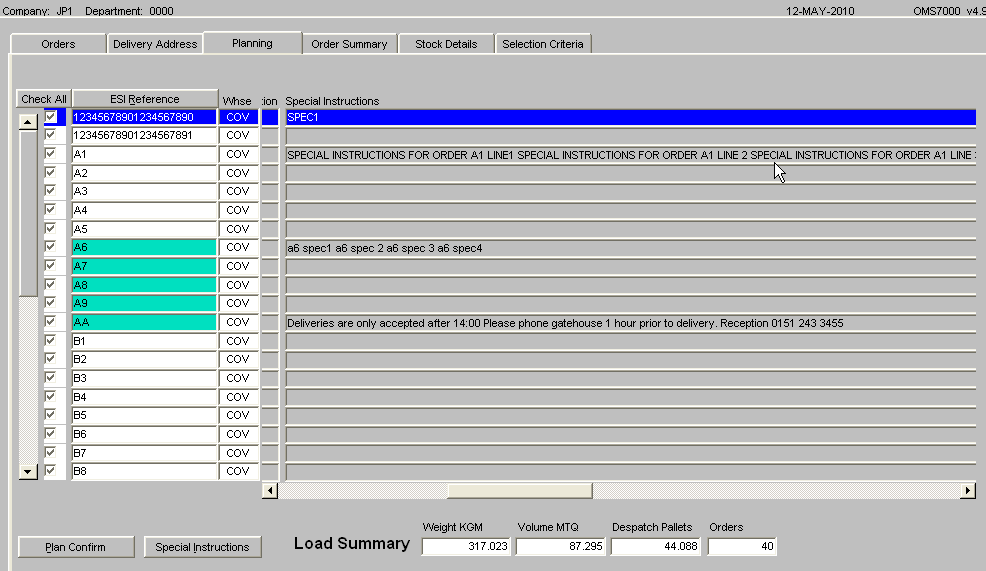
The special instructions will be stored at the ESI reference level. A single ESI reference could generate anticipated orders for two or more warehouses. In this case, the ESI reference will be shown more than once on the main orders screen BUT the special instructions will only need to be entered once. The special instructions can be changed at any order status. When the orders are sent to the warehouse, the special instructions (at ESI reference level) will be transferred to the despatch instructions of the WMS order number. Any changes to the special instructions within the OML will be cascaded down to the WMS order number despatch instructions.
If required, the standard order entry screen (SOS1110), “Order Notes” button, can be used to amend the WMS order despatch instructions. However, if this order is then cancelled and the order re-processed through the OML the despatch instructions will revert back to the Special instructions entered in the OML.
