WHS0633: Difference between revisions
(Initial Creation) |
m (Minor formatting change) |
||
| (One intermediate revision by the same user not shown) | |||
| Line 1: | Line 1: | ||
This is the configurable stock adjustments screen. | This is the configurable stock adjustments screen.<center> | ||
[[File:WHS0633.png|800px]] | [[File:WHS0633.png|800px]] | ||
</center>You can use the Stock Adjustments screen to increase or decrease levels of stock within the warehouse. | |||
You can use the Stock Adjustments screen to increase or decrease levels of stock within the warehouse. | |||
The Stock Adjustments screen is located in the Stock Movements folder. | The Stock Adjustments screen is located in the Stock Movements folder. | ||
| Line 10: | Line 8: | ||
=== Adjusting Existing Stock Up and Down === | === Adjusting Existing Stock Up and Down === | ||
Upon entering the screen the cursor will be in the Owner field. The Owner will be defaulted from your user settings. The owner can be changed if you require. | Upon entering the screen the cursor will be in the ''Owner'' field. The Owner will be defaulted from your user settings. The owner can be changed if you require. | ||
Once the correct owner has been entered, click in the 'Stock | Once the correct owner has been entered, click in the ''Stock Code'' field. | ||
Enter the stock code that you wish to stock adjust. Note: You can use the list of values icon and select the required code. | Enter the stock code that you wish to stock adjust. Note: You can use the list of values icon and select the required code. | ||
Enter the | Enter the ''Employee Code'' doing the adjustments. | ||
You may also select by additional criteria here: | You may also select by additional criteria here: | ||
* Customer Pallet ID (range). | * ''Customer Pallet ID (range).'' | ||
* Pallet ID (range). | * ''Pallet ID (range).'' | ||
* Location. | * ''Location.'' | ||
* System Rotation. | * ''System Rotation.'' | ||
* Customer Rotation (Batch). | * ''Customer Rotation (Batch).'' | ||
* Reason Code. | * ''Reason Code.'' | ||
Once you have entered the parameters, click '''Find Pallets''' - the list of pallets will be displayed in the ''Adjustments'' tab.<center> | |||
[[File:WHS0633-ADJ.png|800x800px]] | [[File:WHS0633-ADJ.png|800x800px]] | ||
</center>You can scroll this results table horizontally to see more details. You can also configure the layout of the table through the '''Configure''' button - this will display the program layout configuration screen [[WHS0909]]. | |||
You can scroll this results table horizontally to see more details. You can also configure the layout of the table through the '''Configure''' button - this will display the program layout configuration screen [[WHS0909]]. | |||
You can adjust the free and held quantities/cases/units and weight using the supplied fields. You are entering the adjustment quantity, so to adjust ''up'' from e.g. 50 to 51, set the adjustment quantity to '''1'''. To adjust ''down'' from e.g. 50 to 48, set the adjustment quantity to '''-2'''. | You can adjust the free and held quantities/cases/units and weight using the supplied fields. You are entering the adjustment quantity, so to adjust ''up'' from e.g. 50 to 51, set the adjustment quantity to '''1'''. To adjust ''down'' from e.g. 50 to 48, set the adjustment quantity to '''-2'''. | ||
| Line 37: | Line 33: | ||
If you adjust a quantity, you must enter a reason code - a lookup is provided. | If you adjust a quantity, you must enter a reason code - a lookup is provided. | ||
For Serial Numbered products, the medical number screen will be called, select the serials to be adjusted and then delete them. By pressing the '''Confirm''' button you will then return to the standard Adjustment screen. <center> | |||
[[Image:MED-032.PNG]] | |||
</center>{{Note}}Extra checks are included for negative adjustments; if the serial number is assigned to a sales order then it cannot be adjusted off the system. It will be possible to adjust off serial numbers that are held. | |||
Press the '''Save''' button to confirm the adjustment. A pop up box (WHS0629) will appear that allows the user to enter a text comment regarding the adjustment. <center> | |||
[[File:WHS0629.png|800x800px]] | [[File:WHS0629.png|800x800px]] | ||
</center>Press the '''Save''' button to record the text audit. Press the '''Exit''' button to return to the previous screen. | |||
Press the '''Save''' button to record the text audit. Press the '''Exit''' button to return to the previous screen. | |||
The screen will now display the adjusted quantity of the pallet. | The screen will now display the adjusted quantity of the pallet. | ||
=== Creating New Pallet and Stock === | === Creating New Pallet and Stock === | ||
Press the '''Add New Pallets''' button - you will be taken to the Stock Adjust Add Facility screen WHS0631. | Press the '''Add New Pallets''' button - you will be taken to the Stock Adjust Add Facility screen WHS0631.<center> | ||
[[File:WHS0631.png|800x800px]] | [[File:WHS0631.png|800x800px]] | ||
</center>Enter the following data, based on what is required for the owner: | |||
* ''Pallet ID'' - Press the Tab button and the system will assign a new pallet id. | |||
* ''Pall(et) Type'' - Press the tab button for the system to use the default pallet type that has been assigned to the stock code in the stock maintenance screen. Or you can use the list of values and select the pallet type that is required. | |||
* Pallet ID - Press the Tab button and the system will assign a new pallet id. | * ''Rotation No'' - Enter the rotation number of the pallet. This can be switched off if it not required. | ||
* Pall(et) Type - Press the tab button for the system to use the default pallet type that has been assigned to the stock code in the stock maintenance screen. Or you can use the list of values and select the pallet type that is required. | * ''Sell By Date'' - Enter the sale by date of the product. This will only be required if the stock requires a sell by date (this is set up within Stock Maintenance). | ||
* Rotation No - Enter the rotation number of the pallet. This can be switched off if it not required. | * ''Reason'' - Enter the relevant reason code for the adjustment. The list of values will display all reason codes. | ||
* Sell By Date - Enter the sale by date of the product. This will only be required if the stock requires a sell by date (this is set up within Stock Maintenance). | * ''Cases/Units'' - Enter the number of cases/units that are to be stored on the pallet. | ||
* Reason - Enter the relevant reason code for the adjustment. The list of values will display all reason codes. | * ''Location Code'' - Enter the location where the pallet is stored. The list of values can be used to select the location from. | ||
* Cases/Units - Enter the number of cases/units that are to be stored on the pallet. | * ''Manu Date'' - Enter the manufacturing date (if you tab over the field the system will use today’s date). | ||
* Location Code - Enter the location where the pallet is stored. The list of values can be used to select the location from. | * ''Cust Pallet ID'' | ||
* Manu Date - Enter the manufacturing date (if you tab over the field the system will use today’s date). | |||
* Cust Pallet ID | |||
Once all the above data has been entered a pop up box will be displayed. This gives you the option to enter details regarding a GRA (goods received advice), if you are aware of how it was received. If you don't know the details then you can leave them blank. | Once all the above data has been entered a pop up box will be displayed. This gives you the option to enter details regarding a GRA (goods received advice), if you are aware of how it was received. If you don't know the details then you can leave them blank. | ||
| Line 66: | Line 63: | ||
You can also enter the following information: | You can also enter the following information: | ||
* Country of Origin | * ''Country of Origin'' | ||
* Supp Code | * ''Supp Code'' | ||
* Catch Weight | * ''Catch Weight'' | ||
* Temperature | * ''Temperature'' | ||
* Cust Rotation No | * ''Cust Rotation No'' | ||
For Serial Numbered products, once the line is completed then enter the '''Serial No''' button to call the Medical Number Entry screen.<center>[[Image:MED-035.PNG]]</center> | |||
Enter the Medical Numbers as required using either the '''Create Range''' option or by manually entering each line separately. '''Confirm'''ing the entry will then return the user to the Add Pallet screen. | |||
Once all the relevant data has been entered, press the '''Save''' button. A pop up box will appear that allows the user to enter a text comment regarding the adjustment, just like when adjusting quantities above. | Once all the relevant data has been entered, press the '''Save''' button. A pop up box will appear that allows the user to enter a text comment regarding the adjustment, just like when adjusting quantities above. | ||
Latest revision as of 09:27, 27 June 2025
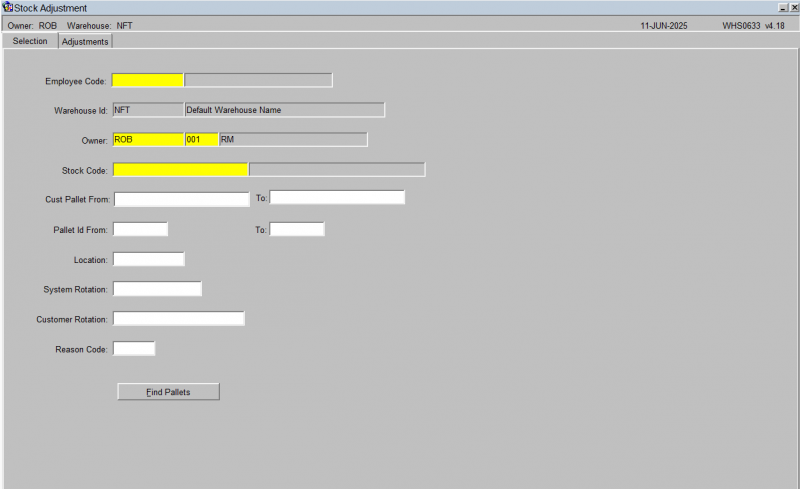
This is the configurable stock adjustments screen.
You can use the Stock Adjustments screen to increase or decrease levels of stock within the warehouse.
The Stock Adjustments screen is located in the Stock Movements folder.
The following document covers how to increase stock on an existing pallet, reduce stock on an existing pallet and creating a new pallet.
Adjusting Existing Stock Up and Down
Upon entering the screen the cursor will be in the Owner field. The Owner will be defaulted from your user settings. The owner can be changed if you require.
Once the correct owner has been entered, click in the Stock Code field.
Enter the stock code that you wish to stock adjust. Note: You can use the list of values icon and select the required code.
Enter the Employee Code doing the adjustments.
You may also select by additional criteria here:
- Customer Pallet ID (range).
- Pallet ID (range).
- Location.
- System Rotation.
- Customer Rotation (Batch).
- Reason Code.
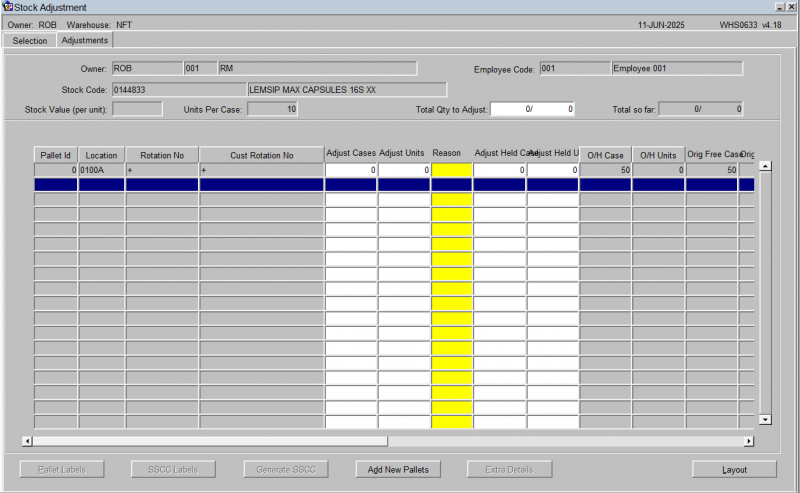
Once you have entered the parameters, click Find Pallets - the list of pallets will be displayed in the Adjustments tab.
You can scroll this results table horizontally to see more details. You can also configure the layout of the table through the Configure button - this will display the program layout configuration screen WHS0909.
You can adjust the free and held quantities/cases/units and weight using the supplied fields. You are entering the adjustment quantity, so to adjust up from e.g. 50 to 51, set the adjustment quantity to 1. To adjust down from e.g. 50 to 48, set the adjustment quantity to -2.
If you adjust a quantity, you must enter a reason code - a lookup is provided.
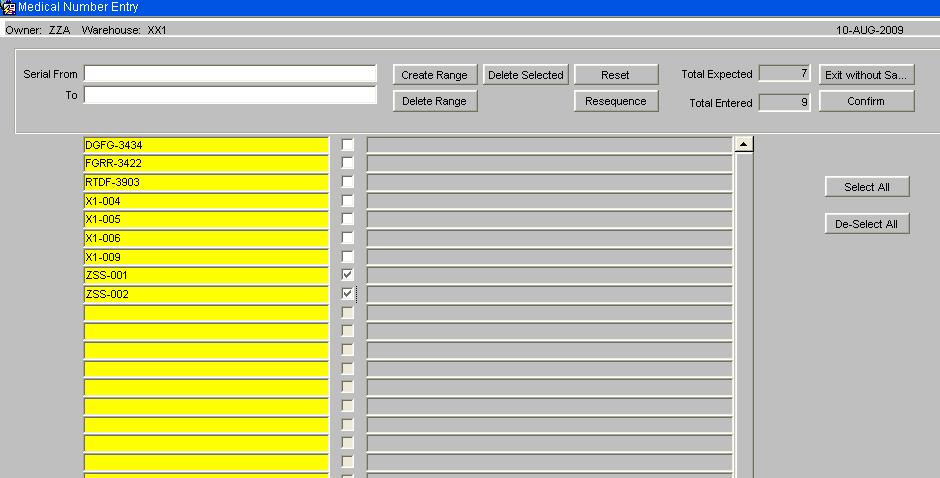
For Serial Numbered products, the medical number screen will be called, select the serials to be adjusted and then delete them. By pressing the Confirm button you will then return to the standard Adjustment screen.
![]() Note: Extra checks are included for negative adjustments; if the serial number is assigned to a sales order then it cannot be adjusted off the system. It will be possible to adjust off serial numbers that are held.
Press the Save button to confirm the adjustment. A pop up box (WHS0629) will appear that allows the user to enter a text comment regarding the adjustment.
Note: Extra checks are included for negative adjustments; if the serial number is assigned to a sales order then it cannot be adjusted off the system. It will be possible to adjust off serial numbers that are held.
Press the Save button to confirm the adjustment. A pop up box (WHS0629) will appear that allows the user to enter a text comment regarding the adjustment.
Press the Save button to record the text audit. Press the Exit button to return to the previous screen.
The screen will now display the adjusted quantity of the pallet.
Creating New Pallet and Stock
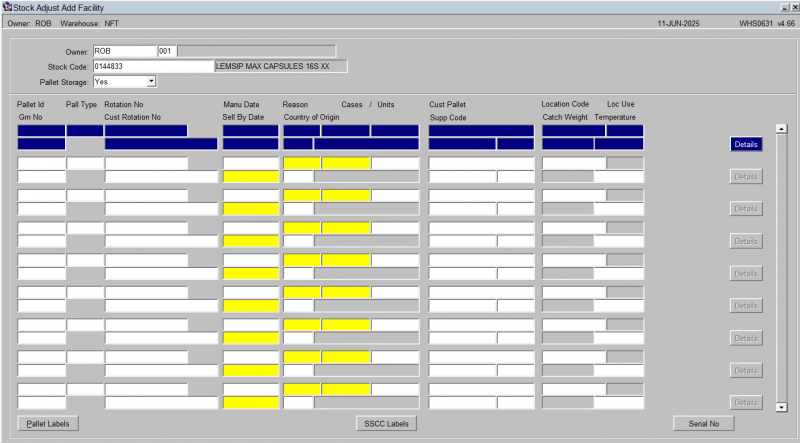
Press the Add New Pallets button - you will be taken to the Stock Adjust Add Facility screen WHS0631.
Enter the following data, based on what is required for the owner:
- Pallet ID - Press the Tab button and the system will assign a new pallet id.
- Pall(et) Type - Press the tab button for the system to use the default pallet type that has been assigned to the stock code in the stock maintenance screen. Or you can use the list of values and select the pallet type that is required.
- Rotation No - Enter the rotation number of the pallet. This can be switched off if it not required.
- Sell By Date - Enter the sale by date of the product. This will only be required if the stock requires a sell by date (this is set up within Stock Maintenance).
- Reason - Enter the relevant reason code for the adjustment. The list of values will display all reason codes.
- Cases/Units - Enter the number of cases/units that are to be stored on the pallet.
- Location Code - Enter the location where the pallet is stored. The list of values can be used to select the location from.
- Manu Date - Enter the manufacturing date (if you tab over the field the system will use today’s date).
- Cust Pallet ID
Once all the above data has been entered a pop up box will be displayed. This gives you the option to enter details regarding a GRA (goods received advice), if you are aware of how it was received. If you don't know the details then you can leave them blank.
You can also enter the following information:
- Country of Origin
- Supp Code
- Catch Weight
- Temperature
- Cust Rotation No
For Serial Numbered products, once the line is completed then enter the Serial No button to call the Medical Number Entry screen.
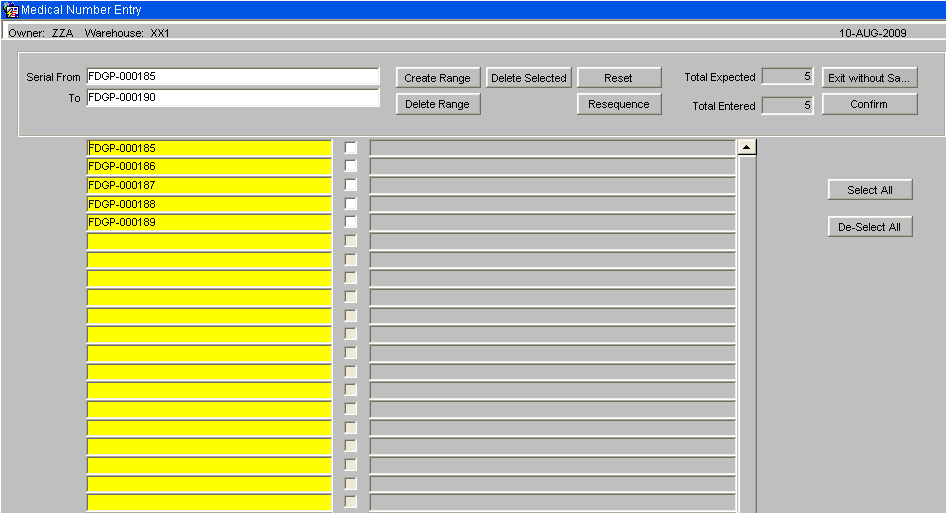
Enter the Medical Numbers as required using either the Create Range option or by manually entering each line separately. Confirming the entry will then return the user to the Add Pallet screen.
Once all the relevant data has been entered, press the Save button. A pop up box will appear that allows the user to enter a text comment regarding the adjustment, just like when adjusting quantities above.
Press Exit to return to the main screen - the new pallet will be displayed.
Generating Labels and SSCC IDs
After you have completed your adjustments, you can print labels or generate SSCC ids using the following buttons, which will be available only if required and configured to do so.
- Pallet Labels
- SSCC Label
- Generate SSCC
