Creating a Goods Receipt: Difference between revisions
(New page: <br\> ==Goods In – Goods Receipt Confirmation== <br\> The Goods Receipt Confirmation screen is used to create the stock within the warehouse. The screen retrieves the data from a pre...) |
m (Text replacement - "OBS Logistics" to "Aptean") |
||
| (12 intermediate revisions by one other user not shown) | |||
| Line 3: | Line 3: | ||
==Goods In – Goods Receipt Confirmation== | ==Goods In – Goods Receipt Confirmation== | ||
<br\> | <br\> | ||
The Goods Receipt Confirmation screen is used to create the stock within the warehouse. The screen retrieves the data from a previously created Goods Received Advice. | The Goods Receipt Confirmation screen is used to create the stock within the warehouse. The screen retrieves the data from a previously created Goods Received Advice. | ||
<br\> | <br\> | ||
The Goods Receipt Confirmation screen can be found in the Goods Receipt folder. | The Goods Receipt Confirmation screen can be found in the Goods Receipt folder. | ||
<br\> | <br\> | ||
The following section covers how to receive in stock. | The following section covers how to receive in stock. | ||
| Line 17: | Line 14: | ||
[[Image:]] | [[Image:WHS0150SIG.PNG|790X512PX]] | ||
<br\> | <br\> | ||
| Line 23: | Line 20: | ||
Upon entering the screen, you will notice that the screen is in ‘Query Mode’ and the cursor in the GRN No. field. | Upon entering the screen, you will notice that the screen is in ‘Query Mode’ and the cursor in the GRN No. field. | ||
<br\> | <br\> | ||
Note: GRA and GRN are the same thing. | Note: GRA and GRN are the same thing. | ||
<br\> | <br\> | ||
To start the receipt process, enter the GRN number you wish to receive against and press the ‘Execute Query’ icon. | To start the receipt process, enter the GRN number you wish to receive against and press the ‘Execute Query’ icon. | ||
| Line 33: | Line 28: | ||
[[Image:]] | [[Image:WHS0150SIG1.PNG|790X512PX]] | ||
<br\> | <br\> | ||
You will now be presented with a new screen. | You will now be presented with a new screen. | ||
<br\> | <br\> | ||
[[Image:]] | [[Image:WHS0150SIG2.PNG|790X512PX]] | ||
<br\> | <br\> | ||
| Line 47: | Line 42: | ||
The yellow fields are mandatory and must be filled in. Using the tab button in the fields will make the default value be entered. | The yellow fields are mandatory and must be filled in. Using the tab button in the fields will make the default value be entered. | ||
<br\> | <br\> | ||
Receipt Date – Default value is today’s date. | Receipt Date – Default value is today’s date. | ||
| Line 53: | Line 47: | ||
Receipt Type – Default value is ‘REC’. The user can manually enter ‘RET’ if the stock being entered is from a return. | Receipt Type – Default value is ‘REC’. The user can manually enter ‘RET’ if the stock being entered is from a return. | ||
<br\> | <br\> | ||
The total received and returned pallets is piece of functionality that is related to pallet exchange (chep etc) and not really used. | The total received and returned pallets is piece of functionality that is related to pallet exchange (chep etc) and not really used. | ||
<br\> | <br\> | ||
Once all the details have been entered, press the ‘Details’ option on the left hand side of the screen (see the screen shot below). | Once all the details have been entered, press the ‘Details’ option on the left hand side of the screen (see the screen shot below). | ||
| Line 63: | Line 55: | ||
[[Image:]] | [[Image:WHS0150SIG3.PNG|790X512PX]] | ||
<br\> | <br\> | ||
[[Image:]] | |||
<br\> | |||
[[Image:WHS0150SIG4.PNG|790X512PX]] | |||
<br\> | <br\> | ||
| Line 73: | Line 68: | ||
The product details that were created in the GRA are now displayed. | The product details that were created in the GRA are now displayed. | ||
<br\> | <br\> | ||
Select the product you wish to receive by clicking on it and then press the ‘Pallet Details’ button (see screen shot above). This will take you to the detail screen. | Select the product you wish to receive by clicking on it and then press the ‘Pallet Details’ button (see screen shot above). This will take you to the detail screen. | ||
| Line 80: | Line 73: | ||
[[Image:]] | [[Image:WHS0150SIG5.PNG|790X512PX]] | ||
<br\> | <br\> | ||
Details to enter – | Details to enter – | ||
<br\> | <br\> | ||
Type – This is the pallet type that the product is being brought in on. If you tab though the field the stock will be brought in the default pallet type that has been set up against the product code in stock maintenance. | Type – This is the pallet type that the product is being brought in on. If you tab though the field the stock will be brought in the default pallet type that has been set up against the product code in stock maintenance. | ||
<br\> | <br\> | ||
No. Pals – This is the number of pallets that you are receiving of the stock. | No. Pals – This is the number of pallets that you are receiving of the stock. | ||
<br\> | <br\> | ||
System Pallet Id – The system will generate the pallet id, you do not need to enter any information in this field. | System Pallet Id – The system will generate the pallet id, you do not need to enter any information in this field. | ||
<br\> | <br\> | ||
Quantity – This is the quantity to be received. If you tab across this field then the default quantity for the number of pallets entered will be applied. | Quantity – This is the quantity to be received. If you tab across this field then the default quantity for the number of pallets entered will be applied. | ||
<br\> | <br\> | ||
System Rotation - This option can be switched off. If a rotation is required then this is where it is entered. | System Rotation - This option can be switched off. If a rotation is required then this is where it is entered. | ||
<br\> | <br\> | ||
Owner Rotation – This will default to whatever is entered in the System Rotation field. This can be overwritten. | Owner Rotation – This will default to whatever is entered in the System Rotation field. This can be overwritten. | ||
<br\> | <br\> | ||
Sell by date – This is can be switched on or off dependant on whether a sell by date is relevant. | Sell by date – This is can be switched on or off dependant on whether a sell by date is relevant. | ||
<br\> | <br\> | ||
Location – If ‘Auto Putaway’ in enabled then the system will attempt to suggest a location based on the selected putaway rules for the product. If not, then the user can enter a location manually. Note: The user can also use the list of values icon and ask the system to show a list of empty or available locations. | Location – If ‘Auto Putaway’ in enabled then the system will attempt to suggest a location based on the selected putaway rules for the product. If not, then the user can enter a location manually. Note: The user can also use the list of values icon and ask the system to show a list of empty or available locations. | ||
| Line 121: | Line 105: | ||
[[Image:]] | [[Image:WHS0150SIG6.PNG|790X512PX]] | ||
<br\> | <br\> | ||
| Line 129: | Line 113: | ||
[[ | [[Image:WHS0150SIG7.PNG]] | ||
<br\> | <br\> | ||
| Line 139: | Line 123: | ||
Once all the products have been received, the GRN can be confirmed by pressing the ‘Confirm’ button (see screen shot above). | Once all the products have been received, the GRN can be confirmed by pressing the ‘Confirm’ button (see screen shot above). | ||
<br\> | <br\> | ||
You can now see that the status of the GRN is now ‘Confirmed’ (see screen show below). | You can now see that the status of the GRN is now ‘Confirmed’ (see screen show below). | ||
| Line 147: | Line 130: | ||
[[Image:WHS0150SIG8.PNG]] | |||
[[ | |||
<br\> | <br\> | ||
| Line 156: | Line 138: | ||
[[Image:]] | [[Image:WHS0150SIG9.PNG]] | ||
<br\> | <br\> | ||
| Line 162: | Line 144: | ||
The most common print outs being Pallet Labels and Putaway Instructions. | The most common print outs being Pallet Labels and Putaway Instructions. | ||
<br\> | <br\> | ||
| Line 184: | Line 165: | ||
Copyright | Copyright Aptean © 2008 | ||
The information contained herein is the property of | The information contained herein is the property of Aptean and is supplied without liability for errors or omissions. No part may be reproduced or used except as authorised by contract or other written permission. The copyright and foregoing restriction on reproduction and use extend to all media in which the information may be embodied | ||
Latest revision as of 15:07, 16 July 2025
<br\>
Goods In – Goods Receipt Confirmation
<br\>
The Goods Receipt Confirmation screen is used to create the stock within the warehouse. The screen retrieves the data from a previously created Goods Received Advice. <br\>
The Goods Receipt Confirmation screen can be found in the Goods Receipt folder. <br\>
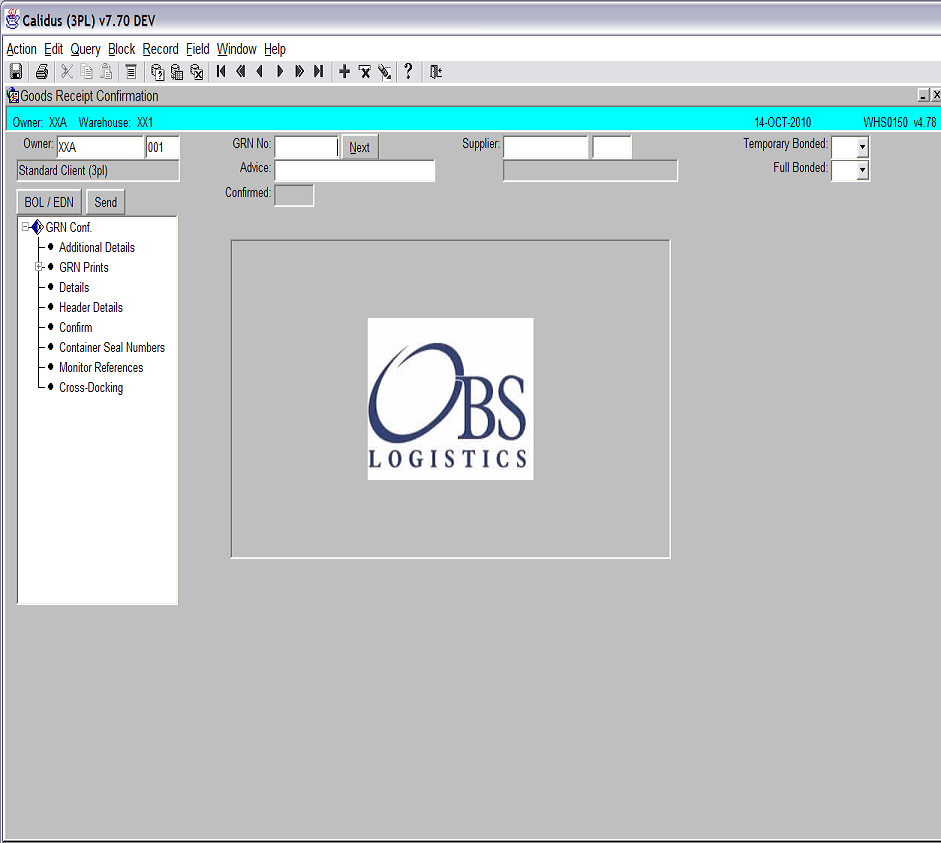
The following section covers how to receive in stock. <br\>
Upon entering the screen, you will notice that the screen is in ‘Query Mode’ and the cursor in the GRN No. field.
<br\>
Note: GRA and GRN are the same thing. <br\>
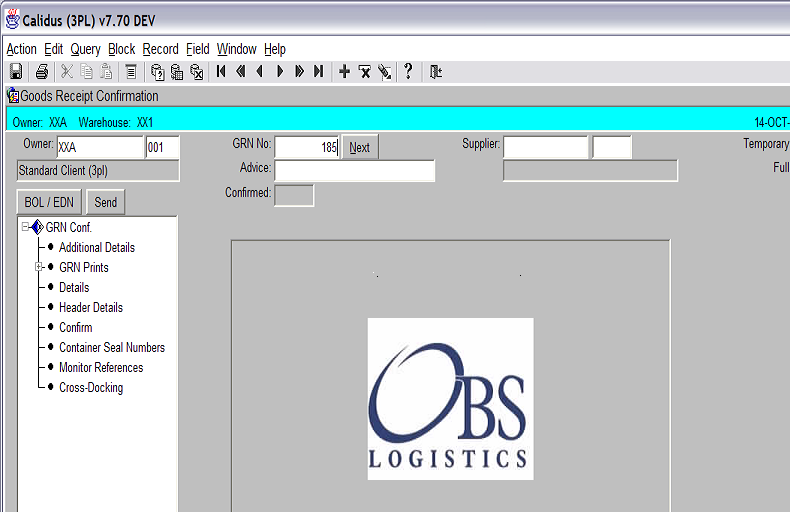
To start the receipt process, enter the GRN number you wish to receive against and press the ‘Execute Query’ icon. <br\>
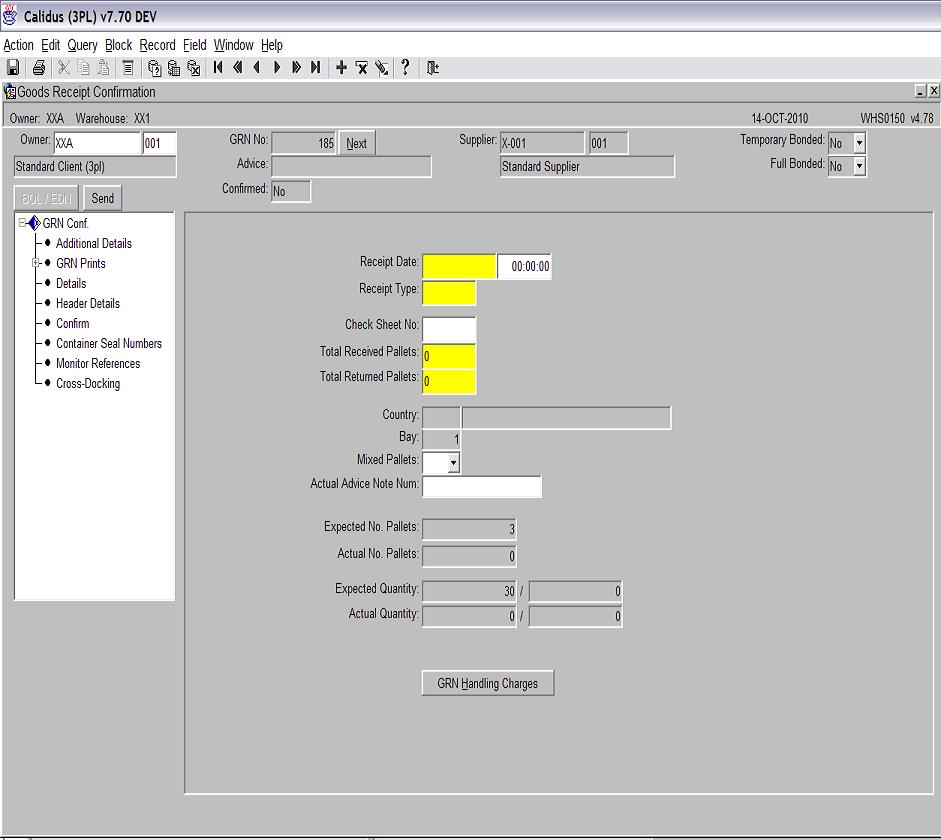
You will now be presented with a new screen.
<br\>
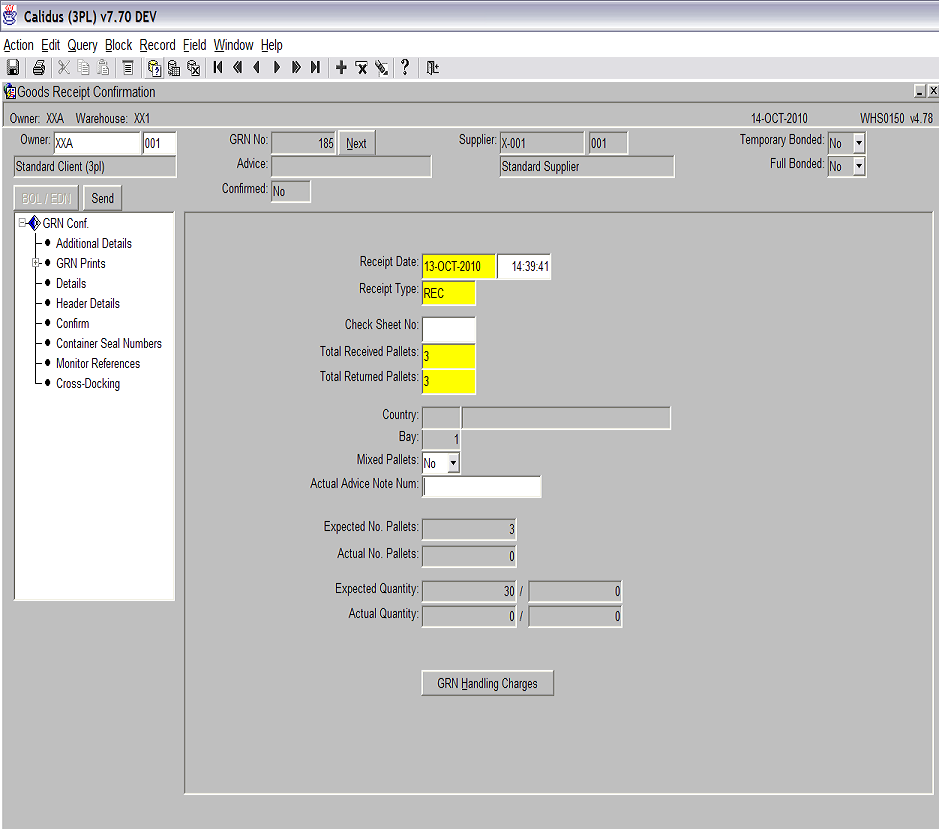
The yellow fields are mandatory and must be filled in. Using the tab button in the fields will make the default value be entered.
<br\>
Receipt Date – Default value is today’s date.
Receipt Type – Default value is ‘REC’. The user can manually enter ‘RET’ if the stock being entered is from a return. <br\>
The total received and returned pallets is piece of functionality that is related to pallet exchange (chep etc) and not really used. <br\>
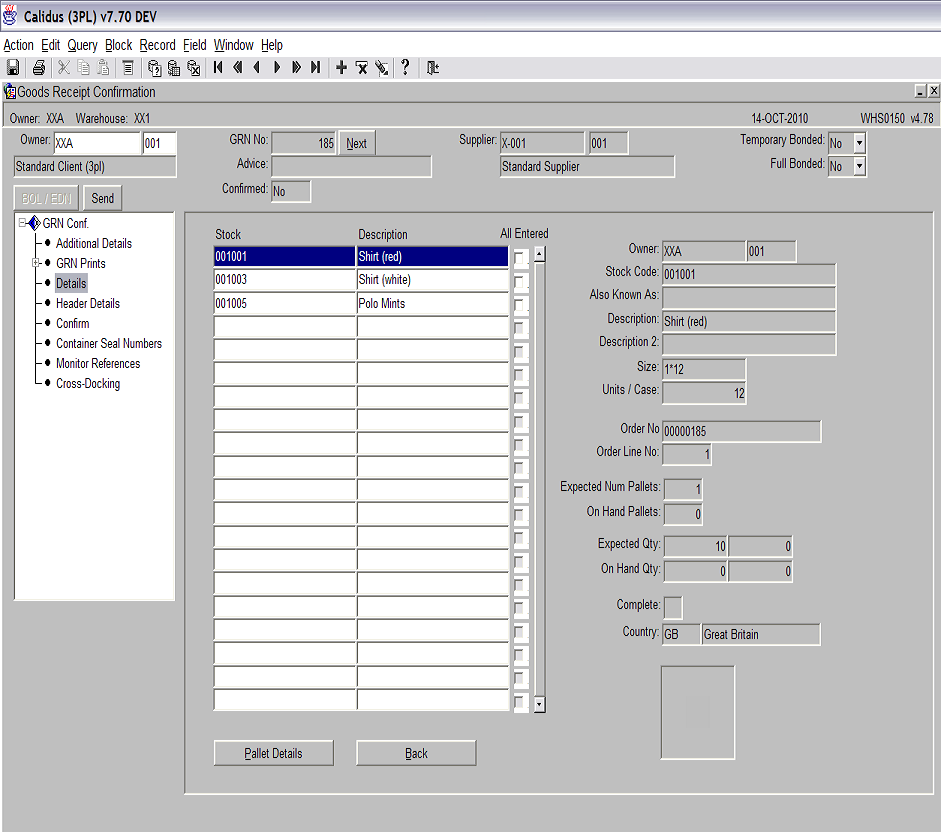
Once all the details have been entered, press the ‘Details’ option on the left hand side of the screen (see the screen shot below). <br\>
<br\>
The product details that were created in the GRA are now displayed.
<br\>
Select the product you wish to receive by clicking on it and then press the ‘Pallet Details’ button (see screen shot above). This will take you to the detail screen. <br\>
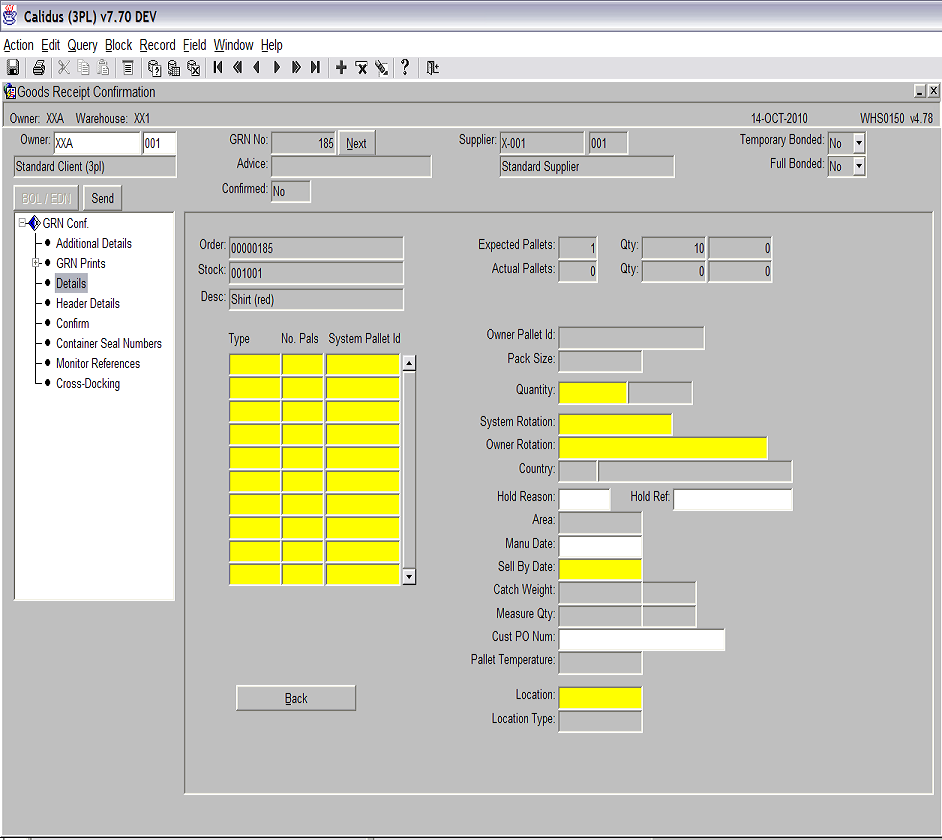
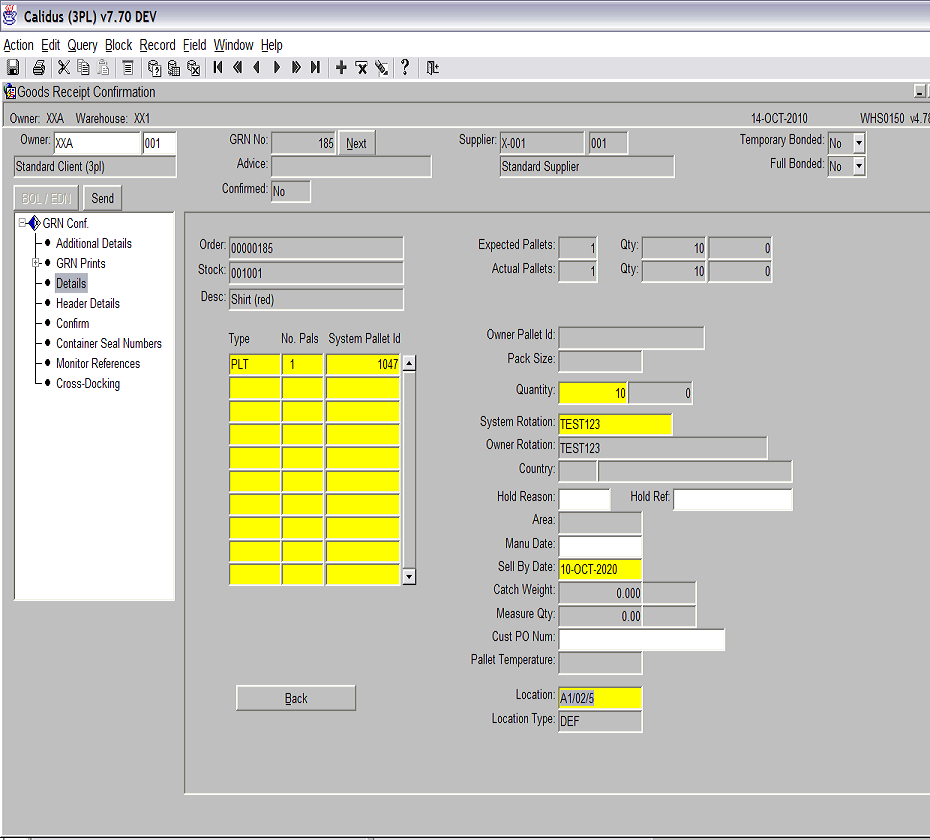
Details to enter –
<br\>
Type – This is the pallet type that the product is being brought in on. If you tab though the field the stock will be brought in the default pallet type that has been set up against the product code in stock maintenance. <br\>
No. Pals – This is the number of pallets that you are receiving of the stock. <br\>
System Pallet Id – The system will generate the pallet id, you do not need to enter any information in this field. <br\>
Quantity – This is the quantity to be received. If you tab across this field then the default quantity for the number of pallets entered will be applied. <br\>
System Rotation - This option can be switched off. If a rotation is required then this is where it is entered. <br\>
Owner Rotation – This will default to whatever is entered in the System Rotation field. This can be overwritten. <br\>
Sell by date – This is can be switched on or off dependant on whether a sell by date is relevant. <br\>
Location – If ‘Auto Putaway’ in enabled then the system will attempt to suggest a location based on the selected putaway rules for the product. If not, then the user can enter a location manually. Note: The user can also use the list of values icon and ask the system to show a list of empty or available locations. <br\>
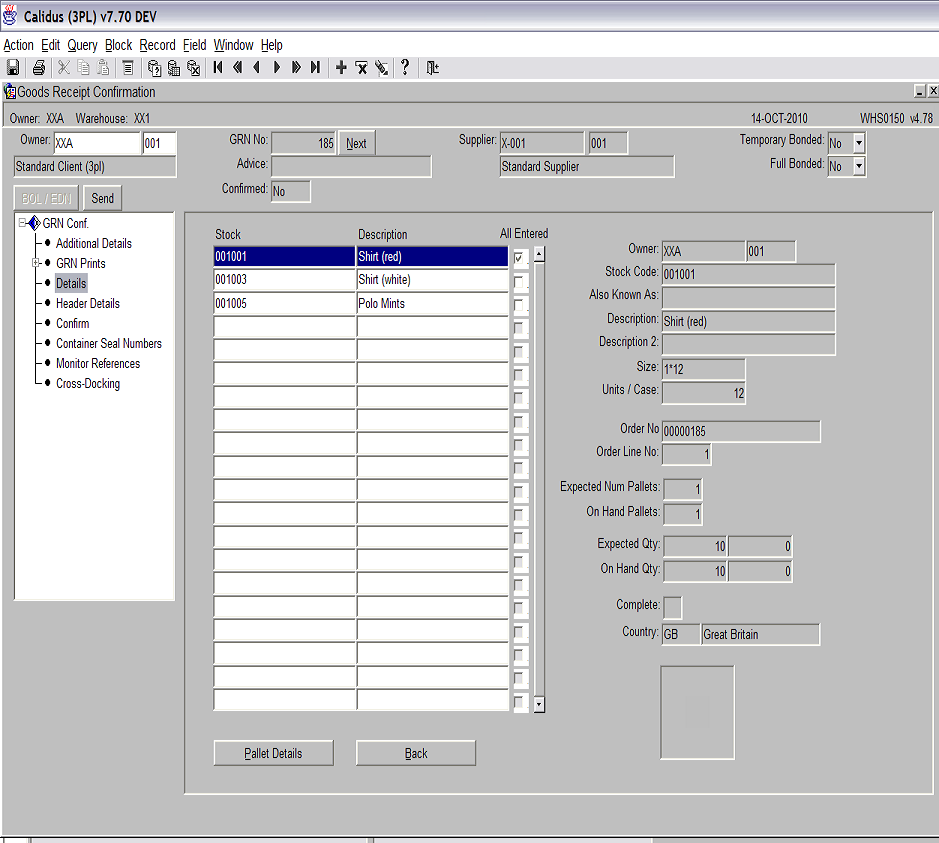
After the details have been entered for the product, press the ‘Back’ button to return the previous screen.
<br\>
You will now see that the product you just received is showing as ‘All Entered’ with the check box filled in (see screen shot above).
You can now receive all the remaining products using the processes previously described.
Once all the products have been received, the GRN can be confirmed by pressing the ‘Confirm’ button (see screen shot above). <br\>
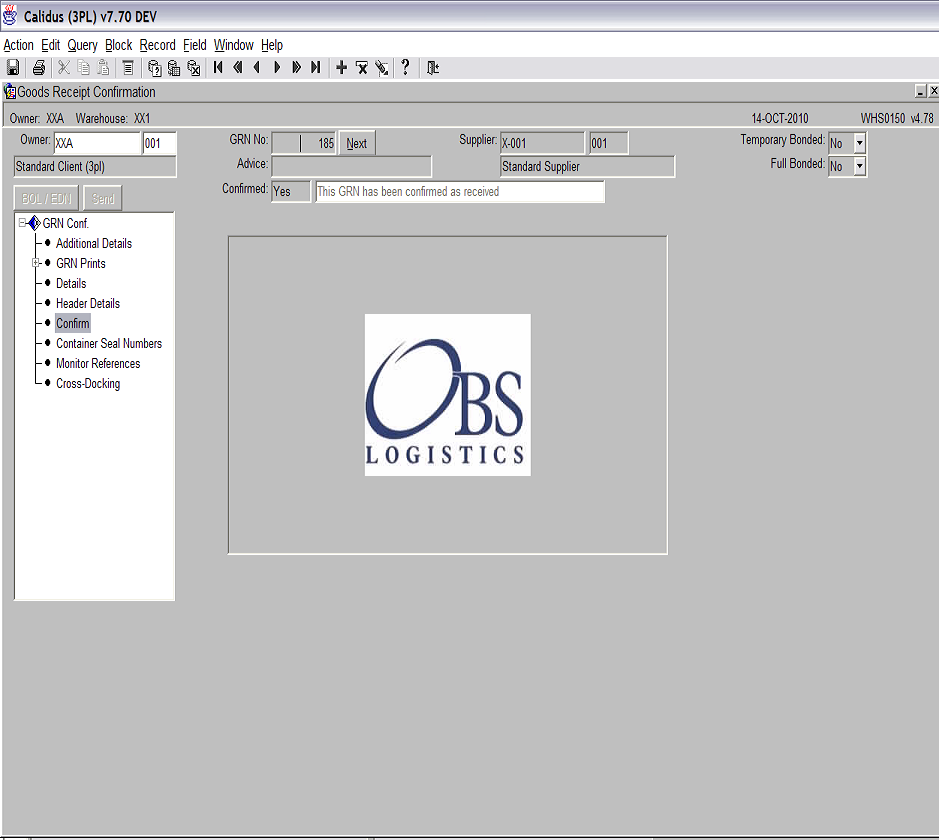
You can now see that the status of the GRN is now ‘Confirmed’ (see screen show below).
The stock will now be on the system but on hold. A putaway confirmation must be carried out in order to release the stock for use. This is done in a separate Putaway Confirmed screen. <br\>
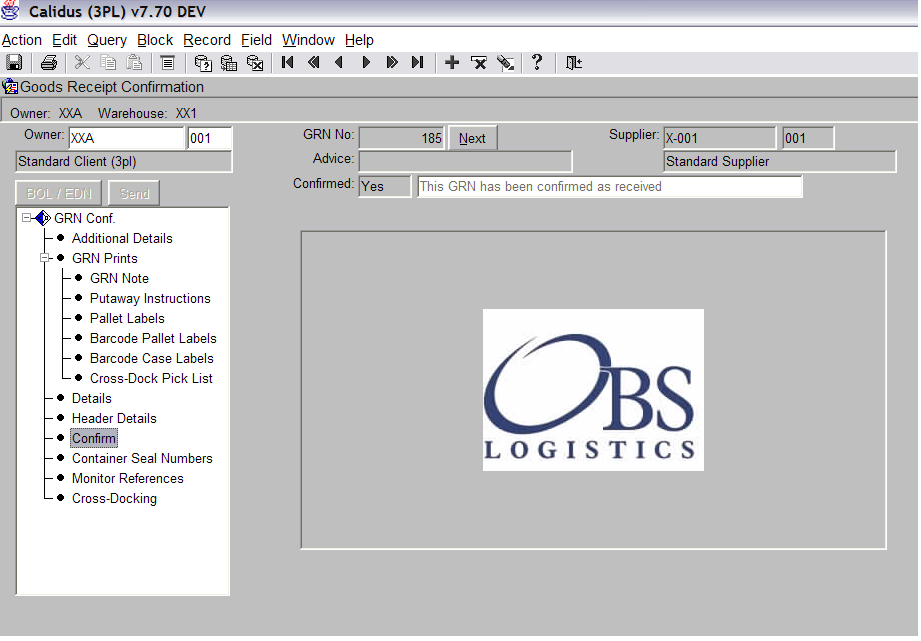
It is now possible to produce various prints related to the GRN (see screen shot below)
<br\>
The most common print outs being Pallet Labels and Putaway Instructions.
<br\>
Document History
Copyright Aptean © 2008
The information contained herein is the property of Aptean and is supplied without liability for errors or omissions. No part may be reproduced or used except as authorised by contract or other written permission. The copyright and foregoing restriction on reproduction and use extend to all media in which the information may be embodied
