Oracle Reporting Suite: Difference between revisions
m (Text replacement - "[Category:Reports]" to "<noinclude>[Category:Reports]</noinclude>") |
m (Text replacement - "[<noinclude>[Category:Reports]</noinclude>]" to "<noinclude>Category:Reports</noinclude>") |
||
| Line 147: | Line 147: | ||
|WRSC ||Stock Take Information generated via RF – <br>Client Specific (Not released)|| Detail | |WRSC ||Stock Take Information generated via RF – <br>Client Specific (Not released)|| Detail | ||
|} | |} | ||
<noinclude>[[Category:Reports]]</noinclude> | |||
Latest revision as of 15:57, 17 July 2025
The Oracle Reporting Suite (ORS) allows you to build your own extracts from a suite of report types and different levels.
Oracle Reporting Suits is a tool that can be used to generate reports with a defined set of data. The output is in CSV format and there is an option to auto email reports to specified email addresses at set frequencies (set times and days).
Oracle reporting suite is located in: Operations – Warehouse Reports – Calidus Extract Suite Maint (ORS0100)
Report Creation
The user can create a report by using the filters at the top of the screen:
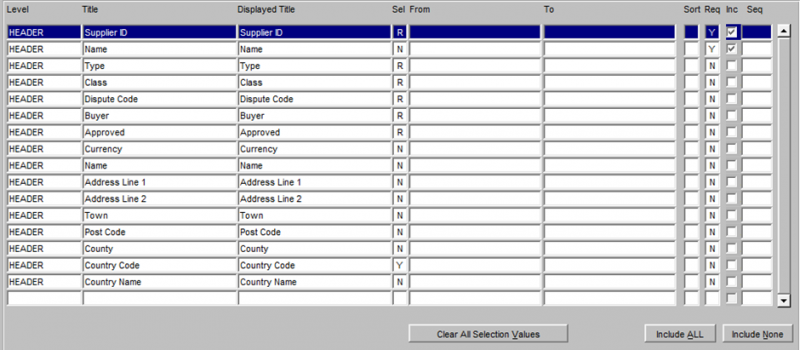
Select the relevant header level, followed by the appropriate line level detail. The user will then see a list of available options. The user can select specified required fields, all fields (include all) or remove fields (include none).
Once the user is happy with the report, it is possible to save it – this option is located at the base of the screen:
Once the report has a specific name, the user will be able to run the report from the drop down list at the top of the page:
Explanations of the options within the Oracle Reporting Suite:
- Include All - all columns will be included in the report
- Include None - no columns will be selected in the report
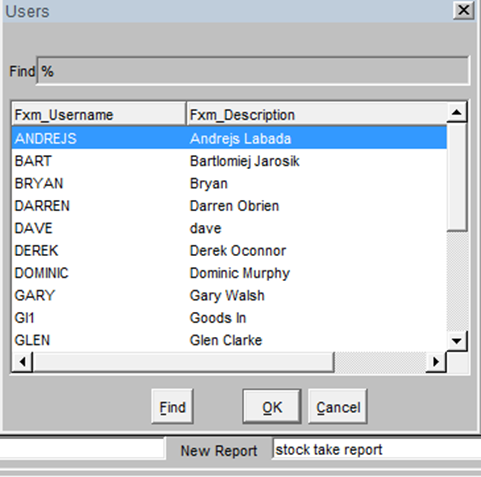
- Save report - User will be asked to enter a report name. The Report will then be saved to the users profile.
- Copy Report to Another User - it is possible to copy reports across to other WMS users’ profiles. This is achieved by selecting the save report – the user is then presented with a drop list of WMS users – select the appropriate username – ok. The report will then be added to the specified users WMS profile.
- Inc - this is to add only selected columns
- Seq - this is the column that the data will be displayed in. ie number “1” will display the data in column A in the associated CSV file. Number “5” will display the data in column E.
- Displayed Title - this field can be overwritten and renamed with something that could be more relevant to the end user. This is the text that will be displayed in the CSV extract.
Setting up EDI for CSV Extracts
Once an extract has been created, it is possible for that extract to be emailed as an attachment to specified email addressed on specified dates/times. The process for this is as follows:
- Create the appropriate report as listed above.
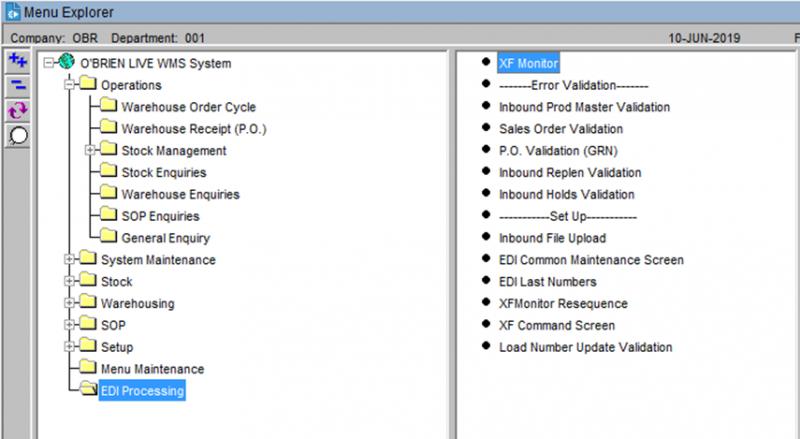
- Navigate to the XF Monitor Screen (XFM0020)
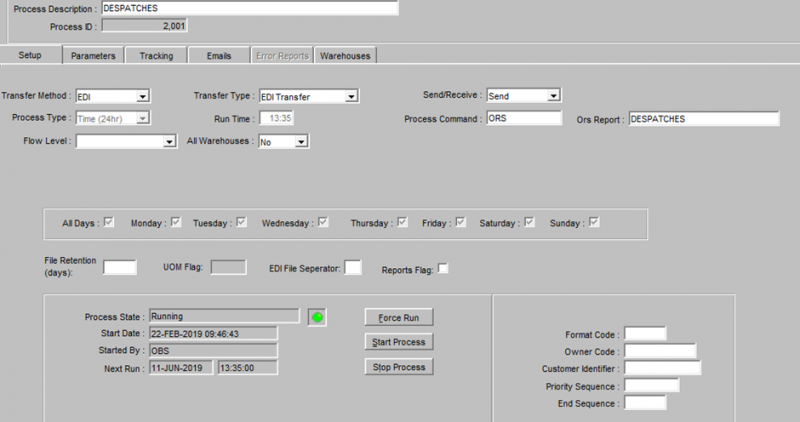
- Set the "Transfer method" as "EDI" and "Transfer Type" as "EDI Transfer"
- Set the "send/receive" to "Send", set the "Process Command" to "ORS"
- Use the drop down list when in the "ORS Report" field and select the appropriate report (the one that has just been created)
- Set the run time to "Time (24 hr)" and set an appropriate run time (the time the report will be sent out to the selected email addresses).
- Set the relevant days you would like the report to run or use the "all days" option if you wish for it to run each day.
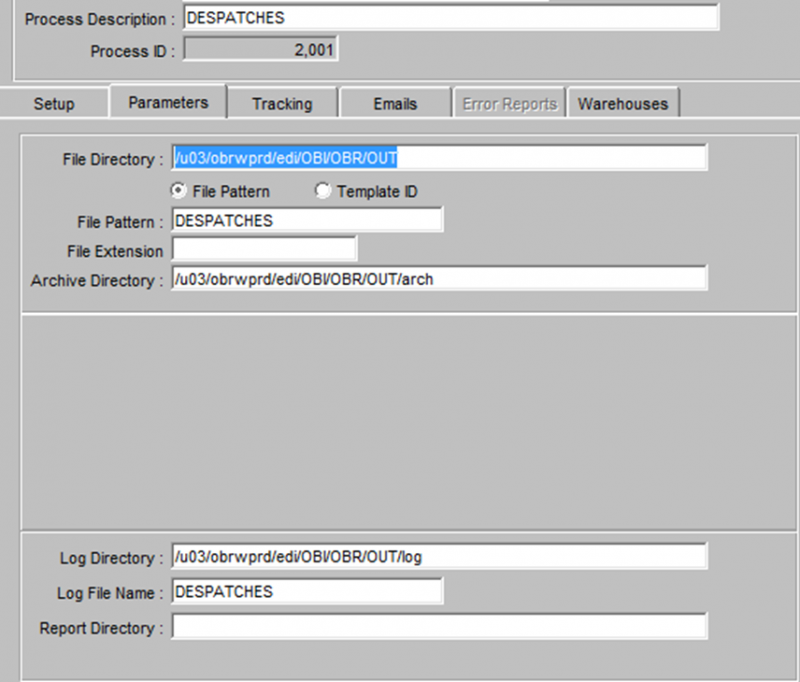
- In the Parameters tab, set the appropriate file directory, archive directory and log directories
- The file pattern name and the log file name can be set to match the ORS report name
- The tracking tab displays the success or failure criteria in terms of whether or not the extract was successfully sent.
- The emails tab stores the email addresses where the extracts will be sent to. Input ID, full name and email address as appropriate. Multiple email addresses can be entered as required.
- The "Force Run" option will run the process at that time and the associated email(s) will be sent out.
- "Stop Process" will stop the emails from being sent out.
- "Start Process" will resume the process and emails will be sent out at the specified times.
- The green light signifies the process is currently running. When the process is stopped, there is a red light that displays.
Oracle Reporting Suite Options
A full list can be found in ORS Reports List, along with fields and links to samples.
| Report Type | Description | Report Level |
|---|---|---|
| SUBSTITUTE | For warehouse & owner all master stock codes and their substitute products | Header |
| POST_OML | Order Management Layer - Client Specific | Header |
| SUPPLIER | Suppler codes, names and addresses | Header |
| ORDER | Sales order information from header to pallet level | Header Well Detail Pallet |
| PACK | Packing Information from header to detail | Level Detail |
| USERS_AUD | System Users and SQL being used | Header |
| JOURNAL | System Transactions, including serial numbers | Header Serial |
| WMS_AUDIT | Client Specific | Header |
| WARRANT | Despatch Information – Client Specific | Detail |
| ANTIC_OML | Order Management Layer – Client Specific | Header |
| CUSTOMER | Customer codes, names and address details | Header |
| INBOUND | GRN information from advice to putaway and header to pallet | Header Detail |
| INVENTORY | Current stock level information at warehouse & owner level | Warehouse Stock Pallet Serial |
| STOCK | Stock Code parameter information and replenishment locations and levels | Header Location |
| DATE_DISC | Stock with sell by dates, including stock description | Header |
| LOGON_AUD | System Users and system logging | Header |
| MASTER_OML | Order Management Layer – Client Specific | Header Detail |
| CY_CON_DTL | Container and Hazardous Information | Detail |
| CY_MOV_DTL | Container Movement and Hazardous Information | Detail |
| EDI_ERRORS | Extract containing file failure for EDI | Header |
| INVTRY_HAZ | Similar to INVENTORY but including Hazardous information | Warehouse Stock Pallet Hazardous |
| KMOVES_DTL | Client Specific | Detail |
| KMOVES_HDR | Client Specific | Header |
| METAPACK | Pack Message information – Client Specific |
Header |
| PICK_CONT | Pick Container information – Client Specific |
Pick Container |
| OINV_CHGS | Generated charges and Invoices | Charges Invoices |
| OINV_RATES | Defined Charges and Rates | Bands Charges Rates |
| OINV_SETUP | Owner level charges and Invoices setup | Owner |
| STOCK_TAKE | Inventory data required to run a stock take check sheet | Detail |
| SW_MINLEV | Stock Warehouse Minimum stock levels | Header |
| WRSC | Stock Take Information generated via RF – Client Specific (Not released) |
Detail |

