Goods Receipt Process
How the Goods Receipt Process Works
In order to complete a goods receipt, a ‘Pre Advice’ must be created, this can be done either via EDI or manually. This enables the user to create a list of expected products and quantities to be received. This can be done in advance of the goods arriving at the warehouse.
Once this advice is entered, a unique ‘GRN No.’ is created by the system. This unique number is then used throughout the remaining process.
The user then uses the ‘Receipt Confirmation’ screen to confirm the actual quantities received. The stock is automatically held by the system once confirmation has taken place.
The final step, ‘Putaway Confirmation’ releases the stock, enabling it to be ordered or amended. The user can also enter check digits here if the warehouse requires it.
Goods Receipt Advice Header (WHS0110)
This is where the expected goods to be received is maintained. This can be completed far in advance of the actual physical receipt. The pre advice can be entered manually or via the EDI process. The EDI flow will be covered in a separate document.
The GRN (Goods Receipt Note) number generated in this screen will then be used as the unique number to process the goods through the rest of the receipt cycle.
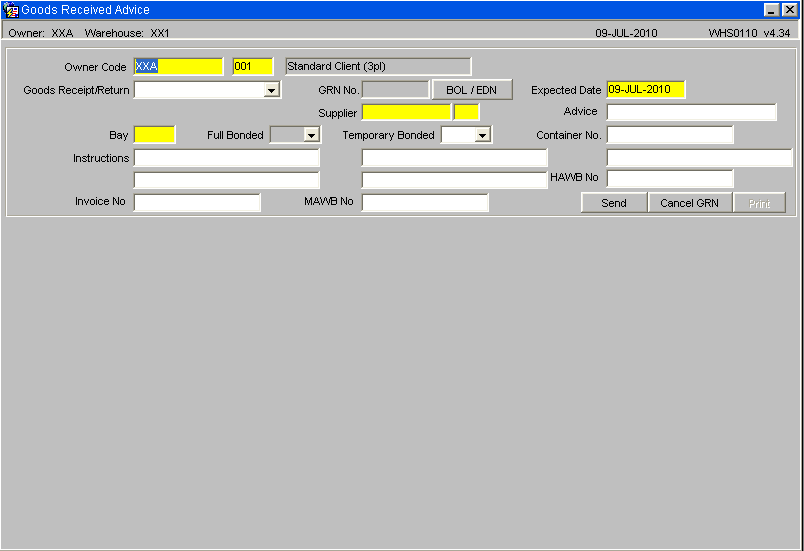
Once in entry mode, the user can tab through each field. The Goods Receipt/Return field will default to Non Purchase Order. Note: the Purchase Ordering option will be covered by the Purchase Order User Guide. This will allow the user to enter a standard receipt. The user should always ensure an Advice reference has been entered.
Once all the header details have been entered, and the user has tabbed past the MAWB No. field, an additional screen will appear prompting the user for the specific stock code information.
Field Information:
- The Owner code will automatically default into this field. This can be amended if the user is set-up to enter multiple owner values.
- The Goods Receipt/Return field will default to Receipt. This will allow the user to enter a standard receipt.
- The Supplier Code will default to the value set up against Supplier Code in Owner Maintenance or can be selected from the available List of Values
- The Advice field is used as a unique reference for this GRN. It can be searched at a later date to find the system generated GRN no. The number used in this field is normally the advice note number on the receipt documentation.
- The Container, Instructions, HAWB and MAWB fields will appear on the GRN note if populated.
- The Invoice No. will only appear on the Invoice documentation.
- The Cancel GRN button will set the GRN to status ‘C’ and no amendments to the GRN can then be made. Note the Cancel Option is only possible before Confirmation.
- The Print button will only be enabled if GRN note is required and the pre advice details have been saved.
Goods Receipt Advice Details
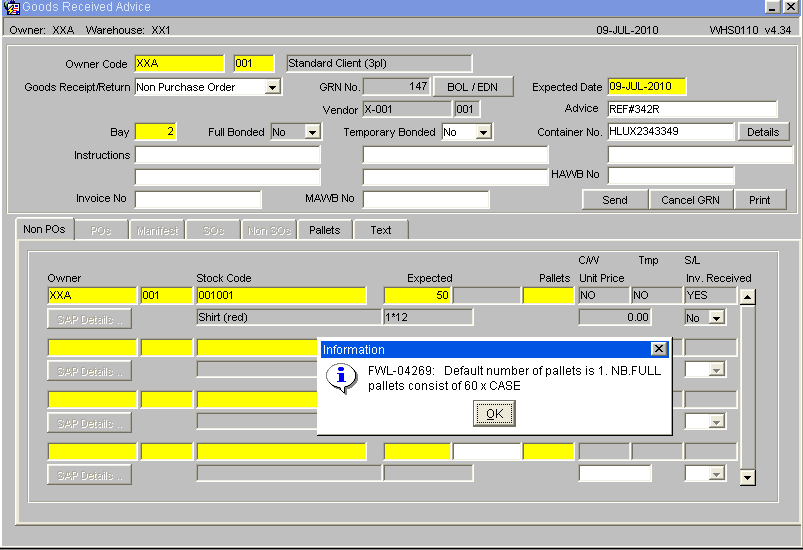
This screen (Non Pos) is used to enter the stock codes and quantities to be received. The information box shown below will display each time the user tabs past the quantity field. It displays the expected number of pallet to be received. The system works this out based on the stock code information set up in stock codes maintenance. This set-up can be seen in the Stock Set-up User Guide.
There is also an additional information box that may be seen once the user has entered the stock code. This box would warn the user that the product has no dedicated pick face. This simply means that a default location for receipt has not yet been set-up against the product.
Field In formation:
- The Owner Code will default to the owner of the GRN and sub code 001 will automatically be populated.
- The Stock Code must have been previously set up in stock code maintenance.
- The Expected field prompts you for the number of cases to be received. The box following this will only be activated if the product is set to two units of measure.
- The Pallets field will default to the pre defined number of pallets as set up in stock maintenance or can be entered manually.
- The remaining fields, CW, Temp, S/L, Unit Price and Inv. Received fields are all information boxes to show the user what settings have been made against the GRN. Note, these additional settings will be included in the Goods Receipt Super User Training Guide.
- A ‘Send’ Button appears if the warehouse is set to receive via RF
Goods Receipt Advice Pallets
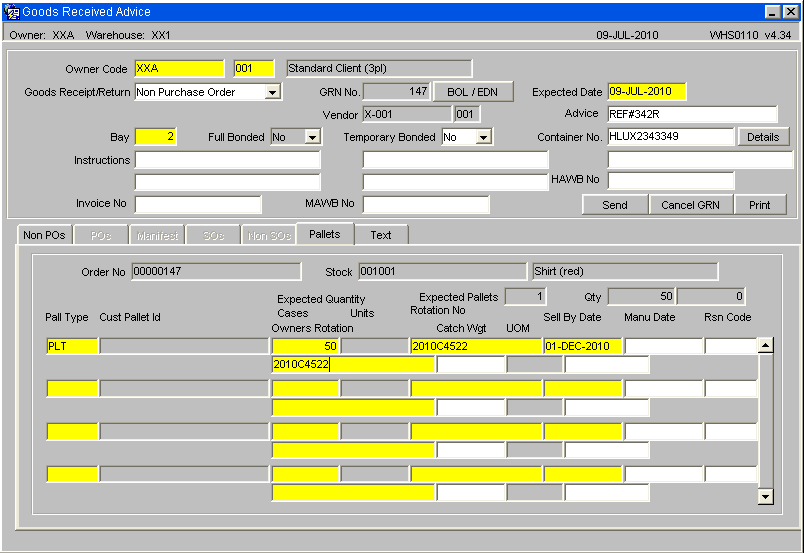
If required, pallet details for the expected stock can be entered at pre advice. Once entered, this information will automatically default at receipt confirmation.
Field Information:
- Pall Type: Enter the pallet type to be received or field will be populated with the default pallet type set against the product in Stock Maintenance.
- Cust Pallet Id: This is the customer’s reference for this pallet.
- Expected Quantity: Enter the quantity in cases and/or units of stock expected for the pallet.
- Rotation No: Enter the rotational information for the expected stock.
- Sell By Date: Enter the sell-by-date of the stock being received.
- Manu Date: Enter the date the stock was manufactured.
- Rsn Code: If you wish to put the line of stock on hold, enter a reason code in this field.
- Owners Rotation: Enter the rotational information for the expected stock. This is normally the customer’s batch number.
- Catch Wgt: If a manual weight is to be entered for the pallet, enter it here.
- UOM: To be entered if the product is received with a different Unit of Measure.
Goods Receipt Note Print (WHR0110)
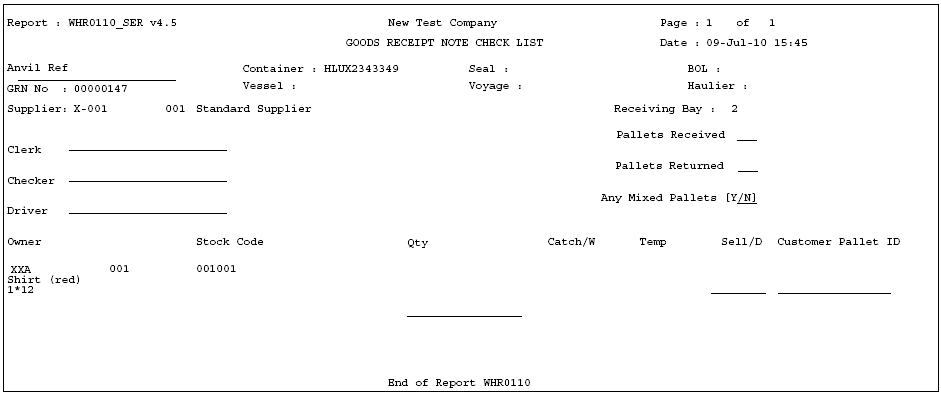
By selecting the print option from the header section of Goods Received Advice it is possible to produce a blind check sheet.
Formats are set in Owner Maintenance/Formats/GRN Checklist
| Format | Description | |
|---|---|---|
| FWL or blank | Standard print as displayed above | |
| AVO | Includes additional columns to capture - Pieces/Carton Cartons/Layer and Layers/Pallet Lot Numbers | |
| SER | Will display medical/serial numbers if entered |
Goods Receipt Confirmation Header (WHS0150)
The second part of the GRN process involves entering the pallet details of the receipt. This screen confirms the header information for the GRN and confirms how many pallets have been received and their associated details such as rotation numbers and sell by dates where applicable.
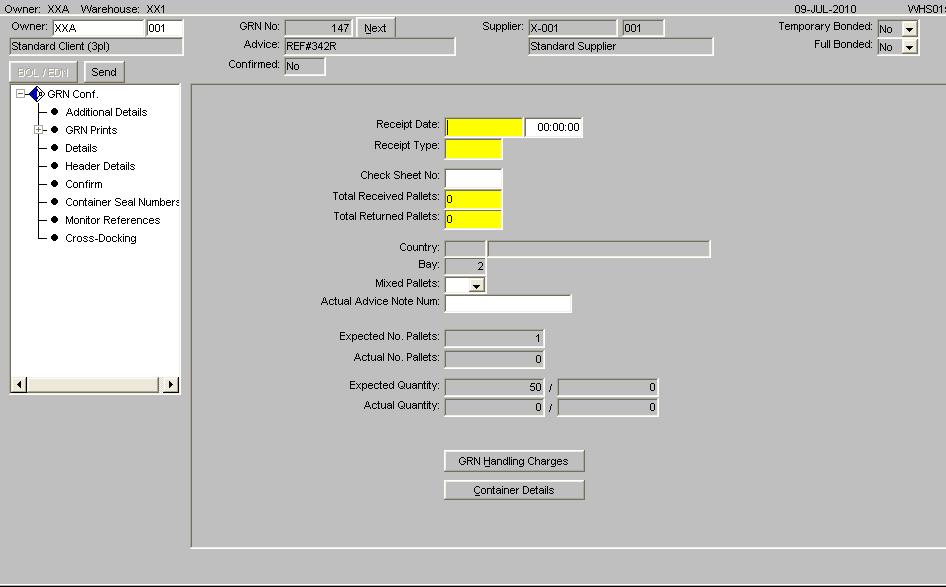
The form is split into two parts, the left hand side of the screen provides additional options such as producing any required GRN prints or entering additional details. The center of the form displays to the user the main header details of the GRN such as the total number of actual pallets recieved against expected.
The BOL/EDN button will only be enabled if the container information as been entered via the BOL/EDN button at pre advice. Similar to pre-advice, if RF is to be used to process the goods receipt, the Send button will be enabled to send the GR information to the RF system.
If the owner has client invoicing enabled then there will be the option to enter and view any receipt handling charges which have been generated.
Field Information:
- The Receipt date and time will default to the Pre-Advice date or can be manually entered.
- Receipt Type: This must be manually entered. Indicates the receipt type. The standard receipt type is ‘REC’ or ‘RET’
- Check Sheet No: If required, a check sheet number can be entered here for returns.
- Total Received and Total Returned Pallets: used to indicate the number of physical pallets received. Will default to the number of pallets entered at pre advice.
- Country: If populated by the client specific commercial invoice, the country of origin for the receipt will be populated here
- Bay: If bay number is required, enter the warehouse bay number that the goods will be received into.
- Mixed Pallets: Determines whether the goods are being received with mixed stock codes on a pallet.
- The GRN Handling Charges button will enable the user to enter invoicing information for the GRN.
If automatic putaway is not being used, the goods must be allocated locations within the warehouse. If using auto putaway, the system will automatically suggest locations.
Goods Receipt Confirmation Header - Additional Details (WHS0150)
From this screen, the box on the left will give the user the options to go into various other screens and reports.
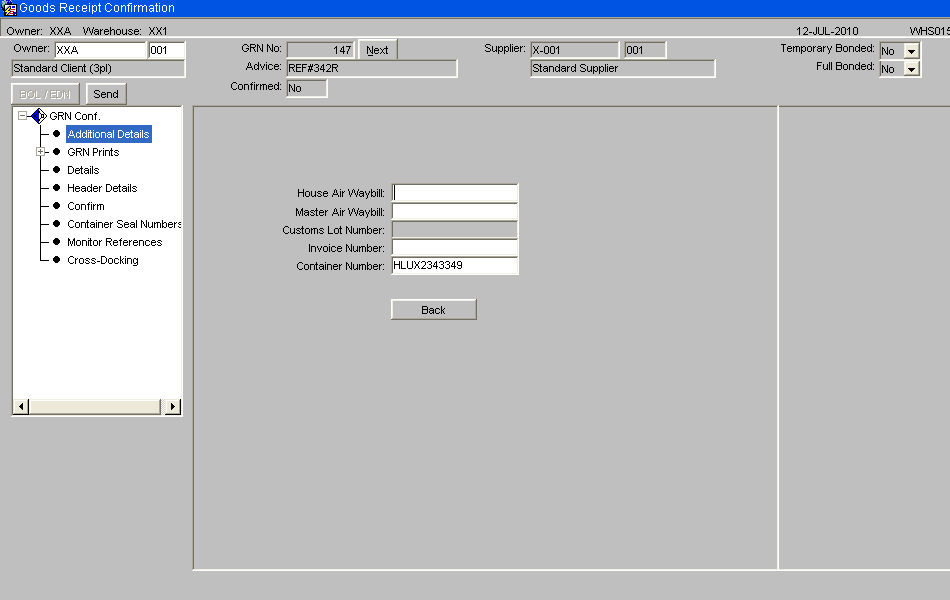
Above screen shot: This gives the user the option to enter waybill information.
Goods Receipt Confirmation Header - GRN Prints (WHS0150)
Optional Prints include: -
GRN Print - Displays actual receipt details
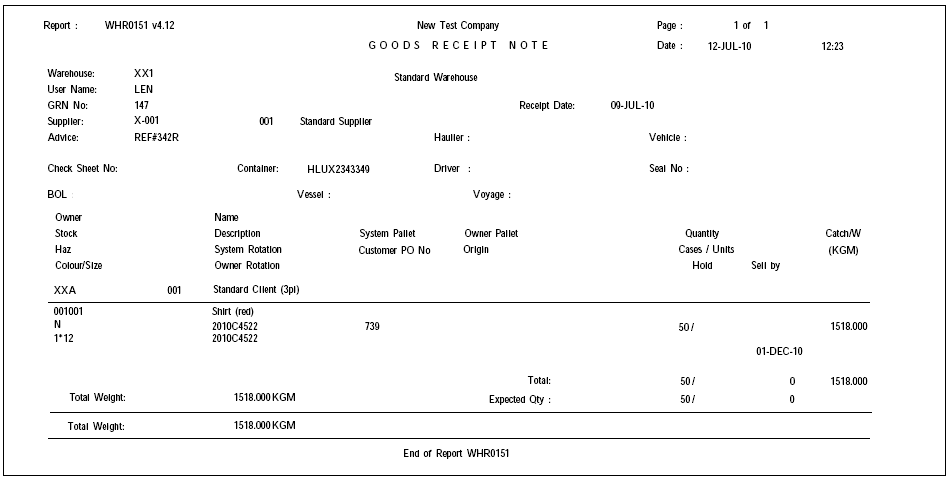
Putaway Instructions - If required, detailing where the receipted pallet should be located within the warehouse.
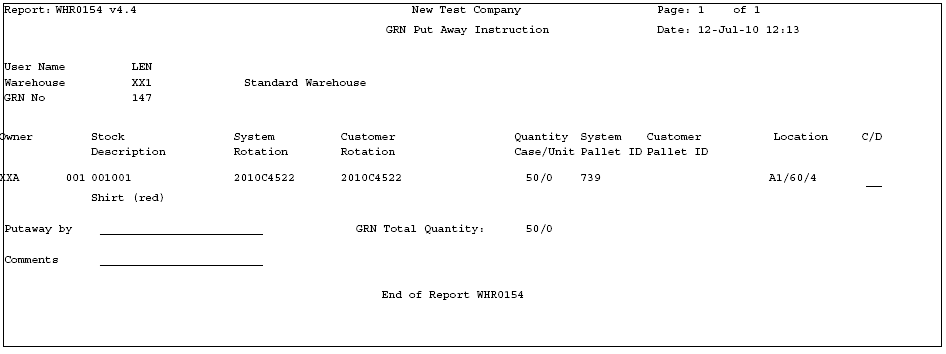
Pallet Labels
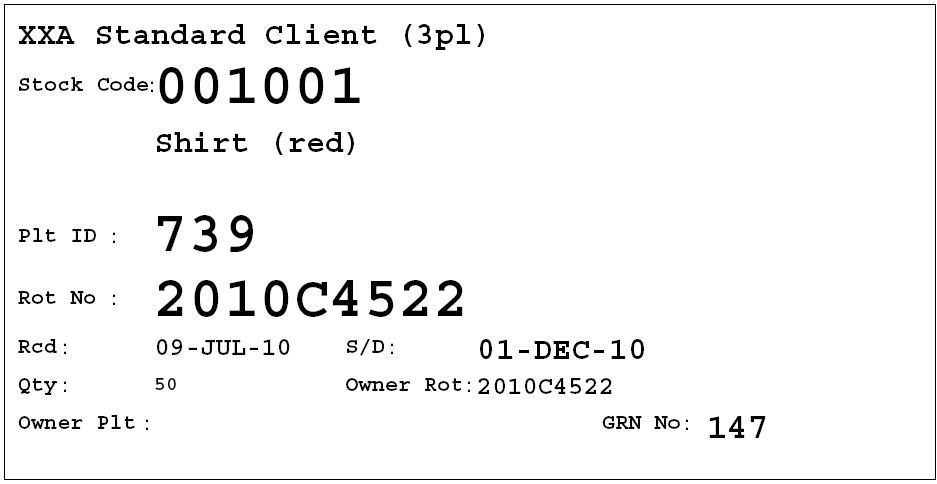
Barcode Pallet Labels Barcode Case Labels Cross-Dock Pick List
'Note:
- The GRN Prints option will display all reports that can be printed from this screen. Clicking on one of these options will take the user through the printing process.
- The Cross Docking option will allocate any stock outstanding on orders directly from this GRN.
- The Details option will take the user through to the stock code level confirmation details. This is described in the following page.
Once the user has clicked the Details option from the box on the left, the following screen will display with all stock codes expected on this GRN. The stock codes will be sorted in alpha numerical sequence. To enter confirmation details for their relevant product, the user must highlight the specific stock code.
Note:
- In order to enter confirmation details, the user has to right click the mouse on the stock code field as displayed in this picture.
- Pallet Details: This is the option that must be entered to manually confirm the GRN.
- Text: Allows the user to enter additional text for the GRN prints.
- Handling Charges: Enables the user to enter Receipt invoicing charges.
- Back: Takes the user back to the header screen .
Once the user has right clicked on their selected stock code, the pallet information for the product will be displayed as below. If the user has entered pallet details into the pallets tab at pre advice, the information will default as below in figure 1.
Figure 2 displays the screen shown to the user if no pallet details are entered at pre advice.
Fig 1: Receipt confirmation details with pallet information populated
Fig 2: Receipt confirmation details with no pallet information populated
Note: Tabbing through all fields from Type onwards will default most information as entered at pre advice. However, all can be amended or entered manually.
Field Information:
- Type: This is the pallet type the stock is to be received onto.
- No: This is the number of pallets to be received. If entering more than one pallet, the system will expect the user to book multiple pallets into one location or will give the user the option to let the system generate them (if autoputaway is setup)
- System Pallet Id: If tabbed through, the system will generate the next sequential pallet id. If multiple pallets are to be generated by the system, multiple system pallet id’s will also be generated.
- Owner Pallet Id: If customer pallet references are to be used, this field will be mandatory.
- Pack Size: Determines an additional unit of measure for the stock .
- Qty: Enter the expected number of cases or units to be received, or tab to default to expected at pre advice.
Field Information:
- System Rot: This is the system generated rotation number as is used as a batch number or for FIFO requirements.
- Owner Rot: This is the customer batch number.
- Country: Similar to pre advice, if country of origin information has been entered via invoicing, it will be populated here.
- Hold: If the user wishes to place the pallet on hold, a valid hold reason code must be entered.
- Area: Used for client specific processing, this determines a specific area within the warehouse for the goods to be stored.
- Manu Date: The date the stock was manufactured. Will default to the current system date.
- Sell By Date: If required, enter the sell by date for the stock code.
- Catch Weight: If stock weight is not to be used, the manual weight can be entered .
Once all of the relevant fields have been populated, the line needs to be saved. Once saved, the user must right click on the highlighted line below and choose ‘Back’ from the menu displayed. This will take the user back to the details screen to allow them to continue with more stock codes if required.
The user may either click the Confirm option from the left hand option box from here, or may do it from the previous details screen. The system will then inform the user that the GRN has been confirmed.
Note: If the number of pallets entered at confirmation is different than expected at advice, the user will be shown a warning message asking them if they still wish to confirm.
Field Information:
- Measure Qty: If a different unit of measure to the one set up against stock maintenance is to be used, the quantity must be entered here.
- Cust PO Num: A client specific reference number up to 20 characters may be entered for the pallet.
- Pallet Temperature: This field will only be enabled if freezing details are required. Enter the temperature of the pallet.
- Location: Enter the location code the goods are to be received into. An LOV here will list Available, Empty or All locations within the warehouse for the entered pallet type. If Auto-Putaway is used then an available location will be shown based on a number of parameters set-up against the Stock code.
Above screen shot: This gives the user the option to enter shipment seal numbers for the containers.