Financials Set Up
Pre-requisites
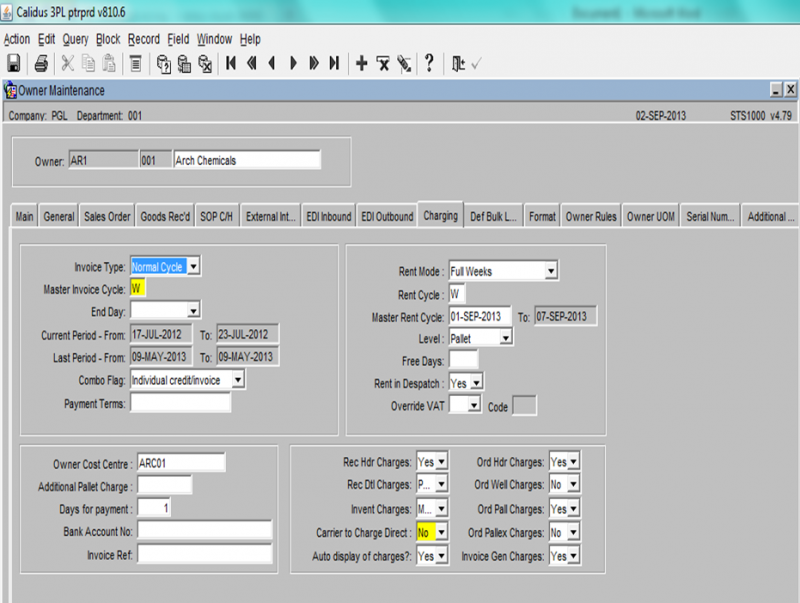
Owner Maintenance Charging
The Charging tab of the Owner maintenance screen is utilised to control / describe the Invoice processing applicable to an individual Stock Owner. It is split into 4 distinct sections.
Section 1:Invoice Details – for Standard Invoice processing
| Field Name | Description | Options |
| TYPE | Flag to identify if Invoicing is applicable to this owner | NORMAL or
NONE |
| CYCLE | Unique single character identifier for this owners cycle | Must be valid code from table INVOICE_CYCLE which will define it as Daily, Wekkly, Half Monthly etc… |
| END DAY | If appropriate – defines that actual day that a period will end on | User defined |
| CURRENT INVOICE PERIOD | The dates of the current Invoice Period for the Owner as defined by the running of the Invoice Production Process | Display only |
| LAST INVOICE PERIOD | The dates of the last Invoice Period for the Owner as defined by the running of the Invoice Production Process | Display only |
| COMBO FLAG | Identify whether Invoice and Credits should be produced as individual documents or combined onto one document | "Drop down – COMBINED INDIVIDUAL" |
| PAYMENT TERMS | Free text for owner specific payment terms to be printed on Invoices | User input |
Section 2 – Rent Details – applicable to Rent Charge processing only
| Field Name | Description | Options | |
| RENT MODE | Fixed definition of the type of Rent applicable for the owner | None / Advance / Average / Fixed Advance / Maximum | |
| RENT CYCLE | Daily / Weekly / Monthly / Half-Monthly etc (as described above). Note that although the same table is used to define the CYCLE, the Rent and Invoice Cycle are separate processes. | As for Invoice cycle above | |
| MASTER RENT CYCLE | Start and End date for the current Rent Cycle for the Owner | User sets up start date and system defines the end date based on the Rent Cycle and the regular (daily) update of rent processing. | |
| LEVEL | The standard charge level for rent | Stock / Pallet / Rotation | |
| FREE DAYS | Numeric value to represent the number of days that Stock can remain in the warehouse Free of Charge for rent | User input | |
| RENT in DESPATCH | Note this and WHOLE/PART, which is set by the MODE, determines if charges are for full periods, and whether or not Credits are to be generated when stock despatched (and the level of the credit). Also utilises the FREE DAYS to determine the generation of credits for rent already charged. | Yes / No flag |
Section 3 - Charge Level Details – for control of individual ‘Charge Processing’
‘Auto charges’ (Charge codes with type of ‘Auto’) will be generated automatically within the individual processes if the appropriate flag is set to Yes. All are Yes / No flags (unless otherwise stated). These flags simply allow the user to ‘switch on/off’ charge generation for specific processing as required.
| REC HDR | Receipt Header level |
| REC DTL | Receipt detail level |
| INVENT | Inventory Movements (inc. Freeze/Chill process) |
| ORDER HDR | Sales Order handling - Order header level |
| ORDER WELL | Sales Orders - Product type level |
| ORDER PALL | Sales Orders - Despatch pallet level |
| ORD PALLEX | Special Pallet exchange code processing.
This checks if a specific charge is to be raised against the Stock Owner for the use of Pallets, due to the fact that neither the Stock Owner or their Customer has an account code for the Pallet Exchange system. |
| INVOICE GEN | Invoice generation process
Do we raise a charge each type we produice an Invoice for this owner? |
| CARRIER DIRECT | Carrier charges (not UPM) – not used any more |
| DISPLAY AUTO | Owner level check for display of auto generated charge codes (pre confirmation within individual processes) |
| DAYS FOR PAYMENT | The number of days allowed for payment – between Invoice Date and Due Date printed on the invoice |
| INVOICE REF | Free text reference for printing on the invoice |
Section 4 –
| Field Name | Description | Options |
| OWNER COST CENTRE | An owner cost centre can be entered if required | Free text field. |
| ADITIONAL PALLET CHARGE | Legacy. | N/A |
| DAYS FOR PAYMENT | Legacy. | N/A |
| BANK ACCOUNT NUMBER | Legacy. | N/A |
| INVOICE REF | Blank text field that appears on the invoice | Free text field |
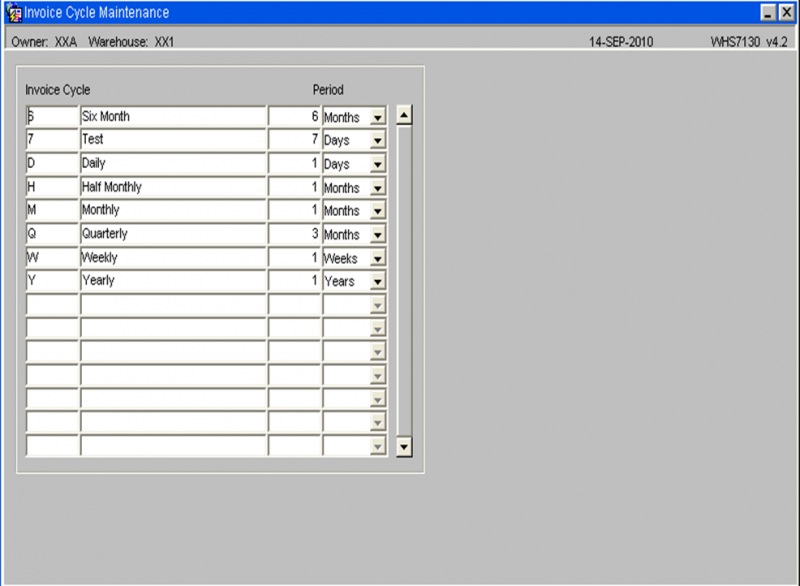
Invoice Period Maintenance
Used to define type and length of invoicing periods (used for both Rent and Invoice cycles individually).
| Field Name | Description | Options | Generic Value |
| INVOICE CYCLE | Single character Unique Identifier | User input but following codes expected as a minimum: | ‘D’ – Daily,
‘W’ – Weekly, ‘M’ – Monthly, ‘H’ – Half Monthly, , br/> ‘Y’ - Yearly |
| DESCRIPTION | Free text description | ||
| PERIOD – Numeric | Number of PERIOD TYPES in a CYCLE. The length of the period type described in the following column. | User input | The number of ….. in a period, UNLESS, the value in this column is 14, 15, or 16 and the following column is Days. This is how the system identifies Half Monthly periods and the 14/15/16 relates to the date of the end of the first half-month. |
| PERIOD - Type | Description of the type | Drop down selection | Days / Weeks / Months / Years |
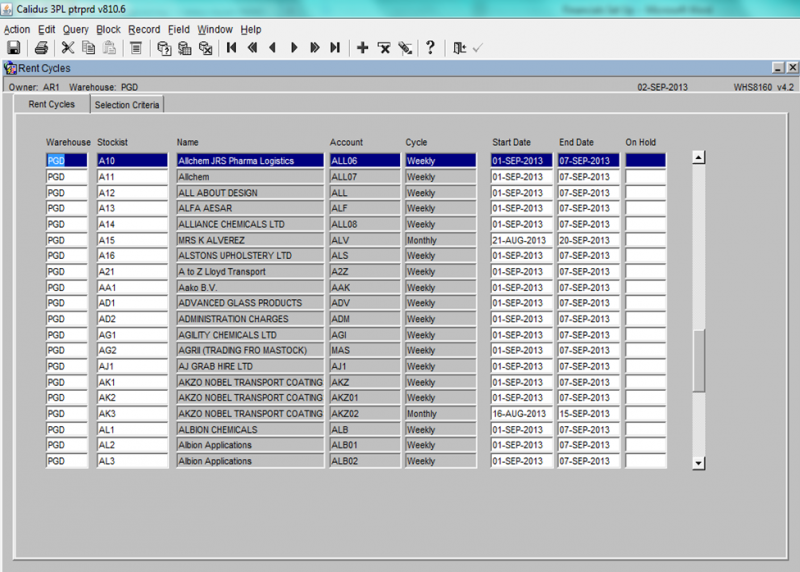
Rent Cycles
The rent cycle screen allows the user to setup the start and end rent cycle for each warehouse and owner. The account and cycle information will be imported from the charging tab in the owner maintenance screen.
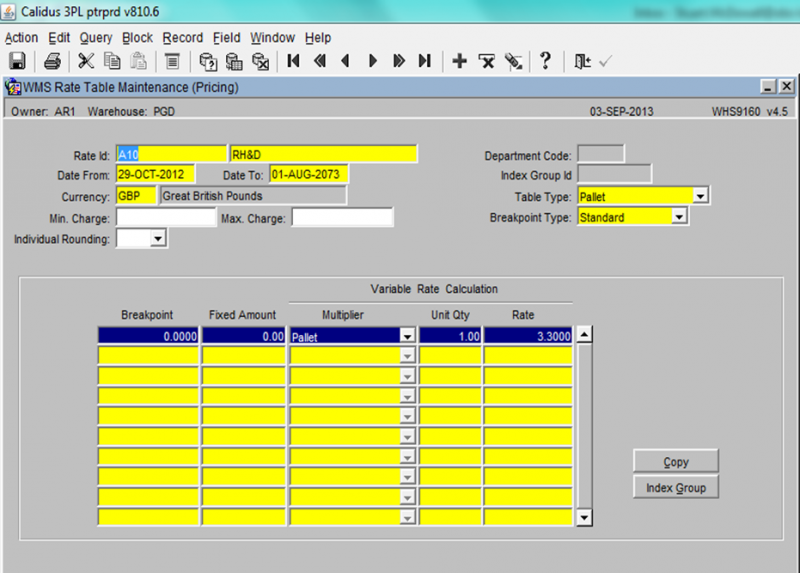
Rate Table Maintenance
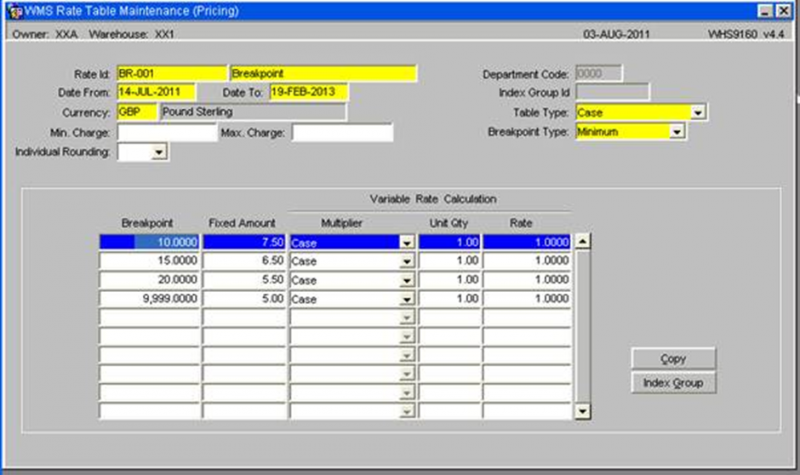
Rates can be set to define the price to be applied to any Invoice transactions.
| Field Name | Description | Options |
| Rate Id | This is where the user can create a unique id for the rate they wish to setup | Blank text field |
| Rate Id Description | A text description of the rate | Blank text field |
| Date from/to | Start and end date that you wish the rate to be valid. | Mandatory standard date |
| Currency | The relevant currency to be charged | Any valid currency rate |
| Min/Max Charge | Allows the user to set a minimum and maximum charge against the rate | |
| Individual Rounding | This instructs the processing to round all transactions to two decimal places if set. | Yes/No |
| Table Type | This defines the quantity type that the breakpoints will be based on | Quantity = No. of units
Cases = No. of cases Pallets = No. of pallets Weight = No. of weight UOM Charge Value = currency value for invoice level charges. NOTE: The other options in the dropdown are legacy. |
| Breakpoint Type | This defines the breakpoint type | Standard – Allow for multiple breakpoint details to establish the highest detail found for the quantity to be charged for.
Minimum – Only raise charge if quantity to be charged for is lower than the first (and only) breakpoint detail Maximum – Only raise charge if quantity to be charged for is higher than the first (and only) breakpoint detail Percentage – For use with charge value when defining the rate for Invoice Group . Level charges. Uses specific values in the first (and only) breakpoint details row found. |
| Breakpoint | Defines the breakpoint to be used when generating charges | See below for an example |
In the example above if the received quantity if for 9 cases then a fixed rate of £7.50 would be generated. If 19 cases where generated then a fixed rate of £5.50 would be generated.
| Fixed Amount | This is a fixed currency amount to be charged. | User must enter either Fixed amount or the equivalent multiplier / qty / rate for variable amounts, unless It is a percentage type breakpoint, in which case this will be the percentage value applied to the quantity / value to charge when using the variable rate data that will also be entered |
| Multiplier | This is set to be the same as the table type. | |
| Unit Qty | The unit quantity that the rate is applicable to. | |
| Rate | The actual rate that will be applied to the invoice for each unit qty. | |
| Copy Button | Pressing this button will bring up a pop-up box allowing the rate to be copied to a new warehouse/owner/rate id. |
Charge Code Table Maintenance
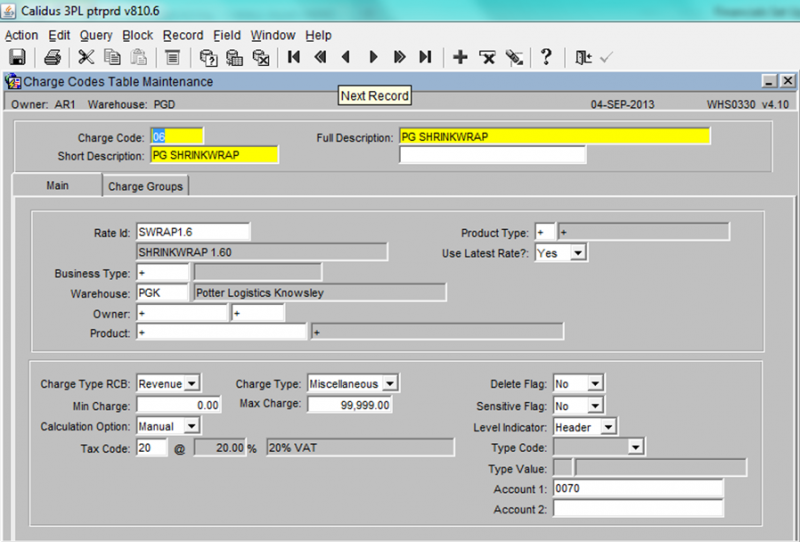
Charge codes will be defined to enable the production of charges.
Each can have an associated Rate Id for the calculation of the Charge Value, or can use an ‘ad-hoc rate’ when entered manually.
Each can be applicable to a particular Business Type, or for general use.
Each can be applicable to a ‘specific level’ within the Invoicing processes – namely Company / Warehouse / Stockist / Stock or Product Type.
| Field Name | Description | Options |
| Charge Code | This is a unique identifier | User defined |
| Short Description | A free text field for a short description of what the charge is for. | User defined |
| Full Description | A free text field for a longer description of what the charge is for. | User defined |
| Rate Id | If entered, must be a valid ID else it will default to ‘+’ to enable use for entry of an ‘ad-hoc rate’ | A valid rate id or a ‘+’ |
| Business Type | This enables charge generation within specific WMS processes – referred to as ‘in Process charges’. | MIS – Use this for all miscellaneous charges
REC – Charges that will be generated at the point of receipt confirmation. DES – Charges that will be generated at the point of either pick or despatch confirmation CYC – Use this for cyclical charges such as rent. |
| Warehouse | This relates to the specific warehouse that the charge will apply to | A valid warehouse id |
| Owner | This relates to the specific owner the charge will apply to. | A valid owner. A ‘+’ can be used if you want the charge to apply to all owners. |
| Product | If you wish to restrict what products a charge can be applied against, then a valid product code can be entered. | Any valid product code. A ‘+’ can be entered if you wish to apply the charge to all products. |
| Product Type | If you wish to restrict what product type a charge can be applied against, then a valid product type code can be entered. | Any valid product type code. A ‘+’ can be entered if you wish to apply the charge to all product types. |
| Use Latest Rate | A Flag that is used to enable the recalculation of any charges not yet invoiced if new rates / charges are introduced | Drop down box – Options are Yes / No / Blank. Must select Yes if previously generated charges are to be updated. |
| Charge Type RCB | Descriptive flag relating to whether the code is Cost / Revenue or Both. | |
| Charge Type | Descriptive flag relating to the type of charge. | Allowable values are –
Ancillary, Cyclical, Handling, Landing, Miscellaneous, Processing, Rent, Sales and Special Forces. Typically Handling will be used for receipt and despatch charges, Miscellaneous for ad-hoc charges and Rent for any storage charges. |
| Min/Max Charge | The Minimum / Maximum charge value to be applied to the charge code on an invoice. Note that all charges on an invoice are ‘subtotalled at charge code level’ so this will allow for the application of a Min/Max charge for Invoice Level charges for a specific charge code. | |
| Delete Flag | If set to ‘Yes’ the charge will not be applied to an invoice. | |
| Sensitive Flag | System use only | |
| Level Indicator | This defines the level that the charge is to be applied to. | Header – use for charges applied for a GRN or Sales Order e.g. a set admin charge for each order processed.
Detail – this would be a charge for each line on the GRN / Sales Order. Pallet – for pallet handling charges. |
| Calculation Option | This is where how you define how the system calculates the charges | Options are:
|
| Type Code | For use within the Special Order Handling processing | Type codes will be checked against specific codes on an Order, to define if the charge is applicable. |
| Tax Code | Defines what tax code should be applied to the charge | Any valid tax code. |
Charge Profiles
The Charge Profile Code is 2 characters. Someone will need to decide which codes to use. The best option is probably a meaningful code, e.g. A code of WT for the products charged by weight. A code of HV- for high value products.
If meaningful codes are not to be used then a generic code could be assigned e.g. P1 – Profile 1, P2 – Profile 2.
The same profile code can be used for different owners. In this situation each owner would need to be setup for each profile code.
If there is a similar concept on the old system then if may be desirable to use a similar code.
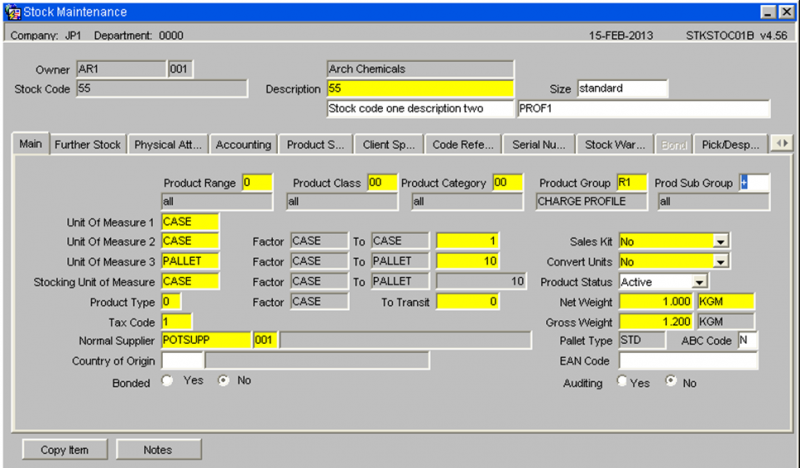
The Charge profile code for each stock code, will be stored in the product group.
The product group field is included in the Oracle Reporting Suite stock report as a selectable field. This means, it will be possible to produce a spreadsheet of stock codes assigned to a particular charge profile.
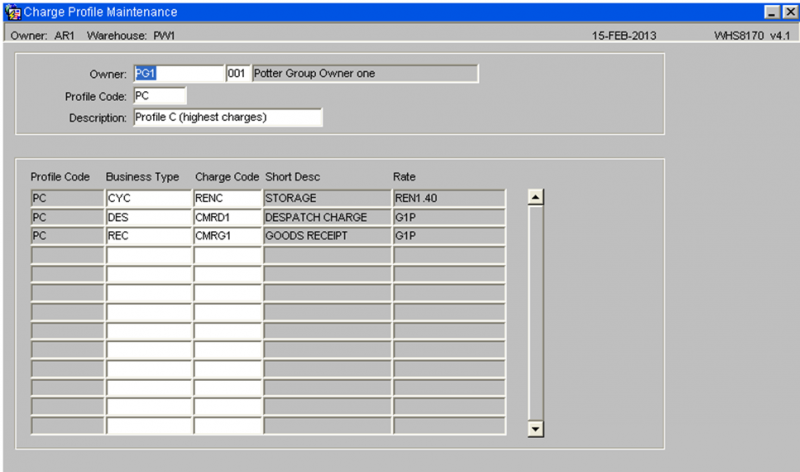
A new “Charge profile” maintenance screen (WHS8170) will be used to setup the charge profiles for each owner, as shown below:-
Product Groups
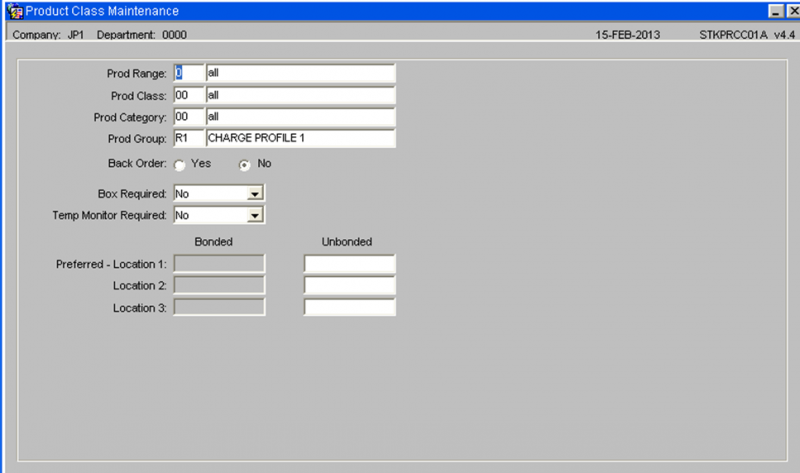
For each charge profile code used, a new product group will need to be created for each owner.
The product class maintenance screen is used to create new product groups.
Owner Rule
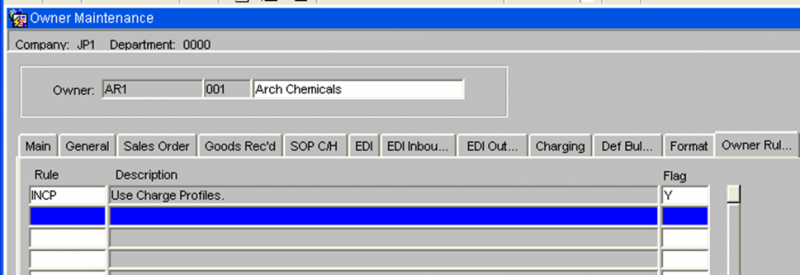
The owner rule INCP can be used to switch the “Charge Profile” functionality on by setting the flag to Y.
STOCK CODE AND CHARGE SET-UP
Stock Master
For owners using charge profiles, each stock code will need to have the product group set to the correct charge profile code. NB. The product group field is included in the stock upload.
Charge Code Set-up
Charges can be setup at owner level by setting the Product to + to indicate all stock codes for this owner. This functionality will not change.
For charge codes using the new “Charge profile” functionality,
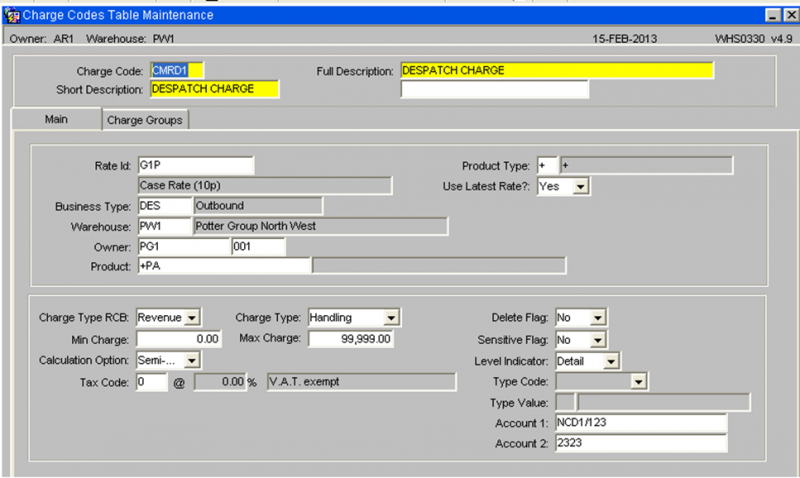
The Product should be set to +XX where XX is the 2 character charge profile code. This set-up identifies the charge code as a charge that applies to all stock codes with a matching charge profile code.
When charges are applied automatically, the system will work as it currently does, applying owner level and stock code level charges. The Charge profile charges will be applied as well as the current charges.
Charges can be setup at owner level by setting the Product to + to indicate all stock codes for this owner. This functionality will not change.
Copy Owner
If the INCP rule is set to Y for the owner being copied from, then the system will create the charge profiles and charge codes for the new owner, if the copy charges option is selected in the copy owner screen.
The assumption is made that all existing charge codes will have the format SSSAA, where SSS is the stockist code and AA a 2 character identifier. If the charge codes are in a different format then the copy of the charge codes will not occur.
When the system creates the new charge codes for the new owner, this charge code format will be followed.
For example, If the owner is AR1 there with charge codes AR1RH, AR1AD. The charge codes created for a new owner, DA2 will be DA2RH, DA2AD.
Conversion of Existing Owners
For owners with charges setup at stock code level.
- Set up the charge profile records.
- Create the product group records.
- Switch the owner rule INCP to Y
- Choose a sample stock code. Find the charge codes for this stock code and change the Product to +XX where XX is the charge profile code.
- Find the stock details in stock maintenance and set the product group to the charge profile code.
- Do a receipt and pick confirm an order for the sample stock code.
- Run the quicks (expected revenue) report and ensure the generated charges are correct.
- Repeat with a sample stock code for each of the charge profiles for the owner.
Once the sample stock codes are verified as producing the correct automatic charges, the remaining stock codes can be converted. To convert the remaining stock codes the product group, on stock maintenance, must be set to the correct charge profile code. The charge codes set up at stock code level can now be deleted.
Rent Creation and Invoice Production
The following document describes the process in order to create rent and produce invoices.
Step 1 – Rent Creation
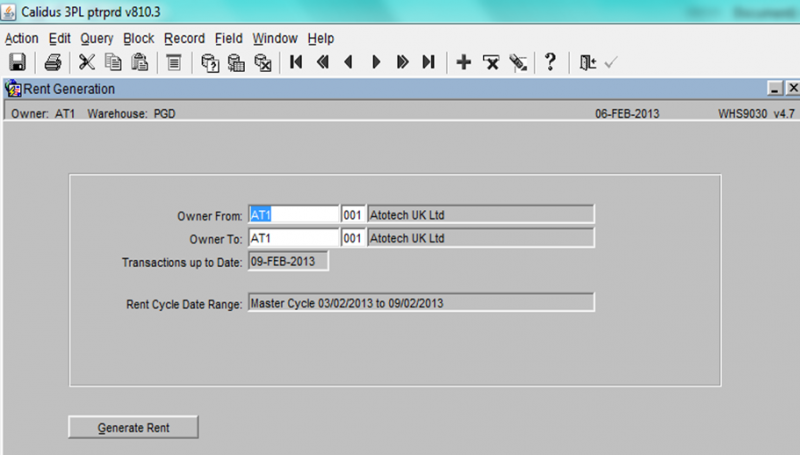
Go to the Rent Creation screen (WHS9030)
- Enter the Owners that you wish to produce the rent for.
- Enter the Transaction up to date.
- Press the Generate Rent button
Step 2 – Owner Invoice Production
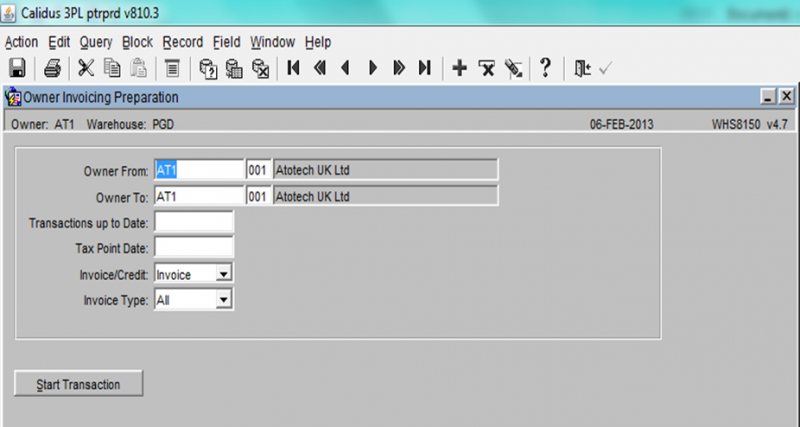
Go to the Owner Invoice Production screen (WHS8150).
- Enter the Owner From and To
- Enter the Transactions up to Date
- Enter the Tax Point Date
- Select whether you wish to produce an invoice or credit
- Select what type of invoice you wish to produce (All, Rent, others e.g REC and DES)
- Press the Start Transaction button to create the invoices/credits
Step 3 – Invoice Printing and Emailing
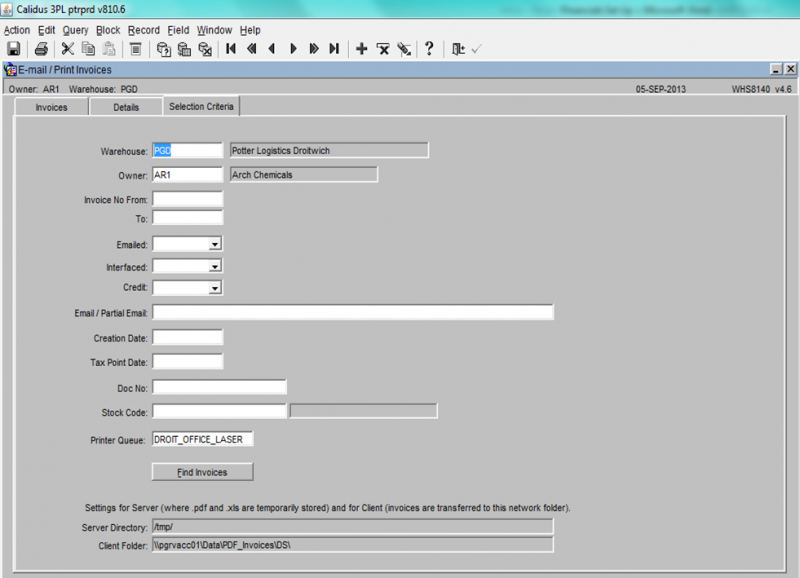
Go to the E-Mail / Print Invoices screen (WHS8140)
1 - The warehouse will default to the current warehouse, but it is possible to enter any valid warehouse.
2 – Enter any relevant data in the selection criteria fields you require
3 – Press the ‘Find Invoices’ button to retrieve the invoices
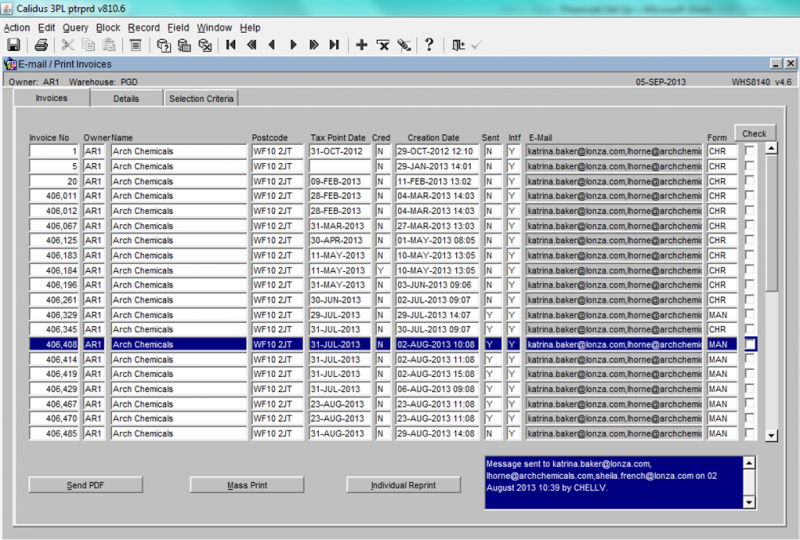
4 – As you can see above, the system has retrieved all invoices that match the selection criteria. Note: The email address is defaulted from the Owner Maintenance screen (Main tab)
5 - You have can now send a PDF of the invoice/credit note, carry out a mass print of all invoices or produce an individual reprint. First you must select the invoice/credit notes you wish to action by using the check box against specific lines. Once selected press one of the 3 buttons.
Manual Invoice / Credit Screen
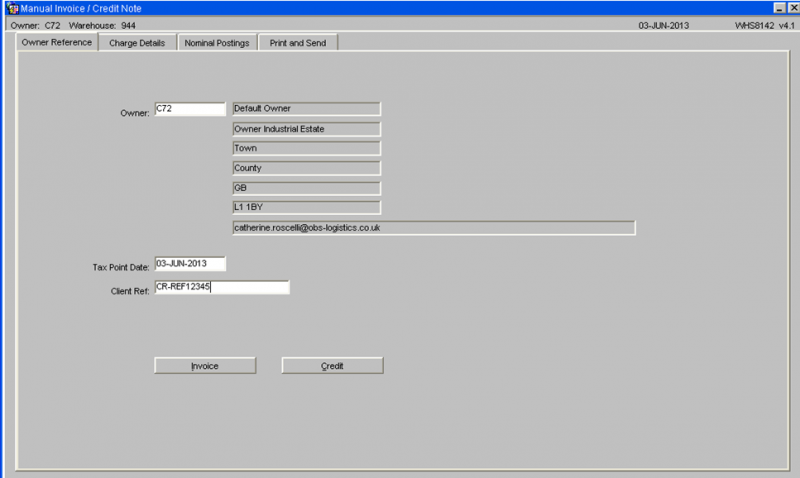
The header section will include the following fields:-
- Owner Code – This will default to the current owner. A list of values will be available which will show all the owners the user has access to.
- The owner name, address and email address will be displayed.
- Tax Point Date – A past or future date can be entered.
- Client Reference.
- Invoice Button – This button is used to create a manual invoice.
- Credit Button – This button is used to create a manual credit note.
Manual Invoice / Credit – Charge Details Section
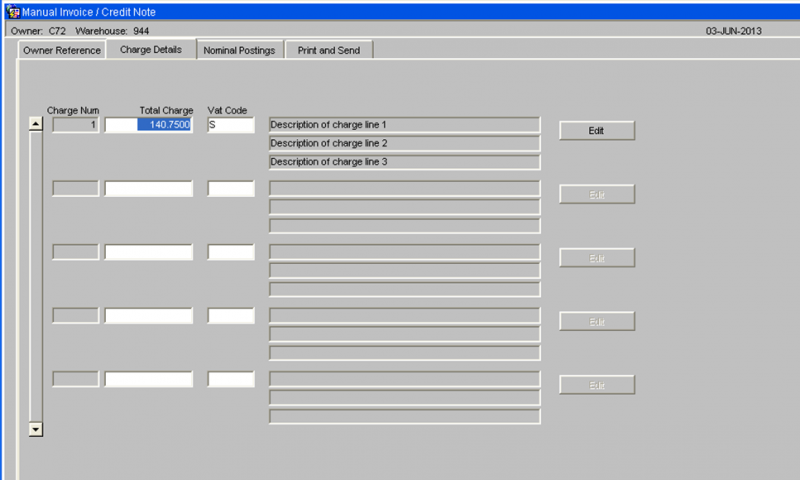
The “Charge Details” tab screen will include the following fields. This screen will display the first 3 lines of the description. The “Edit” button can be used / amend view any additional description:-
Each charge line comprises of:-
- Charge Number – this is a system generated sequential number.
- Charge Amount
- Vat code – this will be validated to ensure the vat code exists.
- Charge description - This will be free text.
The charge amount and the VAT code will be entered. Upon leaving the VAT code field, the user will be taken to the “Charge Description” sub-screen.
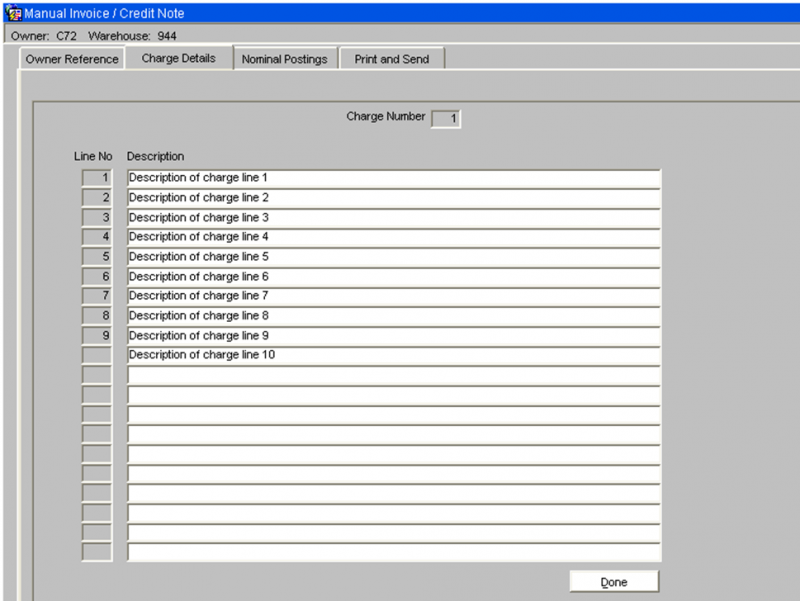
Charge Description Sub-Screen
This sub-screen will allow all the required text to be entered, as shown below:-
When the “Done” button is clicked, the sub-screen will be closed and the first three lines of the description will be displayed on the main “Charge Details” screen.
As many charge lines can be added as required.
Nominal Posting Section
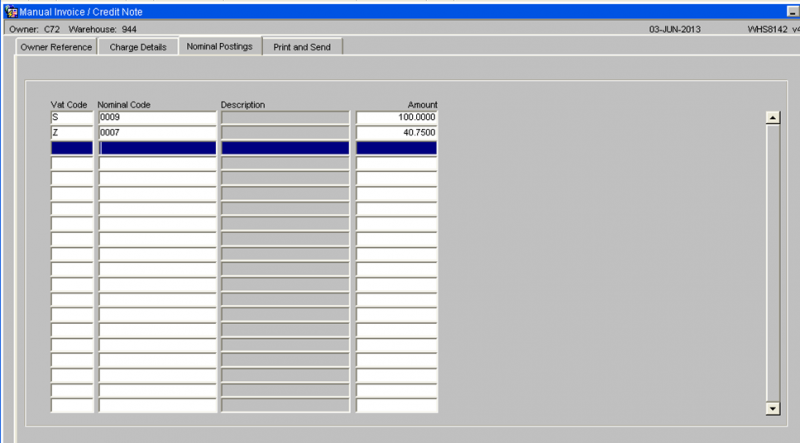
The Nominal Postings section must be completed for each Vat code. This section will include the following fields:-
- Vat Code
- Nominal Code
- Description of Nominal Code
- Amount
The table of nominal codes will be used to provide a list of values and to retrieve the description of the nominal code. An amount will be entered against each nominal code.
Print and Send Section
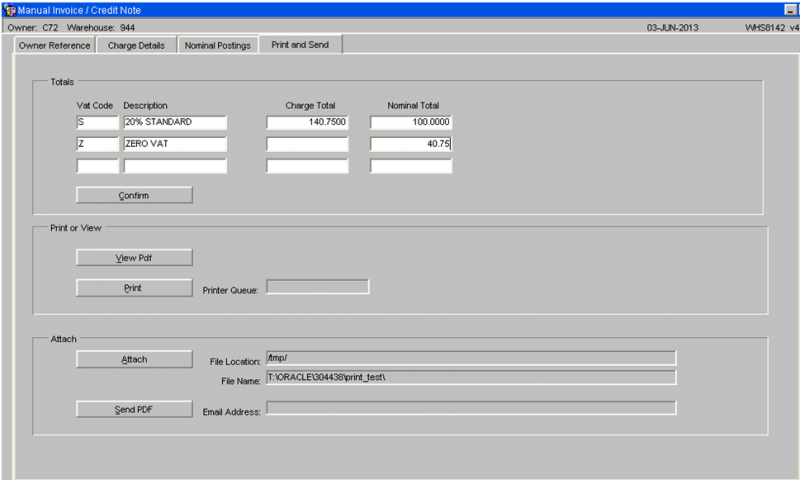
The totals section will show each VAT code used on this document with the total entered for this Vat code in the “Charge Details” section and the total entered for this VAT code in the “Nominal Postings” section.
The totals must match before the “Confirm” button is used to complete the entry of the invoice / credit note.
View PDF
Press the ”View PDF” to allow the PDF invoice / credit note to be produced and either displayed on the screen or sent to a printer.
Press the ”Print” when this button and the PDF invoice / credit note will be produced and sent to the default printer queue, as displayed.
Attach
The Attach Documents section is optional.
The user may have scanned a document which now exists on the hard disc of their PC. This document needs to be attached to the e-mail sent out to the client.
This section will include the following fields:-
- Pathname – the location of the file.
- File name – the name of the file.
- Attach button
The system will verify that a document exists in the selected location with the entered filename.
