OMS0130
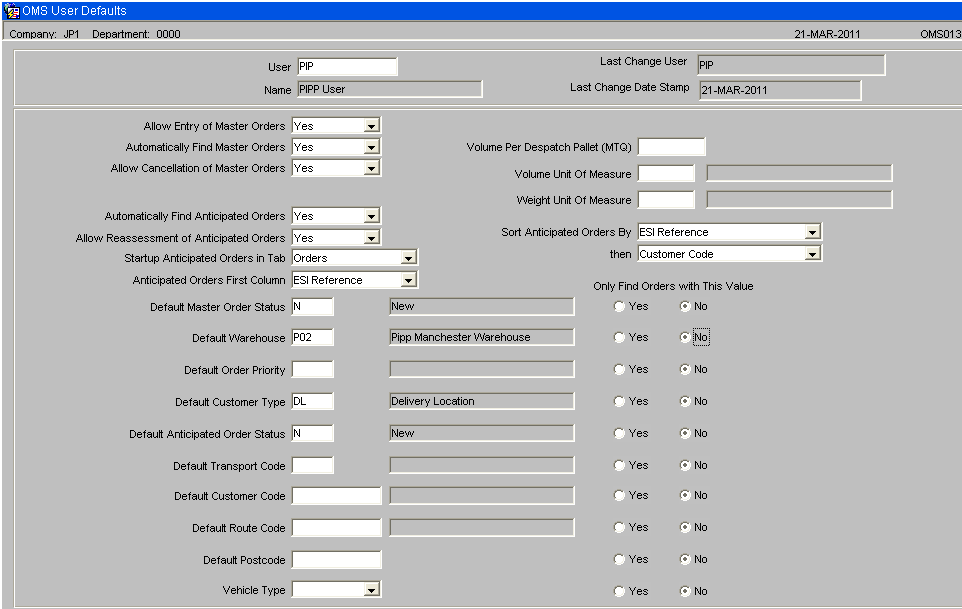
A new maintenance screen will be provided to control the main functions of the Order Management System at a user level. This screen will allow each user to be set up with their preferred settings and will allow the OML software to be configured to suit each user’s requirements. Unless stated otherwise, the user’s settings will override the OMS control settings.

Allow Entry of Master Orders Y/N. When set to “Y”, it will be possible to enter a master order directly in the ‘Master Orders’ control form. This option could be used if the EDI order files have failed to reach the server or to rapidly enter an emergency order. If “N” is selected then this functionality is not available for this user. NB. The “Allow Entry of Master Orders” must be set to Y on OMS control as well as against the user . If the “Allow Entry of Master Orders” must be set to N on OMS control then no user will be able to enter master orders regardless of the value of this flag.
Automatically Find Master Orders Y/N. When set to Y, instead of the master order screen starting up on the Selection Criteria tab, the user will be taken straight into the main master order tab.
Allow Cancellation of Master Orders Y/N. When set Y, the user will be able to click the cancel buttons in the master orders screen. If set to N, then the Cancellation buttons will be greyed out in the master order screen.
Automatically Find Anticipated Orders Y/N. When set to Y, instead of the anticipated order screen starting up on the Selection Criteria tab, the user will be taken straight into their preferred tab, as set up on the “Startup Anticipated Orders in Tab” option.
Automatically Select Anticipated Orders Y/N. The anticipated orders have a check box next to each order. This flag controls whether this check box is checked or left blank. When set to Y, every time the user triggers a query in the anticipated orders screen, the system will automatically check the orders. This option should be used when the user is setup to retrieve a small number of records for each find. NB, Queries are triggered following any possible change to the displayed orders. For example, if an order is re-assigned to a different warehouse, then the system will re-query the data as the re-assignment may have placed the order outside the “Selection Criteria”. The re-query of the data will reset the value of the check flag, to either blank or checked, depending upon the setting of this flag.
Allow Re-assessment of Anticipated Orders Y/N. This flag controls whether this user is allowed to click the “Re-assess ALL orders at Status New” in the anticipated order screen. If this flag is set to N then the button will be greyed out.
Startup Tab on Anticipated Orders This can be set to control which tab the form displays following every re-find of orders. Values are:-
- Orders
- Order Summary
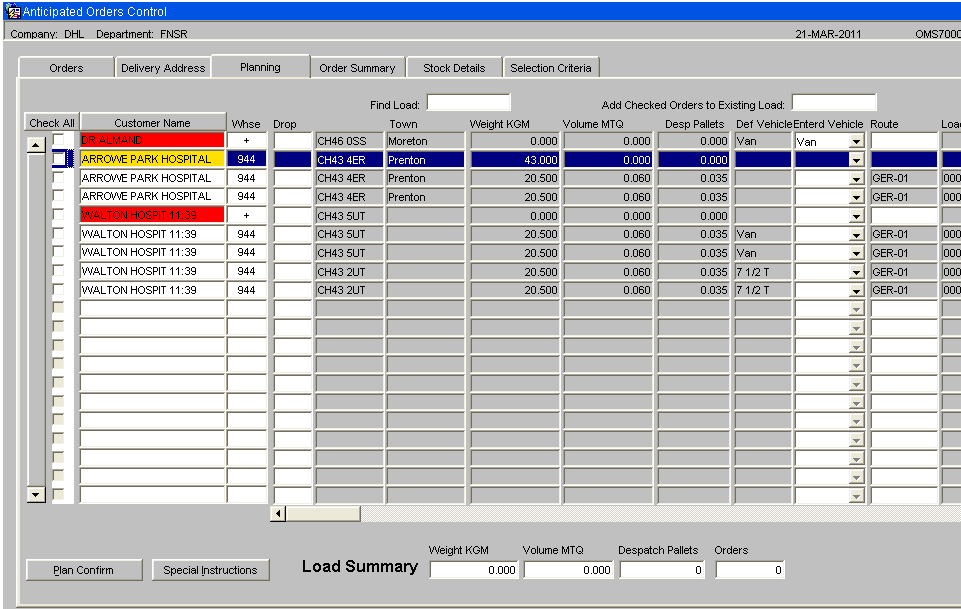
- Planning
- Delivery Address
- Stock Details
For Transport planning users this can be set to “Planning” to run the form in “Planning” mode.
Anticipated Orders First Column This can be set to control which data value is displayed in the first column on the “Anticipated Orders” screen, Orders tab. A drop down list will be available which will allow one of the following data fields to be selected as the first column:-
- ESI reference
- Customer name
- WMS Order Number
The setting of the user’s, “Anticipated Orders First Column”, flag will control which value will be displayed in the first column of the anticipated orders screen.

Default Master Order Status If this value is set, then the Status on the selection criteria tab on the master order screen, will be automatically filled in to this value.
Default Warehouse If this value is set, then the warehouse on the selection criteria tab on the anticipated order screen will be automatically filled in to this value.
Default Order Priority If this value is set, then the priority on the selection criteria tab on the anticipated order screen will be automatically filled in to this value.
Default Customer Type If this value is set, then the customer type on the selection criteria tab on the anticipated order screen will be automatically filled in to this value.
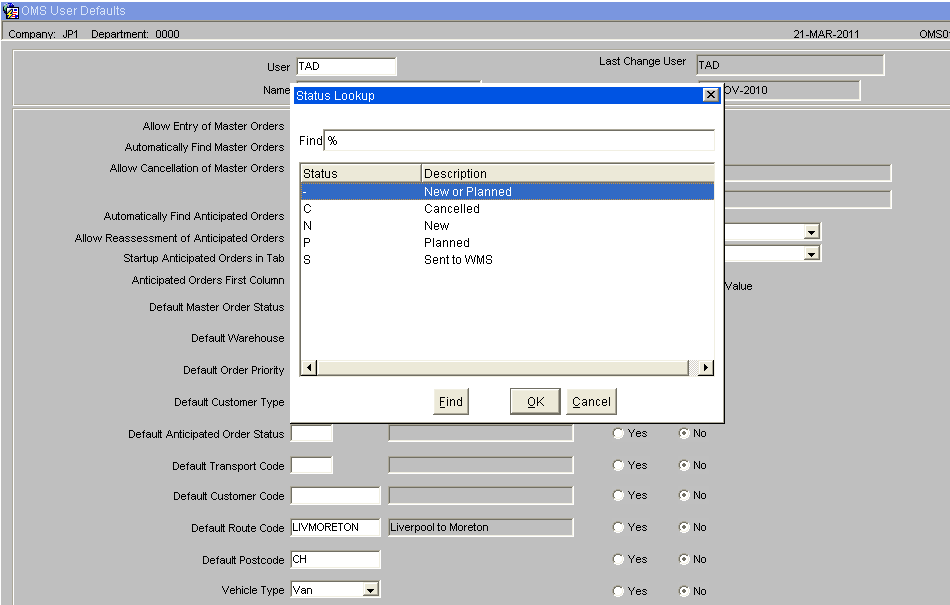
Default Anticipated Order Status If this value is set, then the status on the selection criteria tab on the anticipated order screen will be automatically filled in to this value. Allowed values are:-

Default Transport Code If this value is set, then the transport code on the selection criteria tab on the anticipated order screen will be automatically filled in to this value.
Default Customer Code If this value is set, then the customer code on the selection criteria tab on the anticipated order screen will be automatically filled in to this value.
Default Route Code If this value is set, then the route code on the selection criteria tab on the anticipated order screen will be automatically filled in to this value.
Default Postcode If this value is set, then the postcode on the selection criteria tab on the anticipated order screen will be automatically filled in to this value. The start of a postcode can be entered e.g. CH to find all orders for postcodes beginning with CH.
Default Vehicle Type If this value is set, then the Vehicle Type on the selection criteria tab on the anticipated order screen will be automatically filled in to this value.
Radio Buttons – “Only this Value” A radio button titled “Only this value” will be included next to each of the default search values. If this button is clicked to the Yes position, then the user will only be able to find orders for their default setting. This will allow certain users a restricted view of the anticipated orders while other users can change the selection criteria to view all orders.
Volume Per Despatch Pallet MTQ This value stores the volume of the despatch pallet. This value will be used in the OML to calculate the number of pallets required. If this value is blank or zero then the OML will use the volume per despatch pallet set up on OMS Control.
Volume Unit Of Measure This value controls the Unit Of measure used in the OML to display the volume. If this value is blank then the OML will use the ‘Volume Unit of Measure’ set up on OMS Control.
Weight Unit Of Measure This value controls the Unit Of measure used in the OML to display the weight. If this value is blank then the OML will use the ‘Weight Unit of Measure’ set up on OMS Control.
Sort Anticipated Orders By The two sort fields control how the anticipated orders are sorted. The following sort options are available. NB. The sort field names are the actual names of the database columns rather than a column description.
- Warehouse_id – The warehouse assigned to the anticipated order.
- WMS_Order_num – The warehouse order number.
- Order_description – The ESI order reference.
- Status – The status of the anticipated order. (N – New, P – Planned or S – Sent to WMS).
- Cust_code – The customer code.
- Oh_Seq_no – The system generated sequence number for each anticipated order. This sort option will return the anticipated orders in the sequence in which they were generated.
- Order_priority – The priority of the order.
- Delivery_date – The delivery date is evaluated as the “Entered Delivery Date”, if a “Entered Delivery Date” has been entered against the order. If a “Entered delivery date” has not been entered the delivery date will be set to the “Default Delivery date”.
- Default Delivery Date – The default delivery date. This is the delivery date based on the order priority.
- Planned Delivery Date – The entered delivery date. This date can be entered against an anticipated order to override the “Default delivery date”.
- Transport Code – Also known as the carrier code.
- Create_date_stamp – The date the anticipated order was created.
- Create_user – the user id of the user who created the anticipated orders.
- Change_date_stamp – The date of the last change to the anticipated order.
- Change_user – The user id of the user who last changed the order.
- Weight – The weight of the order.
- Volume – The volume of the order. NB. The pallets are calculated using the volume. Sorting by this option is equivalent to sorting by the number of pallets.
- Route_code – The route code assigned to the order.
- Load_number – The load number assigned to the order.
- Drop_seq – The drop sequence that has been entered against each order.
- Marshall_loc – The marshal location assigned to the order.
- Load_date – The load date assigned to the order. The load date field includes the load time.
- Postcode – The postcode of the customer’s delivery address.
- Town – The town of the customer’s delivery address.
If the sort options are left blank, the orders will be sorted by the ESI order reference (order_description) then by the warehouse id.